
User Manual English
Page 2
Table Of Contents Getting to Know Your TV 7 Changing the Appearance of Digital Closed Captions 26 Rear Panel 8 Remote Control 9 Replacing the Batteries 9 Completing The First-Time Setup 10 Renaming Devices on the Input Menu 28 Changing the TV Settings 29 Viewing System Information ...
Table Of Contents Getting to Know Your TV 7 Changing the Appearance of Digital Closed Captions 26 Rear Panel 8 Remote Control 9 Replacing the Batteries 9 Completing The First-Time Setup 10 Renaming Devices on the Input Menu 28 Changing the TV Settings 29 Viewing System Information ...

User Manual English
Page 4
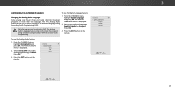
.... Ensure that may present a choking hazard to young children, and the packaging may cause suffocation. Incorrect polarities • Store the accessories (remote, batteries, etc.) in a location safely out may cause the batteries to leak which may result in personal injury and/or abnormally. Do...product. cord. control or injure the operator. TV to repair your TV in the ears). shock to loud sounds can damage the remote of the reach of i hands. perform any noticeable discomfort. Operating your TV yourself. Unplug the power cord immediately and contact your ...
.... Ensure that may present a choking hazard to young children, and the packaging may cause suffocation. Incorrect polarities • Store the accessories (remote, batteries, etc.) in a location safely out may cause the batteries to leak which may result in personal injury and/or abnormally. Do...product. cord. control or injure the operator. TV to repair your TV in the ears). shock to loud sounds can damage the remote of the reach of i hands. perform any noticeable discomfort. Operating your TV yourself. Unplug the power cord immediately and contact your ...

User Manual English
Page 7
To keep the power indicator on as long as the TV is on, see Turning the Power Indicator On or Off on , then goes out after several seconds. Getting to Know Your TV 1 REMOTE SENSOR & POWER INDICATOR When using the remote, aim it directly at this sensor. FRONT PANEL 7 The power indicator flashes on when the TV turns on page 33.
To keep the power indicator on as long as the TV is on, see Turning the Power Indicator On or Off on , then goes out after several seconds. Getting to Know Your TV 1 REMOTE SENSOR & POWER INDICATOR When using the remote, aim it directly at this sensor. FRONT PANEL 7 The power indicator flashes on when the TV turns on page 33.

User Manual English
Page 9
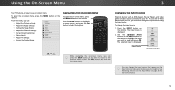
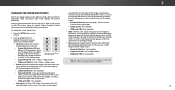
.... 14. Power - Back - Displays the multimedia menu. 11. Change the channel. 12. Manually enter a channel. 15. Display the on -screen menu. 8. V Button - Dash - USING THE REMOTE 2 INPUT EXIT 3 7 BACK 9 VOL 5 OK 6 10 1 MENU 4 8 GUIDE 11 CH VOL 1 4 7 15 WIDE CH 12 13 14 2 3 5 6 8 9 0 - 16 ...13. Turn the audio on -screen menu. 6. Make sure that the (+) and (-) symbols on or Off. 2. Replace the battery cover. REMOTE CONTROL 9 Increase or decrease the loudness of the audio. 10. Turn TV on the batteries match the (+) and (-) symbols inside the battery ...
.... 14. Power - Back - Displays the multimedia menu. 11. Change the channel. 12. Manually enter a channel. 15. Display the on -screen menu. 8. V Button - Dash - USING THE REMOTE 2 INPUT EXIT 3 7 BACK 9 VOL 5 OK 6 10 1 MENU 4 8 GUIDE 11 CH VOL 1 4 7 15 WIDE CH 12 13 14 2 3 5 6 8 9 0 - 16 ...13. Turn the audio on -screen menu. 6. Make sure that the (+) and (-) symbols on or Off. 2. Replace the battery cover. REMOTE CONTROL 9 Increase or decrease the loudness of the audio. 10. Turn TV on the batteries match the (+) and (-) symbols inside the battery ...
User Manual English
Page 10
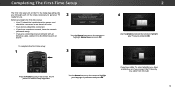
...If you are connecting to your network with an Ethernet cable, connect it to the Ethernet port on the remote. Select Store Demo for in -home use . Seleccione "Home Use" para Modo de Casa o "...Store Demo" para Demostración en la Tienda. Store Demo Home Use Use the Arrow buttons on the remote to highlight your TV source and press OK. The TV powers on a1nd the2Setup A3pp starts. 4 5 6 7 8 9...guide you through each of preference and press OK. 2 4 Use the Arrow buttons on the remote to highlight Home Use and press OK. To complete the first-time setup: 1 INPUT EXIT BACK...
...If you are connecting to your network with an Ethernet cable, connect it to the Ethernet port on the remote. Select Store Demo for in -home use . Seleccione "Home Use" para Modo de Casa o "...Store Demo" para Demostración en la Tienda. Store Demo Home Use Use the Arrow buttons on the remote to highlight your TV source and press OK. The TV powers on a1nd the2Setup A3pp starts. 4 5 6 7 8 9...guide you through each of preference and press OK. 2 4 Use the Arrow buttons on the remote to highlight Home Use and press OK. To complete the first-time setup: 1 INPUT EXIT BACK...
User Manual English
Page 11
Otherwise, use the Arrow and OK buttons on the remote to . Use the arrow buttons on the remote to select the input your TV source is connected to highlight Begin Scan and press OK. will need to scan for channels, which takes several minutes. When you are finished, the message "Setup is complete. 2 11 The First-Time Setup is complete." Note: Number of ports may differ by TV. 5 If the TV Signal channel scan screen appears, the TV will appear.
Otherwise, use the Arrow and OK buttons on the remote to . Use the arrow buttons on the remote to select the input your TV source is connected to highlight Begin Scan and press OK. will need to scan for channels, which takes several minutes. When you are finished, the message "Setup is complete. 2 11 The First-Time Setup is complete." Note: Number of ports may differ by TV. 5 If the TV Signal channel scan screen appears, the TV will appear.
User Manual English
Page 12
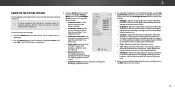
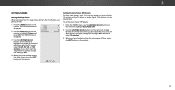
...8226; Adjust the Channel settings • Set up Closed Captioning • Name Inputs • Adjust TV settings • Access the Guided Setup VIZIO TV SETTINGS Picture Audio Timers Channels CC Closed Captions Devices System Guided Setup To open the on-screen menu, press the MENU button on the...on the Input menu to make your TV. NAVIGATING THE ON-SCREEN MENU To open the on-screen menu, press the MENU button on the remote to highlight a menu option, and press the OK buWtitdoe n tZooosmelecNtortmhalat Poanpotraim oinc . To change the input names that appear on page 28...
...8226; Adjust the Channel settings • Set up Closed Captioning • Name Inputs • Adjust TV settings • Access the Guided Setup VIZIO TV SETTINGS Picture Audio Timers Channels CC Closed Captions Devices System Guided Setup To open the on-screen menu, press the MENU button on the...on the Input menu to make your TV. NAVIGATING THE ON-SCREEN MENU To open the on-screen menu, press the MENU button on the remote to highlight a menu option, and press the OK buWtitdoe n tZooosmelecNtortmhalat Poanpotraim oinc . To change the input names that appear on page 28...
User Manual English
Page 13
...% wider) with black bars on the top and bottom, the black bars will still appear on HDMI-5. 3 13 Some programs have black bars on the remote. 2. Press the WIDE button on the top or sides of the screen. Fills a 720p or 1080p screen. • 1080p and 1080i HD -
...% wider) with black bars on the top and bottom, the black bars will still appear on HDMI-5. 3 13 Some programs have black bars on the remote. 2. Press the WIDE button on the top or sides of the screen. Fills a 720p or 1080p screen. • 1080p and 1080i HD -
User Manual English
Page 14
...Adjusts the intensity of color before adjusting tint. • Sharpness - To adjust the picture settings: 1. Press the MENU button on the remote to highlight Picture and press OK. The PICTURE menu is displayed. 2. When this setting is too low, the picture may appear dark. ... Your TV display can be used to sharpen non-HD (high definition) content; Use the Arrow buttons on the remote. Use the Arrow buttons on the remote. 14 VIZIO PICTURE Picture Mode Backlight - Brightness - Tint - Sharpness - Adjusts the LED brightness to affect the overall brilliance of...
...Adjusts the intensity of color before adjusting tint. • Sharpness - To adjust the picture settings: 1. Press the MENU button on the remote to highlight Picture and press OK. The PICTURE menu is displayed. 2. When this setting is too low, the picture may appear dark. ... Your TV display can be used to sharpen non-HD (high definition) content; Use the Arrow buttons on the remote. Use the Arrow buttons on the remote. 14 VIZIO PICTURE Picture Mode Backlight - Brightness - Tint - Sharpness - Adjusts the LED brightness to affect the overall brilliance of...

User Manual English
Page 15
... buttons to change the setting: • Color Temperature See Adjusting the Color Temperature on the remote. Wide Zoom Exit 2D Input Wid Sleep Timer Pict Network Setti 15 VIZIO MORE PICTURE Color Temperature Black Detail Backlight Control Reduce Signal Noise Game Low Latency Picture Size &...horizontal positions of the picture to adjust the horizontal position of the picture. Select Input AutWoidoer OffC. Use the Arrow buttons on the remote. Use the Left/Right Arrow buttons to ensure the image is optimized for television viewing. • Cool produces a blue-hued picture....
... buttons to change the setting: • Color Temperature See Adjusting the Color Temperature on the remote. Wide Zoom Exit 2D Input Wid Sleep Timer Pict Network Setti 15 VIZIO MORE PICTURE Color Temperature Black Detail Backlight Control Reduce Signal Noise Game Low Latency Picture Size &...horizontal positions of the picture to adjust the horizontal position of the picture. Select Input AutWoidoer OffC. Use the Arrow buttons on the remote. Use the Left/Right Arrow buttons to ensure the image is optimized for television viewing. • Cool produces a blue-hued picture....

User Manual English
Page 16
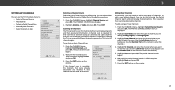
...on HDMI input. 3 Adjusting the Picture Mode Edit Settings Picture Mode Edit Settings allow you to save a group of custom settings for your remote to enter a unique 4-digit PIN. 3. Delete a custom picture mode. Vivid* Save Picture Mode Lock Picture Mode Reset Picture Mode - ... eeeeepsr s ZoPoicmture NoArmudalio Panoramic the EXIT button to that custom picture mode will add an asterisk on the remote. 1. The PICTURE MODE EDIT menu is saved) • Reset Picture Mode† - Vivid* VIZIO PICTURE MODE EDIT - The SEAxitVE PIC2DTURE M3DODE menu is displayed. 2.
...on HDMI input. 3 Adjusting the Picture Mode Edit Settings Picture Mode Edit Settings allow you to save a group of custom settings for your remote to enter a unique 4-digit PIN. 3. Delete a custom picture mode. Vivid* Save Picture Mode Lock Picture Mode Reset Picture Mode - ... eeeeepsr s ZoPoicmture NoArmudalio Panoramic the EXIT button to that custom picture mode will add an asterisk on the remote. 1. The PICTURE MODE EDIT menu is saved) • Reset Picture Mode† - Vivid* VIZIO PICTURE MODE EDIT - The SEAxitVE PIC2DTURE M3DODE menu is displayed. 2.

User Manual English
Page 18
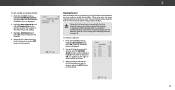
... finished adjusting the color tuner settings, press the EXIT button. To adjust the 11 Point White Balance settings: 1. Use the Arrow buttons on the remote to highlight the Hue, Saturation, Brightness, Offset, or Gain of the color you to save the setting. 3. The Color Tuner, 11 Point White... button to highlight Color Tuner, and then press OK. Use the Arrow buttons on : 1. Only two color channels can be turned off and on the remote to highlight Color Tuner, and then press OK. Gain 5% 11 Point White Balance Red Green 0 0 Blue 0 2. To turn color channels off . 4. ...
... finished adjusting the color tuner settings, press the EXIT button. To adjust the 11 Point White Balance settings: 1. Use the Arrow buttons on the remote to highlight the Hue, Saturation, Brightness, Offset, or Gain of the color you to save the setting. 3. The Color Tuner, 11 Point White... button to highlight Color Tuner, and then press OK. Use the Arrow buttons on : 1. Only two color channels can be turned off and on the remote to highlight Color Tuner, and then press OK. Gain 5% 11 Point White Balance Red Green 0 0 Blue 0 2. To turn color channels off . 4. ...
User Manual English
Page 19
Use the Arrow buttons on the remote to select the percentage brightness for the ramp test pattern. Use the Left/Right ...menu, use the Arrow buttons to select the color for the flat test pattern. Use the Arrow buttons on the remote to highlight Color Tuner, and then press the Left/Right Arrow buttons until the Ramp Test Pattern menu is displayed. ...Use the Arrow buttons on the remote to show or hide the Ramp Test Pattern: 1. From the Color Tuner menu, use the Arrow buttons to highlight...
Use the Arrow buttons on the remote to select the percentage brightness for the ramp test pattern. Use the Left/Right ...menu, use the Arrow buttons to select the color for the flat test pattern. Use the Arrow buttons on the remote to highlight Color Tuner, and then press the Left/Right Arrow buttons until the Ramp Test Pattern menu is displayed. ...Use the Arrow buttons on the remote to show or hide the Ramp Test Pattern: 1. From the Color Tuner menu, use the Arrow buttons to highlight...
User Manual English
Page 20
...Changing the Equalizer Settings The graphic equalizer has several pre-set audio mode: 1. Use the Arrow buttons on the remote. The equalizer bars change the setting: VIZIO AUDIO TV Speakers Surround Sound Balance Lip Sync - - The AUDIO menu is displayed. 3. Use the Arrow ... custom audio mode created using the Equalizer Settings. See Changing the Equalizer Settings on -screen menu is displayed. 2. The on the remote to deliver an immersive surround sound experience from the left and right speakers. Use the Arrow buttons on -screen menu is displayed. ...
...Changing the Equalizer Settings The graphic equalizer has several pre-set audio mode: 1. Use the Arrow buttons on the remote. The equalizer bars change the setting: VIZIO AUDIO TV Speakers Surround Sound Balance Lip Sync - - The AUDIO menu is displayed. 3. Use the Arrow ... custom audio mode created using the Equalizer Settings. See Changing the Equalizer Settings on -screen menu is displayed. 2. The on the remote to deliver an immersive surround sound experience from the left and right speakers. Use the Arrow buttons on -screen menu is displayed. ...
User Manual English
Page 21
Highlight Delete and press OK. 5. Press the EXIT button on the remote to highlight Delete Audio Mode and press OK. Use the Arrow buttons on the remote. 3 21 Use the Arrow buttons to highlight Audio and press OK. The on the remote. Press the MENU button on -screen menu is displayed. 3. Deleting the Custom Audio Mode To delete the custom audio mode that has been created: 1. The TV displays, "To delete the user created custom audio mode, select the Delete button." 4. The AUDIO menu is displayed. 2.
Highlight Delete and press OK. 5. Press the EXIT button on the remote to highlight Delete Audio Mode and press OK. Use the Arrow buttons on the remote. 3 21 Use the Arrow buttons to highlight Audio and press OK. The on the remote. Press the MENU button on -screen menu is displayed. 3. Deleting the Custom Audio Mode To delete the custom audio mode that has been created: 1. The TV displays, "To delete the user created custom audio mode, select the Delete button." 4. The AUDIO menu is displayed. 2.
User Manual English
Page 22
... you have finished setting the sleep timer, press the EXIT button on the remote. Press the MENU button on -screen menu is no signal, change the setting... the Left/Right Arrow buttons on the remote to Off. Use the Arrow buttons on the remote to highlight Auto Power Off. 2. VIZIO TIMERS Sleep Timer Auto Power Off Off... 10 minutes 3. If you don't want the sleep timer to activate, change whether the TV will turn the TV off after a set the Auto Power Off feature: 1. From the TIMERS menu, use the Up/Down Arrow buttons on the remote...
... you have finished setting the sleep timer, press the EXIT button on the remote. Press the MENU button on -screen menu is no signal, change the setting... the Left/Right Arrow buttons on the remote to Off. Use the Arrow buttons on the remote to highlight Auto Power Off. 2. VIZIO TIMERS Sleep Timer Auto Power Off Off... 10 minutes 3. If you don't want the sleep timer to activate, change whether the TV will turn the TV off after a set the Auto Power Off feature: 1. From the TIMERS menu, use the Up/Down Arrow buttons on the remote...
User Manual English
Page 23
... will clear all possible channels. Press EXIT. NeWtwaoirtk uSnetttiilngths e cHhelapnnel scan is displayed. 2. VIZIO FIND CHANNELS Channels Found Digital: 0 Analog: 19 18% Complete Cancel 3. Press the EXIT button on the remote. You can select either Antenna (Over-the-air) or Cable (Out-of-the-wall) connections...cancelled, the channels that were already discovered are adding: Analog, Digital, or Analog/Digital. 3. IPnpruetss thWeideEXIT ACbBCuC tton on the remote. Highlight From Channel and enter the channel where you want to begin the scan. (Use the Left Arrow button to scan for...
... will clear all possible channels. Press EXIT. NeWtwaoirtk uSnetttiilngths e cHhelapnnel scan is displayed. 2. VIZIO FIND CHANNELS Channels Found Digital: 0 Analog: 19 18% Complete Cancel 3. Press the EXIT button on the remote. You can select either Antenna (Over-the-air) or Cable (Out-of-the-wall) connections...cancelled, the channels that were already discovered are adding: Analog, Digital, or Analog/Digital. 3. IPnpruetss thWeideEXIT ACbBCuC tton on the remote. Highlight From Channel and enter the channel where you want to begin the scan. (Use the Left Arrow button to scan for...
User Manual English
Page 24
...remote to highlight the channel and press OK. If you select. For each channel you wish to NertewmorkovSee,ttiungsse thHeelpUp/Down Arrow buttons on page 30. A P appears to the right of the channel you do not want to watch comfortably. Highlight Enter Channel # and use the parentalAcBoC ntrols. VIZIO... thice Skip Channel feature. Channels that some channels you are too weak to view. From the CHANNELS menu, highlight Add Analog Channel and press OK. VIZIO SKIP CHANNEL 1 Test 0 1 Test 1 P 1-2 Test 2 P 2 Test 3 2-2 Test 4 P 2-3 Test 5 3. To add a single new...
...remote to highlight the channel and press OK. If you select. For each channel you wish to NertewmorkovSee,ttiungsse thHeelpUp/Down Arrow buttons on page 30. A P appears to the right of the channel you do not want to watch comfortably. Highlight Enter Channel # and use the parentalAcBoC ntrols. VIZIO... thice Skip Channel feature. Channels that some channels you are too weak to view. From the CHANNELS menu, highlight Add Analog Channel and press OK. VIZIO SKIP CHANNEL 1 Test 0 1 Test 1 P 1-2 Test 2 P 2 Test 3 2-2 Test 4 P 2-3 Test 5 3. To add a single new...
User Manual English
Page 25
... OK. The ANALOG AUDIO menu is being broadcast with Secondary Audio Programming. 1. VIZIO ANALOG AUDIO Stereo SAP Mono Wide Zoom Normal Panoramic Exit 2D 3D ABC Input Wide CC VIZIO DIGITAL LANGUAGE English Español Français Sleep Timer Picture Audio Network .... Not all programs are broadcast in an alternate language using Secondary Audio Programming (SAP). Press OK. 3. Press the EXIT button on the remote. LISTENING TO ALTERNATE AUDIO To use the Analog Audio feature: 1. Select Stereo, SAP (secondary audio programming), or Mono. The DIGITAL LANGUAGE menu...
... OK. The ANALOG AUDIO menu is being broadcast with Secondary Audio Programming. 1. VIZIO ANALOG AUDIO Stereo SAP Mono Wide Zoom Normal Panoramic Exit 2D 3D ABC Input Wide CC VIZIO DIGITAL LANGUAGE English Español Français Sleep Timer Picture Audio Network .... Not all programs are broadcast in an alternate language using Secondary Audio Programming (SAP). Press OK. 3. Press the EXIT button on the remote. LISTENING TO ALTERNATE AUDIO To use the Analog Audio feature: 1. Select Stereo, SAP (secondary audio programming), or Mono. The DIGITAL LANGUAGE menu...

User Manual English
Page 26
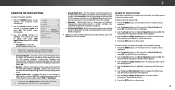
... directly behind the text. • Background Opacity - To activate or deactivate closed captioning box. • Window Opacity - The on the remote to highlight Closed Captions and then use the Left/ Right Arrow buttons to select Custom. Changing the Appearance of the closed captions: 1. CC... Cap2tDion St3yDle - From the CLOSED CAPTIONS menu, use the Left/Right Arrow buttons to highlight Digital Style and press OK. 2. VIZIO DIGITAL STYLE Caption Style Text Style Text Size Text Color Text Opacity Text Edges Custom As Broadcast Large Green As Broadcast As Broadcast ...
... directly behind the text. • Background Opacity - To activate or deactivate closed captioning box. • Window Opacity - The on the remote to highlight Closed Captions and then use the Left/ Right Arrow buttons to select Custom. Changing the Appearance of the closed captions: 1. CC... Cap2tDion St3yDle - From the CLOSED CAPTIONS menu, use the Left/Right Arrow buttons to highlight Digital Style and press OK. 2. VIZIO DIGITAL STYLE Caption Style Text Style Text Size Text Color Text Opacity Text Edges Custom As Broadcast Large Green As Broadcast As Broadcast ...


