User Manual English
Page 3
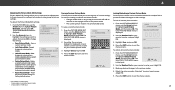
...cause fire or electric shock. • Follow instructions for moving your TV in the operating instructions unless you to loud sounds can damage the remote control or injure the operator. Do not expose batteries to excessive heat such as sunshine, fire or the like. • If any other ...may cause the batteries to persons. Continued use of the following occurs, contact the dealer: - Pulling on the apparatus. • Store the accessories (remote, batteries, etc.) in permanent damage to the sound level, which can damage your TV away from damage due to power surges. • Do ...
...cause fire or electric shock. • Follow instructions for moving your TV in the operating instructions unless you to loud sounds can damage the remote control or injure the operator. Do not expose batteries to excessive heat such as sunshine, fire or the like. • If any other ...may cause the batteries to persons. Continued use of the following occurs, contact the dealer: - Pulling on the apparatus. • Store the accessories (remote, batteries, etc.) in permanent damage to the sound level, which can damage your TV away from damage due to power surges. • Do ...

User Manual English
Page 6
... Settings 39 Limited Warranty 54 Mexico Limited Warranty 56 Legal Information 58 Completing The First-Time Setup 19 Using the Parental Controls 39 Using the On-Screen Menu 21 Navigating the On-Screen Menu 21 Changing the Input Source 21 Changing the Screen...on a Wall 5 Front Panel 6 Rear Panel 7 Scanning for Channels 32 Adding New Channels 32 Skipping Channels 33 Specifications 52 Regulatory Information 53 Remote Control Front 8 Replacing the Batteries 8 Connecting Your Devices 14 Connecting A Device 14 Connecting A Device - Table Of Contents Getting to Play USB ...
... Settings 39 Limited Warranty 54 Mexico Limited Warranty 56 Legal Information 58 Completing The First-Time Setup 19 Using the Parental Controls 39 Using the On-Screen Menu 21 Navigating the On-Screen Menu 21 Changing the Input Source 21 Changing the Screen...on a Wall 5 Front Panel 6 Rear Panel 7 Scanning for Channels 32 Adding New Channels 32 Skipping Channels 33 Specifications 52 Regulatory Information 53 Remote Control Front 8 Replacing the Batteries 8 Connecting Your Devices 14 Connecting A Device 14 Connecting A Device - Table Of Contents Getting to Play USB ...

User Manual English
Page 7
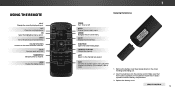
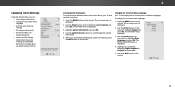
Remote Control with Batteries (for D32hn-D0) Remote Control with Batteries (for D39hn-D0) TV Stands (Left and Right) 2 x Quick Start Guides (1 English, 1 French-Spanish) 4 x M4 Phillips Screws PACKAGE CONTENTS 1 7 Use the images below to inspect the package contents. VIZIO LED HDTV Power Cord INPUT EXIT BACK OK VOL VOL 1 2 4 5 7 8 WIDE 0 MENU GUIDE CH CH 3 6 9 - Getting to Know Your TV INSPECTING THE PACKAGE CONTENTS Before installing your new TV, take a moment to ensure nothing is missing or damaged.
Remote Control with Batteries (for D32hn-D0) Remote Control with Batteries (for D39hn-D0) TV Stands (Left and Right) 2 x Quick Start Guides (1 English, 1 French-Spanish) 4 x M4 Phillips Screws PACKAGE CONTENTS 1 7 Use the images below to inspect the package contents. VIZIO LED HDTV Power Cord INPUT EXIT BACK OK VOL VOL 1 2 4 5 7 8 WIDE 0 MENU GUIDE CH CH 3 6 9 - Getting to Know Your TV INSPECTING THE PACKAGE CONTENTS Before installing your new TV, take a moment to ensure nothing is missing or damaged.
User Manual English
Page 12
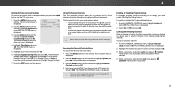
...the battery cover by pressing down on the batteries match the (+) and (-) symbols inside the battery compartment. 3. Insert two batteries into the remote control. CHANNEL UP/DOWN Change the channel. DASH Use with the number pad to the previous on -screen menu. Make sure that the (+)...on the arrow markings and sliding out. 2. ARROW Navigate the on -screen menu. Replace the battery cover. REMOTE CONTROL 12 LAST Return to the channel last viewed. USING THE REMOTE INPUT Change the currently-displayed input. MUTE Turn the audio off . MENU Display the on -screen menu....
...the battery cover by pressing down on the batteries match the (+) and (-) symbols inside the battery compartment. 3. Insert two batteries into the remote control. CHANNEL UP/DOWN Change the channel. DASH Use with the number pad to the previous on -screen menu. Make sure that the (+)...on the arrow markings and sliding out. 2. ARROW Navigate the on -screen menu. Replace the battery cover. REMOTE CONTROL 12 LAST Return to the channel last viewed. USING THE REMOTE INPUT Change the currently-displayed input. MUTE Turn the audio off . MENU Display the on -screen menu....

User Manual English
Page 13
...to the channel last viewed. NUMBER PAD Manually enter a channel. MENU Display the on -screen menu. Insert two batteries into the remote control. INFO Display the info window. LAST Return to the previous on-screen menu. VOLUME UP/DOWN Increase or decrease loudness of the audio... the battery cover. 13 V BUTTON Open the USB media player. OK Select the highlighted menu option. USING THE REMOTE INPUT Change the currently-displayed input. A/V CONTROLS Control USB photo player. EXIT Close the on -screen menu. GUIDE Display the info window. DASH Use with number pad...
...to the channel last viewed. NUMBER PAD Manually enter a channel. MENU Display the on -screen menu. Insert two batteries into the remote control. INFO Display the info window. LAST Return to the previous on-screen menu. VOLUME UP/DOWN Increase or decrease loudness of the audio... the battery cover. 13 V BUTTON Open the USB media player. OK Select the highlighted menu option. USING THE REMOTE INPUT Change the currently-displayed input. A/V CONTROLS Control USB photo player. EXIT Close the on -screen menu. GUIDE Display the info window. DASH Use with number pad...
User Manual English
Page 24
... then press the Left/ Right Arrow buttons to change the setting: • Color Temperature See Adjusting the Color Temperature on the remote. Diminishes artifacts in the image caused by adusting the backlight. Reduces pixelation and distortion • for bright room conditions, and higher ... (lag) when gaming. • Picture Size & Position - Adjusts the average brightness of image motion content. VIZIO MORE PICTURE Color Temperature Black Detail Backlight Control Reduce Signal Noise Reduce Block Noise Game Low Latency Picture Size & Position Film Mode Gamma Cool Off On Off ...
... then press the Left/ Right Arrow buttons to change the setting: • Color Temperature See Adjusting the Color Temperature on the remote. Diminishes artifacts in the image caused by adusting the backlight. Reduces pixelation and distortion • for bright room conditions, and higher ... (lag) when gaming. • Picture Size & Position - Adjusts the average brightness of image motion content. VIZIO MORE PICTURE Color Temperature Black Detail Backlight Control Reduce Signal Noise Reduce Block Noise Game Low Latency Picture Size & Position Film Mode Gamma Cool Off On Off ...
User Manual English
Page 25
...The LOCK PICTURE MODE menu is locked) • Delete Picture Mode - To save groups of picture settings. VIZIO PICTURE MODE EDIT - VIZIO LOCK PICTURE MODE Create a picture control PIN to prevent changes to highlight Lock Picture Mode, and then press OK. From the PICTURE MODE EDIT menu..., use the Arrow buttons to all custom picture modes: 1. Use either the oAnBC-screen keyboard or keyboard on your remote to...
...The LOCK PICTURE MODE menu is locked) • Delete Picture Mode - To save groups of picture settings. VIZIO PICTURE MODE EDIT - VIZIO LOCK PICTURE MODE Create a picture control PIN to prevent changes to highlight Lock Picture Mode, and then press OK. From the PICTURE MODE EDIT menu..., use the Arrow buttons to all custom picture modes: 1. Use either the oAnBC-screen keyboard or keyboard on your remote to...
User Manual English
Page 29
...VIZIO AUDIO TV Speakers Surround Sound Balance - Adjusts the synchronization between the display image and the accompanying audio track. • Digital Audio Out - See Changing the Equalizer Settings on page 30. 4. Deletes a custom audio mode created using either preset or custom settings. Use the Arrow buttons on the remote... audio outputs. • Surround Sound - The on the remote. 29 Digital Audio Out Analog Audio Out Equalizer Delete Audio Mode On On +0 +0 PCM Fixed When the TV speakers are controlling the volume with more than two channels (3.0, 5.0, or 5.1,...
...VIZIO AUDIO TV Speakers Surround Sound Balance - Adjusts the synchronization between the display image and the accompanying audio track. • Digital Audio Out - See Changing the Equalizer Settings on page 30. 4. Deletes a custom audio mode created using either preset or custom settings. Use the Arrow buttons on the remote... audio outputs. • Surround Sound - The on the remote. 29 Digital Audio Out Analog Audio Out Equalizer Delete Audio Mode On On +0 +0 PCM Fixed When the TV speakers are controlling the volume with more than two channels (3.0, 5.0, or 5.1,...
User Manual English
Page 38
... input and your network. The SYSTEM menu is displayed. VIZIO MENU LANGUAGE English Español Français 3. ABC 5. The on the remote. Use the Arrow buttons on -screen menu language • Set time zone and local settings • Set up parental controls • Resize the video size • Adjust wide mode...
... input and your network. The SYSTEM menu is displayed. VIZIO MENU LANGUAGE English Español Français 3. ABC 5. The on the remote. Use the Arrow buttons on -screen menu language • Set time zone and local settings • Set up parental controls • Resize the video size • Adjust wide mode...
User Manual English
Page 39
The SYSTEM menu is displayed. 5. VIZIO June 11, 2015 11:48AM Time Zone Pacific (-8) Daylight Savings ... it is currently Daylight Savings Time, Off if it will be inaccessible. Use the Arrow buttons on the remote to highlight Parental Controls and press OK. 4. Enter your time zone and press OK. 6. To set a PIN, enter the...Program Rating feature: 1. The CHANNEL LOCKS menu is NedtwisoprklaySeetdtin.gs Help 2. Press the MENU button on the remote. The Parental Controls menu only appears when: • You are using a composite video cable Exit or a2Dcoaxia3l Dcable, such as...
The SYSTEM menu is displayed. 5. VIZIO June 11, 2015 11:48AM Time Zone Pacific (-8) Daylight Savings ... it is currently Daylight Savings Time, Off if it will be inaccessible. Use the Arrow buttons on the remote to highlight Parental Controls and press OK. 4. Enter your time zone and press OK. 6. To set a PIN, enter the...Program Rating feature: 1. The CHANNEL LOCKS menu is NedtwisoprklaySeetdtin.gs Help 2. Press the MENU button on the remote. The Parental Controls menu only appears when: • You are using a composite video cable Exit or a2Dcoaxia3l Dcable, such as...
User Manual English
Page 40
.... In the CONFIRM PIN field, use the Up/Down and Left/Right Arrow buttons on the remote to block content based on the remote to enter your new 4-digit parental control PIN. 3. From the PARENTAL CONTROLS menu, highlight Reset Locks and press OK. When this rating and all lower ratings can use ... appears unlocked. When the rating type is the case, you use the Arrow buttons on the remote to re-enter your new parental control PIN and save it in a secure location. 5. Changing the Parental Control PIN If you can be viewed. 4. Resetting the Content Locks To reset the content locks to...
.... In the CONFIRM PIN field, use the Up/Down and Left/Right Arrow buttons on the remote to block content based on the remote to enter your new 4-digit parental control PIN. 3. From the PARENTAL CONTROLS menu, highlight Reset Locks and press OK. When this rating and all lower ratings can use ... appears unlocked. When the rating type is the case, you use the Arrow buttons on the remote to re-enter your new parental control PIN and save it in a secure location. 5. Changing the Parental Control PIN If you can be viewed. 4. Resetting the Content Locks To reset the content locks to...

User Manual English
Page 42
...The on-screen menu is connected and supports CEC, select Device Discovery and then press OK. 7. To determain if your device is displayed. 4. You can control: • Power On/Off • Volume • Mute Not all HDMI devices support CEC. The SYSTEM menu is displayed. 6. To enable, disable,...Off The Power Indicator on -screen menu is displayed. 5. Press the MENU button on the remote. To turn the Power Indicator Light On or Off: 1. Highligh CEC and press OK. See your VIZIO TV remote can change this setting if you must select Enable. • Device Discovery - Use the ...
...The on-screen menu is connected and supports CEC, select Device Discovery and then press OK. 7. To determain if your device is displayed. 4. You can control: • Power On/Off • Volume • Mute Not all HDMI devices support CEC. The SYSTEM menu is displayed. 6. To enable, disable,...Off The Power Indicator on -screen menu is displayed. 5. Press the MENU button on the remote. To turn the Power Indicator Light On or Off: 1. Highligh CEC and press OK. See your VIZIO TV remote can change this setting if you must select Enable. • Device Discovery - Use the ...
User Manual English
Page 43
...that you have added and any V.I.A. Highlight Reset and press OK. 7. This includes any changes you have made to the settings will begin. VIZIO RESET & ADMIN Reset TV to Factory Defaults and press OK. Restoring the TV to Factory Default Settings All of the on-screen menu settings can...TV's Reset & Admin menu to restore the TV to its factory default settings. If you have changed the default parental control PIN, enter it now. Use the Arrow buttons on the remote. The RESET & ADMIN menu is displayed. 2. To restore the TV to its factory default settings: 1. Press the ...
...that you have added and any V.I.A. Highlight Reset and press OK. 7. This includes any changes you have made to the settings will begin. VIZIO RESET & ADMIN Reset TV to Factory Defaults and press OK. Restoring the TV to Factory Default Settings All of the on-screen menu settings can...TV's Reset & Admin menu to restore the TV to its factory default settings. If you have changed the default parental control PIN, enter it now. Use the Arrow buttons on the remote. The RESET & ADMIN menu is displayed. 2. To restore the TV to its factory default settings: 1. Press the ...

User Manual English
Page 49
...symbols. • Replace the batteries with new ones. The power is on, but there is no sound. • Press Volume Up on the remote control. • Press the MUTE button on page 31 28. • Check the audio connections of the channel may not display correctly. See Adjusting...TV displays "No Signal." • Press the INPUT button on the remote control to select a different input source. • If you are using cable TV or antenna connected directly to turn the TV on page 3128. VIZIO recommends selecting Calibrated. • Check all devices are inherent to a window...
...symbols. • Replace the batteries with new ones. The power is on, but there is no sound. • Press Volume Up on the remote control. • Press the MUTE button on page 31 28. • Check the audio connections of the channel may not display correctly. See Adjusting...TV displays "No Signal." • Press the INPUT button on the remote control to select a different input source. • If you are using cable TV or antenna connected directly to turn the TV on page 3128. VIZIO recommends selecting Calibrated. • Check all devices are inherent to a window...


