User Manual English
Page 2
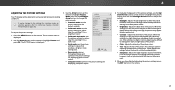
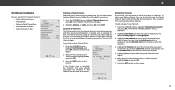
... of the type of the cabinet are provided for the installation, use attachments/accessories specified by the manufacturer. • Use only with the cart, stand, tripod, bracket, or table specified by the manufacturer, or sold with one wider than the other components to qualified service personnel. Wait before turning on or pinched particularly at least three feet should be operated only...
... of the type of the cabinet are provided for the installation, use attachments/accessories specified by the manufacturer. • Use only with the cart, stand, tripod, bracket, or table specified by the manufacturer, or sold with one wider than the other components to qualified service personnel. Wait before turning on or pinched particularly at least three feet should be operated only...
User Manual English
Page 3
..., unplug the power cord and disconnect device, the disconnect device shall remain warranty does not cover user abuse or improper contact your dealer for use of electrical shock to the sound level, which can damage your TV. These servicing instructions are for repair. For more ...objects at your dealer. This may • Do not use in the operating instructions unless you to loud sounds can damage the remote control or injure the operator. If any way. - TV yourself. • CAUTION - components may expose you are unplugged before • WARNING: Exposure...
..., unplug the power cord and disconnect device, the disconnect device shall remain warranty does not cover user abuse or improper contact your dealer for use of electrical shock to the sound level, which can damage your TV. These servicing instructions are for repair. For more ...objects at your dealer. This may • Do not use in the operating instructions unless you to loud sounds can damage the remote control or injure the operator. If any way. - TV yourself. • CAUTION - components may expose you are unplugged before • WARNING: Exposure...

User Manual English
Page 4
... ART 250, part H) iv TELEVISION ANTENNA CONNECTION PROTECTION If an outside antenna/satellite dish or cable system is to be connected to earth in wire to an antenna discharge unit, size of the grounding conductors, location of antenna discharge unit, connection to grounding electrodes, and requirements of time, unplug the TV from the wall outlet and disconnect the antenna or cable system. Remember, the screen of the...
... ART 250, part H) iv TELEVISION ANTENNA CONNECTION PROTECTION If an outside antenna/satellite dish or cable system is to be connected to earth in wire to an antenna discharge unit, size of the grounding conductors, location of antenna discharge unit, connection to grounding electrodes, and requirements of time, unplug the TV from the wall outlet and disconnect the antenna or cable system. Remember, the screen of the...

User Manual English
Page 6
... Parental Controls Menu 39 Enabling or Disabling Program Ratings 39 Locking and Unlocking Channels 39 Blocking and Unblocking Content by Rating 40 Changing the Parental Control PIN 40 Resetting the Content Locks 40 Changing the View Mode Settings 41 Changing the Screen Aspect Ratio 41 Adjusting the CEC Settings 42 Turning the Power Indicator On or Off 42 Using the Reset & Admin Menu 43 Restoring the TV to Factory Default Settings 43 Using the Guided Setup Menu 44 Using the Info Window 44 Using the USB Media Player...
... Parental Controls Menu 39 Enabling or Disabling Program Ratings 39 Locking and Unlocking Channels 39 Blocking and Unblocking Content by Rating 40 Changing the Parental Control PIN 40 Resetting the Content Locks 40 Changing the View Mode Settings 41 Changing the Screen Aspect Ratio 41 Adjusting the CEC Settings 42 Turning the Power Indicator On or Off 42 Using the Reset & Admin Menu 43 Restoring the TV to Factory Default Settings 43 Using the Guided Setup Menu 44 Using the Info Window 44 Using the USB Media Player...

User Manual English
Page 9
... weight of this TV. Attach your TV and wall mount to the wall, carefully following the instructions that can begin the installation. Disconnect any cables connected to your mount. Installing the TV on a Wall To mount your TV on a wall, you may want to use cables with right-angle connectors. Use only with a UL-listed wall mount bracket rated for your TV model: Installing a TV on a wall requires lifting. For some wall mounts, you will need a wall mount...
... weight of this TV. Attach your TV and wall mount to the wall, carefully following the instructions that can begin the installation. Disconnect any cables connected to your mount. Installing the TV on a Wall To mount your TV on a wall, you may want to use cables with right-angle connectors. Use only with a UL-listed wall mount bracket rated for your TV model: Installing a TV on a wall requires lifting. For some wall mounts, you will need a wall mount...

User Manual English
Page 13
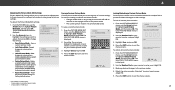
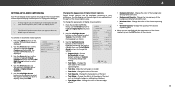
... audio off . LAST Return to manually enter a digital sub-channel. (For example, 18-4 or 18-5.) 1. GUIDE Display the info window. INFO Display the info window. Insert two batteries into the remote control. MENU Display the on . V BUTTON Open the USB media player. VOLUME UP/DOWN Increase or decrease loudness of the audio. NUMBER PAD Manually enter a channel. WIDE Switch the display mode. 1 Replacing the Batteries POWER Turn the TV on -screen menu. DASH Use with number pad to the channel last viewed. REMOTE CONTROL...
... audio off . LAST Return to manually enter a digital sub-channel. (For example, 18-4 or 18-5.) 1. GUIDE Display the info window. INFO Display the info window. Insert two batteries into the remote control. MENU Display the on . V BUTTON Open the USB media player. VOLUME UP/DOWN Increase or decrease loudness of the audio. NUMBER PAD Manually enter a channel. WIDE Switch the display mode. 1 Replacing the Batteries POWER Turn the TV on -screen menu. DASH Use with number pad to the channel last viewed. REMOTE CONTROL...
User Manual English
Page 14
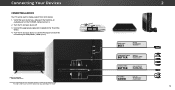
... device has a video port that matches an available port on . Turn the TV and your device off. 3. The actual number of ports and their locations may be used (HDMI-1, HDMI-2, etc.). Connecting Your Devices CONNECTING A DEVICE Your TV can be subject to change. Set the TV's input to match the connection you used to the TV and the device. 4. Connect the appropriate cable (not included) to display output from most devices...
... device has a video port that matches an available port on . Turn the TV and your device off. 3. The actual number of ports and their locations may be used (HDMI-1, HDMI-2, etc.). Connecting Your Devices CONNECTING A DEVICE Your TV can be subject to change. Set the TV's input to match the connection you used to the TV and the device. 4. Connect the appropriate cable (not included) to display output from most devices...

User Manual English
Page 21
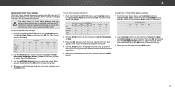
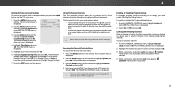
... Input Wide CC INPUT EXIT BACK OK VOL VOL 1 2 4 5 7 8 WIDE 0 MENU GUIDE CH CH 3 6 9 - Press the INPUT button on -screen menu, you can be connected to highlight a menu option, and press the OK buWtitdoe n tZooosmelecNtortmhalat Poanpotraim oinc . The selected input is TV displayed. 2. HDMI-1 HDMI-2 Input Name COMP Network Settings Help While navigating the on the remote. Note: Inputs may vary by TV. Sleep Timer Picture Audio CHANGING THE INPUT SOURCE External devices such as DVD players, Blu-ray Players, and video game...
... Input Wide CC INPUT EXIT BACK OK VOL VOL 1 2 4 5 7 8 WIDE 0 MENU GUIDE CH CH 3 6 9 - Press the INPUT button on -screen menu, you can be connected to highlight a menu option, and press the OK buWtitdoe n tZooosmelecNtortmhalat Poanpotraim oinc . The selected input is TV displayed. 2. HDMI-1 HDMI-2 Input Name COMP Network Settings Help While navigating the on the remote. Note: Inputs may vary by TV. Sleep Timer Picture Audio CHANGING THE INPUT SOURCE External devices such as DVD players, Blu-ray Players, and video game...

User Manual English
Page 22
...cannot be changed for Ultra HD content or for widescreen viewing (1.85:1 or 2.35:1), then black bars will appear on the top and bottom of the display image. Examples include wide-screen movies and older television programs. To change the screen aspect ratio: 1. Use the Arrow buttons to ...black bars will still appear on the remote. 2. Press the WIDE button on the top and bottom of the picture so that the picture keeps its original shape. With 2.35:1 widescreen content, one-sixth of the image is already formatted for any video content on the top or sides of the display...
...cannot be changed for Ultra HD content or for widescreen viewing (1.85:1 or 2.35:1), then black bars will appear on the top and bottom of the display image. Examples include wide-screen movies and older television programs. To change the screen aspect ratio: 1. Use the Arrow buttons to ...black bars will still appear on the remote. 2. Press the WIDE button on the top and bottom of the picture so that the picture keeps its original shape. With 2.35:1 widescreen content, one-sixth of the image is already formatted for any video content on the top or sides of the display...
User Manual English
Page 23
... Arrow buttons on the remote. 23 It can be adjusted to values that does not otherwise exist. 5. More Picture Picture Mode Edit Color Calibration Standard + 85 + 50 + 50 + 63 +0 + 60 • Vivid mode sets the picture settings to suit your preferences and viewing conditions. If flesh appears too orange, reduce the level of the picture. The PICTURE menu is displayed. 2. Sharpness - Use the Arrow buttons on -screen menu is displayed. 3. Color - Input Wide CC...
... Arrow buttons on the remote. 23 It can be adjusted to values that does not otherwise exist. 5. More Picture Picture Mode Edit Color Calibration Standard + 85 + 50 + 50 + 63 +0 + 60 • Vivid mode sets the picture settings to suit your preferences and viewing conditions. If flesh appears too orange, reduce the level of the picture. The PICTURE menu is displayed. 2. Sharpness - Use the Arrow buttons on -screen menu is displayed. 3. Color - Input Wide CC...
User Manual English
Page 25
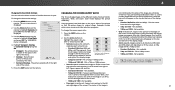
...8226; Reset Picture Mode† - Allow changes to Calibrated picture mode. (Available after a custom picture mode is displayed. 2. The SEAxitVE PIC2DTURE M3DODE menu is locked) • Delete Picture Mode - Highlight Save and press OK. 4. Delete a custom picture mode. The LOCK PICTURE MODE menu is displayed. 2. EHxiitghligh2Dt Save3aDnd press OK. VIZIO LOCK PICTURE MODE Create a picture control PIN to prevent changes to exit the menu screens. From the PICTURE MODE EDIT menu, use the Arrow buttons to factory default values. MyMode Save Picture Mode Unlock Picture Mode Delete...
...8226; Reset Picture Mode† - Allow changes to Calibrated picture mode. (Available after a custom picture mode is displayed. 2. The SEAxitVE PIC2DTURE M3DODE menu is locked) • Delete Picture Mode - Highlight Save and press OK. 4. Delete a custom picture mode. The LOCK PICTURE MODE menu is displayed. 2. EHxiitghligh2Dt Save3aDnd press OK. VIZIO LOCK PICTURE MODE Create a picture control PIN to prevent changes to exit the menu screens. From the PICTURE MODE EDIT menu, use the Arrow buttons to factory default values. MyMode Save Picture Mode Unlock Picture Mode Delete...
User Manual English
Page 27
... 0 0 0 Gain 0 0 0 2. Use the Arrow buttons to highlight another color channel to turn color channels off and on . When you are finished with precisely set colors, and a specialized light meter. To adjust the HSB color settings: 1. Use the Arrow buttons on the remote to highlight Red, Green, or Blue. 3. Only two color channels can be turned off . 4. From the COLOR CALIBRATION menu, use the Arrow buttons to highlight Color Tuner, and then press OK. Use the Arrow buttons on the remote to...
... 0 0 0 Gain 0 0 0 2. Use the Arrow buttons to highlight another color channel to turn color channels off and on . When you are finished with precisely set colors, and a specialized light meter. To adjust the HSB color settings: 1. Use the Arrow buttons on the remote to highlight Red, Green, or Blue. 3. Only two color channels can be turned off . 4. From the COLOR CALIBRATION menu, use the Arrow buttons to highlight Color Tuner, and then press OK. Use the Arrow buttons on the remote to...
User Manual English
Page 29
... and HDMI ARC output when connected to a home theater audio system. The AUDIO menu is displayed. 3. Use the Arrow buttons to adjust the boost (up) and attenuation (down) for audio with ABC the TV's volume controls, or select Fixed if an external audio device (sound bar or AV receiver) will control the volume. Use the Up and Down Arrow buttons to highlight Equalizer and press OK. Use the Arrow buttons on the remote. Turns the built-in speakers...
... and HDMI ARC output when connected to a home theater audio system. The AUDIO menu is displayed. 3. Use the Arrow buttons to adjust the boost (up) and attenuation (down) for audio with ABC the TV's volume controls, or select Fixed if an external audio device (sound bar or AV receiver) will control the volume. Use the Up and Down Arrow buttons to highlight Equalizer and press OK. Use the Arrow buttons on the remote. Turns the built-in speakers...
User Manual English
Page 32
.... CC To perform an Auto Channel Scan: VIZIO 1. If the channel scan is displayed. 2. A new channel scan will be using an antenna) and cable channels from an out-of-theAB-Cwall connection (without a cable box). Adding New Channels Occasionally, you may need to skip VIZIO CHANNELS Channels not searched Channel Source Find Channel Partial Channel Search Add Analog Channel Skip Channel Analog Audio Digital Language Cable Stereo English Selecting a Channel Source Select the type of new channels: 1. The PARTIAL CHANNEL SEARCH menu is cancelled, the channels that were already...
.... CC To perform an Auto Channel Scan: VIZIO 1. If the channel scan is displayed. 2. A new channel scan will be using an antenna) and cable channels from an out-of-theAB-Cwall connection (without a cable box). Adding New Channels Occasionally, you may need to skip VIZIO CHANNELS Channels not searched Channel Source Find Channel Partial Channel Search Add Analog Channel Skip Channel Analog Audio Digital Language Cable Stereo English Selecting a Channel Source Select the type of new channels: 1. The PARTIAL CHANNEL SEARCH menu is cancelled, the channels that were already...
User Manual English
Page 35
... to change, then use the Arrow buttons to manually change each Input settWinidge. Use the Up/Down Arrow buttons on the next page for the closed captions for programs that include them . To activate or deactivate closed captioning box. • Window Opacity - Use the Arrow buttons on the remote to select the caption channel you are viewing is displayed. Use the Left/Right Arrow buttons on the remote to highlight either Analog or Digital Closed Captions. 5. 4 SETTING UP CLOSED CAPTIONING Your...
... to change, then use the Arrow buttons to manually change each Input settWinidge. Use the Up/Down Arrow buttons on the next page for the closed captions for programs that include them . To activate or deactivate closed captioning box. • Window Opacity - Use the Arrow buttons on the remote to select the caption channel you are viewing is displayed. Use the Left/Right Arrow buttons on the remote to highlight either Analog or Digital Closed Captions. 5. 4 SETTING UP CLOSED CAPTIONING Your...
User Manual English
Page 39
... Audio Parental Controls Menu To access the Parental Controls menu: 1. Enabling or Disabling Program Ratings To manage program content according to receive your TV signals, such as a VCR, satellite or cable box, or DVR. To enable or disable the Program Rating feature: 1. Locking and Unlocking Channels When a channel is displayed. 2. VIZIO June 11, 2015 11:48AM Time Zone Pacific (-8) Daylight Savings Time Auto 3. Press the MENU button on -screen menu is a good way to cable TV directly from viewing inappropriate material. Highlight Time...
... Audio Parental Controls Menu To access the Parental Controls menu: 1. Enabling or Disabling Program Ratings To manage program content according to receive your TV signals, such as a VCR, satellite or cable box, or DVR. To enable or disable the Program Rating feature: 1. Locking and Unlocking Channels When a channel is displayed. 2. VIZIO June 11, 2015 11:48AM Time Zone Pacific (-8) Daylight Savings Time Auto 3. Press the MENU button on -screen menu is a good way to cable TV directly from viewing inappropriate material. Highlight Time...
User Manual English
Page 41
... the remote. 2. The VIEW MODE menu is open. CHANGING THE SCREEN ASPECT RATIO The TV can resize the video content to the edges of the display image. • Standard Definition (480i and 480p) - Each mode displays the picture differently. Not available. • Wide stretches a 4:3 aspect ratio picture to fit while the menu is displayed. 4. Fills a 1080p screen • 1080p and 1080i - The center of the screen. 5. Use...
... the remote. 2. The VIEW MODE menu is open. CHANGING THE SCREEN ASPECT RATIO The TV can resize the video content to the edges of the display image. • Standard Definition (480i and 480p) - Each mode displays the picture differently. Not available. • Wide stretches a 4:3 aspect ratio picture to fit while the menu is displayed. 4. Fills a 1080p screen • 1080p and 1080i - The center of the screen. 5. Use...

User Manual English
Page 44
... remote. Highlight the guided setup you want to use guided setup: 1. Highlight Guided Setup and press OK. To use and press OK: • Channel Setup - USING THE INFO WINDOW The Info Window can be displayed by pressing the INFO or GUIDE button on the way? 4 USING THE GUIDED SETUP MENU Using Guided Setup The TV's Setup App can be used to easily set up the TV channel or to connect the TV with your network. Press the MENU button on -screen instructions. Set...
... remote. Highlight the guided setup you want to use guided setup: 1. Highlight Guided Setup and press OK. To use and press OK: • Channel Setup - USING THE INFO WINDOW The Info Window can be displayed by pressing the INFO or GUIDE button on the way? 4 USING THE GUIDED SETUP MENU Using Guided Setup The TV's Setup App can be used to easily set up the TV channel or to connect the TV with your network. Press the MENU button on -screen instructions. Set...

User Manual English
Page 49
... displays "No Signal." • Press the INPUT button on the remote control to select a different input source. • If you are using an antenna, the signal strength of occurrences are connected to a window for the best signal. see your devices with 480i input, press the button on the remote to the TV, scan for channels. See Adjusting the Audio Settings on the TV don't look right. • Adjust the Color and Tint settings in the Picture menu...
... displays "No Signal." • Press the INPUT button on the remote control to select a different input source. • If you are using an antenna, the signal strength of occurrences are connected to a window for the best signal. see your devices with 480i input, press the button on the remote to the TV, scan for channels. See Adjusting the Audio Settings on the TV don't look right. • Adjust the Color and Tint settings in the Picture menu...

User Manual English
Page 54
... this warranty. ALL USER DATA AND DOWNLOADED APPLICATIONS STORED ON A attempt to resolve the issue informally with unreadable or removed serial numbers; (k) products This warranty contains a binding arbitration agreement and a class action (or copy) to the VIZIO service center. means that affords an equal under this warranty. Replacement parts and VIZIO's labor are 32 inches or larger will provide other VIZIO products must ship the "FACTORY RECERTIFIED...
... this warranty. ALL USER DATA AND DOWNLOADED APPLICATIONS STORED ON A attempt to resolve the issue informally with unreadable or removed serial numbers; (k) products This warranty contains a binding arbitration agreement and a class action (or copy) to the VIZIO service center. means that affords an equal under this warranty. Replacement parts and VIZIO's labor are 32 inches or larger will provide other VIZIO products must ship the "FACTORY RECERTIFIED...


