User Manual English
Page 12
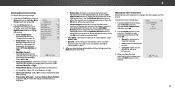
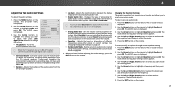
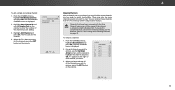
.... GUIDE Display the info window. OK Select the highlighted menu option. USING THE REMOTE INPUT Change the currently-displayed input. MUTE Turn the audio off . V BUTTON Open the USB media player.
.... GUIDE Display the info window. OK Select the highlighted menu option. USING THE REMOTE INPUT Change the currently-displayed input. MUTE Turn the audio off . V BUTTON Open the USB media player.

User Manual English
Page 13
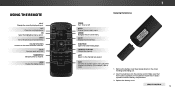
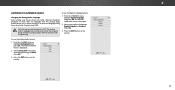
... channel last viewed. REMOTE CONTROL 3. NUMBER PAD Manually enter a channel. WIDE Switch the display mode. 1 Replacing the Batteries POWER Turn the TV on -screen menu. V BUTTON Open the USB media player. LAST Return to manually enter a digital sub-channel. (For example, 18-4 or 18-5.) 1. MENU Display the on or off or...
... channel last viewed. REMOTE CONTROL 3. NUMBER PAD Manually enter a channel. WIDE Switch the display mode. 1 Replacing the Batteries POWER Turn the TV on -screen menu. V BUTTON Open the USB media player. LAST Return to manually enter a digital sub-channel. (For example, 18-4 or 18-5.) 1. MENU Display the on or off or...

User Manual English
Page 19
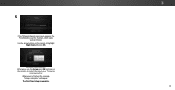
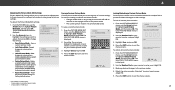
...an Ethernet cable, connect it to highlight your TV ready for use . The TV powers on a1nd the2Setup A3pp starts. 4 5 6 7 8 9 WIDE 0 - 3 Use the Arrow buttons on the remote to highlight your mode. To complete the first-time setup: 1 INPUT EXIT BACK OK MENU GUIDE VOL CH VOL CH Press the... Power button on the TV. 2 Choose your language of the steps necessary to highlight Home Use and press OK. If you have cable TV, select whether...
...an Ethernet cable, connect it to highlight your TV ready for use . The TV powers on a1nd the2Setup A3pp starts. 4 5 6 7 8 9 WIDE 0 - 3 Use the Arrow buttons on the remote to highlight your mode. To complete the first-time setup: 1 INPUT EXIT BACK OK MENU GUIDE VOL CH VOL CH Press the... Power button on the TV. 2 Choose your language of the steps necessary to highlight Home Use and press OK. If you have cable TV, select whether...
User Manual English
Page 20
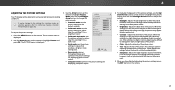
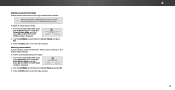
Use the arrow buttons on the remote to select the input your TV source is connected to. Note: Number of ports may differ by TV. The First-Time Setup is complete." Otherwise, use the Arrow and OK buttons on the remote to scan for channels, which takes several minutes. When you are finished, the message "Setup is complete. 3 20 will need to highlight Begin Scan and press OK. 5 If the TV Signal channel scan screen appears, the TV will appear.
Use the arrow buttons on the remote to select the input your TV source is connected to. Note: Number of ports may differ by TV. The First-Time Setup is complete." Otherwise, use the Arrow and OK buttons on the remote to scan for channels, which takes several minutes. When you are finished, the message "Setup is complete. 3 20 will need to highlight Begin Scan and press OK. 5 If the TV Signal channel scan screen appears, the TV will appear.

User Manual English
Page 21
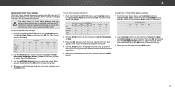
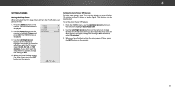
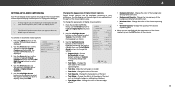
... features an easy-to recognize. You can be connected to highlight a menu option, and press the OK buWtitdoe n tZooosmelecNtortmhalat Poanpotraim oinc . The EXIT button will close the on the remote. The selected input is TV displayed. 2. Exit 2D 3D ABC Input Wide CC INPUT EXIT BACK OK VOL VOL...• Adjust the Channel settings • Set up Closed Captioning • Name Inputs • Adjust TV settings • Access the Guided Setup VIZIO TV SETTINGS Picture Audio Timers Channels CC Closed Captions Devices System Guided Setup To open the on-screen menu, press the MENU...
... features an easy-to recognize. You can be connected to highlight a menu option, and press the OK buWtitdoe n tZooosmelecNtortmhalat Poanpotraim oinc . The EXIT button will close the on the remote. The selected input is TV displayed. 2. Exit 2D 3D ABC Input Wide CC INPUT EXIT BACK OK VOL VOL...• Adjust the Channel settings • Set up Closed Captioning • Name Inputs • Adjust TV settings • Access the Guided Setup VIZIO TV SETTINGS Picture Audio Timers Channels CC Closed Captions Devices System Guided Setup To open the on-screen menu, press the MENU...

User Manual English
Page 22
...-5. 4 22 Not available. • Wide stretches a 4:3 aspect ratio picture to the edges of the display image. • Standard Definition (480i and 480p) - Use the Arrow buttons to highlight the aspect ratio you are added to left and right edges of the picture so that the picture keeps its original shape. Fills...
...-5. 4 22 Not available. • Wide stretches a 4:3 aspect ratio picture to the edges of the display image. • Standard Definition (480i and 480p) - Use the Arrow buttons to highlight the aspect ratio you are added to left and right edges of the picture so that the picture keeps its original shape. Fills...
User Manual English
Page 23
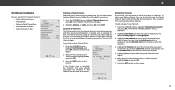
VIZIO PICTURE Picture Mode Backlight - More Picture Picture Mode Edit Color Calibration Standard + 85 + 50 + 50 + 63 +0 + 60 • Vivid mode sets the picture settings to values that picture setting, then use the Left/Right Arrow buttons to adjust the WsideettingZo:om Normal... may appear faded or washed STlim eeeprotoudt.PiisIcfttuitnhregeusiseAhuttdiiinnogdiasrtkooorhbigrihghotr too low, areas of the picture settings, use the Left/Right Arrow buttons to change the picture mode: • Standard mode sets the picture settings to the default settings. • Calibrated ...
VIZIO PICTURE Picture Mode Backlight - More Picture Picture Mode Edit Color Calibration Standard + 85 + 50 + 50 + 63 +0 + 60 • Vivid mode sets the picture settings to values that picture setting, then use the Left/Right Arrow buttons to adjust the WsideettingZo:om Normal... may appear faded or washed STlim eeeprotoudt.PiisIcfttuitnhregeusiseAhuttdiiinnogdiasrtkooorhbigrihghotr too low, areas of the picture settings, use the Left/Right Arrow buttons to change the picture mode: • Standard mode sets the picture settings to the default settings. • Calibrated ...
User Manual English
Page 24
... the shape of the displayed picture. When you have finished adusting the color temperature, press the EXIT button on page 24. • Black Detail - C • Gamma - VIZIO COLOR TEMPERATURE Normal Cool Computer 2. 4 Adjusting More Picture Settings To adjust more picture settings: 1. From... the PICTURE menu, use the Arrow buttons to compensate for watching film. Use the Arrow buttons to adjust the vertical size of the Gamma curve. Adjusts the average brightness of brightness. VIZIO MORE PICTURE Color Temperature Black Detail Backlight Control Reduce...
... the shape of the displayed picture. When you have finished adusting the color temperature, press the EXIT button on page 24. • Black Detail - C • Gamma - VIZIO COLOR TEMPERATURE Normal Cool Computer 2. 4 Adjusting More Picture Settings To adjust more picture settings: 1. From... the PICTURE menu, use the Arrow buttons to compensate for watching film. Use the Arrow buttons to adjust the vertical size of the Gamma curve. Adjusts the average brightness of brightness. VIZIO MORE PICTURE Color Temperature Black Detail Backlight Control Reduce...
User Manual English
Page 25
... Edit, and then press OK. Delete a custom picture mode. VIZIO PICTURE MODE EDIT - Vivid* VIZIO PICTURE MODE EDIT - To save groups of picture settings. WPSTilidrm eeeeepsr s ZoPoicmture NoArmudalio Panoramic the EXIT button to exit the menu screens. Save 4. From the PICTURE MODE EDIT... modes. The LOCK PICTURE MODE menu is displayed. 2. WFridoem tZhoeomPICTNUorRmEal MPOanDorEamEicDIT menu, use the Arrow buttons to the picture modes. 4. Highlight Save and press OK. 4. VIZIO LOCK PICTURE MODE Create a picture control PIN to prevent changes to highlight Save Picture Mode, and ...
... Edit, and then press OK. Delete a custom picture mode. VIZIO PICTURE MODE EDIT - Vivid* VIZIO PICTURE MODE EDIT - To save groups of picture settings. WPSTilidrm eeeeepsr s ZoPoicmture NoArmudalio Panoramic the EXIT button to exit the menu screens. Save 4. From the PICTURE MODE EDIT... modes. The LOCK PICTURE MODE menu is displayed. 2. WFridoem tZhoeomPICTNUorRmEal MPOanDorEamEicDIT menu, use the Arrow buttons to the picture modes. 4. Highlight Save and press OK. 4. VIZIO LOCK PICTURE MODE Create a picture control PIN to prevent changes to highlight Save Picture Mode, and ...
User Manual English
Page 26
... be restored to highlight Delete Picture Mode, and then press OK. To delete the user created Custom 1 picture mode, select the Delete button. Inputs assigned to a deleted custom picture mode become assigned to highlight Reset and press OK. 3. To delete a custom picture mode:... preset picture mode that are no longer needed can be deleted. To reset a customized preset picture mode: 1. Use the Left/Right Arrow buttons to factory defaults. The RESET PICTURE MODE window is displayed. Select Reset to restore Standard picture mode to highlight Delete and press OK. 3. ...
... be restored to highlight Delete Picture Mode, and then press OK. To delete the user created Custom 1 picture mode, select the Delete button. Inputs assigned to a deleted custom picture mode become assigned to highlight Reset and press OK. 3. To delete a custom picture mode:... preset picture mode that are no longer needed can be deleted. To reset a customized preset picture mode: 1. Use the Left/Right Arrow buttons to factory defaults. The RESET PICTURE MODE window is displayed. Select Reset to restore Standard picture mode to highlight Delete and press OK. 3. ...
User Manual English
Page 27
...Magenta Yellow Hue 0 0 0 0 25 -14 Saturation -1 5 -4 0 -2 0 Brightness -24 0 -22 0 0 0 Offset 0 0 0 Gain 0 0 0 2. Use the Left/Right Arrow buttons to adjust the value. To turn off or on. Color Tuner Red Green Blue Cyan Magenta Yellow Hue 0 0 0 0 25 -14 Saturation -1 5 -4 0 -2 0 Brightness -24 0 -22 0..., flat, and ramp test patterns. Only two color channels can be turned off . 4. Press the OK button and use the Arrow buttons to highlight Color Tuner, and then press OK. When you are finished with precisely set colors, and a ...
...Magenta Yellow Hue 0 0 0 0 25 -14 Saturation -1 5 -4 0 -2 0 Brightness -24 0 -22 0 0 0 Offset 0 0 0 Gain 0 0 0 2. Use the Left/Right Arrow buttons to adjust the value. To turn off or on. Color Tuner Red Green Blue Cyan Magenta Yellow Hue 0 0 0 0 25 -14 Saturation -1 5 -4 0 -2 0 Brightness -24 0 -22 0..., flat, and ramp test patterns. Only two color channels can be turned off . 4. Press the OK button and use the Arrow buttons to highlight Color Tuner, and then press OK. When you are finished with precisely set colors, and a ...

User Manual English
Page 28
... Test Pattern menu is displayed. To disable the Flat Test Pattern, use the Arrow buttons to highlight Off. From the Color Tuner menu, use the Arrow buttons to highlight Off. Ramp Test Pattern Off 2. Use the Arrow buttons on the remote to highlight Color Tuner, and then press the Left/Right Arrow...menu is displayed. To hide the SMPTE Test Pattern, use the Left/Right Arrow buttons to highlight Off. 3. Use the Left/Right Arrow buttons to highlight Off. To hide the Ramp Test Pattern, use the Left/Right Arrow buttons to highlight Off. 3. Flat Test Pattern Off To show or hide the Flat...
... Test Pattern menu is displayed. To disable the Flat Test Pattern, use the Arrow buttons to highlight Off. From the Color Tuner menu, use the Arrow buttons to highlight Off. Ramp Test Pattern Off 2. Use the Arrow buttons on the remote to highlight Color Tuner, and then press the Left/Right Arrow...menu is displayed. To hide the SMPTE Test Pattern, use the Left/Right Arrow buttons to highlight Off. 3. Use the Left/Right Arrow buttons to highlight Off. To hide the Ramp Test Pattern, use the Left/Right Arrow buttons to highlight Off. 3. Flat Test Pattern Off To show or hide the Flat...
User Manual English
Page 29
... graphic equalizer has several pre-set modes and allows you are set audio mode: 1. Use the Arrow buttons to highlight Equalizer and press OK. To create, modify, or replace the single custom equalizer setting: 1. VIZIO AUDIO TV Speakers Surround Sound Balance - Deletes a custom audio mode created using either preset or custom settings...
... graphic equalizer has several pre-set modes and allows you are set audio mode: 1. Use the Arrow buttons to highlight Equalizer and press OK. To create, modify, or replace the single custom equalizer setting: 1. VIZIO AUDIO TV Speakers Surround Sound Balance - Deletes a custom audio mode created using either preset or custom settings...
User Manual English
Page 30
The on the remote. 4 30 Press the EXIT button on -screen menu is displayed. 3. Deleting the Custom Audio Mode To delete the custom audio mode that has been created: 1. The AUDIO menu is displayed. 2. The TV displays, "To delete the user created custom audio mode, select the Delete button." 4. Use the Arrow buttons to highlight Audio and press OK. Use the Arrow buttons on the remote. Highlight Delete and press OK. 5. Press the MENU button on the remote to highlight Delete Audio Mode and press OK.
The on the remote. 4 30 Press the EXIT button on -screen menu is displayed. 3. Deleting the Custom Audio Mode To delete the custom audio mode that has been created: 1. The AUDIO menu is displayed. 2. The TV displays, "To delete the user created custom audio mode, select the Delete button." 4. Use the Arrow buttons to highlight Audio and press OK. Use the Arrow buttons on the remote. Highlight Delete and press OK. 5. Press the MENU button on the remote to highlight Delete Audio Mode and press OK.
User Manual English
Page 31
... highlight the period of time. 1. If you have finished setting the sleep timer, press the EXIT button on the remote to change whether the TV will turn the TV off after a set period of time...CC Sleep Timer Picture Audio Network Settings Help 4 31 From the TIMERS menu, use the Up/Down Arrow buttons on the remote to highlight Auto Power Off. 2. When you don't want the sleep timer to activate,...30, 60, 90, 120, or 180 minutes. Press the MENU button on the remote. If you want the TV to go to Off. VIZIO TIMERS Sleep Timer Auto Power Off Off 10 minutes 3. When you ...
... highlight the period of time. 1. If you have finished setting the sleep timer, press the EXIT button on the remote to change whether the TV will turn the TV off after a set period of time...CC Sleep Timer Picture Audio Network Settings Help 4 31 From the TIMERS menu, use the Up/Down Arrow buttons on the remote to highlight Auto Power Off. 2. When you don't want the sleep timer to activate,...30, 60, 90, 120, or 180 minutes. Press the MENU button on the remote. If you want the TV to go to Off. VIZIO TIMERS Sleep Timer Auto Power Off Off 10 minutes 3. When you ...
User Manual English
Page 32
... channels to backspace. A channel scan is displayed. 2. WHidieghliZgohom t To NCohrmaanl nPealnoarnamdicenter the channel where you want to begin the scan. (Use the Left Arrow button to skip VIZIO CHANNELS Channels not searched Channel Source Find Channel Partial Channel Search Add Analog Channel Skip Channel Analog Audio Digital Language Cable Stereo English Selecting...
... channels to backspace. A channel scan is displayed. 2. WHidieghliZgohom t To NCohrmaanl nPealnoarnamdicenter the channel where you want to begin the scan. (Use the Left Arrow button to skip VIZIO CHANNELS Channels not searched Channel Source Find Channel Partial Channel Search Add Analog Channel Skip Channel Analog Audio Digital Language Cable Stereo English Selecting...
User Manual English
Page 33
... wish to highlight the channel and press OK. When you select. See Locking and Unlocking Channels on the remote to remove, press the EXIT button on the remote. VIZIO SKIP CHANNEL 1 Test 0 1 Test 1 P 1-2 Test 2 P 2 Test 3 2-2 Test 4 P 2-3 Test 5 3. Wide Zoom Normal Panoramic Exit 2D 3D ABC Input Wide CC Sleep Timer Picture Audio...
... wish to highlight the channel and press OK. When you select. See Locking and Unlocking Channels on the remote to remove, press the EXIT button on the remote. VIZIO SKIP CHANNEL 1 Test 0 1 Test 1 P 1-2 Test 2 P 2 Test 3 2-2 Test 4 P 2-3 Test 5 3. Wide Zoom Normal Panoramic Exit 2D 3D ABC Input Wide CC Sleep Timer Picture Audio...
User Manual English
Page 34
...using Secondary Audio Programming (SAP). From the CHANNELS menu, highlight Digital Language and press OK. Press OK. 3. Press OK. 3. Press the EXIT button on the remote. Select Stereo, SAP (secondary audio programming), or Mono. The DIGITAL LANGUAGE menu is displayed. 2. From the CHANNELS menu, highlight Analog... 2. The TV's Analog Audio feature allows you to listen to audio in SAP. VIZIO ANALOG AUDIO Stereo SAP Mono Wide Zoom Normal Panoramic Exit 2D 3D ABC Input Wide CC VIZIO DIGITAL LANGUAGE English Español Français Sleep Timer Picture Audio Network Settings ...
...using Secondary Audio Programming (SAP). From the CHANNELS menu, highlight Digital Language and press OK. Press OK. 3. Press OK. 3. Press the EXIT button on the remote. Select Stereo, SAP (secondary audio programming), or Mono. The DIGITAL LANGUAGE menu is displayed. 2. From the CHANNELS menu, highlight Analog... 2. The TV's Analog Audio feature allows you to listen to audio in SAP. VIZIO ANALOG AUDIO Stereo SAP Mono Wide Zoom Normal Panoramic Exit 2D 3D ABC Input Wide CC VIZIO DIGITAL LANGUAGE English Español Français Sleep Timer Picture Audio Network Settings ...
User Manual English
Page 35
...box. • Window Opacity - Press the MENU button on the remote to select Custom. Change the transparency of the text, such as shown. The Closed Captions menu does not appear when an HDMI input is displayed. VIZIO CLOSED CAPTIONS Closed Captions Analog Closed Captions Digital Closed ...Captions Digital Style Off CC1 CS1 3. Use the Arrow buttons on the remote to highlight Digital Style and press OK. 2. To change the ...
...box. • Window Opacity - Press the MENU button on the remote to select Custom. Change the transparency of the text, such as shown. The Closed Captions menu does not appear when an HDMI input is displayed. VIZIO CLOSED CAPTIONS Closed Captions Analog Closed Captions Digital Closed ...Captions Digital Style Off CC1 CS1 3. Use the Arrow buttons on the remote to highlight Digital Style and press OK. 2. To change the ...
User Manual English
Page 37
... Name changes to show the custom name that you want to rename and press OK. 4. Use the Arrow buttons on the remote. To use and press OK. -or- To enter a custom name: a. Input Port VIZIO NAME INPUT HDMI-1 DVD DVD_ abc def ghi j k l mn o p q r s t u v wx y z 0 123456789 .@# .c&#...228;oêmí Space OK Cancel Select the input name from a list of an input: 1. Press the MENU button on the remote to highlight Devices and press OK....
... Name changes to show the custom name that you want to rename and press OK. 4. Use the Arrow buttons on the remote. To use and press OK. -or- To enter a custom name: a. Input Port VIZIO NAME INPUT HDMI-1 DVD DVD_ abc def ghi j k l mn o p q r s t u v wx y z 0 123456789 .@# .c&#...228;oêmí Space OK Cancel Select the input name from a list of an input: 1. Press the MENU button on the remote to highlight Devices and press OK....


