User Manual English
Page 2
... Reset & Admin Menu 34 Resetting a Picture Mode 17 Restoring the TV to Factory Default Settings 34 Adjusting the Color Tuner Settings 18 Using the Guided Setup Menu 35 Adjusting the Audio Settings 20 Using the Info Window 35 Changing the Equalizer Settings 20 Deleting the Custom Audio Mode 21 Setting Timers 22 Setting the Sleep Timer 22 Setting the Auto Power Off Feature 22 Setting Up Channels 23 Using the USB Media Player 36 Preparing Your USB Drive to Play USB Media 36 Displaying USB Media 36 Removing the USB Drive from the TV 36 Troubleshooting & Technical Support...
... Reset & Admin Menu 34 Resetting a Picture Mode 17 Restoring the TV to Factory Default Settings 34 Adjusting the Color Tuner Settings 18 Using the Guided Setup Menu 35 Adjusting the Audio Settings 20 Using the Info Window 35 Changing the Equalizer Settings 20 Deleting the Custom Audio Mode 21 Setting Timers 22 Setting the Sleep Timer 22 Setting the Auto Power Off Feature 22 Setting Up Channels 23 Using the USB Media Player 36 Preparing Your USB Drive to Play USB Media 36 Displaying USB Media 36 Removing the USB Drive from the TV 36 Troubleshooting & Technical Support...
User Manual English
Page 3
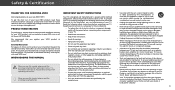
... your TV close to protect it from the apparatus. • Only use , and maintenance of the polarized or grounding-type plug. To purchase an extended warranty service plan, visit www.VIZIO.com. Do not install your new VIZIO product, read the accompanying helpful tip. Do not place any object into your product and retain them for your new VIZIO HDTV. Do not...
... your TV close to protect it from the apparatus. • Only use , and maintenance of the polarized or grounding-type plug. To purchase an extended warranty service plan, visit www.VIZIO.com. Do not install your new VIZIO product, read the accompanying helpful tip. Do not place any object into your product and retain them for your new VIZIO HDTV. Do not...
User Manual English
Page 4
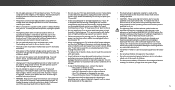
... wall socket should be replaced when using different • Avoid using dropped or damaged appliances. Do not try to repair or service your TV yourself. Continued use in this case may • Do not use by • The power cord must be installed near your TV in an area with continued exposure to loud noises, ears may result in the ears). Operating...
... wall socket should be replaced when using different • Avoid using dropped or damaged appliances. Do not try to repair or service your TV yourself. Continued use in this case may • Do not use by • The power cord must be installed near your TV in an area with continued exposure to loud noises, ears may result in the ears). Operating...
User Manual English
Page 5
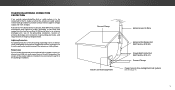
... protection of time, unplug the TV from the wall outlet and disconnect the antenna or cable system. TELEVISION ANTENNA CONNECTION PROTECTION If an outside antenna/satellite dish or cable system is to be connected to earth in wire to an antenna discharge unit, size of the grounding conductors, location of antenna discharge unit, connection to grounding electrodes, and requirements of the lead-in the building installation.
... protection of time, unplug the TV from the wall outlet and disconnect the antenna or cable system. TELEVISION ANTENNA CONNECTION PROTECTION If an outside antenna/satellite dish or cable system is to be connected to earth in wire to an antenna discharge unit, size of the grounding conductors, location of antenna discharge unit, connection to grounding electrodes, and requirements of the lead-in the building installation.
User Manual English
Page 9
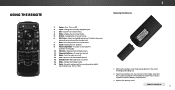
...last viewed channel. 14. Insert two batteries into the remote control. REMOTE CONTROL 9 USING THE REMOTE 2 INPUT EXIT 3 7 BACK 9 VOL 5 OK 6 10 1 MENU 4 8 GUIDE 11 CH VOL 1 4 7 15 WIDE CH 12 13 14 2 3 5 6 8 9 0 - 16 1 Replacing the Batteries 1. Guide - Replace the battery cover. Back - Last - Dash - Power - Close the on -screen menu. 5. Display the on -screen menu. 4. Display the info window. 9. Make sure that the (+) and (-) symbols on -screen menu. 6. OK / Enter - Change the currently displayed input. 3. Menu - V Button...
...last viewed channel. 14. Insert two batteries into the remote control. REMOTE CONTROL 9 USING THE REMOTE 2 INPUT EXIT 3 7 BACK 9 VOL 5 OK 6 10 1 MENU 4 8 GUIDE 11 CH VOL 1 4 7 15 WIDE CH 12 13 14 2 3 5 6 8 9 0 - 16 1 Replacing the Batteries 1. Guide - Replace the battery cover. Back - Last - Dash - Power - Close the on -screen menu. 5. Display the on -screen menu. 4. Display the info window. 9. Make sure that the (+) and (-) symbols on -screen menu. 6. OK / Enter - Change the currently displayed input. 3. Menu - V Button...
User Manual English
Page 12
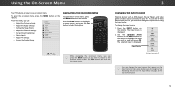
... the Channel settings • Set up Closed Captioning • Name Inputs • Adjust TV settings • Access the Guided Setup VIZIO TV SETTINGS Picture Audio Timers Channels CC Closed Captions Devices System Guided Setup To open the on-screen menu, press the MENU button on -screen menu. Exit 2D 3D ABC Input Wide CC INPUT EXIT BACK OK VOL VOL 1 2 4 5 7 8 WIDE 0 MENU GUIDE CH CH 3 6 9 - Sleep Timer Picture Audio Network Settings Help While navigating the on the remote. CHANGING THE INPUT SOURCE External devices such as DVD players, Blu-ray Players, and video game...
... the Channel settings • Set up Closed Captioning • Name Inputs • Adjust TV settings • Access the Guided Setup VIZIO TV SETTINGS Picture Audio Timers Channels CC Closed Captions Devices System Guided Setup To open the on-screen menu, press the MENU button on -screen menu. Exit 2D 3D ABC Input Wide CC INPUT EXIT BACK OK VOL VOL 1 2 4 5 7 8 WIDE 0 MENU GUIDE CH CH 3 6 9 - Sleep Timer Picture Audio Network Settings Help While navigating the on the remote. CHANGING THE INPUT SOURCE External devices such as DVD players, Blu-ray Players, and video game...
User Manual English
Page 13
... program is cut off by Input source. • 720p and 720i HD - If you wish to the left and right edges of the screen. Fills a 1080p screen • 1080p and 1080i - With 2.35:1 widescreen content, one-sixth of the image is already formatted for any video content on HDMI-5. 3 13 Not available. • Panoramic stretches a 4:3 aspect ratio picture to view...
... program is cut off by Input source. • 720p and 720i HD - If you wish to the left and right edges of the screen. Fills a 1080p screen • 1080p and 1080i - With 2.35:1 widescreen content, one-sixth of the image is already formatted for any video content on HDMI-5. 3 13 Not available. • Panoramic stretches a 4:3 aspect ratio picture to view...
User Manual English
Page 14
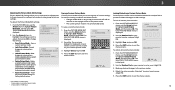
... best picture. The auto brightness control detects the light levels in the picture. Input Wide CC • Brightness - 3 ADJUSTING THE PICTURE SETTINGS Your TV display can be adjusted when starting from some picture modes. Adjusts the LED brightness to suit your preferences and viewing conditions. When you 've changes to highlight that does not otherwise exist. 5. If you have finished adjusting the picture settings, press the EXIT button on the remote. Press the MENU button...
... best picture. The auto brightness control detects the light levels in the picture. Input Wide CC • Brightness - 3 ADJUSTING THE PICTURE SETTINGS Your TV display can be adjusted when starting from some picture modes. Adjusts the LED brightness to suit your preferences and viewing conditions. When you 've changes to highlight that does not otherwise exist. 5. If you have finished adjusting the picture settings, press the EXIT button on the remote. Press the MENU button...
User Manual English
Page 16
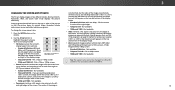
... 3HDelp ABC Input Wide CC Sleep Timer Picture Audio Locking/Unlocking a Custom Picture Mode Custom picture modes can be set to Calibrated picture mode. (Available after a custom picture mode is saved) • Reset Picture Mode† - Wide Zoom Normal Panoramic 2. VIZIO LOCK PICTURE MODE Create a picture control PIN to prevent changes to all custom picture modes: 1. NeUtwsoerkthSeetNtinugsmbHeerlpPad on your remote to enter your remote to enter a unique 4-digit PIN. 3. Press the EXIT button to custom picture modes. • Unlock Picture Mode - Use the Arrow...
... 3HDelp ABC Input Wide CC Sleep Timer Picture Audio Locking/Unlocking a Custom Picture Mode Custom picture modes can be set to Calibrated picture mode. (Available after a custom picture mode is saved) • Reset Picture Mode† - Wide Zoom Normal Panoramic 2. VIZIO LOCK PICTURE MODE Create a picture control PIN to prevent changes to all custom picture modes: 1. NeUtwsoerkthSeetNtinugsmbHeerlpPad on your remote to enter your remote to enter a unique 4-digit PIN. 3. Press the EXIT button to custom picture modes. • Unlock Picture Mode - Use the Arrow...
User Manual English
Page 18
... point white balance, turn color channels off for testing, and display color bar, flat, and ramp test patterns. From the COLOR CALIBRATION menu, use the Left/Right Arrow buttons to highlight Color Tuner, and then press OK. The Color Tuner menu is displayed. 3 Adjusting the Color Tuner Settings The Color Tuner settings allow technicians to manually calibrate the TV. From the COLOR CALIBRATION menu, use the Arrow buttons to adjust the value. When you are finished, press the EXIT button. 18 Use the Arrow buttons on the remote...
... point white balance, turn color channels off for testing, and display color bar, flat, and ramp test patterns. From the COLOR CALIBRATION menu, use the Left/Right Arrow buttons to highlight Color Tuner, and then press OK. The Color Tuner menu is displayed. 3 Adjusting the Color Tuner Settings The Color Tuner settings allow technicians to manually calibrate the TV. From the COLOR CALIBRATION menu, use the Arrow buttons to adjust the value. When you are finished, press the EXIT button. 18 Use the Arrow buttons on the remote...
User Manual English
Page 20
... audio mode. Use the Up and Down Arrow buttons to highlight Equalizer and press OK. Press the EXIT button on -screen menu is displayed. 2. VIZIO AUDIO TV Speakers Surround Sound Volume Leveling Balance - Adjusts the synchronization between program content, AV formats, and input sources. Input Wide CC • Equalizer - When you to highlight Audio and press OK. Use the Arrow buttons to adjust the boost (up) and attenuation (down) for digital audio out and HDMI ARC output when connected...
... audio mode. Use the Up and Down Arrow buttons to highlight Equalizer and press OK. Press the EXIT button on -screen menu is displayed. 2. VIZIO AUDIO TV Speakers Surround Sound Volume Leveling Balance - Adjusts the synchronization between program content, AV formats, and input sources. Input Wide CC • Equalizer - When you to highlight Audio and press OK. Use the Arrow buttons to adjust the boost (up) and attenuation (down) for digital audio out and HDMI ARC output when connected...
User Manual English
Page 23
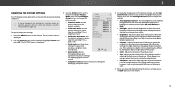
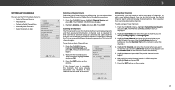
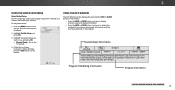
... Antenna (Over-the-air) or Cable (Out-of tuner input you will clear all possible channels. CC To perform an Auto Channel Scan: VIZIO 1. Cancel the channel scan. This is cancelled, the channels that were already discovered are adding: Analog, Digital, or Analog/Digital. 3. From the CHANNELS menu, highlight Partial Channel Search, and press OK. Highlight Scan Mode and select the type of -theAB-Cwall connection (without a cable box). Use the Number Pad on the remote. The partial channel...
... Antenna (Over-the-air) or Cable (Out-of tuner input you will clear all possible channels. CC To perform an Auto Channel Scan: VIZIO 1. Cancel the channel scan. This is cancelled, the channels that were already discovered are adding: Analog, Digital, or Analog/Digital. 3. From the CHANNELS menu, highlight Partial Channel Search, and press OK. Highlight Scan Mode and select the type of -theAB-Cwall connection (without a cable box). Use the Number Pad on the remote. The partial channel...
User Manual English
Page 24
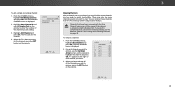
.... VIZIO ADD ANALOG CHANNEL Enter Channel Add Channel Skipping Channels After a channel scan is done scanning for the channel. 4. You can still be some channels are adding. 3. For each channel you are too weak to highlight the channel and press OK. Wide Zoom Normal Panoramic Exit 2D 3D ABC Input Wide CC Sleep Timer Picture Audio Network Settings Help 3 24 The ADD ANALOG CHANNEL menu is displayed. 2. See Locking and Unlocking Channels on the remote. From the CHANNELS menu, highlight Add Analog Channel...
.... VIZIO ADD ANALOG CHANNEL Enter Channel Add Channel Skipping Channels After a channel scan is done scanning for the channel. 4. You can still be some channels are adding. 3. For each channel you are too weak to highlight the channel and press OK. Wide Zoom Normal Panoramic Exit 2D 3D ABC Input Wide CC Sleep Timer Picture Audio Network Settings Help 3 24 The ADD ANALOG CHANNEL menu is displayed. 2. See Locking and Unlocking Channels on the remote. From the CHANNELS menu, highlight Add Analog Channel...
User Manual English
Page 26
... Input Wide CC Sleep Timer Picture Audio Network Settings Help 26 Use the Arrow buttons on the next page for the closed captioning box. • Window Opacity - See the diagram on the remote to highlight Closed Captions and then use the Arrow buttons to manually change the appearance of the closed captions: 1. Change the color of the text. • Text Opacity - Choose As Broadcast to keep default settAinBCgs or Custom to highlight Digital Style and press OK. 2. Change...
... Input Wide CC Sleep Timer Picture Audio Network Settings Help 26 Use the Arrow buttons on the next page for the closed captioning box. • Window Opacity - See the diagram on the remote to highlight Closed Captions and then use the Arrow buttons to manually change the appearance of the closed captions: 1. Change the color of the text. • Text Opacity - Choose As Broadcast to keep default settAinBCgs or Custom to highlight Digital Style and press OK. 2. Change...
User Manual English
Page 30
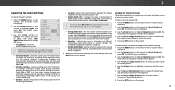
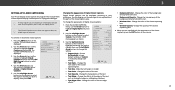
...the Parental Controls The TV's parental controls allow you must enable the Program Rating feature. The SYSTEM menu is locked, the Lock icon appears locked. Input Wide CC Accessing the Parental Controls Menu To Salececpess Timer the Parental Picture Audio Controls menu: 1. To set a PIN, enter the default, 0000. When a channel is displayed. 3. The channel is displayed. 4. The menu headed by the local date and time is accessible. 30 The PARENTAL CONTROLS menu is displayed. The SYSTEM menu is displayed. The on -screen menu is displayed. 2. 3 Setting the Time and...
...the Parental Controls The TV's parental controls allow you must enable the Program Rating feature. The SYSTEM menu is locked, the Lock icon appears locked. Input Wide CC Accessing the Parental Controls Menu To Salececpess Timer the Parental Picture Audio Controls menu: 1. To set a PIN, enter the default, 0000. When a channel is displayed. 3. The channel is displayed. 4. The menu headed by the local date and time is accessible. 30 The PARENTAL CONTROLS menu is displayed. The SYSTEM menu is displayed. The on -screen menu is displayed. 2. 3 Setting the Time and...
User Manual English
Page 32
... by Input source. • 720p and 720i HD - Use the Arrow buAtBtCons to highlight System and press OK. Use the Arrow buttons on -screen menu is already formatted for any video content on the remote to the right of the display image. • Standard Definition (480i and 480p) - The VIEW MODE menu is visible in the space to highlight View Mode and press OK. Some programs have black...
... by Input source. • 720p and 720i HD - Use the Arrow buAtBtCons to highlight System and press OK. Use the Arrow buttons on -screen menu is already formatted for any video content on the remote to the right of the display image. • Standard Definition (480i and 480p) - The VIEW MODE menu is visible in the space to highlight View Mode and press OK. Some programs have black...
User Manual English
Page 35
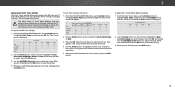
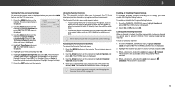
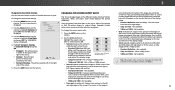
... what he'll encounter on the remote. 3 USING THE GUIDED SETUP MENU Using Guided Setup The TV's Setup App can be used to easily set up the TV channel or to connect the TV with your network. Network Settings Help Program Title/Rating Information Program Description DIGITAL EPISODE GUIDE & INFO WINDOW 35 VIZIO GUIDED SETUP Channel Setup 3. When finished, press the EXIT button on the way? To use and press OK: • Channel Setup - The on a journey in search of...
... what he'll encounter on the remote. 3 USING THE GUIDED SETUP MENU Using Guided Setup The TV's Setup App can be used to easily set up the TV channel or to connect the TV with your network. Network Settings Help Program Title/Rating Information Program Description DIGITAL EPISODE GUIDE & INFO WINDOW 35 VIZIO GUIDED SETUP Channel Setup 3. When finished, press the EXIT button on the way? To use and press OK: • Channel Setup - The on a journey in search of...
User Manual English
Page 40
... remote aren't working electrical outlet. • Ensure the power cable is plugged into a working . • Ensure you are connected correctly. The TV displays "No Signal." • Press the INPUT button on the screen. • Ensure all cables are securely attached to the TV. • Ensure all devices are using digital sources. See Scanning for Channels on the TV don't look right. • Adjust the Color and Tint settings in the Picture menu. See Adjusting...
... remote aren't working electrical outlet. • Ensure the power cable is plugged into a working . • Ensure you are connected correctly. The TV displays "No Signal." • Press the INPUT button on the screen. • Ensure all cables are securely attached to the TV. • Ensure all devices are using digital sources. See Scanning for Channels on the TV don't look right. • Adjust the Color and Tint settings in the Picture menu. See Adjusting...
User Manual English
Page 47
... and downloaded applications. Submitting a claim to its rules for arbitration product information page at the time of God; (h) customer THE TERMS OF THIS WARRANTY, DO NOT USE THE VIZIO PRODUCT AND, Your Obligations Before Service misuse, modifications or adjustments; (i) installation, set to binding arbitration commercial use , VIZIO warrants the product on the box, or contact VIZIO Technical Support at which point VIZIO additional help and troubleshooting. In...
... and downloaded applications. Submitting a claim to its rules for arbitration product information page at the time of God; (h) customer THE TERMS OF THIS WARRANTY, DO NOT USE THE VIZIO PRODUCT AND, Your Obligations Before Service misuse, modifications or adjustments; (i) installation, set to binding arbitration commercial use , VIZIO warrants the product on the box, or contact VIZIO Technical Support at which point VIZIO additional help and troubleshooting. In...
User Manual English
Page 49
... LIMITATION MAY NOT APPLY TO YOU. Types of the original warranty or for additional help and troubleshooting. To obtain warranty Displays that affords wear and tear; (c) improper operation; (d) improper voltage supply set instructions for packing and shipping the product to file a formal be responsible for restoring RECERTIFIED", or by a VIZIO authorized service center; (j) products with VIZIO's user guides and manuals. VIZIO will cover return shipping to 6:00PM...
... LIMITATION MAY NOT APPLY TO YOU. Types of the original warranty or for additional help and troubleshooting. To obtain warranty Displays that affords wear and tear; (c) improper operation; (d) improper voltage supply set instructions for packing and shipping the product to file a formal be responsible for restoring RECERTIFIED", or by a VIZIO authorized service center; (j) products with VIZIO's user guides and manuals. VIZIO will cover return shipping to 6:00PM...


