
User Manual
Page 6
... 20 Adjusting the Audio Settings 22 Setting Timers 23 Setting the Timer 23 Setting the Auto Power Off Feature 23 Setting Up Channels 24 Scanning for Channels 24 Skipping Channels 24 Listening to Alternate Audio 25 Changing the Analog Audio Language 25 Parental controls 26 Using Parental Controls 26 Enabling or Disabling Program...
... 20 Adjusting the Audio Settings 22 Setting Timers 23 Setting the Timer 23 Setting the Auto Power Off Feature 23 Setting Up Channels 24 Scanning for Channels 24 Skipping Channels 24 Listening to Alternate Audio 25 Changing the Analog Audio Language 25 Parental controls 26 Using Parental Controls 26 Enabling or Disabling Program...

User Manual
Page 20
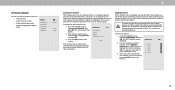
.... Use the Arrow buttons on the remote to highlight Off. When you wish to adjust. The COLOR TUNER menu is displayed. Red Hue 0 Saturation -1 Brightness -24 Offset 0 Gain 0 Green 0 5 0 0 0 Color Tuner Blue 0 -4 -22 0 0 Cyan 0 0 0 Magenta 25 -2 0 Yellow -14 0 0 ... the Flat Test Pattern: 1. Selecting a percentage immediately shows the flat pattern at the same time. 5. The Color Tuner menu is displayed. Red Hue 0 Saturation -1 Brightness -24 Offset 0 Gain 0 Green 0 5 0 0 0 Color Tuner Blue 0 -4 -22 0 0 Cyan 0 0 0 Magenta 25 -2 0 Yellow -14 0 0 2. ...
.... Use the Arrow buttons on the remote to highlight Off. When you wish to adjust. The COLOR TUNER menu is displayed. Red Hue 0 Saturation -1 Brightness -24 Offset 0 Gain 0 Green 0 5 0 0 0 Color Tuner Blue 0 -4 -22 0 0 Cyan 0 0 0 Magenta 25 -2 0 Yellow -14 0 0 ... the Flat Test Pattern: 1. Selecting a percentage immediately shows the flat pattern at the same time. 5. The Color Tuner menu is displayed. Red Hue 0 Saturation -1 Brightness -24 Offset 0 Gain 0 Green 0 5 0 0 0 Color Tuner Blue 0 -4 -22 0 0 Cyan 0 0 0 Magenta 25 -2 0 Yellow -14 0 0 2. ...
User Manual
Page 24
..., press the Exit button on the remote. Digitial : 8 2. Highlight Done and press OK. Press the Exit button on the remote. 0 Test 0 1 Test 1 2 Test 2 3 Test 3 4 Test 4 24 Skipping Channels After a channel scan is required for channels again. If you do not want to view. From the CHANNELS menu, highlight Skip Channel, and...
..., press the Exit button on the remote. Digitial : 8 2. Highlight Done and press OK. Press the Exit button on the remote. 0 Test 0 1 Test 1 2 Test 2 3 Test 3 4 Test 4 24 Skipping Channels After a channel scan is required for channels again. If you do not want to view. From the CHANNELS menu, highlight Skip Channel, and...

User Manual
Page 38
... HDMI Inputs Component Video Inputs Ethernet Input RF Atenna Input USB Audio Output OTHER Remote Control Model Power Consumption Standby Power Voltage OSD Language Certification D24hn-G9 24" 23.5" 21.83" x 14.78" x 6.18" (554.5 x 375.5 x 157.0mm) 21.83" x 13.15" x 2.06" (554.5 x 334.1 x 52.4mm) 6.17 lbs (2.80 kg) 5.95 lbs...
... HDMI Inputs Component Video Inputs Ethernet Input RF Atenna Input USB Audio Output OTHER Remote Control Model Power Consumption Standby Power Voltage OSD Language Certification D24hn-G9 24" 23.5" 21.83" x 14.78" x 6.18" (554.5 x 375.5 x 157.0mm) 21.83" x 13.15" x 2.06" (554.5 x 334.1 x 52.4mm) 6.17 lbs (2.80 kg) 5.95 lbs...


