User Manual
Page 3
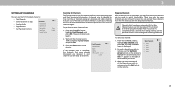
...other moisture. - iii Ensure that may cause fire or electric shock. • Do not install your TV. - Overloading can damage the remote control or injure the operator. Opening or removing the back cover may cause fire or electric shock. • Do not touch the power cord... for example, cupboards or bookcases) without any noticeable • Do not allow children to hang onto the product. • Store the accessories (remote, batteries, etc.) in a location safely out of the reach of children. • The American Academy of Pediatrics discourages television viewing for use ...
...other moisture. - iii Ensure that may cause fire or electric shock. • Do not install your TV. - Overloading can damage the remote control or injure the operator. Opening or removing the back cover may cause fire or electric shock. • Do not touch the power cord... for example, cupboards or bookcases) without any noticeable • Do not allow children to hang onto the product. • Store the accessories (remote, batteries, etc.) in a location safely out of the reach of children. • The American Academy of Pediatrics discourages television viewing for use ...
User Manual
Page 7
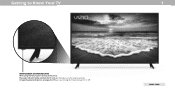
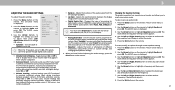
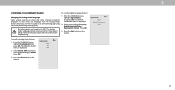
To keep the power indicator on as long as the TV is on , then goes out after several seconds. The power indicator flashes on when the TV turns on , see Turning the Power Indicator On or Off. FRONT PANEL 7 Getting to Know Your TV 1 REMOTE SENSOR & POWER INDICATOR When using the remote, aim it directly at this sensor.
To keep the power indicator on as long as the TV is on , then goes out after several seconds. The power indicator flashes on when the TV turns on , see Turning the Power Indicator On or Off. FRONT PANEL 7 Getting to Know Your TV 1 REMOTE SENSOR & POWER INDICATOR When using the remote, aim it directly at this sensor.
User Manual
Page 11
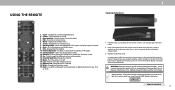
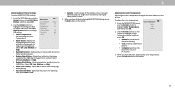
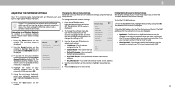
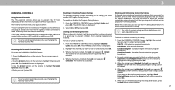
... digital sub-channel. (e.g. 18-4 or 18-5) Replacing the Batteries 1. When needed, VIZIO recommends replacing the batteries that the (+) and (-) symbols on the batteries match the (+) and (-) symbols inside the battery compartment. 3. REMOTE CONTROL 11 Power - Quickly launch the pictured app 4. Close the on the back ... in fire. Pic - Turn the audio on -screen menu 9. Change the Television mode. 19. Input - WARNING: Keep the remote control batteries away from children. vizio.com/environment. Last - Please ensure you properly dispose of the correct type. Mute -
... digital sub-channel. (e.g. 18-4 or 18-5) Replacing the Batteries 1. When needed, VIZIO recommends replacing the batteries that the (+) and (-) symbols on the batteries match the (+) and (-) symbols inside the battery compartment. 3. REMOTE CONTROL 11 Power - Quickly launch the pictured app 4. Close the on the back ... in fire. Pic - Turn the audio on -screen menu 9. Change the Television mode. 19. Input - WARNING: Keep the remote control batteries away from children. vizio.com/environment. Last - Please ensure you properly dispose of the correct type. Mute -
User Manual
Page 12
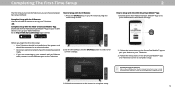
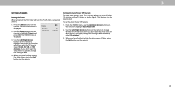
... for detailed instructions on how to install your Television. 3. You can choose between two setup methods: Complete Setup with the IR Remote: Use the included IR remote to set up your VIZIO Television. Follow the instructions on the SmartCast Mobile™ app and Television screen to complete setup. 12 Completing The First-Time...
... for detailed instructions on how to install your Television. 3. You can choose between two setup methods: Complete Setup with the IR Remote: Use the included IR remote to set up your VIZIO Television. Follow the instructions on the SmartCast Mobile™ app and Television screen to complete setup. 12 Completing The First-Time...
User Manual
Page 13
... to make your TV, you can press the Back button at any time to return to view and press OK. See Renaming Devices on the remote. The Exit button will close the onscreen menu. To use one of these devices with your devices easy to -use on-screen menu. While navigating... the on the remote. To open the on-screen menu, press the Menu button on the remote to highlight the input you can : • Adjust the Picture settings • Adjust the Audio settings • Adjust the...
... to make your TV, you can press the Back button at any time to return to view and press OK. See Renaming Devices on the remote. The Exit button will close the onscreen menu. To use one of these devices with your devices easy to -use on-screen menu. While navigating... the on the remote. To open the on-screen menu, press the Menu button on the remote to highlight the input you can : • Adjust the Picture settings • Adjust the Audio settings • Adjust the...
User Manual
Page 14
... for widescreen viewing (1.85:1 or 2.35:1), then black bars will appear on the top and bottom of the screen. Press the Wide button on the remote. 2. A 720p image will still appear on the top and bottom of the screen. Some programs have black bars on the top or sides of the...
... for widescreen viewing (1.85:1 or 2.35:1), then black bars will appear on the top and bottom of the screen. Press the Wide button on the remote. 2. A 720p image will still appear on the top and bottom of the screen. Some programs have black bars on the top or sides of the...

User Manual
Page 15
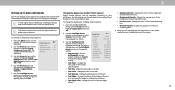
...Adjusts the intensity of picture elements. Adjusts the edge sharpness of the picture colors. • Tint - Press the Menu button on the remote. 14 Customizing picture settings will not produce detail that produce a brighter, more vivid picture. Backlight cannot be difficult to operate the TV. ...Picture Mode). 3 ADJUSTING THE PICTURE SETTINGS Your TV display can be used to sharpen non-HD (high definition) content; The on the remote to highlight Picture Mode, then use the Left/Right Arrow buttons to adjust the setting: • Auto Brightness Control - The auto brightness ...
...Adjusts the intensity of picture elements. Adjusts the edge sharpness of the picture colors. • Tint - Press the Menu button on the remote. 14 Customizing picture settings will not produce detail that produce a brighter, more vivid picture. Backlight cannot be difficult to operate the TV. ...Picture Mode). 3 ADJUSTING THE PICTURE SETTINGS Your TV display can be used to sharpen non-HD (high definition) content; The on the remote to highlight Picture Mode, then use the Left/Right Arrow buttons to adjust the setting: • Auto Brightness Control - The auto brightness ...
User Manual
Page 16
...To adjust the color temperature: Back Color Temperature 1. When you have finished adjusting MORE PICTURE Settings, press the Exit button on the remote. Reduces blue in the image caused by the digitizing of the Gamma curve. Diminishes artifacts in scenes with fast action. Select On ...: Pure Cinema Auto • Color Temperature - Use lower Gamma values for large areas of brightness. Use the Arrow buttons on the remote. 15 When you wish Backlight Control On to adjust, then press the Left/ Reduce Noise Right Arrow buttons to highlight a color temperature...
...To adjust the color temperature: Back Color Temperature 1. When you have finished adjusting MORE PICTURE Settings, press the Exit button on the remote. Reduces blue in the image caused by the digitizing of the Gamma curve. Diminishes artifacts in scenes with fast action. Select On ...: Pure Cinema Auto • Color Temperature - Use lower Gamma values for large areas of brightness. Use the Arrow buttons on the remote. 15 When you wish Backlight Control On to adjust, then press the Left/ Reduce Noise Right Arrow buttons to highlight a color temperature...

User Manual
Page 17
... of the preset mode. • The custom picture mode is set, then lock/unlock. Use either on-screen keyboard to enter a name for your remote to enter a unique 4-digit PIN. Press the Exit button to custom picture modes. Use the Arrow buttons to highlight the setting you wish to adjust..., and then press OK. The LOCK PICTURE MODE menu is set, then you will add an asterisk on the remote. 4. Then turn on Lock Picture Mode. † Only available on your remote to enter your 4-digit PIN. 4. From the PICTURE MODE EDIT menu, use the Arrow buttons to highlight Picture ...
... of the preset mode. • The custom picture mode is set, then lock/unlock. Use either on-screen keyboard to enter a name for your remote to enter a unique 4-digit PIN. Press the Exit button to custom picture modes. Use the Arrow buttons to highlight the setting you wish to adjust..., and then press OK. The LOCK PICTURE MODE menu is set, then you will add an asterisk on the remote. 4. Then turn on Lock Picture Mode. † Only available on your remote to enter your 4-digit PIN. 4. From the PICTURE MODE EDIT menu, use the Arrow buttons to highlight Picture ...
User Manual
Page 19
... turned off at the same time. 5. Press the OK button and use the Arrow buttons to adjust the value. Use the Arrow buttons on the remote to highlight the Hue, Saturation, Brightness, Offset, or Gain of the color you are finished press the OK button to save the setting. 3. The COLOR..., and ramp test patterns. From the Color Tuner menu, use the Arrow buttons to turn color channels off or on the remote to adjust. Use the Arrow buttons on the remote to highlight the Gain and Color values you to adjust the HSB color and 11 point white balance, turn the color...
... turned off at the same time. 5. Press the OK button and use the Arrow buttons to adjust the value. Use the Arrow buttons on the remote to highlight the Hue, Saturation, Brightness, Offset, or Gain of the color you are finished press the OK button to save the setting. 3. The COLOR..., and ramp test patterns. From the Color Tuner menu, use the Arrow buttons to turn color channels off or on the remote to adjust. Use the Arrow buttons on the remote to highlight the Gain and Color values you to adjust the HSB color and 11 point white balance, turn the color...

User Manual
Page 20
...: 1. When you are finished, press the Exit button. 19 When you are finished, press the Exit button. 2. Use the Arrow buttons on the remote to show or hide the Flat Test Pattern: 1. From the Color Tuner menu, use the Arrow buttons to highlight Color Tuner, and then press the...the Color Tuner menu, use the Left/Right Arrow buttons to select the color for the flat test pattern. Use the Arrow buttons on the remote to select the percentage brightness for the ramp test pattern. Selecting a color immediately shows that brightness. -or- When you are finished, press the...
...: 1. When you are finished, press the Exit button. 19 When you are finished, press the Exit button. 2. Use the Arrow buttons on the remote to show or hide the Flat Test Pattern: 1. From the Color Tuner menu, use the Arrow buttons to highlight Color Tuner, and then press the...the Color Tuner menu, use the Left/Right Arrow buttons to select the color for the flat test pattern. Use the Arrow buttons on the remote to select the percentage brightness for the ramp test pattern. Selecting a color immediately shows that brightness. -or- When you are finished, press the...

User Manual
Page 21
Uniformity Analyzer Test Pattern Off 2. Use the Left/Right Arrow buttons to highlight On to highlight Off. Use the Arrow buttons on the remote to show or hide the Uniformity Analyzer Test Pattern: 1. To hide the Uniformity Analyzer Test Pattern, use the Arrow buttons to highlight Off. 3. To show ...
Uniformity Analyzer Test Pattern Off 2. Use the Left/Right Arrow buttons to highlight On to highlight Off. Use the Arrow buttons on the remote to show or hide the Uniformity Analyzer Test Pattern: 1. To hide the Uniformity Analyzer Test Pattern, use the Arrow buttons to highlight Off. 3. To show ...
User Manual
Page 22
...When the TV speakers are controlling the volume with more than two channels (3.0, 5.0, or 5.1, for the frequency. Press the Menu button on the remote. The AUDIO menu is displayed. 3. The Audio Mode and equalizer settings screen appears. • Surround Sound - Volume leveling uses DTS TruVolume&#...Digital Audio Out Analog Audio Out Equalizer Back Auto On On Off 0 0 Auto Fixed • Balance - Use the Arrow buttons on the remote. • Speakers - Surround sound uses DTS TruSurround™ to reflect the mode. 5. Adjusts the synchronization between program content, AV formats,...
...When the TV speakers are controlling the volume with more than two channels (3.0, 5.0, or 5.1, for the frequency. Press the Menu button on the remote. The AUDIO menu is displayed. 3. The Audio Mode and equalizer settings screen appears. • Surround Sound - Volume leveling uses DTS TruVolume&#...Digital Audio Out Analog Audio Out Equalizer Back Auto On On Off 0 0 Auto Fixed • Balance - Use the Arrow buttons on the remote. • Speakers - Surround sound uses DTS TruSurround™ to reflect the mode. 5. Adjusts the synchronization between program content, AV formats,...
User Manual
Page 23
...and OK buttons to enter the TV's MAC address in the router's settings. Finding MAC Addresses for Network Setup The security settings on the remote to a network with an Ethernet (Cat 5) cable. • Wireless MAC - The Wireless (WiFi) MAC address may be needed to... The subnet Exit 2D Save Cancel • Default Gateway - Your preferred domain name server address. • Alt. Press the Exit button on the remote. Connecting to a Wireless Network To connect to the TV. • Subnet Mask - To change advanced network settings: 1. DNS Server RJ45 MAC 0:0:0:0:0:0...
...and OK buttons to enter the TV's MAC address in the router's settings. Finding MAC Addresses for Network Setup The security settings on the remote to a network with an Ethernet (Cat 5) cable. • Wireless MAC - The Wireless (WiFi) MAC address may be needed to... The subnet Exit 2D Save Cancel • Default Gateway - Your preferred domain name server address. • Alt. Press the Exit button on the remote. Connecting to a Wireless Network To connect to the TV. • Subnet Mask - To change advanced network settings: 1. DNS Server RJ45 MAC 0:0:0:0:0:0...

User Manual
Page 24
Using the on the remote. 3 23 This is used to connect to a wireless network whose network name (SSID) is displayed. 2. The TEST CONNECTION screen displays the connection method, network name, ... .@# äêí Space Connect Testing Your Network Connection To test your network's name (SSID), then highlight Connect and press OK 3. Using the on the remote. From the NETWORK menu, highlight Hidden Network and press OK. Press the Exit button on -screen keyboard, enter your network connection: 1. Connecting to a Hidden Network...
Using the on the remote. 3 23 This is used to connect to a wireless network whose network name (SSID) is displayed. 2. The TEST CONNECTION screen displays the connection method, network name, ... .@# äêí Space Connect Testing Your Network Connection To test your network's name (SSID), then highlight Connect and press OK 3. Using the on the remote. From the NETWORK menu, highlight Hidden Network and press OK. Press the Exit button on -screen keyboard, enter your network connection: 1. Connecting to a Hidden Network...
User Manual
Page 25
..., change the setting to sleep: 30, 60, 90, 120, or 180 minutes. Use the Left/Right Arrow buttons on the remote to highlight Timers and press OK. The on the remote. The TIMERS menu is displayed. This feature can be deactivated. To set by default to turn off after which you have... finished setting the sleep timer, press the Exit button on the remote to highlight Auto Power Off. 2. When you don't want the TV to highlight the period of time. 1. SETTING TIMERS Setting the Timer When activated, the...
..., change the setting to sleep: 30, 60, 90, 120, or 180 minutes. Use the Left/Right Arrow buttons on the remote to highlight Timers and press OK. The on the remote. The TIMERS menu is displayed. This feature can be deactivated. To set by default to turn off after which you have... finished setting the sleep timer, press the Exit button on the remote to highlight Auto Power Off. 2. When you don't want the TV to highlight the period of time. 1. SETTING TIMERS Setting the Timer When activated, the...
User Manual
Page 26
... 1. There may also be viewed if the channel is cancelled, the channels that some channels you wish to remove, press the Exit button on the remote. 25 From the CHANNELS menu, Back Skip Channels highlight Skip Channel, and press OK. A channel scan is completed, you select. 3. From the... with the Skip Channel feature can still be some channels are retained. If you wish to remove, use the Up/Down Arrow buttons on the remote. 3 SETTING UP CHANNELS You can use the TV's Channels menu to: • Find Channels • Select channels to skip Channels • ...
... 1. There may also be viewed if the channel is cancelled, the channels that some channels you wish to remove, press the Exit button on the remote. 25 From the CHANNELS menu, Back Skip Channels highlight Skip Channel, and press OK. A channel scan is completed, you select. 3. From the... with the Skip Channel feature can still be some channels are retained. If you wish to remove, use the Up/Down Arrow buttons on the remote. 3 SETTING UP CHANNELS You can use the TV's Channels menu to: • Find Channels • Select channels to skip Channels • ...
User Manual
Page 27
...is being broadcast with Secondary Audio Programming. Select your preferred language: English, Spanish/Video Description, French. Press the Exit button on the remote. 3 26 The TV's Analog Audio feature allows you to listen to audio in SAP. From the CHANNELS menu, highlight Analog Audio and... Stereo press OK. Select Stereo, SAP (secondary audio programming), or Mono. Press OK. 3. Mono 2. Press the Exit button on the remote. To use the Analog Audio feature: Back Analog Audio 1. Press OK. 3. The ANALOG AUDIO SAP menu is displayed. Not all programs are broadcast...
...is being broadcast with Secondary Audio Programming. Select your preferred language: English, Spanish/Video Description, French. Press the Exit button on the remote. 3 26 The TV's Analog Audio feature allows you to listen to audio in SAP. From the CHANNELS menu, highlight Analog Audio and... Stereo press OK. Select Stereo, SAP (secondary audio programming), or Mono. Press OK. 3. Mono 2. Press the Exit button on the remote. To use the Analog Audio feature: Back Analog Audio 1. Press OK. 3. The ANALOG AUDIO SAP menu is displayed. Not all programs are broadcast...
User Manual
Page 28
... When the rating type is displayed. 2. If you may wish to lock or unlock and press OK. 3. Press the Menu button on the remote to highlight Parental Controls and press OK. 4. To enable or disable the Program Rating feature: 1. Blocking and Unblocking Content by its rating. Canadian... to highlight Channels and press OK. To block or unblock content by Rating A channel may not want to block content based on the remote. 27 From the PARENTAL CONTROLS menu, highlight the content type you can be inaccessible. USA Movie - USA movie broadcasts. Canadian English television...
... When the rating type is displayed. 2. If you may wish to lock or unlock and press OK. 3. Press the Menu button on the remote to highlight Parental Controls and press OK. 4. To enable or disable the Program Rating feature: 1. Blocking and Unblocking Content by its rating. Canadian... to highlight Channels and press OK. To block or unblock content by Rating A channel may not want to block content based on the remote. 27 From the PARENTAL CONTROLS menu, highlight the content type you can be inaccessible. USA Movie - USA movie broadcasts. Canadian English television...
User Manual
Page 29
...8226; Text Opacity - The Analog Closed Captions Digital Closed Captions CC1 CS1 CLOSED CAPTIONS menu is selected. Use the Arrow buttons on the remote to select the caption channel you wish to change, then use the Arrow buttons to highlight Closed Captions and press OK. Use the ...satisfied with closed captions, press the Exit button on -screen menu is Closed Captions Back displayed. Use the Up/Down Arrow buttons on the remote to highlight Digital Style and press OK. 2. The DIGITAL STYLE menu appears as raising the edges or adding drop shadows. • Text ...
...8226; Text Opacity - The Analog Closed Captions Digital Closed Captions CC1 CS1 CLOSED CAPTIONS menu is selected. Use the Arrow buttons on the remote to select the caption channel you wish to change, then use the Arrow buttons to highlight Closed Captions and press OK. Use the ...satisfied with closed captions, press the Exit button on -screen menu is Closed Captions Back displayed. Use the Up/Down Arrow buttons on the remote to highlight Digital Style and press OK. 2. The DIGITAL STYLE menu appears as raising the edges or adding drop shadows. • Text ...


