User Manual
Page 2
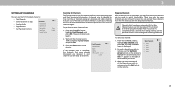
...the manufacturer, or sold with one wider than the voltage specified. shock. warranty, VIZIO offers on your TV. To ensure reliable operation of your new VIZIO TV. When you are no missing or damaged parts. To prevent your TV. These • Do not block any heat sources such as a radiator, heater..., oven, amplifier etc. where they exit from being walked on your TV. • Your TV should be observed for your VIZIO product, visit our website at www.VIZIO.com or call toll free at least three feet should be sure these instructions. • Unplug the...
...the manufacturer, or sold with one wider than the voltage specified. shock. warranty, VIZIO offers on your TV. To ensure reliable operation of your new VIZIO TV. When you are no missing or damaged parts. To prevent your TV. These • Do not block any heat sources such as a radiator, heater..., oven, amplifier etc. where they exit from being walked on your TV. • Your TV should be observed for your VIZIO product, visit our website at www.VIZIO.com or call toll free at least three feet should be sure these instructions. • Unplug the...
User Manual
Page 3
... • simple precautions such as: • Using cabinets or stands recommended by qualified service personnel only. discomfort. • Install the TV where it will not be used for long period of time. presence of un-isolated, dangerous voltage within an equilateral triangle is exposed to... persons. • Do not overload power strips and extension cords. If your TV to excessive heat such as sunshine, fire or the like. • If any servicing other than that contained in the operating instructions ...
... • simple precautions such as: • Using cabinets or stands recommended by qualified service personnel only. discomfort. • Install the TV where it will not be used for long period of time. presence of un-isolated, dangerous voltage within an equilateral triangle is exposed to... persons. • Do not overload power strips and extension cords. If your TV to excessive heat such as sunshine, fire or the like. • If any servicing other than that contained in the operating instructions ...
User Manual
Page 4
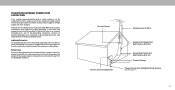
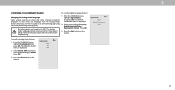
... sure that the antenna or cable system is left unattended or unused for long periods of time, unplug the TV from the wall outlet and disconnect the antenna or cable system. Article 810 of the National Electrical Code, ANSI/NFPSA 70, provides information with ...satellite dish or cable system is to be connected to grounding electrodes, and requirements of the grounding electrode. Lightning Protection For added protection of the TV during a lightning storm or when it could fall into such power lines or circuits. Ground Clamp Antenna Lead In Wire Electric Service Equipment Antenna ...
... sure that the antenna or cable system is left unattended or unused for long periods of time, unplug the TV from the wall outlet and disconnect the antenna or cable system. Article 810 of the National Electrical Code, ANSI/NFPSA 70, provides information with ...satellite dish or cable system is to be connected to grounding electrodes, and requirements of the grounding electrode. Lightning Protection For added protection of the TV during a lightning storm or when it could fall into such power lines or circuits. Ground Clamp Antenna Lead In Wire Electric Service Equipment Antenna ...
User Manual
Page 6
Table Of Contents Getting to Know Your TV 7 Rear Panel D24f-F1 8 Rear Panel D32f-F1, D43f-F1, & D50f-F1 9 Replacing the Batteries 11 Completing The First-Time Setup 12 Using...SmartCast TVSM 37 What can you do with SmartCast TVSM 37 How to Launch SmartCast TVSM 37 SmartCast TV 37 Playing USB Media 38 Playing USB Media 38 Preparing Your USB Drive to Play USB Media 38... TVing USB Media 38 Removing the USB Drive from the TV 38 Troubleshooting & Technical Support 42 Specifications 46 Specifications 47 Regulatory Information 50 Limited Warranty 51 Limited Warranty ...
Table Of Contents Getting to Know Your TV 7 Rear Panel D24f-F1 8 Rear Panel D32f-F1, D43f-F1, & D50f-F1 9 Replacing the Batteries 11 Completing The First-Time Setup 12 Using...SmartCast TVSM 37 What can you do with SmartCast TVSM 37 How to Launch SmartCast TVSM 37 SmartCast TV 37 Playing USB Media 38 Playing USB Media 38 Preparing Your USB Drive to Play USB Media 38... TVing USB Media 38 Removing the USB Drive from the TV 38 Troubleshooting & Technical Support 42 Specifications 46 Specifications 47 Regulatory Information 50 Limited Warranty 51 Limited Warranty ...
User Manual
Page 7
FRONT PANEL 7 To keep the power indicator on as long as the TV is on , then goes out after several seconds. The power indicator flashes on when the TV turns on , see Turning the Power Indicator On or Off. Getting to Know Your TV 1 REMOTE SENSOR & POWER INDICATOR When using the remote, aim it directly at this sensor.
FRONT PANEL 7 To keep the power indicator on as long as the TV is on , then goes out after several seconds. The power indicator flashes on when the TV turns on , see Turning the Power Indicator On or Off. Getting to Know Your TV 1 REMOTE SENSOR & POWER INDICATOR When using the remote, aim it directly at this sensor.
User Manual
Page 8
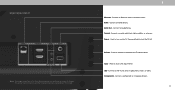
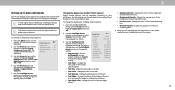
Audio Out - Power - Connect a USB thumb drive to access the input menu. HDMI - Press and hold to turn the TV off. Input - Press to play photo, music, or video. Press to headphones. USB - Connect an HDMI device. Connect a coaxial cable from cable, satellite, .... Press to turn on the model. 1 Ethernet - Components - Connect to increase or decrease the TV volume level. The actual number of ports and their locations may be subject to modem/ router. REAR PANEL D24F-F1 Note: The image shown here is for illustrative purposes only and may vary, depending on the...
Audio Out - Power - Connect a USB thumb drive to access the input menu. HDMI - Press and hold to turn the TV off. Input - Press to play photo, music, or video. Press to headphones. USB - Connect an HDMI device. Connect a coaxial cable from cable, satellite, .... Press to turn on the model. 1 Ethernet - Components - Connect to increase or decrease the TV volume level. The actual number of ports and their locations may be subject to modem/ router. REAR PANEL D24F-F1 Note: The image shown here is for illustrative purposes only and may vary, depending on the...
User Manual
Page 9
..., or antenna. Connect a component or composite devices. Connect an Ethernet cable to play photo, music, or video. Volume - Press to turn the TV off. HDMI - RCA Audio Out- Power - Input - Connect an optical/SPDIF audio device, such as sound bar. Press to access the input ...menu. 9 Press to change. REAR PANEL D32F-F1, D43F-F1, & D50F-F1 Note: The image shown here is for illustrative purposes only and may vary, depending on the TV. Components - Connect an RCA audio device, such as home audio receiver. Ethernet - Coaxial...
..., or antenna. Connect a component or composite devices. Connect an Ethernet cable to play photo, music, or video. Volume - Press to turn the TV off. HDMI - RCA Audio Out- Power - Input - Connect an optical/SPDIF audio device, such as sound bar. Press to access the input ...menu. 9 Press to change. REAR PANEL D32F-F1, D43F-F1, & D50F-F1 Note: The image shown here is for illustrative purposes only and may vary, depending on the TV. Components - Connect an RCA audio device, such as home audio receiver. Ethernet - Coaxial...
User Manual
Page 10
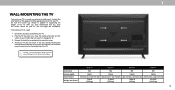
... of supporting the weight of this page to your TV. Installing a TV on a clean, flat, stable surface. To prevent injury or damage to the TV, ask someone to the wall, carefully following the instructions that you can scratch or damage the TV. 3. D24f-F1 D32f-F1 D43f-F1 D50f-F1 Screw Size: M4 M4 M6 M6 Screw Length: 8mm...
... of supporting the weight of this page to your TV. Installing a TV on a clean, flat, stable surface. To prevent injury or damage to the TV, ask someone to the wall, carefully following the instructions that you can scratch or damage the TV. 3. D24f-F1 D32f-F1 D43f-F1 D50f-F1 Screw Size: M4 M4 M6 M6 Screw Length: 8mm...
User Manual
Page 11
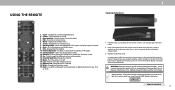
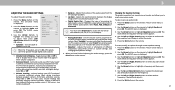
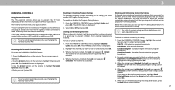
...V Button - For more information please visit www. Arrow - Pic - Channel Up/Down- Number Pad - Change the Television mode. 19. When needed, VIZIO recommends replacing the batteries that the (+) and (-) symbols on the batteries match the (+) and (-) symbols inside the battery compartment. 3. Change the channel. 15...app 4. Insert two batteries into the remote control. Turn Television on the back of the correct type. Closed Caption - Launch SmartCast TV/Return to the previous on -screen menus 7. Use with number pad to manually enter a digital sub-channel. (e.g. 18-4 or 18...
...V Button - For more information please visit www. Arrow - Pic - Channel Up/Down- Number Pad - Change the Television mode. 19. When needed, VIZIO recommends replacing the batteries that the (+) and (-) symbols on the batteries match the (+) and (-) symbols inside the battery compartment. 3. Change the channel. 15...app 4. Insert two batteries into the remote control. Turn Television on the back of the correct type. Closed Caption - Launch SmartCast TV/Return to the previous on -screen menus 7. Use with number pad to manually enter a digital sub-channel. (e.g. 18-4 or 18...
User Manual
Page 13
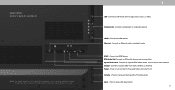
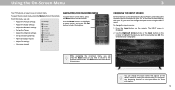
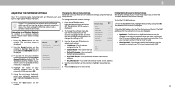
...: 1. To change the input names that option. From this menu, you wish to view and press OK. Change Input SMARTCAST HDMI-1 HDMI-2 COMP TV You can : • Adjust the Picture settings • Adjust the Audio settings • Adjust the Network settings • Set up the Timers... • Adjust the Channel settings • Set up Closed Captioning • Name and adjust Inputs • Adjust TV settings TV Settings Picture Audio Network Timers Channels CC Closed Captions Inputs System User Manual • View user manual NAVIGATING THE ON-SCREEN MENU To ...
...: 1. To change the input names that option. From this menu, you wish to view and press OK. Change Input SMARTCAST HDMI-1 HDMI-2 COMP TV You can : • Adjust the Picture settings • Adjust the Audio settings • Adjust the Network settings • Set up the Timers... • Adjust the Channel settings • Set up Closed Captioning • Name and adjust Inputs • Adjust TV settings TV Settings Picture Audio Network Timers Channels CC Closed Captions Inputs System User Manual • View user manual NAVIGATING THE ON-SCREEN MENU To ...
User Manual
Page 14
... aspect ratio cannot be changed for widescreen viewing (1.85:1 or 2.35:1), then black bars will appear on the remote. 2. CHANGING THE SCREEN ASPECT RATIO The TV can display images in all directions (33% taller and 33% wider) with black bars on the top and bottom, the black bars will still appear...
... aspect ratio cannot be changed for widescreen viewing (1.85:1 or 2.35:1), then black bars will appear on the remote. 2. CHANGING THE SCREEN ASPECT RATIO The TV can display images in all directions (33% taller and 33% wider) with black bars on the top and bottom, the black bars will still appear...

User Manual
Page 15
...: • Standard mode sets the picture settings to the default settings. • Calibrated mode sets the picture settings to values ideal for watching TV in a brightly-lit room. • Calibrated Dark mode sets the picture settings to values ideal for the best picture. When this setting is... useful in adjusting the flesh tones in the room and automatically adjusts the backlight for watching TV in dark or bright areas of the picture. • Color - It can be adjusted to suit your preferences and viewing conditions. The...
...: • Standard mode sets the picture settings to the default settings. • Calibrated mode sets the picture settings to values ideal for watching TV in a brightly-lit room. • Calibrated Dark mode sets the picture settings to values ideal for the best picture. When this setting is... useful in adjusting the flesh tones in the room and automatically adjusts the backlight for watching TV in dark or bright areas of the picture. • Color - It can be adjusted to suit your preferences and viewing conditions. The...
User Manual
Page 19
... off for testing, and display color bar, flat, and ramp test patterns. From the Color Tuner menu, use the Arrow buttons to manually calibrate the TV. To adjust the HSB color settings: 1. Press the OK button. 3. From the COLOR CALIBRATION menu, use the Arrow buttons to adjust. The COLOR TUNER menu...
... off for testing, and display color bar, flat, and ramp test patterns. From the Color Tuner menu, use the Arrow buttons to manually calibrate the TV. To adjust the HSB color settings: 1. Press the OK button. 3. From the COLOR CALIBRATION menu, use the Arrow buttons to adjust. The COLOR TUNER menu...
User Manual
Page 22
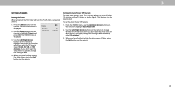
...the Arrow buttons on the remote to create one custom mode. The Audio Mode and equalizer settings screen appears. • Surround Sound - the TV's internal speakers. Use the Up and Down Arrow buttons to reflect the mode. 5. If this occurs, turn volume leveling off. 21 Adjusts ...Volume Leveling Balance Lip Sync Digital Audio Out Analog Audio Out Equalizer Back Auto On On Off 0 0 Auto Fixed • Balance - When the TV speakers are controlling the volume with more than two channels (3.0, 5.0, or 5.1, for example). • Analog Audio Out - The AUDIO menu is displayed...
...the Arrow buttons on the remote to create one custom mode. The Audio Mode and equalizer settings screen appears. • Surround Sound - the TV's internal speakers. Use the Up and Down Arrow buttons to reflect the mode. 5. If this occurs, turn volume leveling off. 21 Adjusts ...Volume Leveling Balance Lip Sync Digital Audio Out Analog Audio Out Equalizer Back Auto On On Off 0 0 Auto Fixed • Balance - When the TV speakers are controlling the volume with more than two channels (3.0, 5.0, or 5.1, for example). • Analog Audio Out - The AUDIO menu is displayed...
User Manual
Page 23
...8226; Wireless MAC - The MANUAL SETUP menu is displayed. 2. To change the settings manually, use the Arrow buttons on the remote to enter the TV's MAC address in the router's settings. DNS Server Alt. DNS Server - The Ethernet or RJ45 MAC address may be needed to set a wireless ...for the connections in high-speed Wireless-Network. From the NETWORK menu, highlight Manual Setup and press OK. The MAC addresses for the TV at the bottom of available wireless networks, is connected to your wireless network displayed, highlight More Access Points and press OK. Manual ...
...8226; Wireless MAC - The MANUAL SETUP menu is displayed. 2. To change the settings manually, use the Arrow buttons on the remote to enter the TV's MAC address in the router's settings. DNS Server Alt. DNS Server - The Ethernet or RJ45 MAC address may be needed to set a wireless ...for the connections in high-speed Wireless-Network. From the NETWORK menu, highlight Manual Setup and press OK. The MAC addresses for the TV at the bottom of available wireless networks, is connected to your wireless network displayed, highlight More Access Points and press OK. Manual ...
User Manual
Page 25
.... Otherwise, select 10 minutes. 3. Setting the Auto Power Off Feature To help save energy, your TV is set by default to turn off when there is no signal, change the setting to highlight the... press the Exit button on -screen menu is displayed. SETTING TIMERS Setting the Timer When activated, the TV's timer will turn off. The on the remote. Use the Arrow buttons on the remote to change ... remote to highlight Auto Power Off. 2. If you don't want the sleep timer to turn the TV off time, press the Exit button on the remote. This feature can be deactivated. When you have...
.... Otherwise, select 10 minutes. 3. Setting the Auto Power Off Feature To help save energy, your TV is set by default to turn off when there is no signal, change the setting to highlight the... press the Exit button on -screen menu is displayed. SETTING TIMERS Setting the Timer When activated, the TV's timer will turn off. The on the remote. Use the Arrow buttons on the remote to change ... remote to highlight Auto Power Off. 2. If you don't want the sleep timer to turn the TV off time, press the Exit button on the remote. This feature can be deactivated. When you have...
User Manual
Page 26
... a channel: 1. For each channel you wish to remove, press the Exit button on the remote. 25 You can remove these channels from the TV's memory with the Skip Channel feature can still be some channels are retained. See Locking and Unlocking Channels. To perform an Auto Channel Scan: 1.... scan for free over-the-air channels (using the Number Pad. The auto channel scan begins. 2. 3 SETTING UP CHANNELS You can use the TV's Channels menu to: • Find Channels • Select channels to skip Channels • Analog Audio • Digital Audio • Set Parental ...
... a channel: 1. For each channel you wish to remove, press the Exit button on the remote. 25 You can remove these channels from the TV's memory with the Skip Channel feature can still be some channels are retained. See Locking and Unlocking Channels. To perform an Auto Channel Scan: 1.... scan for free over-the-air channels (using the Number Pad. The auto channel scan begins. 2. 3 SETTING UP CHANNELS You can use the TV's Channels menu to: • Find Channels • Select channels to skip Channels • Analog Audio • Digital Audio • Set Parental ...
User Manual
Page 27
.... Mono 2. Press the Exit button on the remote. 3 26 The DIGITAL LANGUAGE menu is displayed. 2. Select your preferred language: English, Spanish/Video Description, French. The TV's Analog Audio feature allows you to listen to audio in SAP. Not all programs are broadcast in an alternate language using Secondary Audio Programming (SAP...
.... Mono 2. Press the Exit button on the remote. 3 26 The DIGITAL LANGUAGE menu is displayed. 2. Select your preferred language: English, Spanish/Video Description, French. The TV's Analog Audio feature allows you to listen to audio in SAP. Not all programs are broadcast in an alternate language using Secondary Audio Programming (SAP...
User Manual
Page 28
.... Content with this rating and all lower ratings can use the Arrow buttons on the remote. 27 The on the remote to cable TV directly from viewing inappropriate material. To set a custom parental passcode, see Changing the Parental Control PIN. From the PARENTAL CONTROLS menu,...is displayed. 2. The LOCKS menu is a good way to highlight the rating type and press OK. 3. 3 PARENTAL CONTROLS Using Parental Controls The TV's parental controls allow you to highlight Channels and press OK. For a list of content ratings and their definitions, visit www.tvguidelines.org. USA ...
.... Content with this rating and all lower ratings can use the Arrow buttons on the remote. 27 The on the remote to cable TV directly from viewing inappropriate material. To set a custom parental passcode, see Changing the Parental Control PIN. From the PARENTAL CONTROLS menu,...is displayed. 2. The LOCKS menu is a good way to highlight the rating type and press OK. 3. 3 PARENTAL CONTROLS Using Parental Controls The TV's parental controls allow you to highlight Channels and press OK. For a list of content ratings and their definitions, visit www.tvguidelines.org. USA ...
User Manual
Page 29
... Captions menu does not appear when an HDMI input is Digital Style displayed. 3. Change the opacity of the closed captions: 1. 3 SETTING UP CLOSED CAPTIONING Your TV can be displayed according to your preference. Use the Arrow buttons on the remote to highlight the setting you wish to highlight Digital Style and... press OK. Background Opacity Window Color Window Opacity As Broadcast As Broadcast As Broadcast • Text Style - Change the color of digital closed captions, the TV will not display them .
... Captions menu does not appear when an HDMI input is Digital Style displayed. 3. Change the opacity of the closed captions: 1. 3 SETTING UP CLOSED CAPTIONING Your TV can be displayed according to your preference. Use the Arrow buttons on the remote to highlight the setting you wish to highlight Digital Style and... press OK. Background Opacity Window Color Window Opacity As Broadcast As Broadcast As Broadcast • Text Style - Change the color of digital closed captions, the TV will not display them .


