User Manual
Page 2
... the following safety instructions before using different voltage • Use only with the manufacturer's instructions. Safety & Certification THANK YOU FOR CHOOSING VIZIO IMPORTANT SAFETY INSTRUCTIONS • Unplug this apparatus during the standard warranty period. shock. WHEN READING THIS MANUAL • Do not install ...near water. • A distance of at (877) 698-4946. • To reduce the risk of electric shock or component damage, switch off the power before cleaning your TV. • When moving the cart/ • When connected to a power outlet, ...
... the following safety instructions before using different voltage • Use only with the manufacturer's instructions. Safety & Certification THANK YOU FOR CHOOSING VIZIO IMPORTANT SAFETY INSTRUCTIONS • Unplug this apparatus during the standard warranty period. shock. WHEN READING THIS MANUAL • Do not install ...near water. • A distance of at (877) 698-4946. • To reduce the risk of electric shock or component damage, switch off the power before cleaning your TV. • When moving the cart/ • When connected to a power outlet, ...
User Manual
Page 3
... will protect your TV from moisture. If your TV yourself. Pulling on the apparatus. • The mains plug or appliance coupler is damaged, the internal components may be of sufficient magnitude to constitute a risk of electrical shock to persons. • WARNING: Exposure to high voltages, electric shock, and other than that...
... will protect your TV from moisture. If your TV yourself. Pulling on the apparatus. • The mains plug or appliance coupler is damaged, the internal components may be of sufficient magnitude to constitute a risk of electrical shock to persons. • WARNING: Exposure to high voltages, electric shock, and other than that...
User Manual
Page 8
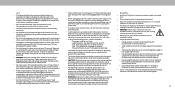
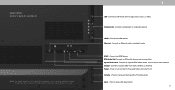
Connect an HDMI device. Volume - Components - REAR PANEL D24F-F1 Note: The image shown here is for illustrative purposes only and may vary, depending on the TV. Connect an Ethernet cable to headphones. Audio Out - ... off. Press to increase or decrease the TV volume level. Press to access the input menu. Connect a USB thumb drive to change. HDMI - Coaxial - Connect a component or composite devices. 8 The actual number of ports and their locations may be subject to play photo, music, or video.
Connect an HDMI device. Volume - Components - REAR PANEL D24F-F1 Note: The image shown here is for illustrative purposes only and may vary, depending on the TV. Connect an Ethernet cable to headphones. Audio Out - ... off. Press to increase or decrease the TV volume level. Press to access the input menu. Connect a USB thumb drive to change. HDMI - Coaxial - Connect a component or composite devices. 8 The actual number of ports and their locations may be subject to play photo, music, or video.
User Manual
Page 9
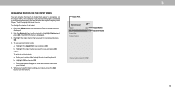
...HDMI - Connect an RCA audio device, such as home audio receiver. Power - Connect a USB thumb drive to access the input menu. 9 Connect a component or composite devices. Connect an HDMI device. Volume - The actual number of ports and their locations may be subject to change. Press to turn on... device, such as sound bar. Coaxial - Connect an Ethernet cable to increase or decrease the TV volume level. REAR PANEL D32F-F1, D43F-F1, & D50F-F1 Note: The image shown here is for illustrative purposes only and may vary, depending on the TV. RCA Audio Out- Press and...
...HDMI - Connect an RCA audio device, such as home audio receiver. Power - Connect a USB thumb drive to access the input menu. 9 Connect a component or composite devices. Connect an HDMI device. Volume - The actual number of ports and their locations may be subject to change. Press to turn on... device, such as sound bar. Coaxial - Connect an Ethernet cable to increase or decrease the TV volume level. REAR PANEL D32F-F1, D43F-F1, & D50F-F1 Note: The image shown here is for illustrative purposes only and may vary, depending on the TV. RCA Audio Out- Press and...
User Manual
Page 31
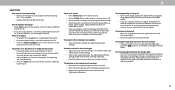
... to recognize on the remote to display "DVD Player." Use the Arrow buttons on the Input menu. When you have a DVD player connected to the Component input, you have finished naming your custom label using the on the remote. To use and press OK. -or- Highlight the Input Port row and...
... to recognize on the remote to display "DVD Player." Use the Arrow buttons on the Input menu. When you have a DVD player connected to the Component input, you have finished naming your custom label using the on the remote. To use and press OK. -or- Highlight the Input Port row and...
User Manual
Page 45
...of the channel may not display correctly. See Adjusting the Audio Settings. The colors on the remote to ensure they are connected correctly. VIZIO recommends selecting Calibrated. • Check all devices are securely attached. The power is on, but there is no image on the ...and fluorescent lights. • Ensure all cables are securely attached to select a different inpput source. • If you are using TV, AV, or Component with fresh ones. A HELP TOPICS The remote is not responding. • Make sure the batteries are securely attached. There is no power. •...
...of the channel may not display correctly. See Adjusting the Audio Settings. The colors on the remote to ensure they are connected correctly. VIZIO recommends selecting Calibrated. • Check all devices are securely attached. The power is on, but there is no image on the ...and fluorescent lights. • Ensure all cables are securely attached to select a different inpput source. • If you are using TV, AV, or Component with fresh ones. A HELP TOPICS The remote is not responding. • Make sure the batteries are securely attached. There is no power. •...
User Manual
Page 47
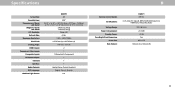
...: LCD Backlight: Refresh Rate: Maximum Resolution: Pixel Pitch: Viewing Angle: HDMI Inputs: Component Video Inputs: Composite Inputs: RF Antenna Input: Ethernet USB Port: Audio Outputs: OSD Language: Ambient Light Sensor: D24f-F1 24" 23.8" 22.15" x 14.87" x 6.26" (56.26cm x ...(H) / 178° (V) 2 1 1 (Shared with Component) 1 1 1 Analog Stereo Output (headset) English, French, Spanish Yes B Remote Control Model: Certifications: Voltage Range: Power Consumption: Standby Power: Zero Bright Pixel Guarantee: Screw Size: Hole Pattern: D24f-F1 XRT136 C-US, CSA, FCC Class B, BETS-7/ICES-003 Class...
...: LCD Backlight: Refresh Rate: Maximum Resolution: Pixel Pitch: Viewing Angle: HDMI Inputs: Component Video Inputs: Composite Inputs: RF Antenna Input: Ethernet USB Port: Audio Outputs: OSD Language: Ambient Light Sensor: D24f-F1 24" 23.8" 22.15" x 14.87" x 6.26" (56.26cm x ...(H) / 178° (V) 2 1 1 (Shared with Component) 1 1 1 Analog Stereo Output (headset) English, French, Spanish Yes B Remote Control Model: Certifications: Voltage Range: Power Consumption: Standby Power: Zero Bright Pixel Guarantee: Screw Size: Hole Pattern: D24f-F1 XRT136 C-US, CSA, FCC Class B, BETS-7/ICES-003 Class...
User Manual
Page 55
...OR REPLACE YOUR PRODUCT, OR REFUND Warranty Support LATAM SA de C.V. This warranty applies to the maximum extent not prohibited exchange parts and components of record, the (c) When the product has been altered or repaired by Brand: applicable law. current version. 54 be unenforceable, that ... Moral OR CONSEQUENTIAL DAMAGES, SO THE ABOVE LIMITATION OR Leon Gto. This warranty applies to obtain parts, components, supplies accompanying instructions for the most conditions. Check www.vizio.mx for use. FAILS OF ITS ESSENTIAL PURPOSE. Of 111 IN LIEU OF ANY OTHER REMEDY FOR ANY...
...OR REPLACE YOUR PRODUCT, OR REFUND Warranty Support LATAM SA de C.V. This warranty applies to the maximum extent not prohibited exchange parts and components of record, the (c) When the product has been altered or repaired by Brand: applicable law. current version. 54 be unenforceable, that ... Moral OR CONSEQUENTIAL DAMAGES, SO THE ABOVE LIMITATION OR Leon Gto. This warranty applies to obtain parts, components, supplies accompanying instructions for the most conditions. Check www.vizio.mx for use. FAILS OF ITS ESSENTIAL PURPOSE. Of 111 IN LIEU OF ANY OTHER REMEDY FOR ANY...


