
Camera Manual
Page 3
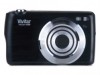
Vivitar makes capturing those special moments as easy as possible. What Your Camera Includes 1. Lithium Battery 3. Introduction Thank you need to be purchased separately. SD Memory cards are not included and need to get the most out of your camera. Everything you for normal use. Note: Your camera needs an SD Memory card (up to 32GB...
Vivitar makes capturing those special moments as easy as possible. What Your Camera Includes 1. Lithium Battery 3. Introduction Thank you need to be purchased separately. SD Memory cards are not included and need to get the most out of your camera. Everything you for normal use. Note: Your camera needs an SD Memory card (up to 32GB...
Camera Manual
Page 4
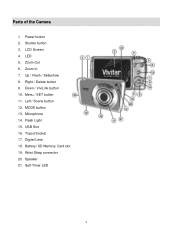
Parts of the Camera 1. LCD Screen 4. Up / Flash / Slideshow 8. Menu / SET button 11. Digital Lens 18. LED 5. Right / Delete button 9. Left / Scene button 12. Flash Light 15. Speaker 21. Zoom Out 6. Down / ViviLink button 10. Battery/ SD Memory Card slot 19. Microphone 14. Zoom In 7. Tripod Socket 17. Wrist Strap connector 20. MODE button 13. Self-Timer LED 3 Power button 2. Shutter button 3. USB Slot 16.
Parts of the Camera 1. LCD Screen 4. Up / Flash / Slideshow 8. Menu / SET button 11. Digital Lens 18. LED 5. Right / Delete button 9. Left / Scene button 12. Flash Light 15. Speaker 21. Zoom Out 6. Down / ViviLink button 10. Battery/ SD Memory Card slot 19. Microphone 14. Zoom In 7. Tripod Socket 17. Wrist Strap connector 20. MODE button 13. Self-Timer LED 3 Power button 2. Shutter button 3. USB Slot 16.

Camera Manual
Page 5
Powering the Camera ON 1) Make sure the batteries have been inserted properly into your digital camera. 2) Make sure an SD card has been inserted into your camera. 3) Press the POWER button to 32GB) needed for normal use (not included) Using the Camera Selecting the modes Accessing the menu When powering the camera ON for the first time the camera will take you through the initial camera setup. Initial Camera Setup Installing the Batteries Installing the Memory Card Turning On the Camera SD Memory card (up to turn on the camera. 4
Powering the Camera ON 1) Make sure the batteries have been inserted properly into your digital camera. 2) Make sure an SD card has been inserted into your camera. 3) Press the POWER button to 32GB) needed for normal use (not included) Using the Camera Selecting the modes Accessing the menu When powering the camera ON for the first time the camera will take you through the initial camera setup. Initial Camera Setup Installing the Batteries Installing the Memory Card Turning On the Camera SD Memory card (up to turn on the camera. 4

Camera Manual
Page 8
Camera Technical Specifications Image Sensor CMOS Sensor Image Resolution Video Resolution (14M) 4416 x 3312, (12M) 4000 x 3000 pixels, (10M) 3648 x 2736 pixels, (8M) 3264 x 2448 pixels, (... second delay Yes Print Photos Yes Face Detect Yes Smile Capture Yes Interface USB 2.0 System Requirements Windows XP and above / Mac OSX 10.5 and above Battery Lithium Battery (BL-5B) Working Temperature 0~40 ℃ 7
Camera Technical Specifications Image Sensor CMOS Sensor Image Resolution Video Resolution (14M) 4416 x 3312, (12M) 4000 x 3000 pixels, (10M) 3648 x 2736 pixels, (8M) 3264 x 2448 pixels, (... second delay Yes Print Photos Yes Face Detect Yes Smile Capture Yes Interface USB 2.0 System Requirements Windows XP and above / Mac OSX 10.5 and above Battery Lithium Battery (BL-5B) Working Temperature 0~40 ℃ 7

Camera Manual
Page 10
... the Auto Power Off settings menu. Use this mode to capture photos with your camera. Powering the camera ON Press the Power button to turn off completely. Using Your Digital Camera Make sure the batteries have already taken with a rechargeable lithium battery, make sure it is fully charged before the first use. Use this mode...
... the Auto Power Off settings menu. Use this mode to capture photos with your camera. Powering the camera ON Press the Power button to turn off completely. Using Your Digital Camera Make sure the batteries have already taken with a rechargeable lithium battery, make sure it is fully charged before the first use. Use this mode...

Camera Manual
Page 26
... RIGHT button to a frequency that this setting will be saved by your camera until you manually change the setting or restore the camera‟s default factory settings. The designated time represents when your camera will automatically power off completely and will need to be powered on the...designated period of the electrical current in flourescent lighting sources in order to conserve you camera‟s battery life. Frequency Menu The options in the Frequency menu represent the frequency of time, the camera will appear on the selected item. 6) Press the LEFT or RIGHT button to ...
... RIGHT button to a frequency that this setting will be saved by your camera until you manually change the setting or restore the camera‟s default factory settings. The designated time represents when your camera will automatically power off completely and will need to be powered on the...designated period of the electrical current in flourescent lighting sources in order to conserve you camera‟s battery life. Frequency Menu The options in the Frequency menu represent the frequency of time, the camera will appear on the selected item. 6) Press the LEFT or RIGHT button to ...

Camera Manual
Page 44
... direction control buttons to scroll through the menu options. 4) Press the M (MENU)/SET button to conserve you camera‟s battery life. Audio Menu The Audio menu allows you to control the camera‟s ability to record audio in the video clips recorded with the power button before the next use the... will appear on the LCD screen. 9) Remember that this setting will automatically power off completely and will need to be turned on again with your camera in addition to the video record. 1) Press the M (MENU)/SET button to open the menus for the current mode. 2) Press the LEFT or...
... direction control buttons to scroll through the menu options. 4) Press the M (MENU)/SET button to conserve you camera‟s battery life. Audio Menu The Audio menu allows you to control the camera‟s ability to record audio in the video clips recorded with the power button before the next use the... will appear on the LCD screen. 9) Remember that this setting will automatically power off completely and will need to be turned on again with your camera in addition to the video record. 1) Press the M (MENU)/SET button to open the menus for the current mode. 2) Press the LEFT or...


