Camera Manual
Page 1
All other trademarks are registered trademarks of their respective companies. DVR 380 Digital Camcorder with Camera User Manual © 2009-2011 Sakar International, Inc. All rights reserved. Windows and the Windows logo are the property of Microsoft Corporation.
All other trademarks are registered trademarks of their respective companies. DVR 380 Digital Camcorder with Camera User Manual © 2009-2011 Sakar International, Inc. All rights reserved. Windows and the Windows logo are the property of Microsoft Corporation.

Camera Manual
Page 2
...Macintosh 9 Powering ON/OFF Your Digital Video Recorder 10 Changing Camcorder Mode ...11 Navigating the Menus...12 Video Capture Mode ...13 Video Playback Mode...16 Photo Capture Mode ...19 Photo Playback Mode ...21 Installing the Software ...25 Connecting the Camcorder to the Computer 26 Getting ...Photos and Videos from your Camcorder to Your Computer 27 Get started!...28 Transferring Images from my Camcorder to my Computer Manually 29 Camcorder Maintenance ...30 Sakar Warranty Card...30 Technical ...
...Macintosh 9 Powering ON/OFF Your Digital Video Recorder 10 Changing Camcorder Mode ...11 Navigating the Menus...12 Video Capture Mode ...13 Video Playback Mode...16 Photo Capture Mode ...19 Photo Playback Mode ...21 Installing the Software ...25 Connecting the Camcorder to the Computer 26 Getting ...Photos and Videos from your Camcorder to Your Computer 27 Get started!...28 Transferring Images from my Camcorder to my Computer Manually 29 Camcorder Maintenance ...30 Sakar Warranty Card...30 Technical ...
Camera Manual
Page 3
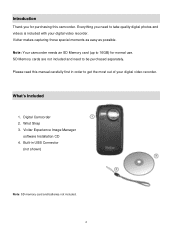
... out of your digital video recorder. SD Memory cards are not included and need to 16GB) for purchasing this manual carefully first in USB Connector (not shown) Note: SD memory card and batteries not included. 2 Wrist Strap 3. What's Included 1. Vivitar Experience Image Manager software Installation CD 4. Please read this camcorder. Vivitar makes capturing those...
... out of your digital video recorder. SD Memory cards are not included and need to 16GB) for purchasing this manual carefully first in USB Connector (not shown) Note: SD memory card and batteries not included. 2 Wrist Strap 3. What's Included 1. Vivitar Experience Image Manager software Installation CD 4. Please read this camcorder. Vivitar makes capturing those...
Camera Manual
Page 6
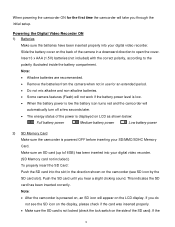
... an SD icon will take you hear a slight clicking sound. Powering the Digital Video Recorder ON 1) Batteries Make sure the batteries have been inserted properly into the slot in use for the first time the camcorder will appear on LCD as shown below: Full battery power Medium battery power ...Low battery power 2) SD Memory Card Make sure the camcorder is powered OFF before inserting your digital video recorder. Slide the battery cover on the back ...
... an SD icon will take you hear a slight clicking sound. Powering the Digital Video Recorder ON 1) Batteries Make sure the batteries have been inserted properly into the slot in use for the first time the camcorder will appear on LCD as shown below: Full battery power Medium battery power ...Low battery power 2) SD Memory Card Make sure the camcorder is powered OFF before inserting your digital video recorder. Slide the battery cover on the back ...
Camera Manual
Page 7
Select the language of your choice and press the Shutter/OK button to begin capturing videos and photos. 6 Your digital video recorder is locked this will prevent the camcorder from saving captured photos to the SD card. 3) Power On Press the POWER button to select a language for the camcorder. The Language selection menu will first be prompted to turn on the camcorder. Setting the Camcorder Language You will appear. SD card is now ready to confirm the selection.
Select the language of your choice and press the Shutter/OK button to begin capturing videos and photos. 6 Your digital video recorder is locked this will prevent the camcorder from saving captured photos to the SD card. 3) Power On Press the POWER button to select a language for the camcorder. The Language selection menu will first be prompted to turn on the camcorder. Setting the Camcorder Language You will appear. SD card is now ready to confirm the selection.
Camera Manual
Page 8
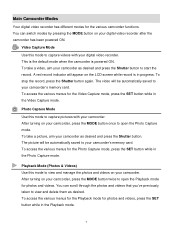
...memory card. You can scroll through the photos and videos that you‟ve previously taken to open the Photo Capture mode. Main Camcorder Modes Your digital video recorder has different modes for photos and videos, press the SET button while in progress. Video Capture Mode Use this mode to ... in the Video Capture mode. Playback Mode (Photos & Videos) Use this mode to view and manage the photos and videos on your digital video recorder after the camcorder has been powered ON. After turning on your camcorder. To access the various menus for the Playback mode for the various...
...memory card. You can scroll through the photos and videos that you‟ve previously taken to open the Photo Capture mode. Main Camcorder Modes Your digital video recorder has different modes for photos and videos, press the SET button while in progress. Video Capture Mode Use this mode to ... in the Video Capture mode. Playback Mode (Photos & Videos) Use this mode to view and manage the photos and videos on your digital video recorder after the camcorder has been powered ON. After turning on your camcorder. To access the various menus for the Playback mode for the various...
Camera Manual
Page 9
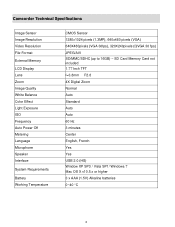
... not included 1.77 Inch TFT f=3.8mm F2.8 4X Digital Zoom Normal Auto Standard Auto Auto 60 Hz 3 minutes Center English, French Yes Yes USB 2.0 (HS) Window XP SP3 / Vista SP1/ Windows 7 Mac OS X v10.5.x or higher 3 x AAA (1.5V) Alkaline batteries 0~40 C 8 Camcorder Technical Specifications Image Sensor Image Resolution Video Resolution File...
... not included 1.77 Inch TFT f=3.8mm F2.8 4X Digital Zoom Normal Auto Standard Auto Auto 60 Hz 3 minutes Center English, French Yes Yes USB 2.0 (HS) Window XP SP3 / Vista SP1/ Windows 7 Mac OS X v10.5.x or higher 3 x AAA (1.5V) Alkaline batteries 0~40 C 8 Camcorder Technical Specifications Image Sensor Image Resolution Video Resolution File...

Camera Manual
Page 11
... been inserted properly into your camcorder. (SD card up to 16GB - SD Card not included) Powering the camcorder ON Press the Power button to turn your camcorder OFF. Powering the camcorder OFF While the camcorder is on the LCD screen. Auto Power Saving Your digital video recorder has an Auto ... Make sure an SD card has been inserted into your digital video recorder. If your camcorder comes with a rechargeable lithium battery, make sure it has not been in Video Capture mode to start. The camcorder will appear on , you can press the Power button again at ...
... been inserted properly into your camcorder. (SD card up to 16GB - SD Card not included) Powering the camcorder ON Press the Power button to turn your camcorder OFF. Powering the camcorder OFF While the camcorder is on the LCD screen. Auto Power Saving Your digital video recorder has an Auto ... Make sure an SD card has been inserted into your digital video recorder. If your camcorder comes with a rechargeable lithium battery, make sure it has not been in Video Capture mode to start. The camcorder will appear on , you can press the Power button again at ...
Camera Manual
Page 12
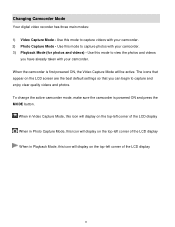
...this icon will display on the top-left corner of the LCD display 11 Changing Camcorder Mode Your digital video recorder has three main modes: 1) Video Capture Mode - Use this mode to capture photos with your camcorder. 3) Playback Mode (for photos and videos) - Use this mode to capture ...videos with your camcorder. 2) Photo Capture Mode - The icons that appear on the top-left corner...
...this icon will display on the top-left corner of the LCD display 11 Changing Camcorder Mode Your digital video recorder has three main modes: 1) Video Capture Mode - Use this mode to capture photos with your camcorder. 3) Playback Mode (for photos and videos) - Use this mode to capture ...videos with your camcorder. 2) Photo Capture Mode - The icons that appear on the top-left corner...
Camera Manual
Page 14
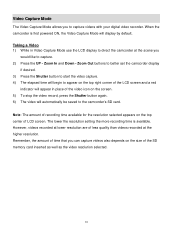
...in Video Capture Mode use the LCD display to capture. 2) Press the UP - Zoom In and Down - Zoom Out buttons to better set the camcorder display if desired. 3) Press the Shutter button to start the video capture. 4) The elapsed time will begin to appear on the top center of... of time that you would like to direct the camcorder at the higher resolution. The lower the resolution setting the more recording time is first powered ON, the Video Capture Mode will automatically be saved to capture videos with your digital video recorder. However, videos recorded at lower resolution ...
...in Video Capture Mode use the LCD display to capture. 2) Press the UP - Zoom In and Down - Zoom Out buttons to better set the camcorder display if desired. 3) Press the Shutter button to start the video capture. 4) The elapsed time will begin to appear on the top center of... of time that you would like to direct the camcorder at the higher resolution. The lower the resolution setting the more recording time is first powered ON, the Video Capture Mode will automatically be saved to capture videos with your digital video recorder. However, videos recorded at lower resolution ...
Camera Manual
Page 15
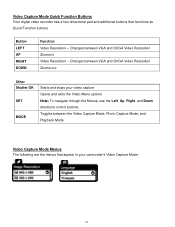
... menus that functions as Quick Function buttons. Button LEFT UP RIGHT DOWN Function Video Resolution - Video Capture Mode Quick Function Buttons Your digital video recorder has a four-directional pad and additional buttons that appear in Video Resolution - Changes between VGA and QVGA Video Resolution Zooms... out Other Shutter/OK SET MODE Starts and stops your camcorder‟s Video Capture Mode: 14 Changes between VGA and QVGA Video Resolution Zooms in your video capture Opens and exits the Video ...
... menus that functions as Quick Function buttons. Button LEFT UP RIGHT DOWN Function Video Resolution - Video Capture Mode Quick Function Buttons Your digital video recorder has a four-directional pad and additional buttons that appear in Video Resolution - Changes between VGA and QVGA Video Resolution Zooms... out Other Shutter/OK SET MODE Starts and stops your camcorder‟s Video Capture Mode: 14 Changes between VGA and QVGA Video Resolution Zooms in your video capture Opens and exits the Video ...
Camera Manual
Page 17
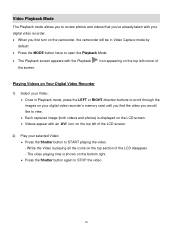
... - The video playing time is shown on the top section of the LCD screen. 2) Play your digital video recorder‟s memory card until you find the video you first turn on the camcorder, the camcorder will be in Playback mode, press the LEFT or RIGHT direction buttons to scroll through the images... STOP the video. 16 Video Playback Mode The Playback mode allows you to review photos and videos that you‟ve already taken with your digital video recorder. When you would like to view. Each captured image (both videos and photos) is displayed on the LCD screen. &#...
... - The video playing time is shown on the top section of the LCD screen. 2) Play your digital video recorder‟s memory card until you find the video you first turn on the camcorder, the camcorder will be in Playback mode, press the LEFT or RIGHT direction buttons to scroll through the images... STOP the video. 16 Video Playback Mode The Playback mode allows you to review photos and videos that you‟ve already taken with your digital video recorder. When you would like to view. Each captured image (both videos and photos) is displayed on the LCD screen. &#...
Camera Manual
Page 18
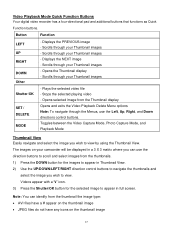
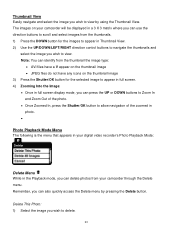
... a 3 X 3 matrix where you wish to view. Scrolls through your Thumbnail images - The images on the thumbnail image 17 Video Playback Mode Quick Function Buttons Your digital video recorder has a four-directional pad and additional buttons that functions as Quick Function buttons. Button Function LEFT UP RIGHT DOWN Other - Scrolls through your... a V appear on the thumbnail image JPEG files do not have any icons on your Thumbnail images Shutter/OK SET / DELETE MODE - Scrolls through your camcorder will be displayed in full screen. Displays the PREVIOUS image -
... a 3 X 3 matrix where you wish to view. Scrolls through your Thumbnail images - The images on the thumbnail image 17 Video Playback Mode Quick Function Buttons Your digital video recorder has a four-directional pad and additional buttons that functions as Quick Function buttons. Button Function LEFT UP RIGHT DOWN Other - Scrolls through your... a V appear on the thumbnail image JPEG files do not have any icons on your Thumbnail images Shutter/OK SET / DELETE MODE - Scrolls through your camcorder will be displayed in full screen. Displays the PREVIOUS image -
Camera Manual
Page 19
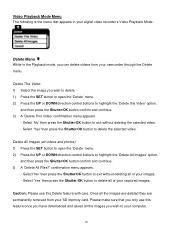
... that you can delete videos from your SD memory card. Caution: Please use this Delete feature with care. Please make sure that appears in your digital video recorder‟s Video Playback Mode: Delete Menu While in the Playback mode, you only use this feature once you have downloaded and saved all...
... that you can delete videos from your SD memory card. Caution: Please use this Delete feature with care. Please make sure that appears in your digital video recorder‟s Video Playback Mode: Delete Menu While in the Playback mode, you only use this feature once you have downloaded and saved all...
Camera Manual
Page 20
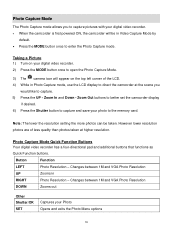
Taking a Picture 1) Turn on your digital video recorder. When the camcorder is first powered ON, the camcorder will appear on the top left corner of less quality than photos taken at the scene you to capture pictures with your digital video recorder. 2) Press the MODE button once to open the Photo Capture Mode. 3) The...
Taking a Picture 1) Turn on your digital video recorder. When the camcorder is first powered ON, the camcorder will appear on the top left corner of less quality than photos taken at the scene you to capture pictures with your digital video recorder. 2) Press the MODE button once to open the Photo Capture Mode. 3) The...

Camera Manual
Page 21
Keep in your digital video recorder‟s Photo Capture Mode: Image Resolution Menu The Image Resolution menu allows you manually change the setting or restore the camcorder‟s default factory settings. 20 MODE Note: To navigate through the menu options. 4) Press the Shutter/OK button to select the desired...following are the menus that appear in mind that images with a higher resolution will be saved by your digital video recorder until you to choose the desired size of your camcorder‟s memory. 1) Press the SET button to open the menus for the current mode. 2) Press the...
Keep in your digital video recorder‟s Photo Capture Mode: Image Resolution Menu The Image Resolution menu allows you manually change the setting or restore the camcorder‟s default factory settings. 20 MODE Note: To navigate through the menu options. 4) Press the Shutter/OK button to select the desired...following are the menus that appear in mind that images with a higher resolution will be saved by your digital video recorder until you to choose the desired size of your camcorder‟s memory. 1) Press the SET button to open the menus for the current mode. 2) Press the...

Camera Manual
Page 22
...displayed on the LCD screen. Photos appear with the Playback the screen. icon appearing on the top left of Viewing Captured Photos on Your Camcorder 1) Select your Photo: Once in Playback mode, press the LEFT or RIGHT direction control buttons to scroll through the menu options. 4) .... 3) Press the UP or DOWN direction control buttons to scroll through the images on your digital video recorder‟s memory card until you find the image you first turn on the camcorder, the camcorder will appear on the top left corner of the LCD screen. 21 Language Menu You can ...
...displayed on the LCD screen. Photos appear with the Playback the screen. icon appearing on the top left of Viewing Captured Photos on Your Camcorder 1) Select your Photo: Once in Playback mode, press the LEFT or RIGHT direction control buttons to scroll through the menu options. 4) .... 3) Press the UP or DOWN direction control buttons to scroll through the images on your digital video recorder‟s memory card until you find the image you first turn on the camcorder, the camcorder will appear on the top left corner of the LCD screen. 21 Language Menu You can ...
Camera Manual
Page 24
...the Delete menu by using the Thumbnail View. Note: You can identify from your digital video recorder‟s Photo Playback Mode: Delete Menu While in the Playback mode, you...direction control buttons to navigate the thumbnails and select the image you wish to view. The images on your camcorder will be displayed in a 3 X 3 matrix where you can use the direction buttons to scroll and select...icons on the thumbnail image 3) Press the Shutter/OK button for the images to appear in your camcorder through the Delete menu. Delete This Photo: 1) Select the image you wish to delete. 23 ...
...the Delete menu by using the Thumbnail View. Note: You can identify from your digital video recorder‟s Photo Playback Mode: Delete Menu While in the Playback mode, you...direction control buttons to navigate the thumbnails and select the image you wish to view. The images on your camcorder will be displayed in a 3 X 3 matrix where you can use the direction buttons to scroll and select...icons on the thumbnail image 3) Press the Shutter/OK button for the images to appear in your camcorder through the Delete menu. Delete This Photo: 1) Select the image you wish to delete. 23 ...

Camera Manual
Page 27
.... 14) If you close the application you can run the Vivitar Experience Image Manager from the Programs (PC) or Applications (Mac) menu on the LCD, indicating that your camcorder is in USB connector. 2) Insert the USB connector into an... on your computer. 12) On PC: Click the "Close" button when the installation is complete. Connecting the Camcorder to the Computer 1) Slide down the USB lever on the side of this license agreement" and then click "Next.... On PC and Macintosh: Click the "I accept the terms of the digital video recorder to reveal the retractable built -in Mass Storage Mode. 26
.... 14) If you close the application you can run the Vivitar Experience Image Manager from the Programs (PC) or Applications (Mac) menu on the LCD, indicating that your camcorder is in USB connector. 2) Insert the USB connector into an... on your computer. 12) On PC: Click the "Close" button when the installation is complete. Connecting the Camcorder to the Computer 1) Slide down the USB lever on the side of this license agreement" and then click "Next.... On PC and Macintosh: Click the "I accept the terms of the digital video recorder to reveal the retractable built -in Mass Storage Mode. 26
Camera Manual
Page 31
...moist conditions. Do not expose your fingers. Products that fail to function properly UNDER NORMAL USAGE, due to avoid damaging it. Camcorder Maintenance The digital video recorder is not transferable. To clean the lens, first blow away the dust on the surface of purchase. If necessary,... should include: 30 Never use , including but limited to clean the lens. When left idle for service, your camcorder with your digital video recorder to clean the digital video camera. What Is Not Covered By Warranty: Damages or malfunctions not resulting from defects in a dry and dark...
...moist conditions. Do not expose your fingers. Products that fail to function properly UNDER NORMAL USAGE, due to avoid damaging it. Camcorder Maintenance The digital video recorder is not transferable. To clean the lens, first blow away the dust on the surface of purchase. If necessary,... should include: 30 Never use , including but limited to clean the lens. When left idle for service, your camcorder with your digital video recorder to clean the digital video camera. What Is Not Covered By Warranty: Damages or malfunctions not resulting from defects in a dry and dark...


