Camera Manual
Page 1
Windows and the Windows logo are the property of Microsoft Corporation. All rights reserved. All other trademarks are registered trademarks of their respective companies. DVR 380 Digital Camcorder with Camera User Manual © 2009-2011 Sakar International, Inc.
Windows and the Windows logo are the property of Microsoft Corporation. All rights reserved. All other trademarks are registered trademarks of their respective companies. DVR 380 Digital Camcorder with Camera User Manual © 2009-2011 Sakar International, Inc.

Camera Manual
Page 2
... Requirements - Macintosh 9 Powering ON/OFF Your Digital Video Recorder 10 Changing Camcorder Mode ...11 Navigating the Menus...12 Video Capture Mode ...13 Video Playback Mode...16 Photo Capture Mode ...19 Photo Playback Mode ...21 Installing the Software ...25 Connecting the Camcorder to the Computer 26 Getting Photos and Videos from your Camcorder to Your Computer 27 Get started!...28 Transferring Images from my Camcorder to my Computer Manually 29 Camcorder Maintenance ...30 Sakar Warranty Card...30 Technical Support...31 Troubleshooting...32 1 Windows 9 Computer System Requirements...
... Requirements - Macintosh 9 Powering ON/OFF Your Digital Video Recorder 10 Changing Camcorder Mode ...11 Navigating the Menus...12 Video Capture Mode ...13 Video Playback Mode...16 Photo Capture Mode ...19 Photo Playback Mode ...21 Installing the Software ...25 Connecting the Camcorder to the Computer 26 Getting Photos and Videos from your Camcorder to Your Computer 27 Get started!...28 Transferring Images from my Camcorder to my Computer Manually 29 Camcorder Maintenance ...30 Sakar Warranty Card...30 Technical Support...31 Troubleshooting...32 1 Windows 9 Computer System Requirements...
Camera Manual
Page 6
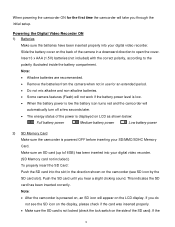
... been inserted into your digital video recorder. (SD Memory card not included.) To properly insert the SD Card: Push the SD card into your SD/MMC/SDHC Memory Card. If you hear a slight clicking sound. If the 5 Note: After the camcorder is powered on the LCD display. Note: Alkaline batteries are recommended. Remove the batteries from the camera when not in a downward direction to the polarity...
... been inserted into your digital video recorder. (SD Memory card not included.) To properly insert the SD Card: Push the SD card into your SD/MMC/SDHC Memory Card. If you hear a slight clicking sound. If the 5 Note: After the camcorder is powered on the LCD display. Note: Alkaline batteries are recommended. Remove the batteries from the camera when not in a downward direction to the polarity...
Camera Manual
Page 7
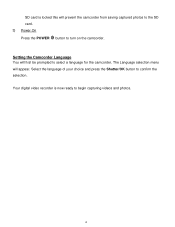
Select the language of your choice and press the Shutter/OK button to begin capturing videos and photos. 6 The Language selection menu will prevent the camcorder from saving captured photos to the SD card. 3) Power On Press the POWER button to select a language for the camcorder. SD card is now ready to confirm the selection. Your digital video recorder is locked this will appear. Setting the Camcorder Language You will first be prompted to turn on the camcorder.
Select the language of your choice and press the Shutter/OK button to begin capturing videos and photos. 6 The Language selection menu will prevent the camcorder from saving captured photos to the SD card. 3) Power On Press the POWER button to select a language for the camcorder. SD card is now ready to confirm the selection. Your digital video recorder is locked this will appear. Setting the Camcorder Language You will first be prompted to turn on the camcorder.
Camera Manual
Page 8
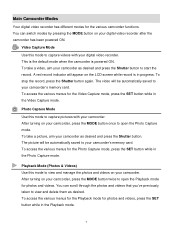
... SET button while in the Photo Capture mode. To take a video, aim your digital video recorder. After turning on the LCD screen while record is powered ON. This is the default mode when the camcorder is in the Video Capture mode. Playback Mode (Photos & Videos) Use this mode to capture pictures with your camcorder as desired and press the Shutter button to capture videos with your camcorder‟s memory card. To take a picture, aim your camcorder, press the MODE button twice to view and manage the photos and videos on your camcorder. To stop...
... SET button while in the Photo Capture mode. To take a video, aim your digital video recorder. After turning on the LCD screen while record is powered ON. This is the default mode when the camcorder is in the Video Capture mode. Playback Mode (Photos & Videos) Use this mode to capture pictures with your camcorder as desired and press the Shutter button to capture videos with your camcorder‟s memory card. To take a picture, aim your camcorder, press the MODE button twice to view and manage the photos and videos on your camcorder. To stop...
Camera Manual
Page 9
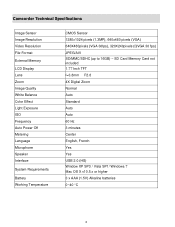
Camcorder Technical Specifications Image Sensor Image Resolution Video Resolution File Format External Memory LCD Display Lens Zoom Image Quality White Balance Color Effect Light Exposure ISO Frequency Auto Power Off Metering Language Microphone Speaker Interface System Requirements Battery Working Temperature CMOS Sensor 1280x1024 pixels (1.3MP), 640x480 pixels (VGA) 640X480pixels (VGA 30fps), 320X240pixels (QVGA 30 fps) JPEG/AVI SD/MMC/SDHC (up to 16GB) - SD Card Memory Card not included 1.77 Inch TFT f=3.8mm F2.8 4X Digital Zoom Normal Auto Standard Auto Auto 60...
Camcorder Technical Specifications Image Sensor Image Resolution Video Resolution File Format External Memory LCD Display Lens Zoom Image Quality White Balance Color Effect Light Exposure ISO Frequency Auto Power Off Metering Language Microphone Speaker Interface System Requirements Battery Working Temperature CMOS Sensor 1280x1024 pixels (1.3MP), 640x480 pixels (VGA) 640X480pixels (VGA 30fps), 320X240pixels (QVGA 30 fps) JPEG/AVI SD/MMC/SDHC (up to 16GB) - SD Card Memory Card not included 1.77 Inch TFT f=3.8mm F2.8 4X Digital Zoom Normal Auto Standard Auto Auto 60...
Camera Manual
Page 12
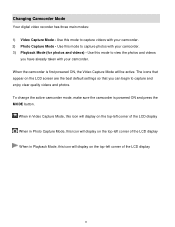
Changing Camcorder Mode Your digital video recorder has three main modes: 1) Video Capture Mode - Use this mode to capture videos with your camcorder. 2) Photo Capture Mode - To change the active camcorder mode, make sure the camcorder is first powered ON, the Video Capture Mode will display on the LCD screen are the best default settings so that appear on the top-left corner of the LCD display When in Photo Capture Mode, this icon will display on the top-left corner of the LCD display 11 Use this mode to capture and...
Changing Camcorder Mode Your digital video recorder has three main modes: 1) Video Capture Mode - Use this mode to capture videos with your camcorder. 2) Photo Capture Mode - To change the active camcorder mode, make sure the camcorder is first powered ON, the Video Capture Mode will display on the LCD screen are the best default settings so that appear on the top-left corner of the LCD display When in Photo Capture Mode, this icon will display on the top-left corner of the LCD display 11 Use this mode to capture and...
Camera Manual
Page 14
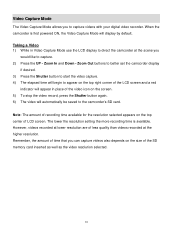
... recording time available for the resolution selected appears on the size of less quality than videos recorded at the scene you to capture videos with your digital video recorder. Taking a Video 1) While in place of LCD screen. The lower the resolution setting the more recording time is first powered ON, the Video Capture Mode will automatically be saved to capture. 2) Press the UP - Video Capture Mode The Video Capture Mode allows you would like to the camcorder‟s SD card. Zoom...
... recording time available for the resolution selected appears on the size of less quality than videos recorded at the scene you to capture videos with your digital video recorder. Taking a Video 1) While in place of LCD screen. The lower the resolution setting the more recording time is first powered ON, the Video Capture Mode will automatically be saved to capture. 2) Press the UP - Video Capture Mode The Video Capture Mode allows you would like to the camcorder‟s SD card. Zoom...
Camera Manual
Page 16
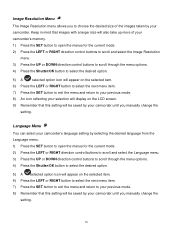
... the desired size of your camcorder‟s memory. 1) Press the SET button to open the menus for the current mode. 2) Press the LEFT or RIGHT direction control buttons to scroll and select the Image Resolution menu. 3) Press the UP or DOWN direction control buttons to scroll through the menu options. 4) Press the Shutter/OK button to your previous mode. 8) Remember that this setting will be saved by your camcorder until you manually change the setting.
... the desired size of your camcorder‟s memory. 1) Press the SET button to open the menus for the current mode. 2) Press the LEFT or RIGHT direction control buttons to scroll and select the Image Resolution menu. 3) Press the UP or DOWN direction control buttons to scroll through the menu options. 4) Press the Shutter/OK button to your previous mode. 8) Remember that this setting will be saved by your camcorder until you manually change the setting.
Camera Manual
Page 17
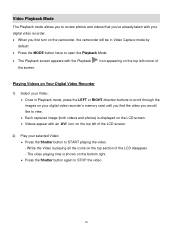
... direction buttons to scroll through the images on your digital video recorder‟s memory card until you find the video you first turn on the bottom right. Press the Shutter button again to START playing the video. - Video Playback Mode The Playback mode allows you to review photos and videos that you‟ve already taken with your digital video recorder. When you would like to view. Each captured image (both videos and photos) is displayed on the LCD screen...
... direction buttons to scroll through the images on your digital video recorder‟s memory card until you find the video you first turn on the bottom right. Press the Shutter button again to START playing the video. - Video Playback Mode The Playback mode allows you to review photos and videos that you‟ve already taken with your digital video recorder. When you would like to view. Each captured image (both videos and photos) is displayed on the LCD screen...
Camera Manual
Page 18
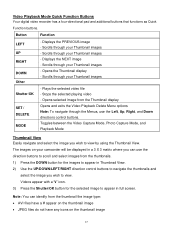
...RIGHT direction control buttons to navigate the thumbnails and select the image you wish to view. The images on the thumbnail image 17 Video Playback Mode Quick Function Buttons Your digital video recorder has a four-directional pad and additional buttons that functions as Quick Function buttons. Note: You can use the Left, Up, Right, and Down directions control buttons. Opens the Thumbnail display - Button Function LEFT UP RIGHT DOWN Other - Plays the selected video file - Toggles between the Video Capture Mode, Photo Capture Mode, and Playback Mode Thumbnail View Easily...
...RIGHT direction control buttons to navigate the thumbnails and select the image you wish to view. The images on the thumbnail image 17 Video Playback Mode Quick Function Buttons Your digital video recorder has a four-directional pad and additional buttons that functions as Quick Function buttons. Note: You can use the Left, Up, Right, and Down directions control buttons. Opens the Thumbnail display - Button Function LEFT UP RIGHT DOWN Other - Plays the selected video file - Toggles between the Video Capture Mode, Photo Capture Mode, and Playback Mode Thumbnail View Easily...
Camera Manual
Page 19
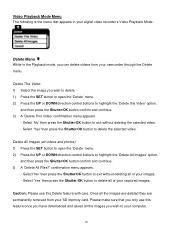
... digital video recorder‟s Video Playback Mode: Delete Menu While in the Playback mode, you wish to delete. 1) Press the SET button to open the „Delete‟ menu. 2) Press the UP or DOWN direction control buttons to your SD memory card. Caution: Please use this Video‟ option, and then press the Shutter/OK button confirm and continue. 3) A „Delete This Video‟ confirmation menu appears. - Delete This Video: 1) Select the image you can delete videos from your computer. 18 Delete All Images (all videos...
... digital video recorder‟s Video Playback Mode: Delete Menu While in the Playback mode, you wish to delete. 1) Press the SET button to open the „Delete‟ menu. 2) Press the UP or DOWN direction control buttons to your SD memory card. Caution: Please use this Video‟ option, and then press the Shutter/OK button confirm and continue. 3) A „Delete This Video‟ confirmation menu appears. - Delete This Video: 1) Select the image you can delete videos from your computer. 18 Delete All Images (all videos...
Camera Manual
Page 20
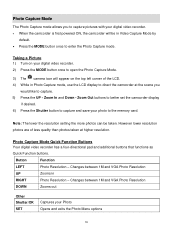
...in Photo Capture mode, use the LCD display to direct the camcorder at higher resolution. Changes between 1M and VGA Photo Resolution DOWN Zooms out Other Shutter/OK SET Captures your Photo Opens and exits the Photo Menu options 19 Zoom In and Down - Button Function LEFT Photo Resolution - Note: The lower the resolution setting the more photos can be in RIGHT Photo Resolution - Photo Capture Mode Quick Function Buttons Your digital video recorder has a four-directional pad and additional buttons that functions as Quick Function buttons. Taking a Picture 1) Turn...
...in Photo Capture mode, use the LCD display to direct the camcorder at higher resolution. Changes between 1M and VGA Photo Resolution DOWN Zooms out Other Shutter/OK SET Captures your Photo Opens and exits the Photo Menu options 19 Zoom In and Down - Button Function LEFT Photo Resolution - Note: The lower the resolution setting the more photos can be in RIGHT Photo Resolution - Photo Capture Mode Quick Function Buttons Your digital video recorder has a four-directional pad and additional buttons that functions as Quick Function buttons. Taking a Picture 1) Turn...

Camera Manual
Page 21
... will display on the LCD screen. 9) Remember that images with a higher resolution will be saved by your digital video recorder until you manually change the setting or restore the camcorder‟s default factory settings. 20 Keep in your digital video recorder‟s Photo Capture Mode: Image Resolution Menu The Image Resolution menu allows you to choose the desired size of your camcorder‟s memory. 1) Press the SET button to open the menus for the current mode. 2) Press the LEFT or RIGHT direction control buttons...
... will display on the LCD screen. 9) Remember that images with a higher resolution will be saved by your digital video recorder until you manually change the setting or restore the camcorder‟s default factory settings. 20 Keep in your digital video recorder‟s Photo Capture Mode: Image Resolution Menu The Image Resolution menu allows you to choose the desired size of your camcorder‟s memory. 1) Press the SET button to open the menus for the current mode. 2) Press the LEFT or RIGHT direction control buttons...

Camera Manual
Page 22
... next menu item. 7) Press the SET button to exit the menu and return to open the Playback Mode. The Playback screen appears with a „JPG‟ icon on the top left of Viewing Captured Photos on Your Camcorder 1) Select your Photo: Once in Playback mode, press the LEFT or RIGHT direction control buttons to scroll through the images on your digital video recorder‟s memory card until you find the image you first turn on...
... next menu item. 7) Press the SET button to exit the menu and return to open the Playback Mode. The Playback screen appears with a „JPG‟ icon on the top left of Viewing Captured Photos on Your Camcorder 1) Select your Photo: Once in Playback mode, press the LEFT or RIGHT direction control buttons to scroll through the images on your digital video recorder‟s memory card until you find the image you first turn on...
Camera Manual
Page 23
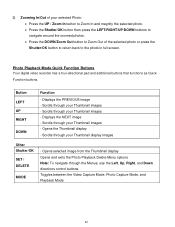
2) Zooming In/Out of your Thumbnail display images Other Shutter/OK SET / DELETE MODE - Displays the PREVIOUS image - Scrolls through the Menus, use the Left, Up, Right, and Down directions control buttons. Opens the Thumbnail display - Displays the NEXT image - Opens selected image from the Thumbnail display Opens and exits the Photo Playback Delete Menu options Note: To navigate through your Thumbnail images - Toggles between the Video Capture Mode, Photo Capture Mode, and Playback Mode 22 Button LEFT UP RIGHT DOWN Function - Scrolls through your Thumbnail images -...
2) Zooming In/Out of your Thumbnail display images Other Shutter/OK SET / DELETE MODE - Displays the PREVIOUS image - Scrolls through the Menus, use the Left, Up, Right, and Down directions control buttons. Opens the Thumbnail display - Displays the NEXT image - Opens selected image from the Thumbnail display Opens and exits the Photo Playback Delete Menu options Note: To navigate through your Thumbnail images - Toggles between the Video Capture Mode, Photo Capture Mode, and Playback Mode 22 Button LEFT UP RIGHT DOWN Function - Scrolls through your Thumbnail images -...
Camera Manual
Page 26
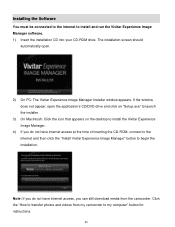
.../DVD drive and click on "Setup.exe" to launch the installer. 3) On Macintosh: Click the icon that appears on the desktop to install the Vivitar Experience Image Manager. 4) If you can still download media from my camcorder to begin the installation. If the window does not appear, open . 2) On PC: The Vivitar Experience Image Manager Installer window appears. Installing the Software You must be connected to the internet to transfer photos and videos...
.../DVD drive and click on "Setup.exe" to launch the installer. 3) On Macintosh: Click the icon that appears on the desktop to install the Vivitar Experience Image Manager. 4) If you can still download media from my camcorder to begin the installation. If the window does not appear, open . 2) On PC: The Vivitar Experience Image Manager Installer window appears. Installing the Software You must be connected to the internet to transfer photos and videos...

Camera Manual
Page 27
.... 3) Power the camcorder ON. 4) The first time you connect the device to the computer you will have internet access, the "Choose your language" window opens, choose your language and click "Next" to open the application. 13) On Macintosh: Click the "Quit" button when the installation is complete. Click the "Launch Vivitar Experience Image Manager" to open the next window. 6) Select your camera model from the Programs (PC) or Applications (Mac) menu...
.... 3) Power the camcorder ON. 4) The first time you connect the device to the computer you will have internet access, the "Choose your language" window opens, choose your language and click "Next" to open the application. 13) On Macintosh: Click the "Quit" button when the installation is complete. Click the "Launch Vivitar Experience Image Manager" to open the next window. 6) Select your camera model from the Programs (PC) or Applications (Mac) menu...
Camera Manual
Page 30
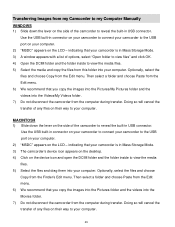
... options, select "Open folder to view files" and click OK. 4) Open the DCIM folder and the folder inside to view the media files. 5) Select the files and drag them into the Movies folder. 7) Do not disconnect the camcorder from the computer during transfer. indicating that you copy the images into the Pictures folder and the videos into your computer. Use the USB built-in USB connector. MACINTOSH 1) Slide...
... options, select "Open folder to view files" and click OK. 4) Open the DCIM folder and the folder inside to view the media files. 5) Select the files and drag them into the Movies folder. 7) Do not disconnect the camcorder from the computer during transfer. indicating that you copy the images into the Pictures folder and the videos into your computer. Use the USB built-in USB connector. MACINTOSH 1) Slide...
Camera Manual
Page 31
... camcorder with your fingers. When left idle for the original consumer purchaser only and is a delicate device. Always wear the wrist strap to prevent the device from other than normal use a proper cloth or tissue for a period of one year from the time of the lens, then use , including but limited to clean the digital video camera. Camcorder Maintenance The digital video recorder is not transferable...
... camcorder with your fingers. When left idle for the original consumer purchaser only and is a delicate device. Always wear the wrist strap to prevent the device from other than normal use a proper cloth or tissue for a period of one year from the time of the lens, then use , including but limited to clean the digital video camera. Camcorder Maintenance The digital video recorder is not transferable...


