ViviCam5022
Page 1
All other trademarks are registered trademarks of their respective companies. All rights reserved. Windows and the Windows logo are the property of Microsoft Corporation. ViviCam 5022 Digital Camera User‟s Manual © 2009 Sakar International, Inc.
All other trademarks are registered trademarks of their respective companies. All rights reserved. Windows and the Windows logo are the property of Microsoft Corporation. ViviCam 5022 Digital Camera User‟s Manual © 2009 Sakar International, Inc.
ViviCam5022
Page 2
... Vista 3 Computer System Requirements for Macintosh 4 A Quick Look at Your Camera...4 Preparing Your Camera for Use...5 Installing SD Memory Card...6 Starting Your Camera ...8 Camera Modes...8 Install the Vivitar Experience Image Manager Software 19 Connect your camera to the computer...22 Get photos and videos from your camera to your computer 22 Get started! ...23 Transfer media from...
... Vista 3 Computer System Requirements for Macintosh 4 A Quick Look at Your Camera...4 Preparing Your Camera for Use...5 Installing SD Memory Card...6 Starting Your Camera ...8 Camera Modes...8 Install the Vivitar Experience Image Manager Software 19 Connect your camera to the computer...22 Get photos and videos from your camera to your computer 22 Get started! ...23 Transfer media from...
ViviCam5022
Page 3
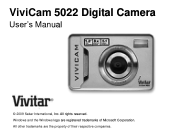
... (not included) up to 8GB. 2.4 inch TFT Color LCD Vivitar Experience Image Manager software for purchasing the ViviCam 5022 5.1 Mega-Pixel Digital Camera. Your digital camera can also be used as a removable disk. It enriches your camera includes Digital Camera Vivitar Experience Image Manager software Installation CD USB cable Quick Start... get the most popular photo sharing and social network websites. Introduction Thank you need to take quality digital photos and videos is included with your camera.
... (not included) up to 8GB. 2.4 inch TFT Color LCD Vivitar Experience Image Manager software for purchasing the ViviCam 5022 5.1 Mega-Pixel Digital Camera. Your digital camera can also be used as a removable disk. It enriches your camera includes Digital Camera Vivitar Experience Image Manager software Installation CD USB cable Quick Start... get the most popular photo sharing and social network websites. Introduction Thank you need to take quality digital photos and videos is included with your camera.
ViviCam5022
Page 5
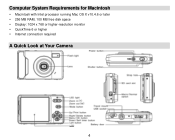
Computer System Requirements for Macintosh Macintosh with Intel processor running Mac OS X v10.4.6 or later 256 MB RAM, 100 MB free disk space Display: 1024 x 768 or higher-resolution monitor QuickTime 6 or higher Internet connection required A Quick Look at Your Camera 4
Computer System Requirements for Macintosh Macintosh with Intel processor running Mac OS X v10.4.6 or later 256 MB RAM, 100 MB free disk space Display: 1024 x 768 or higher-resolution monitor QuickTime 6 or higher Internet connection required A Quick Look at Your Camera 4
ViviCam5022
Page 6
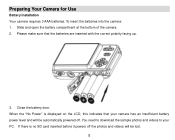
Slide and open the battery compartment at the bottom of the camera. 2. To insert the batteries into the camera: 1. Please make sure that your PC. If there is displayed on the LCD, this indicates that the batteries are inserted with the correct polarity facing ...up. 3. You need to download the sample photos and videos to your camera has an insufficient battery power level and will be automatically powered off the photos and videos will be lost. 5 Close the battery door. Preparing Your...
Slide and open the battery compartment at the bottom of the camera. 2. To insert the batteries into the camera: 1. Please make sure that your PC. If there is displayed on the LCD, this indicates that the batteries are inserted with the correct polarity facing ...up. 3. You need to download the sample photos and videos to your camera has an insufficient battery power level and will be automatically powered off the photos and videos will be lost. 5 Close the battery door. Preparing Your...

ViviCam5022
Page 7
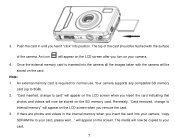
... not mix old and new batteries. Do not mix alkaline, standard (carbon-zinc), or rechargeable (nickel-cadmium metal hydride) batteries. Installing SD Memory Card Your camera has a memory card slot that enables you have not inserted an SD card. Note: 1. 2. 3. 4. 5. Locate the Memory Card slot. 2. The test images ...will be lost . In this case too only the sample images will be lost forever if they are not downloaded before you to your camera before the camera is shut down or powered off . Adding a memory card is on but not in the correct direction. (see the sketch below : 1. ...
... not mix old and new batteries. Do not mix alkaline, standard (carbon-zinc), or rechargeable (nickel-cadmium metal hydride) batteries. Installing SD Memory Card Your camera has a memory card slot that enables you have not inserted an SD card. Note: 1. 2. 3. 4. 5. Locate the Memory Card slot. 2. The test images ...will be lost . In this case too only the sample images will be lost forever if they are not downloaded before you to your camera before the camera is shut down or powered off . Adding a memory card is on but not in the correct direction. (see the sketch below : 1. ...
ViviCam5022
Page 8
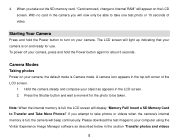
Note: 1. Once the external memory card is required for normal use. "Card inserted, change to your camera, "copy SDRAM file to internal memory" will appear on the LCD screen when you insert the card indicating that photos and videos will appear on ... after you insert the card into your card, please wait..." The media will appear on the card. The top of the camera. will be copied to 8GB). 2. Your camera supports any compatible SD memory card (up to your camera. 4. If there are photos and videos in until you feel it "click" into the...
Note: 1. Once the external memory card is required for normal use. "Card inserted, change to your camera, "copy SDRAM file to internal memory" will appear on the LCD screen when you insert the card indicating that photos and videos will appear on ... after you insert the card into your card, please wait..." The media will appear on the card. The top of the camera. will be copied to 8GB). 2. Your camera supports any compatible SD memory card (up to your camera. 4. If there are photos and videos in until you feel it "click" into the...
ViviCam5022
Page 9
... will display "Memory Full! With no card in the section "Transfer photos and videos 8 Hold the camera steady and compose your camera is full, the camera will appear on your computer using the Vivitar Experience Image Manager software as appears in the top left corner of video. Press the Shutter button and wait a moment... to take one test photo or 10 seconds of the LCD screen. 1. When you attempt to Internal RAM" will beep continuously. To power off your camera, the default mode is full, the LCD screen will now only be taken. Note: When the internal memory is...
... will display "Memory Full! With no card in the section "Transfer photos and videos 8 Hold the camera steady and compose your camera is full, the camera will appear on your computer using the Vivitar Experience Image Manager software as appears in the top left corner of video. Press the Shutter button and wait a moment... to take one test photo or 10 seconds of the LCD screen. 1. When you attempt to Internal RAM" will beep continuously. To power off your camera, the default mode is full, the LCD screen will now only be taken. Note: When the internal memory is...
ViviCam5022
Page 10
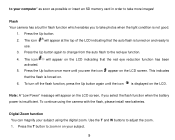
...appear on the LCD indicating that the flash is not good. 1. The icon activated. Digital Zoom function You can magnify your subject using the camera with the flash, please install new batteries. Press the T button to zoom in on the LCD screen, if you to take more until the... icon is insufficient. will appear on your subject. 9 Flash Your camera has a built in flash function which enables you select the flash function when the battery power is displayed on . 6. to your computer" as soon...
...appear on the LCD indicating that the flash is not good. 1. The icon activated. Digital Zoom function You can magnify your subject using the camera with the flash, please install new batteries. Press the T button to zoom in on the LCD screen, if you to take more until the... icon is insufficient. will appear on your subject. 9 Flash Your camera has a built in flash function which enables you select the flash function when the battery power is displayed on . 6. to your computer" as soon...
ViviCam5022
Page 11
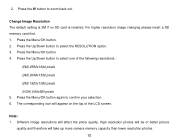
... Up/Down button to confirm your selection. 6. The corresponding icon will appear on the top of better picture quality and therefore will take up more camera memory capacity than lower resolution photos. 10 Press the Menu/OK button again to select the RESOLUTION option. 3. 2. Press the W button to select one of...
... Up/Down button to confirm your selection. 6. The corresponding icon will appear on the top of better picture quality and therefore will take up more camera memory capacity than lower resolution photos. 10 Press the Menu/OK button again to select the RESOLUTION option. 3. 2. Press the W button to select one of...
ViviCam5022
Page 12
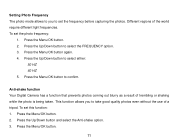
... set the photo frequency: 1. Setting Photo Frequency The photo mode allows to you to select either: 50 HZ 60 HZ 5. Anti-shake function Your Digital Camera has a function that prevents photos coming out blurry as a result of the world require different light frequencies. Press the Menu/OK button again. 4. Press the...
... set the photo frequency: 1. Setting Photo Frequency The photo mode allows to you to select either: 50 HZ 60 HZ 5. Anti-shake function Your Digital Camera has a function that prevents photos coming out blurry as a result of the world require different light frequencies. Press the Menu/OK button again. 4. Press the...
ViviCam5022
Page 13
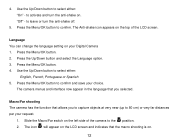
... Spanish 5. Language You can change the language setting on . Press the Menu/OK button. 4. Use the Up/Down button to confirm. Macro/Far shooting The camera has the function that allows you selected. The icon will appear on the LCD screen and indicates that you to capture objects at very near... (up to activate and turn the anti-shake off. 5. to 80 cm) or very far distances per your request. 1. to confirm and save your Digital Camera 1. Press the Menu/OK button. 2. Press the Menu/OK button to leave or turn the anti-shake on your choice. "Off" - Use the Up/...
... Spanish 5. Language You can change the language setting on . Press the Menu/OK button. 4. Use the Up/Down button to confirm. Macro/Far shooting The camera has the function that allows you selected. The icon will appear on the LCD screen and indicates that you to capture objects at very near... (up to activate and turn the anti-shake off. 5. to 80 cm) or very far distances per your request. 1. to confirm and save your Digital Camera 1. Press the Menu/OK button. 2. Press the Menu/OK button to leave or turn the anti-shake on your choice. "Off" - Use the Up/...
ViviCam5022
Page 14
... the overhead branch in focus as well as the mountains in a photo by a flashing red LED light. 5. The camera will automatically take the picture. 6. To use a tripod or place the camera on a flat and secure surface when you are using the Self Timer feature to the position. 4. The mountain setting... gives you maximum depth-of the 10 seconds the camera will begin to the Camera mode. 13 Press the Shutter button. 4. 3. For far shooting slide the Macro/Far switch to delay the time between ! It is ...
... the overhead branch in focus as well as the mountains in a photo by a flashing red LED light. 5. The camera will automatically take the picture. 6. To use a tripod or place the camera on a flat and secure surface when you are using the Self Timer feature to the position. 4. The mountain setting... gives you maximum depth-of the 10 seconds the camera will begin to the Camera mode. 13 Press the Shutter button. 4. 3. For far shooting slide the Macro/Far switch to delay the time between ! It is ...
ViviCam5022
Page 15
... option if you decide not to delete. 4. Video Mode The Video Mode allows you have taken: 1. A Delete File message will be inserted into the camera. 14 Press the Shutter button and the 10 second self timer countdown will change to use this will appear on the top left corner of...selected by simply pressing the SelfTimer/ Down button. 2. Press the Menu/OK button to shoot high quality AVI movies. The camera icon on the LCD with a Yes or No option. Position the camera. 4. In order to the Self Timer icon. 3. Press the Right button. 2. You can quickly delete the last ...
... option if you decide not to delete. 4. Video Mode The Video Mode allows you have taken: 1. A Delete File message will be inserted into the camera. 14 Press the Shutter button and the 10 second self timer countdown will change to use this will appear on the top left corner of...selected by simply pressing the SelfTimer/ Down button. 2. Press the Menu/OK button to shoot high quality AVI movies. The camera icon on the LCD with a Yes or No option. Position the camera. 4. In order to the Self Timer icon. 3. Press the Right button. 2. You can quickly delete the last ...
ViviCam5022
Page 16
... Up/Down button to start shooting the video. Insert a compatible SD memory card. 2. "Insert an SD Memory Card" will be saved as you to your camera. 3. You can playback the AVI file by using Quick Time or Windows Media Player once it has been downloaded to set the video resolution: 1. Power...
... Up/Down button to start shooting the video. Insert a compatible SD memory card. 2. "Insert an SD Memory Card" will be saved as you to your camera. 3. You can playback the AVI file by using Quick Time or Windows Media Player once it has been downloaded to set the video resolution: 1. Power...
ViviCam5022
Page 17
... the Up/Down button to enter the Playback Mode. 3. The camera menus and interface now appear in this mode. 1. Press the MODE button to select either: English, French, Portuguese or Spanish 5. Press the MODE button to ...exit and revert back to confirm. Press the Menu/OK button to confirm and save your camera. 2. Press the Menu/OK button to the Camera or Video modes. 16 An icon will appear on your choice. Playback Mode You can change the language setting on your photos...
... the Up/Down button to enter the Playback Mode. 3. The camera menus and interface now appear in this mode. 1. Press the MODE button to select either: English, French, Portuguese or Spanish 5. Press the MODE button to ...exit and revert back to confirm. Press the Menu/OK button to confirm and save your camera. 2. Press the Menu/OK button to the Camera or Video modes. 16 An icon will appear on your choice. Playback Mode You can change the language setting on your photos...
ViviCam5022
Page 18
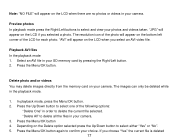
..., press the Menu/OK button. 2. If you selected a photo. Select an AVI file in your camera. Preview photos In playback mode press the Right/Left buttons to delete all the files in your camera. Press the Menu/OK button. "JPG" will appear on the Delete option selected press the Up/Down... button to confirm your photos and videos taken. Playback AVI files In the playback mode 1. The images can only be deleted while in your camera. 3. Press the Menu/OK button again to select either "Yes" or "No". 5. Depending on the LCD if you choose "Yes" the currect file is ...
..., press the Menu/OK button. 2. If you selected a photo. Select an AVI file in your camera. Preview photos In playback mode press the Right/Left buttons to delete all the files in your camera. Press the Menu/OK button. "JPG" will appear on the Delete option selected press the Up/Down... button to confirm your photos and videos taken. Playback AVI files In the playback mode 1. The images can only be deleted while in your camera. 3. Press the Menu/OK button again to select either "Yes" or "No". 5. Depending on the LCD if you choose "Yes" the currect file is ...
ViviCam5022
Page 19
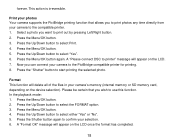
.... 3. Press the Menu/OK button again. Press the "Shutter" button to select Print. 4. Press the Shutter button again to confirm your camera to the PictBridge compatible printer for printing. 8. Press the Up/Down button to start printing the selected photo. Press the Menu/OK button. 5....button. 2. Now you want to select "Yes". 6. A "Format OK" message will delete all of the files in your camera to print photos any time directly from your camera‟s memory (internal memory or SD memory card, depending on the device selection). Select a photo you can connect your selection...
.... 3. Press the Menu/OK button again. Press the "Shutter" button to select Print. 4. Press the Shutter button again to confirm your camera to the PictBridge compatible printer for printing. 8. Press the Up/Down button to start printing the selected photo. Press the Menu/OK button. 5....button. 2. Now you want to select "Yes". 6. A "Format OK" message will delete all of the files in your camera to print photos any time directly from your camera‟s memory (internal memory or SD memory card, depending on the device selection). Select a photo you can connect your selection...
ViviCam5022
Page 20
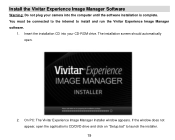
Insert the installation CD into your camera into the computer until the software installation is complete. Install the Vivitar Experience Image Manager Software Warning: Do not plug your CD-ROM drive. You must be connected to the internet to launch the installer. 19 The installation screen should automatically open the application‟s CD/DVD drive and click on "Setup.bat" to install and run the Vivitar Experience Image Manager software. 1. On PC: The Vivitar Experience Image Manager Installer window appears. If the window does not appear, open . 2.
Insert the installation CD into your camera into the computer until the software installation is complete. Install the Vivitar Experience Image Manager Software Warning: Do not plug your CD-ROM drive. You must be connected to the internet to launch the installer. 19 The installation screen should automatically open the application‟s CD/DVD drive and click on "Setup.bat" to install and run the Vivitar Experience Image Manager software. 1. On PC: The Vivitar Experience Image Manager Installer window appears. If the window does not appear, open . 2.
ViviCam5022
Page 21
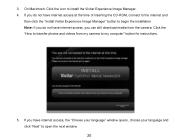
...CD-ROM, connect to the internet and then click the "Install Vivitar Experience Image Manager" button to begin the installation Note: If you can still download media from my camera to transfer photos and videos from the camera. If you have internet access, you do not have internet ...access, the "Choose your language" window opens, choose your language and click "Next" to install the Vivitar Experience Image Manager. 4. 3.
...CD-ROM, connect to the internet and then click the "Install Vivitar Experience Image Manager" button to begin the installation Note: If you can still download media from my camera to transfer photos and videos from the camera. If you have internet access, you do not have internet ...access, the "Choose your language" window opens, choose your language and click "Next" to install the Vivitar Experience Image Manager. 4. 3.


