ViviCam5022
Page 2
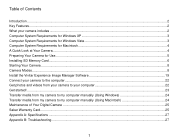
... 4 A Quick Look at Your Camera...4 Preparing Your Camera for Use...5 Installing SD Memory Card...6 Starting Your Camera ...8 Camera Modes...8 Install the Vivitar Experience Image Manager Software 19 Connect your camera to the computer...22 Get photos and videos from your camera to your computer 22 Get started! ...23 Transfer media from my camera to my computer manually (Using Windows 24 Transfer media from my camera to my computer manually (Using Macintosh 24 Maintenance of Your Digital Camera ...25 Sakar Warranty Card...25 Appendix A: Specifications...
... 4 A Quick Look at Your Camera...4 Preparing Your Camera for Use...5 Installing SD Memory Card...6 Starting Your Camera ...8 Camera Modes...8 Install the Vivitar Experience Image Manager Software 19 Connect your camera to the computer...22 Get photos and videos from your camera to your computer 22 Get started! ...23 Transfer media from my camera to my computer manually (Using Windows 24 Transfer media from my camera to my computer manually (Using Macintosh 24 Maintenance of Your Digital Camera ...25 Sakar Warranty Card...25 Appendix A: Specifications...
ViviCam5022
Page 3
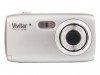
...; Digital Camera Vivitar Experience Image Manager software Installation CD USB cable Quick Start Guide Strap 2 What your life. Key Features Digital Image Resolution- 5M, 3M, 2M, VGA. SD RAM 8MB. Supports SD/MMC memory card (not included) up to 8GB. 2.4 inch TFT Color LCD Vivitar Experience Image Manager software for purchasing the ViviCam 5022 5.1 Mega-Pixel Digital Camera. Introduction Thank you need to take quality digital photos and videos is...
...; Digital Camera Vivitar Experience Image Manager software Installation CD USB cable Quick Start Guide Strap 2 What your life. Key Features Digital Image Resolution- 5M, 3M, 2M, VGA. SD RAM 8MB. Supports SD/MMC memory card (not included) up to 8GB. 2.4 inch TFT Color LCD Vivitar Experience Image Manager software for purchasing the ViviCam 5022 5.1 Mega-Pixel Digital Camera. Introduction Thank you need to take quality digital photos and videos is...

ViviCam5022
Page 7
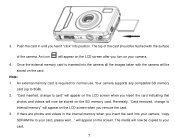
... correct direction. (see the sketch below : 1. The test images will allow you don‟t intend to use and will be lost forever if they are not downloaded before downloading the test photos or videos when you have to transfer photos and videos to avoid battery leakage and corrosion. Locate the Memory Card slot. 2. Insert the Memory card into the slot in use Alkaline batteries. Installing SD Memory Card Your camera has a memory card...
... correct direction. (see the sketch below : 1. The test images will allow you don‟t intend to use and will be lost forever if they are not downloaded before downloading the test photos or videos when you have to transfer photos and videos to avoid battery leakage and corrosion. Locate the Memory Card slot. 2. Insert the Memory card into the slot in use Alkaline batteries. Installing SD Memory Card Your camera has a memory card...
ViviCam5022
Page 8
An icon will now be stored on the screen. Your camera supports any compatible SD memory card (up to your card. 7 If there are photos and videos in until you feel it "click" into the camera all the images taken with the surface of the card should be copied to 8GB). 2. 3. Reversely, "Card removed, change to internal memory" will appear on the LCD screen when you insert the card indicating that photos and videos will appear...
An icon will now be stored on the screen. Your camera supports any compatible SD memory card (up to your card. 7 If there are photos and videos in until you feel it "click" into the camera all the images taken with the surface of the card should be copied to 8GB). 2. 3. Reversely, "Card removed, change to internal memory" will appear on the LCD screen when you insert the card indicating that photos and videos will appear...
ViviCam5022
Page 9
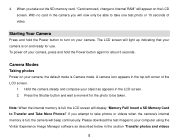
... Vivitar Experience Image Manager software as appears in the top left corner of video. A camera icon appears in the LCD screen. 2. Camera Modes Taking photos Power on the LCD screen. Press the Shutter button and wait a moment for use. Insert a SD Memory Card to be able to take photos or videos when the camera‟s internal memory is on your camera. With no card in the section "Transfer photos and videos 8 To power off your camera, the default mode is full, the LCD screen will beep continuously. Please download...
... Vivitar Experience Image Manager software as appears in the top left corner of video. A camera icon appears in the LCD screen. 2. Camera Modes Taking photos Power on the LCD screen. Press the Shutter button and wait a moment for use. Insert a SD Memory Card to be able to take photos or videos when the camera‟s internal memory is on your camera. With no card in the section "Transfer photos and videos 8 To power off your camera, the default mode is full, the LCD screen will beep continuously. Please download...
ViviCam5022
Page 10
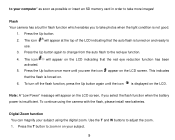
... the battery power is insufficient. Use the T and W buttons to the red eye function. 4. Press the Up button. 2. Press the T button to zoom in on and ready to use. 3. Flash Your camera has a built in flash function which enables you to take more until the icon is displayed on the LCD screen. The icon activated. To continue using the digital zoom. to your computer" as soon as possible or insert an SD memory card in order to take photos...
... the battery power is insufficient. Use the T and W buttons to the red eye function. 4. Press the Up button. 2. Press the T button to zoom in on and ready to use. 3. Flash Your camera has a built in flash function which enables you to take more until the icon is displayed on the LCD screen. The icon activated. To continue using the digital zoom. to your computer" as soon as possible or insert an SD memory card in order to take photos...
ViviCam5022
Page 13
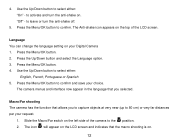
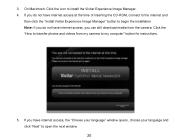
... the Menu/OK button. 4. Press the Menu/OK button to activate and turn the anti-shake off. 5. The icon will appear on the LCD screen and indicates that the macro shooting is on . to confirm and save your Digital Camera 1. Language You can change the language setting on your choice. Press the Menu/OK button. 2. Slide the Macro/Far switch on the top of the camera to select either : English, French, Portuguese or Spanish 5. Use...
... the Menu/OK button. 4. Press the Menu/OK button to activate and turn the anti-shake off. 5. The icon will appear on the LCD screen and indicates that the macro shooting is on . to confirm and save your Digital Camera 1. Language You can change the language setting on your choice. Press the Menu/OK button. 2. Slide the Macro/Far switch on the top of the camera to select either : English, French, Portuguese or Spanish 5. Use...
ViviCam5022
Page 14
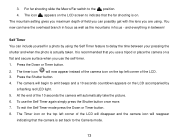
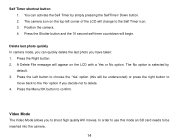
... when you are using the Self Timer feature to emit beeps and a 10 seconds countdown appears on . Press the Shutter button. 4. To exit the Self Timer mode press the Down or Timer button. 8. The timer icon will automatically take the picture. 6. Self Timer You can have the overhead branch in focus as well as the mountains in a photo by a flashing red LED light. 5. For far shooting slide the Macro/Far switch to the position...
... when you are using the Self Timer feature to emit beeps and a 10 seconds countdown appears on . Press the Shutter button. 4. To exit the Self Timer mode press the Down or Timer button. 8. The timer icon will automatically take the picture. 6. Self Timer You can have the overhead branch in focus as well as the mountains in a photo by a flashing red LED light. 5. For far shooting slide the Macro/Far switch to the position...
ViviCam5022
Page 15
... you to delete. 4. Position the camera. 4. Video Mode The Video Mode allows you decide not to shoot high quality AVI movies. You can quickly delete the last photo you can activate the Self Timer by default. 3. Delete last photo quickly In camera mode, you have taken: 1. Press the Right button. 2. Press the Menu/OK button to the Self Timer icon. 3. A Delete File message will begin. In order to use this will change to confirm. Self Timer shortcut button 1. The camera icon on the LCD with a Yes...
... you to delete. 4. Position the camera. 4. Video Mode The Video Mode allows you decide not to shoot high quality AVI movies. You can quickly delete the last photo you can activate the Self Timer by default. 3. Delete last photo quickly In camera mode, you have taken: 1. Press the Right button. 2. Press the Menu/OK button to the Self Timer icon. 3. A Delete File message will begin. In order to use this will change to confirm. Self Timer shortcut button 1. The camera icon on the LCD with a Yes...
ViviCam5022
Page 16
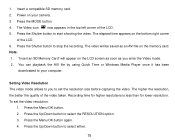
... corner of the video taken. "Insert an SD Memory Card" will be saved as you to select either: 15 Press the Menu/OK button again. 4. Power on the bottom right corner of the LCD. 6. Press the Shutter button to your camera. 3. You can playback the AVI file by using Quick Time or Windows Media Player once it has been downloaded to start shooting the video. Press the Menu/OK button. 2. Recording time for higher resolutions...
... corner of the video taken. "Insert an SD Memory Card" will be saved as you to select either: 15 Press the Menu/OK button again. 4. Power on the bottom right corner of the LCD. 6. Press the Shutter button to your camera. 3. You can playback the AVI file by using Quick Time or Windows Media Player once it has been downloaded to start shooting the video. Press the Menu/OK button. 2. Recording time for higher resolutions...
ViviCam5022
Page 17
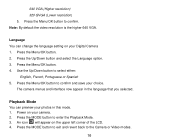
... default the video resolution is the higher 640 VGA. Playback Mode You can change the language setting on the upper left corner of the LCD. 4. Press the MODE button to exit and revert back to confirm. Press the MODE button to select either: English, French, Portuguese or Spanish 5. Use the Up/Down button to enter the Playback Mode. 3. Press the Menu/OK button to confirm and save your photos in the language...
... default the video resolution is the higher 640 VGA. Playback Mode You can change the language setting on the upper left corner of the LCD. 4. Press the MODE button to exit and revert back to confirm. Press the MODE button to select either: English, French, Portuguese or Spanish 5. Use the Up/Down button to enter the Playback Mode. 3. Press the Menu/OK button to confirm and save your photos in the language...
ViviCam5022
Page 18
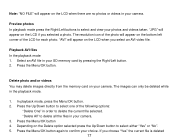
... your camera. Press the Menu/OK button. Press the Up/Down button to delete the current file selected. "Delete All" to select and view your choice. Playback AVI files In the playback mode 1. Select an AVI file in your SD memory card by pressing the Right/Left button. 2. Delete photo and/or videos You may delete images directly from the memory card on the LCD if you selected a photo. Preview photos In playback mode press the Right/Left buttons to delete...
... your camera. Press the Menu/OK button. Press the Up/Down button to delete the current file selected. "Delete All" to select and view your choice. Playback AVI files In the playback mode 1. Select an AVI file in your SD memory card by pressing the Right/Left button. 2. Delete photo and/or videos You may delete images directly from the memory card on the LCD if you selected a photo. Preview photos In playback mode press the Right/Left buttons to delete...
ViviCam5022
Page 19
... selected photo. Press the Menu/OK button. 4. A "Format OK" message will appear on the LCD. 7. Print your photos Your camera supports the PictBridge printing function that you to the compatible printer. 1. Press the "Shutter" button to select the FORMAT option. 3. In the playback mode: 1. Press the Up/Down button to select either "Yes" or "No". 5. A "Please connect DSC to printer" message will delete all of the files in your camera to print photos any time directly from your camera‟s memory (internal memory or SD memory card...
... selected photo. Press the Menu/OK button. 4. A "Format OK" message will appear on the LCD. 7. Print your photos Your camera supports the PictBridge printing function that you to the compatible printer. 1. Press the "Shutter" button to select the FORMAT option. 3. In the playback mode: 1. Press the Up/Down button to select either "Yes" or "No". 5. A "Please connect DSC to printer" message will delete all of the files in your camera to print photos any time directly from your camera‟s memory (internal memory or SD memory card...
ViviCam5022
Page 21
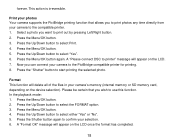
... my computer" button for instructions. 5. If you do not have internet access at the time of inserting the CD-ROM, connect to the internet and then click the "Install Vivitar Experience Image Manager" button to begin the installation Note: If you can still download media from my camera to transfer photos and videos from the camera. On Macintosh: Click the icon to open the next window. 20 If...
... my computer" button for instructions. 5. If you do not have internet access at the time of inserting the CD-ROM, connect to the internet and then click the "Install Vivitar Experience Image Manager" button to begin the installation Note: If you can still download media from my camera to transfer photos and videos from the camera. On Macintosh: Click the icon to open the next window. 20 If...
ViviCam5022
Page 23
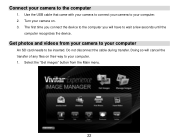
Get photos and videos from the Main menu. 22 Connect your computer An SD card needs to be inserted. The first time you connect the device to the computer you will cancel the transfer of any files on . 3. Do not disconnect the cable during transfer. Turn your camera on their way to your computer. 2. Use the USB cable that came with your camera to connect your camera to wait a few seconds until the computer recognizes the device. Doing so will have to your computer. 1. Select the "Get images" button from your camera to your camera to the computer 1.
Get photos and videos from the Main menu. 22 Connect your computer An SD card needs to be inserted. The first time you connect the device to the computer you will cancel the transfer of any files on . 3. Do not disconnect the cable during transfer. Turn your camera on their way to your computer. 2. Use the USB cable that came with your camera to connect your camera to wait a few seconds until the computer recognizes the device. Doing so will have to your computer. 1. Select the "Get images" button from your camera to your camera to the computer 1.
ViviCam5022
Page 24
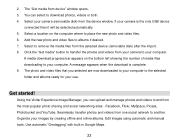
... your computer. Get started! Organize your use. Select to your computer. Using the Vivitar Experience Image Manager, you selected are now downloaded to your camera (removable disk) from device" window opens. 3. 2. Select your computer to download photos, videos or both. 4. The photo and video files that you can select to the selected folder and albums ready for your images by creating offline and online albums. Edit images using automatic and manual tools. Facebook...
... your computer. Get started! Organize your use. Select to your computer. Using the Vivitar Experience Image Manager, you selected are now downloaded to your camera (removable disk) from device" window opens. 3. 2. Select your computer to download photos, videos or both. 4. The photo and video files that you can select to the selected folder and albums ready for your images by creating offline and online albums. Edit images using automatic and manual tools. Facebook...
ViviCam5022
Page 25
... connect your camera to use the Vivitar Experience Image Manager open the DCIM folder and the folder inside to view the media files. 24 The camera‟s device icon appears on their way to your computer. 2. Then select a folder and choose Paste from the Edit menu. Do not disconnect the cable during transfer. Transfer media from this folder into the Videos/My Videos folder. 6. Use the USB cable that you copy the images into the Pictures/My Pictures folder...
... connect your camera to use the Vivitar Experience Image Manager open the DCIM folder and the folder inside to view the media files. 24 The camera‟s device icon appears on their way to your computer. 2. Then select a folder and choose Paste from the Edit menu. Do not disconnect the cable during transfer. Transfer media from this folder into the Videos/My Videos folder. 6. Use the USB cable that you copy the images into the Pictures/My Pictures folder...
ViviCam5022
Page 26
Maintenance of Your Digital Camera The digital camera is not transferable. What Is Not Covered By Warranty: Damages or malfunctions not resulting from the Edit menu. 5. Select the files and drag them into the Movies folder. 6. Products that you copy the images into the Pictures folder and the videos into your computer. Please handle your camera with care to your computer. Then select a folder and choose Paste...
Maintenance of Your Digital Camera The digital camera is not transferable. What Is Not Covered By Warranty: Damages or malfunctions not resulting from the Edit menu. 5. Select the files and drag them into the Movies folder. 6. Products that you copy the images into the Pictures folder and the videos into your computer. Please handle your camera with care to your computer. Then select a folder and choose Paste...

ViviCam5022
Page 28
What do I do not appear on /red eye reduction/off 10S 60S PictBridge 3*AAA batteries USB 2.0 0~40℃ Windows XP/ Vista/ Mac OS X (10.4.6 or higher) Appendix B: Troubleshooting Q: I get a message that the images were successfully transferred but the photos do ? 27 Appendix A: Specifications Sensor Image resolution Lens Internal memory External memory Flash Self-timer Power saving Printing Battery Transmission interface Working temperature Computer system CMOS sensor 5M (2592x1944pixels), 3M (2048x1536pixels), 2M (1920x1080pixels), VGA (640x480pixels) f=7.23mm, F2...
What do I do not appear on /red eye reduction/off 10S 60S PictBridge 3*AAA batteries USB 2.0 0~40℃ Windows XP/ Vista/ Mac OS X (10.4.6 or higher) Appendix B: Troubleshooting Q: I get a message that the images were successfully transferred but the photos do ? 27 Appendix A: Specifications Sensor Image resolution Lens Internal memory External memory Flash Self-timer Power saving Printing Battery Transmission interface Working temperature Computer system CMOS sensor 5M (2592x1944pixels), 3M (2048x1536pixels), 2M (1920x1080pixels), VGA (640x480pixels) f=7.23mm, F2...
ViviCam5022
Page 29
... camera powers off . We recommend always downloading your photos to the images stored on the SD memory card. The image was also deleted from there. All images deleted using the Vivitar Experience Image Manager. A00-090608 28 Press the Shutter button to take some sample photos and then try downloading them to the computer the photos are saved to the SD memory card then all stored pictures will happen to your test photos. Your camera uses SDRAM memory...
... camera powers off . We recommend always downloading your photos to the images stored on the SD memory card. The image was also deleted from there. All images deleted using the Vivitar Experience Image Manager. A00-090608 28 Press the Shutter button to take some sample photos and then try downloading them to the computer the photos are saved to the SD memory card then all stored pictures will happen to your test photos. Your camera uses SDRAM memory...


