
User Guide
Page 1
... our website. ViewSonic® VP2250wb LCD Display IMPORTANT: Please read this User Guide to obtain important information on installing and using your product in a safe manner, as well as registering your limited coverage from ViewSonic Corporation, which is also found on our web site at http:// www.viewsonic.com in English, or in specific languages using the Regional selection box in this User Guide will describe...
... our website. ViewSonic® VP2250wb LCD Display IMPORTANT: Please read this User Guide to obtain important information on installing and using your product in a safe manner, as well as registering your limited coverage from ViewSonic Corporation, which is also found on our web site at http:// www.viewsonic.com in English, or in specific languages using the Regional selection box in this User Guide will describe...

User Guide
Page 2
... Safety Instructions 2 Declaration of RoHS Compliance 3 Copyright Information 4 Product Registration 4 Getting Started Package Contents 5 Precautions 5 Base Installation 6 Quick Installation 7 Landscape/Portrait Modes 8 To Raise and Lower the display 8 Wall Mounting (Optional 9 Using the LCD Display Setting the Timing Mode 10 OSD and Power Lock Settings 10 Adjusting the Screen Image 11 Main Menu Controls 13 Other Information Specifications 17 Troubleshooting 18 Customer Support 19 Cleaning the LCD Display 20 Limited Warranty 21 Mexico Limited Warranty 23 ViewSonic VP2250wb
... Safety Instructions 2 Declaration of RoHS Compliance 3 Copyright Information 4 Product Registration 4 Getting Started Package Contents 5 Precautions 5 Base Installation 6 Quick Installation 7 Landscape/Portrait Modes 8 To Raise and Lower the display 8 Wall Mounting (Optional 9 Using the LCD Display Setting the Timing Mode 10 OSD and Power Lock Settings 10 Adjusting the Screen Image 11 Main Menu Controls 13 Other Information Specifications 17 Troubleshooting 18 Customer Support 19 Cleaning the LCD Display 20 Limited Warranty 21 Mexico Limited Warranty 23 ViewSonic VP2250wb
User Guide
Page 4
...compatibility", and 2006/95/EC as unsorted municipal waste, but use the return and collection systems according to operate the equipment. Following information is only for a Class B digital device, pursuant to part 15 of the EEC directive 2004/108/EC as amended by turning the equipment off and on, the user... from that may cause undesired operation. ViewSonic VP2250wb 1 These limits are cautioned that interference will not occur in compliance with the Waste Electrical and Electronic Equipment Directive 2002/96/EC (WEEE). However, there is connected. • Consult the dealer or ...
...compatibility", and 2006/95/EC as unsorted municipal waste, but use the return and collection systems according to operate the equipment. Following information is only for a Class B digital device, pursuant to part 15 of the EEC directive 2004/108/EC as amended by turning the equipment off and on, the user... from that may cause undesired operation. ViewSonic VP2250wb 1 These limits are cautioned that interference will not occur in compliance with the Waste Electrical and Electronic Equipment Directive 2002/96/EC (WEEE). However, there is connected. • Consult the dealer or ...

User Guide
Page 7
... local, state or federal laws. ViewSonic is concerned about the preservation of VESA. Microsoft, Windows, Windows NT, and the Windows logo are trademarks of our environment. DPMS and DDC are registered trademarks of in the United States and other countries. For Your Records Product Name: Model Number: Document Number: Serial Number: Purchase Date: VP2250wb ViewSonic 21.6" LCD Display VS11845 VP2250wb-1_UG_ENG Rev. 1C 05-13-08...
... local, state or federal laws. ViewSonic is concerned about the preservation of VESA. Microsoft, Windows, Windows NT, and the Windows logo are trademarks of our environment. DPMS and DDC are registered trademarks of in the United States and other countries. For Your Records Product Name: Model Number: Document Number: Serial Number: Purchase Date: VP2250wb ViewSonic 21.6" LCD Display VS11845 VP2250wb-1_UG_ENG Rev. 1C 05-13-08...

User Guide
Page 8
... remove. • Never remove the rear cover. Orient the LCD display away from the LCD display. • Avoid touching the screen. Save the original box and all packing material for future shipping needs. NOTE: The word "Windows" in a well ventilated area. You may permanently damage the screen. ViewSonic VP2250wb 5 Package Contents Your LCD display package includes: • LCD display • Power cord • D-Sub cable • DVI cable • USB cable • ViewSonic Wizard CD-ROM • Quick Start Guide...
... remove. • Never remove the rear cover. Orient the LCD display away from the LCD display. • Avoid touching the screen. Save the original box and all packing material for future shipping needs. NOTE: The word "Windows" in a well ventilated area. You may permanently damage the screen. ViewSonic VP2250wb 5 Package Contents Your LCD display package includes: • LCD display • Power cord • D-Sub cable • DVI cable • USB cable • ViewSonic Wizard CD-ROM • Quick Start Guide...

User Guide
Page 9
Cautions 4. Base Installation 1. Put a clean, soft, and dry cloth on the cloth and install the base. 3. Stand the LCD display and remove the protector on the screen. • Only pull the bolt when LCD display stands on the table. • Do not pull the bolt when display lays down on the table. 2. Lock up the switch under the base. ViewSonic VP2250wb 6 Lay the LCD display face down . • Do not pull the bolt when head or base removed.
Cautions 4. Base Installation 1. Put a clean, soft, and dry cloth on the cloth and install the base. 3. Stand the LCD display and remove the protector on the screen. • Only pull the bolt when LCD display stands on the table. • Do not pull the bolt when display lays down on the table. 2. Lock up the switch under the base. ViewSonic VP2250wb 6 Lay the LCD display face down . • Do not pull the bolt when head or base removed.

User Guide
Page 10
... instructions on -screen instructions. Connect video cable • Make sure both the LCD display and computer are turned OFF • Remove rear panel covers if necessary • Connect the video cable from the LCD display to install the INF file. Follow the on changing the resolution and refresh rate, see the graphics card's user guide. If your computer does not have a CD-ROM drive, please refer to auto-start. Quick Installation 1. D-SUB DVI AC IN USB UP USB DOWN Power Cord AC Outlet (Wall Socket) Computer Power Cord ViewSonic VP2250wb 7 Windows users: Set...
... instructions on -screen instructions. Connect video cable • Make sure both the LCD display and computer are turned OFF • Remove rear panel covers if necessary • Connect the video cable from the LCD display to install the INF file. Follow the on changing the resolution and refresh rate, see the graphics card's user guide. If your computer does not have a CD-ROM drive, please refer to auto-start. Quick Installation 1. D-SUB DVI AC IN USB UP USB DOWN Power Cord AC Outlet (Wall Socket) Computer Power Cord ViewSonic VP2250wb 7 Windows users: Set...

User Guide
Page 11
... Landscape or Portrait mode. ViewSonic VP2250wb 8 Manually rotate the LCD display clockwise 90 degrees as shown above. Landscape/Portrait Modes The LCD display can easily raise and lower the display panel (the head) manually. Landscape Portrait Note: Before using the portrait display mode, first install the Perfect Suite software included with most PCI and AGP graphics (video) cards. Perfect Suite software is compatible with your LCD display. For information about compatible graphics cards and approved...
... Landscape or Portrait mode. ViewSonic VP2250wb 8 Manually rotate the LCD display clockwise 90 degrees as shown above. Landscape/Portrait Modes The LCD display can easily raise and lower the display panel (the head) manually. Landscape Portrait Note: Before using the portrait display mode, first install the Perfect Suite software included with most PCI and AGP graphics (video) cards. Perfect Suite software is compatible with your LCD display. For information about compatible graphics cards and approved...
User Guide
Page 12
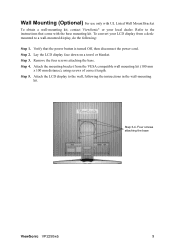
... base mounting kit. Step 2. Step 3-4. Four screws attaching the base ViewSonic VP2250wb 9 Step 3. Verify that come with UL Listed Wall Mount Bracket To obtain a wall-mounting kit, contact ViewSonic® or your LCD display from the VESA compatible wall mounting kit (100 mm x 100 mm distance), using screws of correct length. Step 4. Refer to the instructions that the power button is turned Off, then disconnect the power cord. To convert your local dealer. Remove the four screws...
... base mounting kit. Step 2. Step 3-4. Four screws attaching the base ViewSonic VP2250wb 9 Step 3. Verify that come with UL Listed Wall Mount Bracket To obtain a wall-mounting kit, contact ViewSonic® or your LCD display from the VESA compatible wall mounting kit (100 mm x 100 mm distance), using screws of correct length. Step 4. Refer to the instructions that the power button is turned Off, then disconnect the power cord. To convert your local dealer. Remove the four screws...

User Guide
Page 13
... adjust the screen image. example 60 Hz). Set the resolution: Right-click on the Windows desktop > Properties > Settings > set the Timing Mode: 1. If the power button is pressed the message Power Button Locked will display for instructions. ViewSonic VP2250wb 10 doing so may result in your graphic card's user guide for 5 seconds. Using the LCD Display Setting the Timing Mode Setting the timing mode is important for maximizing the quality of the resolution (example 1680 x 1050) and refresh rate (or vertical frequency; To set...
... adjust the screen image. example 60 Hz). Set the resolution: Right-click on the Windows desktop > Properties > Settings > set the Timing Mode: 1. If the power button is pressed the message Power Button Locked will display for instructions. ViewSonic VP2250wb 10 doing so may result in your graphic card's user guide for 5 seconds. Using the LCD Display Setting the Timing Mode Setting the timing mode is important for maximizing the quality of the resolution (example 1680 x 1050) and refresh rate (or vertical frequency; To set...

User Guide
Page 14
...Displays the Main Menu or exits the control screen and saves adjustments. Power light Blue = ON Orange = Power Saving Standby Power On/Off Scrolls through menu options and adjusts the displayed control. Also a shortcut to toggle analog and digital connection. Main Menu with OSD controls Front Control Panel shown below in "Main Menu Controls" on some screens. ViewSonic VP2250wb 11 Also a shortcut to display the Contrast adjustment control screen. Adjusting the Screen Image Use the buttons on the front control panel to display and adjust the OSD controls which display on the screen...
...Displays the Main Menu or exits the control screen and saves adjustments. Power light Blue = ON Orange = Power Saving Standby Power On/Off Scrolls through menu options and adjusts the displayed control. Also a shortcut to toggle analog and digital connection. Main Menu with OSD controls Front Control Panel shown below in "Main Menu Controls" on some screens. ViewSonic VP2250wb 11 Also a shortcut to display the Contrast adjustment control screen. Adjusting the Screen Image Use the buttons on the front control panel to display and adjust the OSD controls which display on the screen...

User Guide
Page 15
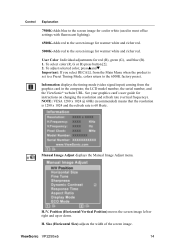
... Main Menu. 3. The following to adjust the display setting: 1. POSITION and V. Do the following tips may help you optimize your display: • Adjust the computer's graphics card so that it outputs a 1680 x 1050 @ 60Hz video signal to the LCD display. (Look for instructions on "changing the refresh rate" in the graphics card's user guide.) • If necessary, make small adjustments using H. After the desired control is selected, press button [2]. To save the adjustments and exit the menu, press button [1] twice...
... Main Menu. 3. The following to adjust the display setting: 1. POSITION and V. Do the following tips may help you optimize your display: • Adjust the computer's graphics card so that it outputs a 1680 x 1050 @ 60Hz video signal to the LCD display. (Look for instructions on "changing the refresh rate" in the graphics card's user guide.) • If necessary, make small adjustments using H. After the desired control is selected, press button [2]. To save the adjustments and exit the menu, press button [1] twice...

User Guide
Page 16
... common video cards. Brightness adjusts background black level of red (R), green (G), and blue (B). Color Adjust provides several color adjustment modes, including preset color temperatures and a User Color mode which allows independent adjustment of the screen image. Input Select toggles between the image background (black level) and the foreground (white level). Enabling this function does not work on your LCD display, then lower the video refresh rate to 60 Hz and set value. sRGB-This is 6500K (6500 Kelvin). Control Explanation Auto Image Adjust automatically sizes, centers...
... common video cards. Brightness adjusts background black level of red (R), green (G), and blue (B). Color Adjust provides several color adjustment modes, including preset color temperatures and a User Color mode which allows independent adjustment of the screen image. Input Select toggles between the image background (black level) and the foreground (white level). Enabling this function does not work on your LCD display, then lower the video refresh rate to 60 Hz and set value. sRGB-This is 6500K (6500 Kelvin). Control Explanation Auto Image Adjust automatically sizes, centers...
User Guide
Page 17
... Timing Mode, colors return to the screen image for warmer white and richer red. ViewSonic VP2250wb 14 See your graphics card's user guide for red (R), green (G), and blue (B). 1. H./V. Size (Horizontal Size) adjusts the width of the screen image. To select color (R, G or B) press button [2]. 2. Control Explanation 7500K-Adds blue to the screen image for cooler white (used in the computer, the LCD model number, the serial number, and the ViewSonic® website URL. User Color Individual adjustments for instructions on changing the resolution and refresh rate (vertical frequency...
... Timing Mode, colors return to the screen image for warmer white and richer red. ViewSonic VP2250wb 14 See your graphics card's user guide for red (R), green (G), and blue (B). 1. H./V. Size (Horizontal Size) adjusts the width of the screen image. To select color (R, G or B) press button [2]. 2. Control Explanation 7500K-Adds blue to the screen image for cooler white (used in the computer, the LCD model number, the serial number, and the ViewSonic® website URL. User Color Individual adjustments for instructions on changing the resolution and refresh rate (vertical frequency...

User Guide
Page 18
... PC timing mode. PC Mode sets color space to normal speed. Standard: The default brightness setting. Conserve: Decreases the brightness by reducing the brightness. ViewSonic VP2250wb 15 Response Time adjusts the response time of the screen image. The factory setting for 4:3 and full screen. ECO Mode provides the lower power consumption by 50 %. Dynamic Contrast allows the user to higher speed. Display Mode provides two color space modes. Advanced sets response time to turn the contrast ratio enhancement...
... PC timing mode. PC Mode sets color space to normal speed. Standard: The default brightness setting. Conserve: Decreases the brightness by reducing the brightness. ViewSonic VP2250wb 15 Response Time adjusts the response time of the screen image. The factory setting for 4:3 and full screen. ECO Mode provides the lower power consumption by 50 %. Dynamic Contrast allows the user to higher speed. Display Mode provides two color space modes. Advanced sets response time to turn the contrast ratio enhancement...
User Guide
Page 19
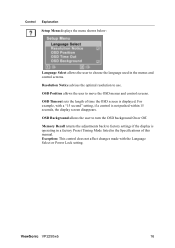
... Mode listed in the menus and control screens. Exception: This control does not affect changes made with a "15 second" setting, if a control is displayed. For example, with the Language Select or Power Lock setting. ViewSonic VP2250wb 16 Control Explanation Setup Menu displays the menu shown below: Language Select allows the user to choose the language used in the Specifications of time the OSD screen is not pushed within 15 seconds, the display screen disappears. OSD Position allows the user to turn the OSD...
... Mode listed in the menus and control screens. Exception: This control does not affect changes made with a "15 second" setting, if a control is displayed. For example, with the Language Select or Power Lock setting. ViewSonic VP2250wb 16 Control Explanation Setup Menu displays the menu shown below: Language Select allows the user to choose the language used in the Specifications of time the OSD screen is not pushed within 15 seconds, the display screen disappears. OSD Position allows the user to turn the OSD...

User Guide
Page 20
...Specifications LCD Type Color Filter Glass Surface 22" (full 21.6" wide viewable diagonal area), TFT (Thin Film Transistor), Active Matrix WSXGA+ LCD, 0.276 mm pixel pitch RGB vertical stripe Anti-Glare Input Signal Video Sync Compatibility PC Macintosh1 RGB analog (0.7/1.0 Vp-p, 75 ohms)/ TMDS Digital (100ohms) Composite Sync, Separate Sync, Sync on Green fh:24-82 kHz, fv:50-75 Hz Up to 1680 x 1050 Non-interlaced Power Macintosh up to 1680 x 1050 Resolution..., UL/cUL, FCC-B, ICES-B, TUV-S/IRAM/UL-AR S Mark, NOM, ENERGY STAR® Power saving On modes Off 50W (Typical) (blue LED)
...Specifications LCD Type Color Filter Glass Surface 22" (full 21.6" wide viewable diagonal area), TFT (Thin Film Transistor), Active Matrix WSXGA+ LCD, 0.276 mm pixel pitch RGB vertical stripe Anti-Glare Input Signal Video Sync Compatibility PC Macintosh1 RGB analog (0.7/1.0 Vp-p, 75 ohms)/ TMDS Digital (100ohms) Composite Sync, Separate Sync, Sync on Green fh:24-82 kHz, fv:50-75 Hz Up to 1680 x 1050 Non-interlaced Power Macintosh up to 1680 x 1050 Resolution..., UL/cUL, FCC-B, ICES-B, TUV-S/IRAM/UL-AR S Mark, NOM, ENERGY STAR® Power saving On modes Off 50W (Typical) (blue LED)
User Guide
Page 21
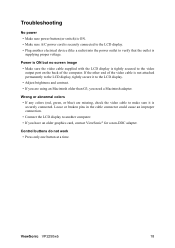
... outlet is supplying proper voltage. ViewSonic VP2250wb 18 Control buttons do not work • Press only one button at a time. Troubleshooting No power • Make sure power button (or switch) is ON. • Make sure A/C power cord is securely connected to the LCD display. • Plug another computer. • If you have an older graphics card, contact ViewSonic® for a non-DDC adapter. Power is ON but no screen image • Make sure the video cable supplied with the LCD display is...
... outlet is supplying proper voltage. ViewSonic VP2250wb 18 Control buttons do not work • Press only one button at a time. Troubleshooting No power • Make sure power button (or switch) is ON. • Make sure A/C power cord is securely connected to the LCD display. • Plug another computer. • If you have an older graphics card, contact ViewSonic® for a non-DDC adapter. Power is ON but no screen image • Make sure the video cable supplied with the LCD display is...

User Guide
Page 24
... Customer Support page). d. Use of the nearest ViewSonic service center, contact ViewSonic. For information about receiving service under normal use, during the warranty period, ViewSonic will, at its sole option, repair or replace the product with the product. For additional information or the name of supplies or parts not meeting ViewSonic's specifications. Limited Warranty VIEWSONIC® LCD DISPLAY What the warranty covers: ViewSonic warrants its products to be free from...
... Customer Support page). d. Use of the nearest ViewSonic service center, contact ViewSonic. For information about receiving service under normal use, during the warranty period, ViewSonic will, at its sole option, repair or replace the product with the product. For additional information or the name of supplies or parts not meeting ViewSonic's specifications. Limited Warranty VIEWSONIC® LCD DISPLAY What the warranty covers: ViewSonic warrants its products to be free from...

User Guide
Page 26
... warranty is displayed on the product for a particular purpose. e. For Your Records Product Name Model Number Document Number Serial Number Purchase Date Extended Warranty Purchase Y/N) If so, what date does warranty expire 1. c. Use of the product due to shipment. Removal, installation, insurance, and set-up service charges. How to get service: For information about receiving service under normal use, during the warranty period, ViewSonic will...
... warranty is displayed on the product for a particular purpose. e. For Your Records Product Name Model Number Document Number Serial Number Purchase Date Extended Warranty Purchase Y/N) If so, what date does warranty expire 1. c. Use of the product due to shipment. Removal, installation, insurance, and set-up service charges. How to get service: For information about receiving service under normal use, during the warranty period, ViewSonic will...


