User Guide
Page 3
... fax to ViewSonic. Your local waste disposal company may change product specifications without notice. In the interest of the U.S. Optiquest Q95 2 Macintosh and Power Macintosh are registered trademarks of Microsoft Corporation in this document may provide information about the preservation of our environment. O p t i q u e s t , the three birds logo, OnView, ViewMatch, and ViewMeter are trademarks of its useful life...
... fax to ViewSonic. Your local waste disposal company may change product specifications without notice. In the interest of the U.S. Optiquest Q95 2 Macintosh and Power Macintosh are registered trademarks of Microsoft Corporation in this document may provide information about the preservation of our environment. O p t i q u e s t , the three birds logo, OnView, ViewMatch, and ViewMeter are trademarks of its useful life...
User Guide
Page 4
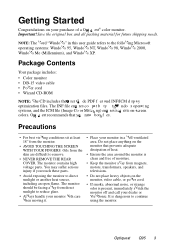
...clean and free of a O p t i q u e s t ® color monitor. Do not place anything on the monitor that y o u i n s t a l l b o t h f i l e s . Optiquest Q95 3 Package Contents Your package includes: • Color monitor • DB-15 video cable • Power cord • Wizard CD-ROM NOTE: T he CD includes the U s e r G u i d e P D F f i l e s a n d I N F / I C M d i s p l a y optimization files. It is dangerous to the following Microsoft operating systems: Windows 95, Windows NT, Windows 98, Windows 2000, Windows Me (Millennium), and Windows XP. s c r e e n colors. Getting Started...
...clean and free of a O p t i q u e s t ® color monitor. Do not place anything on the monitor that y o u i n s t a l l b o t h f i l e s . Optiquest Q95 3 Package Contents Your package includes: • Color monitor • DB-15 video cable • Power cord • Wizard CD-ROM NOTE: T he CD includes the U s e r G u i d e P D F f i l e s a n d I N F / I C M d i s p l a y optimization files. It is dangerous to the following Microsoft operating systems: Windows 95, Windows NT, Windows 98, Windows 2000, Windows Me (Millennium), and Windows XP. s c r e e n colors. Getting Started...
User Guide
Page 5
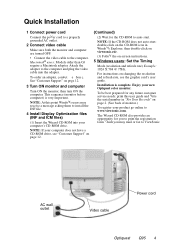
... adapter. AC wall outlet Video cable Power cord Optiquest Q95 4 Quick Installation 1 Connect power cord Connect the power cord to a properly grounded AC outlet. 2 Connect video cable Make sure both the monitor and computer are turned OFF. • Connect the video cable to the computer and plug the video cable into your new Optiquest color monitor. NOTE: At this user guide and write the serial number in Windows Explorer, then double-click on viewsonic.exe. (3) Follow the on-screen instructions. 5 Windows users: Set the Timing Mode (resolution and refresh rate) Example...
... adapter. AC wall outlet Video cable Power cord Optiquest Q95 4 Quick Installation 1 Connect power cord Connect the power cord to a properly grounded AC outlet. 2 Connect video cable Make sure both the monitor and computer are turned OFF. • Connect the video cable to the computer and plug the video cable into your new Optiquest color monitor. NOTE: At this user guide and write the serial number in Windows Explorer, then double-click on viewsonic.exe. (3) Follow the on-screen instructions. 5 Windows users: Set the Timing Mode (resolution and refresh rate) Example...
User Guide
Page 6
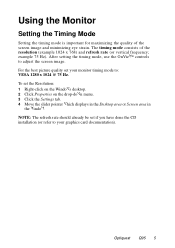
... refresh rate (or vertical frequency; To set your graphics card documentation). example 75 Hz). NOTE: The refresh rate should already be set if you have done the CD installation (or refer to your monitor timing mode to adjust the screen image. After setting the timing mode, use the OnView® controls to : VESA 1280 x 1024 @ 75 Hz. Optiquest Q95 5 The timing mode consists of the screen image and minimizing eye strain. For the best picture quality set the Resolution...
... refresh rate (or vertical frequency; To set your graphics card documentation). example 75 Hz). NOTE: The refresh rate should already be set if you have done the CD installation (or refer to your monitor timing mode to adjust the screen image. After setting the timing mode, use the OnView® controls to : VESA 1280 x 1024 @ 75 Hz. Optiquest Q95 5 The timing mode consists of the screen image and minimizing eye strain. For the best picture quality set the Resolution...
User Guide
Page 7
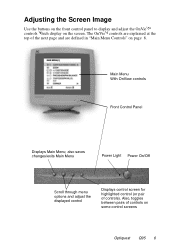
... Screen Image Use the buttons on the front control panel to display and adjust the OnView® controls which display on page 8. also saves changes/exits Main Menu Power Light Power On/Off Scroll through menu options and adjust the displayed control Displays control screen for highlighted control (or pair of controls on some control screens Optiquest Q95 6 Main Menu With OnView controls Front Control Panel Displays Main Menu; The OnView controls are explained at the top of the next page and are defined in "Main Menu Controls...
... Screen Image Use the buttons on the front control panel to display and adjust the OnView® controls which display on page 8. also saves changes/exits Main Menu Power Light Power On/Off Scroll through menu options and adjust the displayed control Displays control screen for highlighted control (or pair of controls on some control screens Optiquest Q95 6 Main Menu With OnView controls Front Control Panel Displays Main Menu; The OnView controls are explained at the top of the next page and are defined in "Main Menu Controls...
User Guide
Page 8
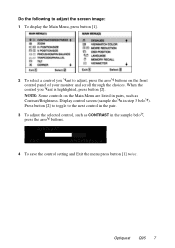
... controls on the front control panel of your monitor and scroll through the choices. Display control screen (sample shown in pairs, such as CONTRAST in the sample below ). Do the following to adjust the screen image: 1 To display the Main Menu, press button [1]. 2 To select a control you want to adjust, press the arrow buttons on the Main Menu are listed in step 3 below , press the arrow buttons. BRIGHTNESS 4 To save the control setting...
... controls on the front control panel of your monitor and scroll through the choices. Display control screen (sample shown in pairs, such as CONTRAST in the sample below ). Do the following to adjust the screen image: 1 To display the Main Menu, press button [1]. 2 To select a control you want to adjust, press the arrow buttons on the Main Menu are listed in step 3 below , press the arrow buttons. BRIGHTNESS 4 To save the control setting...
User Guide
Page 9
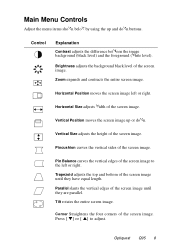
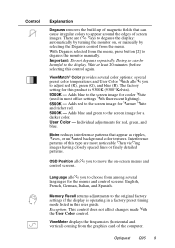
... contracts the entire screen image. Corner Straightens the four corners of the screen image. Main Menu Controls Adjust the menu items shown below by using the up or down buttons. Horizontal Position moves the screen image left or right. Press [ ▼] or [ ▲] to the left or right. Pin Balance curves the vertical edges of the screen image. Brightness adjusts the background black level of the screen image. Vertical Size adjusts the height of the screen image to adjust.
... contracts the entire screen image. Corner Straightens the four corners of the screen image. Main Menu Controls Adjust the menu items shown below by using the up or down buttons. Horizontal Position moves the screen image left or right. Press [ ▼] or [ ▲] to the left or right. Pin Balance curves the vertical edges of the screen image. Brightness adjusts the background black level of the screen image. Vertical Size adjusts the height of the screen image to adjust.
User Guide
Page 10
... white (used in this product is operating in a factory preset timing mode listed in most noticeable when viewing images having closely spaced lines or finely detailed patterns. OSD Position allows you to choose from the menu. There are most office settings with the User Color control. Individual adjustments for a darker color. Exception: This control does not affect changes made with fluorescent lighting). 6500K - Adds red to the screen image for red, green, and blue. User Color - Control...
... white (used in this product is operating in a factory preset timing mode listed in most noticeable when viewing images having closely spaced lines or finely detailed patterns. OSD Position allows you to choose from the menu. There are most office settings with the User Color control. Individual adjustments for a darker color. Exception: This control does not affect changes made with fluorescent lighting). 6500K - Adds red to the screen image for red, green, and blue. User Color - Control...
User Guide
Page 11
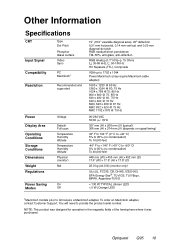
Other Information Specifications CRT Type Dot Pitch Input Signal Phosphor Glass surface Video Sync Compatibility PC Macintosh1 Resolution Recommended and supported Power Display Area Operating Conditions Storage Conditions Dimensions Weight Regulations Voltage Default Full scan Temperature Humidity Altitude Temperature Humidity Altitude Physical (monitor) Net Power Saving On Modes Off 19" (18.0" viewable diagonal area), 90o deflection 0.21 mm horizontal, 0.14 mm vertical, and 0.25 mm diagonal dot pitch RGB medium/short...
Other Information Specifications CRT Type Dot Pitch Input Signal Phosphor Glass surface Video Sync Compatibility PC Macintosh1 Resolution Recommended and supported Power Display Area Operating Conditions Storage Conditions Dimensions Weight Regulations Voltage Default Full scan Temperature Humidity Altitude Temperature Humidity Altitude Physical (monitor) Net Power Saving On Modes Off 19" (18.0" viewable diagonal area), 90o deflection 0.21 mm horizontal, 0.14 mm vertical, and 0.25 mm diagonal dot pitch RGB medium/short...
User Guide
Page 12
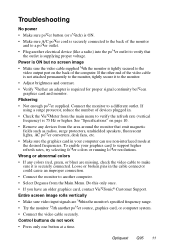
... ViewSonic® Customer Support. Connect the monitor to verify the refresh rate (vertical frequency) is securely connected. To enable your computer can use non-interlaced mode at a time. Entire screen image rolls vertically • Make sure video input signals are missing, check the video cable to the video output port on page 10. • Remove any colors (red, green, or blue) are within the monitor's specified frequency range. • Try the monitor with the monitor is tightly secured to make sure it to another power source...
... ViewSonic® Customer Support. Connect the monitor to verify the refresh rate (vertical frequency) is securely connected. To enable your computer can use non-interlaced mode at a time. Entire screen image rolls vertically • Make sure video input signals are missing, check the video cable to the video output port on page 10. • Remove any colors (red, green, or blue) are within the monitor's specified frequency range. • Try the monitor with the monitor is tightly secured to make sure it to another power source...

User Guide
Page 13
... service.ap@ F: 886 2 8242 3668 viewsonic.com South Africa viewsonic.com/asia T: 886 2 2246 3456 service.ap@ F: 886 2 8242 3668 viewsonic.com Optiquest Q95 12 NOTE: You will need the product serial number. Country/ Region Web site T = Telephone Email F = FAX United States viewsonic.com/ support T: (800) 688-6688 service.us@ F: (909) 468-1202 viewsonic.com Canada viewsonic.com/ support T: (800) 688-6688 F: (909) 468-1202 service.ca@ viewsonic...
... service.ap@ F: 886 2 8242 3668 viewsonic.com South Africa viewsonic.com/asia T: 886 2 2246 3456 service.ap@ F: 886 2 8242 3668 viewsonic.com Optiquest Q95 12 NOTE: You will need the product serial number. Country/ Region Web site T = Telephone Email F = FAX United States viewsonic.com/ support T: (800) 688-6688 service.us@ F: (909) 468-1202 viewsonic.com Canada viewsonic.com/ support T: (800) 688-6688 F: (909) 468-1202 service.ca@ viewsonic...
User Guide
Page 14
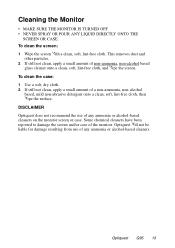
.... Cleaning the Monitor • MAKE SURE THE MONITOR IS TURNED OFF. • NEVER SPRAY OR POUR ANY LIQUID DIRECTLY ONTO THE SCREEN OR CASE. Some chemical cleaners have been reported to damage the screen and/or case of a non-ammonia, non-alcohol based, mild non-abrasive detergent onto a clean, soft, lint-free cloth, then wipe the surface. Optiquest Q95 13 This removes dust...
.... Cleaning the Monitor • MAKE SURE THE MONITOR IS TURNED OFF. • NEVER SPRAY OR POUR ANY LIQUID DIRECTLY ONTO THE SCREEN OR CASE. Some chemical cleaners have been reported to damage the screen and/or case of a non-ammonia, non-alcohol based, mild non-abrasive detergent onto a clean, soft, lint-free cloth, then wipe the surface. Optiquest Q95 13 This removes dust...
User Guide
Page 15
... product modification, or failure to shipment. ViewSonic CRT Monitor Warranty (V3.0) Release Date: 03-26-2002 Optiquest Q95 14 Any damage of the product. Removal or installation of the product due to follow instructions supplied with a like product. For information about receiving service under warranty, you . What the warranty does not cover: 1. d. Removal, installation, and set-up service charges. VIEWSONIC SHALL NOT BE LIABLE FOR: 1. Any...
... product modification, or failure to shipment. ViewSonic CRT Monitor Warranty (V3.0) Release Date: 03-26-2002 Optiquest Q95 14 Any damage of the product. Removal or installation of the product due to follow instructions supplied with a like product. For information about receiving service under warranty, you . What the warranty does not cover: 1. d. Removal, installation, and set-up service charges. VIEWSONIC SHALL NOT BE LIABLE FOR: 1. Any...
User Guide
Page 16
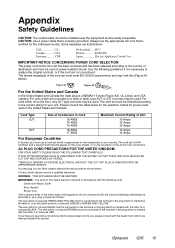
... plug which is appropriate for power cords used . SEV Britain BASE/BS Japan Electric Appliance Control Act IMPORTANT NOTICE CONCERNING POWER CORD SELECTION The power cord set must be connected to the current rating for...code as follows: The wire which is coloured GREEN-AND-YELLOW must use a cord set is a NEMA5-15 style (Figure A2), UL Listed, and CSA Labeled. If you have purchased the product. Always use , please consult with the letter L or coloured RED. The cord set for this appliance do not correspond with the letter N or coloured BLACK. Cord Type SJT SVT Size...
... plug which is appropriate for power cords used . SEV Britain BASE/BS Japan Electric Appliance Control Act IMPORTANT NOTICE CONCERNING POWER CORD SELECTION The power cord set must be connected to the current rating for...code as follows: The wire which is coloured GREEN-AND-YELLOW must use a cord set is a NEMA5-15 style (Figure A2), UL Listed, and CSA Labeled. If you have purchased the product. Always use , please consult with the letter L or coloured RED. The cord set for this appliance do not correspond with the letter N or coloured BLACK. Cord Type SJT SVT Size...
User Guide
Page 17
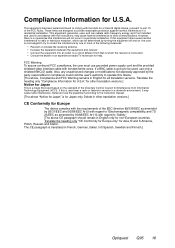
... reasonable protection against harmful interference in English only for compliance could void the user's authority to operate this is going to part 15 of the Voluntary Control Council for help. Install and use grounded power supply cord and the provided shielded video interface cable with the limits for U.S.A." Translate the heading only "Compliance Information for a Class B digital device, pursuant to be determined by...
... reasonable protection against harmful interference in English only for compliance could void the user's authority to operate this is going to part 15 of the Voluntary Control Council for help. Install and use grounded power supply cord and the provided shielded video interface cable with the limits for U.S.A." Translate the heading only "Compliance Information for a Class B digital device, pursuant to be determined by...


