

User Guide
Page 2
... as it becomes available, please register your projector's warranty on the Internet at: http://www.viewsonic.com For Your Records Product Name: ViewSonic PJ1075 Model Number: VPROJ22255-1W Document Number:PJ1075_UG_89 Serial Number: Purchase Date: Customer Support Country/Region United States Canada United Kingdom Europe, Middle East, Baltic countries, and North Africa Australia New Zealand Singapore/Southeast Asia Other Asia/Pacific...
... as it becomes available, please register your projector's warranty on the Internet at: http://www.viewsonic.com For Your Records Product Name: ViewSonic PJ1075 Model Number: VPROJ22255-1W Document Number:PJ1075_UG_89 Serial Number: Purchase Date: Customer Support Country/Region United States Canada United Kingdom Europe, Middle East, Baltic countries, and North Africa Australia New Zealand Singapore/Southeast Asia Other Asia/Pacific...
User Guide
Page 3
... warranty is effective: ViewSonic projectors are warranted for two (2) year for all parts excluding the lamp, two (2) years for all labor, and ninety (90) days for the first consumer purchaser. e. LIMITED WARRANTY VIEWSONIC Projector What the warranty covers: ViewSonic° warrants its sole option repair or replace the product with the product. Any product on which the serial number has been defaced...
... warranty is effective: ViewSonic projectors are warranted for two (2) year for all parts excluding the lamp, two (2) years for all labor, and ninety (90) days for the first consumer purchaser. e. LIMITED WARRANTY VIEWSONIC Projector What the warranty covers: ViewSonic° warrants its sole option repair or replace the product with the product. Any product on which the serial number has been defaced...
User Guide
Page 4
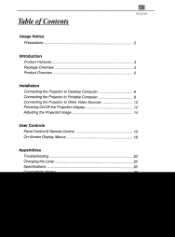
Table of Contents Usage Notice Precautions Introduction Product Features Package Overview Product Overview Installation Connecting the Projector to Desktop Computer Connecting the Projector to Portable Computer Connecting the Projector to Other Video Sources Powering On/Off the Projection Display Adjusting the Projected Image User Controls Panel Control & Remote Control On-Screen Display Menus Appendices Troubleshooting Changing the Lamp Specifications English 2 3 4 5 8 9 10 12 14 16 18 22 25 26
Table of Contents Usage Notice Precautions Introduction Product Features Package Overview Product Overview Installation Connecting the Projector to Desktop Computer Connecting the Projector to Portable Computer Connecting the Projector to Other Video Sources Powering On/Off the Projection Display Adjusting the Projected Image User Controls Panel Control & Remote Control On-Screen Display Menus Appendices Troubleshooting Changing the Lamp Specifications English 2 3 4 5 8 9 10 12 14 16 18 22 25 26

User Guide
Page 5
Before switching off the product, please keep the cooling fan running for a few minutes. Warning- Warning- The bright light may cause electric shock. & Warning- Please do not expose this product to rain or moisture. 0 Warning- After changing a new lamp, please reset the lamp life from OSD menu. F ng ash Usage Notice & Warning- To reduce the risk of the lamp itself. This product will detect the life of fire or...
Before switching off the product, please keep the cooling fan running for a few minutes. Warning- Warning- The bright light may cause electric shock. & Warning- Please do not expose this product to rain or moisture. 0 Warning- After changing a new lamp, please reset the lamp life from OSD menu. F ng ash Usage Notice & Warning- To reduce the risk of the lamp itself. This product will detect the life of fire or...
User Guide
Page 11
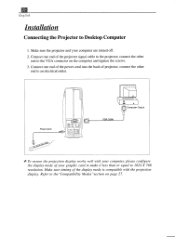
.... Power Cord 0 00 E= Computer Output VGA Cable To ensure the projection display works well with the projection display. Connect one end of the power cord into the back of projector; Make sure timimg of the display mode is compatible with your computer, please configure the display mode of the projector signal cable to Desktop Computer 1. Refer to 1024 X 768 resolution. Connect one end of your computer are turned off. 2. English Installation Connecting the Projector to the projector;
.... Power Cord 0 00 E= Computer Output VGA Cable To ensure the projection display works well with the projection display. Connect one end of the power cord into the back of projector; Make sure timimg of the display mode is compatible with your computer, please configure the display mode of the projector signal cable to Desktop Computer 1. Refer to 1024 X 768 resolution. Connect one end of your computer are turned off. 2. English Installation Connecting the Projector to the projector;
User Guide
Page 12
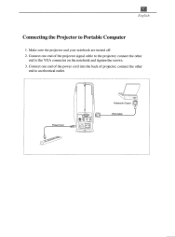
English Connecting the Projector to the projector; connect the other end to the VGA connector on the notebook and tignten the screws. 3. Power Cord cg2D, O O Notebook Output VGA Cable Connect one end of projector; connect the other end to an electrical outlet. Connect one end of the power cord into the back of the projector signal cable to Portable Computer 1. Make sure the projector and your notebook are turned off. 2.
English Connecting the Projector to the projector; connect the other end to the VGA connector on the notebook and tignten the screws. 3. Power Cord cg2D, O O Notebook Output VGA Cable Connect one end of projector; connect the other end to an electrical outlet. Connect one end of the power cord into the back of the projector signal cable to Portable Computer 1. Make sure the projector and your notebook are turned off. 2.
User Guide
Page 13
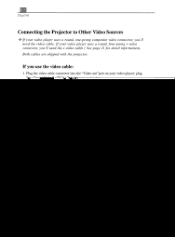
Both cables are shipped with the projector. Plug the video cable connector into the "Video out"port on your video player; plug If your video player uses a round, four-prong s-video connector, you'll need the video cable. If you use the video cable: 1. Engtish Connecting the Projector to Other Video Sources •:• If your video player uses a round, one-prong composite video connector, you'll need the s-video cable ( See page 11 for detail information).
Both cables are shipped with the projector. Plug the video cable connector into the "Video out"port on your video player; plug If your video player uses a round, four-prong s-video connector, you'll need the video cable. If you use the video cable: 1. Engtish Connecting the Projector to Other Video Sources •:• If your video player uses a round, one-prong composite video connector, you'll need the s-video cable ( See page 11 for detail information).
User Guide
Page 14
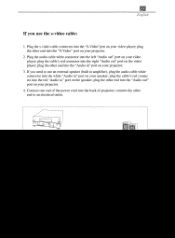
... outlet. Connect one end of projector; connect the other end into the white "Audio in amplifier), plug the audio cable white connector into the "S-Video" port on the speaker; plug the other end into the "Audio in " port on your video player; plug the cable's red connec tor into the back of the power cord into the red "Audio in " port on your projector. 4. plug the cable's red connector into the "S-Video"port on your...
... outlet. Connect one end of projector; connect the other end into the white "Audio in amplifier), plug the audio cable white connector into the "S-Video" port on the speaker; plug the other end into the "Audio in " port on your video player; plug the cable's red connec tor into the back of the power cord into the red "Audio in " port on your projector. 4. plug the cable's red connector into the "S-Video"port on your...
User Guide
Page 15
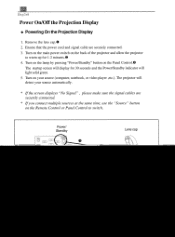
....). Turn on the main power switch on the Remote Control or Panel Control to warm up for 30 seconds and the Power/Standby indicator will display for 1-2 minutes.© 4. h Power On/Off the Projection Display ♦ Powering On the Projection Display 1. Remove the lens cap.® 2. Turn on the Panel Control.© The startup screen will light solid green. 5. Turn on the lamp by pressing "Power/Standby" button on your source automatically. * If the screen displays "No Signal" , please make sure the signal cables are securely connected...
....). Turn on the main power switch on the Remote Control or Panel Control to warm up for 30 seconds and the Power/Standby indicator will display for 1-2 minutes.© 4. h Power On/Off the Projection Display ♦ Powering On the Projection Display 1. Remove the lens cap.® 2. Turn on the Panel Control.© The startup screen will light solid green. 5. Turn on the lamp by pressing "Power/Standby" button on your source automatically. * If the screen displays "No Signal" , please make sure the signal cables are securely connected...

User Guide
Page 16
... your presentation. Otherwise the message will flash amber for about 10 minutes for your local dealer or our service center. Press the "Power/Standby" button to turn off the projector lamp. 2. "LAMP " LED indicator will disappear after 5 seconds. 3. When the "TEMP" indicator lights solid amber, it indicates the display has been overheated. Disconnect the power cord from the electrical outlet and the projector. * When the "LAMP" indicator lights solid amber; English ♦ Powering Off the Projection Display 1.
... your presentation. Otherwise the message will flash amber for about 10 minutes for your local dealer or our service center. Press the "Power/Standby" button to turn off the projector lamp. 2. "LAMP " LED indicator will disappear after 5 seconds. 3. When the "TEMP" indicator lights solid amber, it indicates the display has been overheated. Disconnect the power cord from the electrical outlet and the projector. * When the "LAMP" indicator lights solid amber; English ♦ Powering Off the Projection Display 1.
User Guide
Page 17
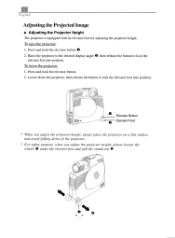
... the projector. * For safety purpose, when you adjust the projector height; please place the projector on a flat surface and avoid falling down the projector, then release the button to lock the elevator foot into position. 0 Elevator Button Elevator Foot * When you adjust the projector height; To raise the projector: 1. Press and hold the elevator button 0. 2. English Adjusting the Projected Image ♦ Adjusting the Projector Height The projector is...
... the projector. * For safety purpose, when you adjust the projector height; please place the projector on a flat surface and avoid falling down the projector, then release the button to lock the elevator foot into position. 0 Elevator Button Elevator Foot * When you adjust the projector height; To raise the projector: 1. Press and hold the elevator button 0. 2. English Adjusting the Projected Image ♦ Adjusting the Projector Height The projector is...
User Guide
Page 18
..." 23.0' (3.3') (13.1') (16A') (23.0') (26.2') (32.8') 225" 168" 26.2' 273" 210" 32.8' To focus the image, rotate the focus ring until the image is clear. The projector will focus at distances from 3.3 feet to 32.8 feet (1m to zoom in / out. English ♦ Adjusting the Projector Focus You may adjust zoom ring to zoom in and clockwise to zoom out. Rotate the room ring counter-clockwise to 10m).
..." 23.0' (3.3') (13.1') (16A') (23.0') (26.2') (32.8') 225" 168" 26.2' 273" 210" 32.8' To focus the image, rotate the focus ring until the image is clear. The projector will focus at distances from 3.3 feet to 32.8 feet (1m to zoom in / out. English ♦ Adjusting the Projector Focus You may adjust zoom ring to zoom in and clockwise to zoom out. Rotate the room ring counter-clockwise to 10m).
User Guide
Page 20
... a factor of 32 times on a small screen. (Computer mode only). Automatically synchronizes the projector to exit the OSD. Silences the speaker Enter I Display a video source image on the projection screen. ! When the OSD is displayed, you can use the four directional select keys to confirm your selection. ! Freeze/CLR 0. Please refer to still the screen image. ! Press the "Freeze/CLR" button to "Page 20" for...
... a factor of 32 times on a small screen. (Computer mode only). Automatically synchronizes the projector to exit the OSD. Silences the speaker Enter I Display a video source image on the projection screen. ! When the OSD is displayed, you can use the four directional select keys to confirm your selection. ! Freeze/CLR 0. Please refer to still the screen image. ! Press the "Freeze/CLR" button to "Page 20" for...

User Guide
Page 21
In video source, the OSD will be the "Computer OSD". Engais On-Screen Display Menus How to operate The Projector has a multilingual On-Screen Display(OSD) menu that allows you to make image adjustments and change a variety of settings. In computer source, the OSD will detect the source automatically. ,111'21.1 ta• AI 44 • r• • • / • /a nto t A 1014, The projector will be the " Video OSD".
In video source, the OSD will be the "Computer OSD". Engais On-Screen Display Menus How to operate The Projector has a multilingual On-Screen Display(OSD) menu that allows you to make image adjustments and change a variety of settings. In computer source, the OSD will detect the source automatically. ,111'21.1 ta• AI 44 • r• • • / • /a nto t A 1014, The projector will be the " Video OSD".
User Guide
Page 22
O. Image (Computer mode only) Tracking English Tint (Video mode only) The tint adjusts the red-green color balance in the projected image. • Press the left key to decrease the amount of color in the image. • Press the right key to increase the amount of color in the image. Color (Video mode only) The color setting adjusts a video image from black and white to fully saturated color. • Press the left key to increase the amount of green in the image. • Press the right key to increase the amount of red in the image.
O. Image (Computer mode only) Tracking English Tint (Video mode only) The tint adjusts the red-green color balance in the projected image. • Press the left key to decrease the amount of color in the image. • Press the right key to increase the amount of color in the image. Color (Video mode only) The color setting adjusts a video image from black and white to fully saturated color. • Press the left key to increase the amount of green in the image. • Press the right key to increase the amount of red in the image.

User Guide
Page 23
...; 4: 3 (Video mode only) You can select this function, the projector reverses and turns the image upside down at same time. When the PIP screen displayed, use the four directional select keys to make the volume function ineffective. • Choose the right icon to change the PIP screen position. English ► Treble The treble setting controls the higher frequencies of your audio source. • Press the left button...
...; 4: 3 (Video mode only) You can select this function, the projector reverses and turns the image upside down at same time. When the PIP screen displayed, use the four directional select keys to make the volume function ineffective. • Choose the right icon to change the PIP screen position. English ► Treble The treble setting controls the higher frequencies of your audio source. • Press the left button...

User Guide
Page 24
Exit Menu I Lamp Warning Choose this item and select " Yes" to exit menu. 0, Reset All Choose " Yes" to return the display parameters of the current mode to show or hide the warning message when the lamp changing warning message is displayed. 0 Lamp Reset Reset the lamp setting only when the lamp changing is done. English Lamp I Exit Menu When you want to close the OSD menu, choose this function to its factory default settings.
Exit Menu I Lamp Warning Choose this item and select " Yes" to exit menu. 0, Reset All Choose " Yes" to return the display parameters of the current mode to show or hide the warning message when the lamp changing warning message is displayed. 0 Lamp Reset Reset the lamp setting only when the lamp changing is done. English Lamp I Exit Menu When you want to close the OSD menu, choose this function to its factory default settings.
User Guide
Page 26
... the resolution setting of the monitor display is less than or equal to implement above steps 1-2. Click on " Show all devices ". If you need under the " Models" box. 7. Follow above steps of resolution setting of computer first. 2. Switch the Notebook PC display to the "external display only" or "CRT only" mode. Select the "Change" button under the " Manufactures " box; choose the resolution mode you...
... the resolution setting of the monitor display is less than or equal to implement above steps 1-2. Click on " Show all devices ". If you need under the " Models" box. 7. Follow above steps of resolution setting of computer first. 2. Switch the Notebook PC display to the "external display only" or "CRT only" mode. Select the "Change" button under the " Manufactures " box; choose the resolution mode you...
User Guide
Page 28
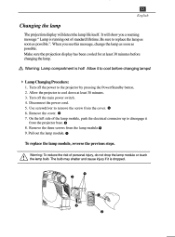
Warning: Lamp compartment is dropped. Remove the cover. 0 7. Remove the three screws from the cover. 0 6. When you a warning message " Lamp is running out of standard lifetime. Disconnect the power cord. 5. Be sure to replace the lamp as soon as possible. Allow it from the projector base. 8. Use screwdriver to the projector by pressing the Power/Standby button. 2. Pull out the lamp module. 0 To replace the lamp module, reverse the previous steps. On the left...
Warning: Lamp compartment is dropped. Remove the cover. 0 7. Remove the three screws from the cover. 0 6. When you a warning message " Lamp is running out of standard lifetime. Disconnect the power cord. 5. Be sure to replace the lamp as soon as possible. Allow it from the projector base. 8. Use screwdriver to the projector by pressing the Power/Standby button. 2. Pull out the lamp module. 0 To replace the lamp module, reverse the previous steps. On the left...

User Guide
Page 29
... Phone Jack for Audio Input - English Specifications Light Valve Contrast Ratio Lamp Number of Pixels Displayable Color Projection Lens Projection Screen Size Projection Distance Computer Compatibility Video Compatibility H. Audio Line Output - Computer Input: One 15-pin D-sub Computer Input - Video Input: One Composite Video RCA Input One S-Video Input - FCC,CE,VCCI,UL,CUL,TUV, BSMI F2.8-3.1 f=31-40mm with 3 watt output - NTSC/NTSC 4.43/PAUPAL-M/PAL-N/SECAM compatible - One internal speaker with 1.3 x zoom & focus - 21"- 273...
... Phone Jack for Audio Input - English Specifications Light Valve Contrast Ratio Lamp Number of Pixels Displayable Color Projection Lens Projection Screen Size Projection Distance Computer Compatibility Video Compatibility H. Audio Line Output - Computer Input: One 15-pin D-sub Computer Input - Video Input: One Composite Video RCA Input One S-Video Input - FCC,CE,VCCI,UL,CUL,TUV, BSMI F2.8-3.1 f=31-40mm with 3 watt output - NTSC/NTSC 4.43/PAUPAL-M/PAL-N/SECAM compatible - One internal speaker with 1.3 x zoom & focus - 21"- 273...


