English Owners Manual
Page 5
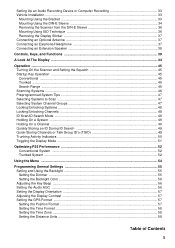
Setting Up an Audio Recording Device or Computer Recording 33 Vehicle Installation ...33 Mounting Using the Bracket ...33 Mounting Using the DIN-E Sleeve 34 Removing the Scanner from the DIN-E Sleeve 36 Mounting Using ISO Technique 36 Removing the Display Sticker ...37 Connecting an Optional Antenna 37 Connecting an Earphone/Headphone 37 Connecting an...
Setting Up an Audio Recording Device or Computer Recording 33 Vehicle Installation ...33 Mounting Using the Bracket ...33 Mounting Using the DIN-E Sleeve 34 Removing the Scanner from the DIN-E Sleeve 36 Mounting Using ISO Technique 36 Removing the Display Sticker ...37 Connecting an Optional Antenna 37 Connecting an Earphone/Headphone 37 Connecting an...

English Owners Manual
Page 30
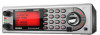
...If any of these items are missing or damaged, immediately contact your place of purchase or Uniden Customer Service at: (800) 297-1023, 8:00 a.m. Included With Your Scanner BCD996T Scanner AC Adapter (P/N AD-1009) Cigarette Lighter Adapter Power Cord Three Wire DC Power Cord ...- See Step 5, "Mounting Using the DIN-E Sleeve" on Page 34 Mounting Bracket and Hardware DIN-E Sleeve and Removal Keys for vehicle installation Push-on type Telescopic Antenna...
...If any of these items are missing or damaged, immediately contact your place of purchase or Uniden Customer Service at: (800) 297-1023, 8:00 a.m. Included With Your Scanner BCD996T Scanner AC Adapter (P/N AD-1009) Cigarette Lighter Adapter Power Cord Three Wire DC Power Cord ...- See Step 5, "Mounting Using the DIN-E Sleeve" on Page 34 Mounting Bracket and Hardware DIN-E Sleeve and Removal Keys for vehicle installation Push-on type Telescopic Antenna...
English Owners Manual
Page 31
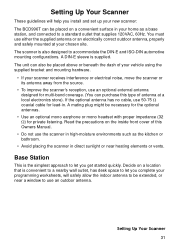
...-in high-moisture environments such as a base station, and connected to accommodate the DIN-E and ISO-DIN automotive mounting configurations. Setting Up Your Scanner 31 The unit can also be placed above...nearby wall outlet, has desk space to let you complete your programming worksheets, will help you install and set up your home as the kitchen or bathroom. • Avoid placing the scanner ...use the scanner in . Read the precautions on a convenient surface in your new scanner: The BCD996T can purchase this type of this Owners Manual. • Do not use either the supplied antenna...
...-in high-moisture environments such as a base station, and connected to accommodate the DIN-E and ISO-DIN automotive mounting configurations. Setting Up Your Scanner 31 The unit can also be placed above...nearby wall outlet, has desk space to let you complete your programming worksheets, will help you install and set up your home as the kitchen or bathroom. • Avoid placing the scanner ...use the scanner in . Read the precautions on a convenient surface in your new scanner: The BCD996T can purchase this type of this Owners Manual. • Do not use either the supplied antenna...
English Owners Manual
Page 33
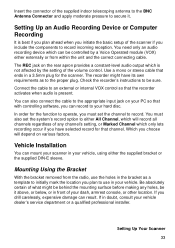
... mono or stereo cable that with controlling software, you can mount your scanner in your vehicle, using either the supplied bracket or the supplied DIN-E sleeve. If you have its own requirements as a template to initially mark the location you plan to use in doubt, consult your dash.... Setting Up Your Scanner 33 Which you choose will record all channels regardless of your vehicle dealer's service department or a qualified professional installer. The REC jack on various factors. Setting Up an Audio Recording Device or Computer Recording It is best if you plan ahead when...
... mono or stereo cable that with controlling software, you can mount your scanner in your vehicle, using either the supplied bracket or the supplied DIN-E sleeve. If you have its own requirements as a template to initially mark the location you plan to use in doubt, consult your dash.... Setting Up Your Scanner 33 Which you choose will record all channels regardless of your vehicle dealer's service department or a qualified professional installer. The REC jack on various factors. Setting Up an Audio Recording Device or Computer Recording It is best if you plan ahead when...
English Owners Manual
Page 34
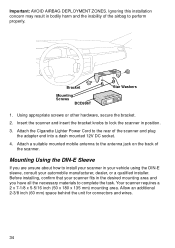
... to complete the task. Your scanner requires a 2 x 7-1/8 x 5-5/16 inch (50 x 180 x 135 mm) mounting area. Mounting Using the DIN-E Sleeve If you have all the necessary materials to the antenna jack on the back of the scanner and plug the adapter end into a dash... mounted 12V DC socket. 4. Before installing, confirm that your automobile manufacturer, dealer, or a qualified installer. Bracket Mounting Screws BCD996T Star Washers 1. Insert the scanner and insert the bracket knobs to perform properly. Important: AVOID AIRBAG...
... to complete the task. Your scanner requires a 2 x 7-1/8 x 5-5/16 inch (50 x 180 x 135 mm) mounting area. Mounting Using the DIN-E Sleeve If you have all the necessary materials to the antenna jack on the back of the scanner and plug the adapter end into a dash... mounted 12V DC socket. 4. Before installing, confirm that your automobile manufacturer, dealer, or a qualified installer. Bracket Mounting Screws BCD996T Star Washers 1. Insert the scanner and insert the bracket knobs to perform properly. Important: AVOID AIRBAG...
English Owners Manual
Page 35
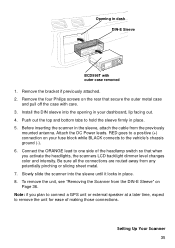
... the vehicle's chassis ground (-). 6. Before inserting the scanner in place. 5. Setting Up Your Scanner 35 Be sure all the connections are routed away from the DIN-E Sleeve" on Page 36. Connect the ORANGE lead to remove the unit for ease of the headlamp switch so that secure the outer metal case... dimmer level changes color and intensity. Opening in place. 8. To remove the unit, see "Removing the Scanner from any potentially pinching or slicing sheet metal. 7. Install the DIN sleeve into the sleeve until it locks in dash DIN-E Sleeve BCD996T with care. 3.
... the vehicle's chassis ground (-). 6. Before inserting the scanner in place. 5. Setting Up Your Scanner 35 Be sure all the connections are routed away from the DIN-E Sleeve" on Page 36. Connect the ORANGE lead to remove the unit for ease of the headlamp switch so that secure the outer metal case... dimmer level changes color and intensity. Opening in place. 8. To remove the unit, see "Removing the Scanner from any potentially pinching or slicing sheet metal. 7. Install the DIN sleeve into the sleeve until it locks in dash DIN-E Sleeve BCD996T with care. 3.
English Owners Manual
Page 36
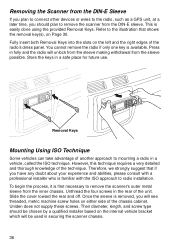
... slots on the internal vehicle bracket which will be chosen by a qualified installer based on the left and the right edges of the radio's dress panel...the four screws in a vehicle, called the ISO technique. This is available. Removing the Scanner from the DIN-E Sleeve If you plan to connect other devices or wires to the radio, such as a GPS unit,...the scanner from the DIN-E sleeve. Refer to the illustration that if you have any doubt about your experience and abilities, please consult with a professional installer who is first necessary to radio installation. Store the keys...
... slots on the internal vehicle bracket which will be chosen by a qualified installer based on the left and the right edges of the radio's dress panel...the four screws in a vehicle, called the ISO technique. This is available. Removing the Scanner from the DIN-E Sleeve If you plan to connect other devices or wires to the radio, such as a GPS unit,...the scanner from the DIN-E sleeve. Refer to the illustration that if you have any doubt about your experience and abilities, please consult with a professional installer who is first necessary to radio installation. Store the keys...

