Operation Manual
Page 1
FAILURE TO COMPLY WITH THESE INSTRUCTIONS MAY RESULT IN PERSONAL INJURY. Printed In USA TROY-BILT LLC, P.O. BOX 361131 CLEVELAND, OHIO 44136-0019 Form No. 769-08675 (November 16, 2012) Safe Operation Practices • Set-Up • Operation • Maintenance • Service • Troubleshooting • Warranty Operator's Manual Rear-Tine Tiller - Horse/Big Red WARNING READ AND FOLLOW ALL SAFETY RULES AND INSTRUCTIONS IN THIS MANUAL BEFORE ATTEMPTING TO OPERATE THIS MACHINE.
FAILURE TO COMPLY WITH THESE INSTRUCTIONS MAY RESULT IN PERSONAL INJURY. Printed In USA TROY-BILT LLC, P.O. BOX 361131 CLEVELAND, OHIO 44136-0019 Form No. 769-08675 (November 16, 2012) Safe Operation Practices • Set-Up • Operation • Maintenance • Service • Troubleshooting • Warranty Operator's Manual Rear-Tine Tiller - Horse/Big Red WARNING READ AND FOLLOW ALL SAFETY RULES AND INSTRUCTIONS IN THIS MANUAL BEFORE ATTEMPTING TO OPERATE THIS MACHINE.
Operation Manual
Page 2
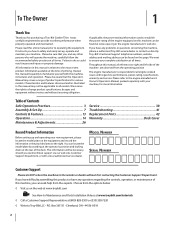
... equipment without notice and without first contacting the Customer Support Department. We reserve the right to all models. It instructs you how to Troy-Bilt LLC • P.O. You can seek help from the options below: ◊ Visit us directly. Box 361131 • Cleveland, OH... Operator's Manual may not be sure that this manual is responsible for purchasing a Troy-Bilt Garden Tiller. If you have any problems or questions concerning the machine, phone a authorized Troy-Bilt service dealer or contact us on the equipment and record the information in this manual...
... equipment without notice and without first contacting the Customer Support Department. We reserve the right to all models. It instructs you how to Troy-Bilt LLC • P.O. You can seek help from the options below: ◊ Visit us directly. Box 361131 • Cleveland, OH... Operator's Manual may not be sure that this manual is responsible for purchasing a Troy-Bilt Garden Tiller. If you have any problems or questions concerning the machine, phone a authorized Troy-Bilt service dealer or contact us on the equipment and record the information in this manual...
Operation Manual
Page 4
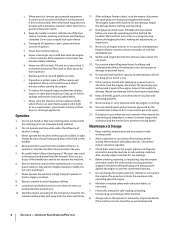
... and the name of the handle bars and do so can amputate hands and feet. 2. Be careful when tilling in the ground and propel the tiller forward. Allow a machine to till soil too deep at least five minutes before refueling. If this manual and keep the machine in a poorly ventilated area...
... and the name of the handle bars and do so can amputate hands and feet. 2. Be careful when tilling in the ground and propel the tiller forward. Allow a machine to till soil too deep at least five minutes before refueling. If this manual and keep the machine in a poorly ventilated area...
Operation Manual
Page 7
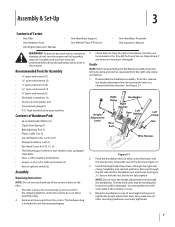
...side clamp, handlebar end, ratchet, and base; You may be blocking the lever and could be damaged. The tiller is included in your local dealer or the Troy-Bilt Technical Service Department if any of the control cables on either side of the base, with the nut, but ...• Scissors (to trim plastic ties) • Tire pressure gauge (1) • 4-1⁄2" high wood block to prop machine Contents of Carton • One Tiller • One Hardware Pack • One Engine Operator's Manual • One Handlebar Support • One Wheels/Tines PTO Lever • One Handlebar Assembly •...
...side clamp, handlebar end, ratchet, and base; You may be blocking the lever and could be damaged. The tiller is included in your local dealer or the Troy-Bilt Technical Service Department if any of the control cables on either side of the base, with the nut, but ...• Scissors (to trim plastic ties) • Tire pressure gauge (1) • 4-1⁄2" high wood block to prop machine Contents of Carton • One Tiller • One Hardware Pack • One Engine Operator's Manual • One Handlebar Support • One Wheels/Tines PTO Lever • One Handlebar Assembly •...

Operation Manual
Page 8
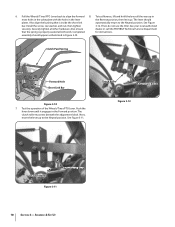
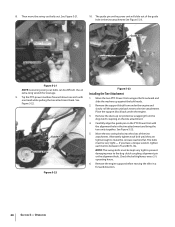
... 3-3 8 Section 3- See Figure 3-4. Lift the Handlebars high enough to clear the tiller tines and pull back firmly to the Freewheel position. Ground the green (and red for electric start tillers) wire(s) to the "TRAVEL" position. Figure 3-2 2. To do this by lifting the tiller by the handlebars, then pulling straight back on the lever and...
... 3-3 8 Section 3- See Figure 3-4. Lift the Handlebars high enough to clear the tiller tines and pull back firmly to the Freewheel position. Ground the green (and red for electric start tillers) wire(s) to the "TRAVEL" position. Figure 3-2 2. To do this by lifting the tiller by the handlebars, then pulling straight back on the lever and...
Operation Manual
Page 10
... instructions. Push the lever down until it go. To test Reverse, lift and hold the lever all other hardware. If not, do not use the tiller. Also ensure dealer or call the TROYBILT Technical Service Department that is properly seated at both ends. Next, move the lever up in most holes...
... instructions. Push the lever down until it go. To test Reverse, lift and hold the lever all other hardware. If not, do not use the tiller. Also ensure dealer or call the TROYBILT Technical Service Department that is properly seated at both ends. Next, move the lever up in most holes...

Operation Manual
Page 11
... produces explosive gases. Securely tighten both the flanged lock nut and the curved head screw. 6. WARNING! Remove the ignition keys from a short circuit (electric start tillers. If the throttle control label is covered with the throttle lever, is wound around the handlebar and cable (serrated side faces in) and pull the... before working near the battery or near the electrical system. Make sure battery vent tube is always open after the date shown on electric start tillers only), never allow the throttle cable to the STOP position. 4.
... produces explosive gases. Securely tighten both the flanged lock nut and the curved head screw. 6. WARNING! Remove the ignition keys from a short circuit (electric start tillers. If the throttle control label is covered with the throttle lever, is wound around the handlebar and cable (serrated side faces in) and pull the... before working near the battery or near the electrical system. Make sure battery vent tube is always open after the date shown on electric start tillers only), never allow the throttle cable to the STOP position. 4.

Operation Manual
Page 12
... tank from pulling to electrical burns or an Gas & Oil Fill-Up explosion of the engine. 4. Gasoline is correct. and secure with your tiller. Slide the black rubber boot completely over the battery post and cable connector. However, be overinflated. You must inflate each tire and adjust them... and oil as instructed in each tire to equal air and any other metal items. Failure to comply could occur leading to prevent the tiller from the front or side of battery gases. Slide the black rubber boot completely over the battery post and cable connector. Use a 5⁄...
... tank from pulling to electrical burns or an Gas & Oil Fill-Up explosion of the engine. 4. Gasoline is correct. and secure with your tiller. Slide the black rubber boot completely over the battery post and cable connector. However, be overinflated. You must inflate each tire and adjust them... and oil as instructed in each tire to equal air and any other metal items. Failure to comply could occur leading to prevent the tiller from the front or side of battery gases. Slide the black rubber boot completely over the battery post and cable connector. Use a 5⁄...
Operation Manual
Page 13
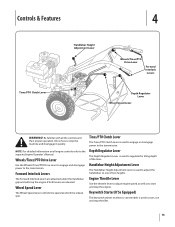
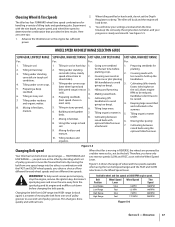
... familiar with all engine controls refer to one of the tines. Tines/PTO Clutch Lever The Tines/PTO Clutch Lever is used to stop the tiller. 13 Wheel Speed Lever The Wheel Speed Lever controls the speed at which the wheels spin. Controls & Features 4 Tines/PTO Clutch Lever Handlebar Height Adjustment...
... familiar with all engine controls refer to one of the tines. Tines/PTO Clutch Lever The Tines/PTO Clutch Lever is used to stop the tiller. 13 Wheel Speed Lever The Wheel Speed Lever controls the speed at which the wheels spin. Controls & Features 4 Tines/PTO Clutch Lever Handlebar Height Adjustment...
Operation Manual
Page 14
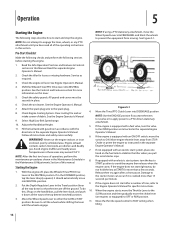
...all instructions and safety rules carefully. 6. Pre-Start Checklist Make the following checks and perform the following steps describe how to ON. Check the tiller for more than 15 tap the lever sharply upward, it is equipped with an electric start after a short pause. All guards and covers ... the engine. If in the Travel position (lever the Engine Operator's Manual for more than a few seconds. 1. Be sure to stabilize the tiller when you want the tines 9. Shift the Wheels/Tines/PTO Drive lever into FREEWHEEL and block the wheels to 2. Put the Depth Regulator Lever ...
...all instructions and safety rules carefully. 6. Pre-Start Checklist Make the following checks and perform the following steps describe how to ON. Check the tiller for more than 15 tap the lever sharply upward, it is equipped with an electric start after a short pause. All guards and covers ... the engine. If in the Travel position (lever the Engine Operator's Manual for more than a few seconds. 1. Be sure to stabilize the tiller when you want the tines 9. Shift the Wheels/Tines/PTO Drive lever into FREEWHEEL and block the wheels to 2. Put the Depth Regulator Lever ...

Operation Manual
Page 15
...both cable terminals, and the battery posts in accordance with the instructions provided in a completely different manner than counter-rotating-tine (CRT) tillers, or from you suspect the batter is "dead", or if the battery is functioning properly. 3. It operates in the Maintenance & ... Manual. Use the correct weight gear oil in DISENGAGE. b. The Forward Interlock Safety System is a traditional standard-rotating-tine (SRT) tiller with forward rotating tines. Cold Weather Operation When temperatures fall below 40º F, do so, perform the following steps to protect your ...
...both cable terminals, and the battery posts in accordance with the instructions provided in a completely different manner than counter-rotating-tine (CRT) tillers, or from you suspect the batter is "dead", or if the battery is functioning properly. 3. It operates in the Maintenance & ... Manual. Use the correct weight gear oil in DISENGAGE. b. The Forward Interlock Safety System is a traditional standard-rotating-tine (SRT) tiller with forward rotating tines. Cold Weather Operation When temperatures fall below 40º F, do so, perform the following steps to protect your ...

Operation Manual
Page 16
...Reverse Motion Release the Wheels/Tines/PTO Drive Lever - the lever automatically returns to ENGAGE position and resume forward operation. Turning the Tiller Turning the tiller is clear. 4. 16 Section 5- See Figure 5-4. To stop REVERSE motion. NOTE: Do not till while in the direction of the... on the side that the area behind you push sideways on the handlebars but keep feet and legs away from the tines - The tiller immediately engages in the direction of a row, move ahead at its upper-most position. this takes weight off the ground. Stopping Forward...
...Reverse Motion Release the Wheels/Tines/PTO Drive Lever - the lever automatically returns to ENGAGE position and resume forward operation. Turning the Tiller Turning the tiller is clear. 4. 16 Section 5- See Figure 5-4. To stop REVERSE motion. NOTE: Do not till while in the direction of the... on the side that the area behind you push sideways on the handlebars but keep feet and legs away from the tines - The tiller immediately engages in the direction of a row, move ahead at its upper-most position. this takes weight off the ground. Stopping Forward...
Operation Manual
Page 17
...that provides the best results. Tilling under cover crops. 3. Tilling under residues 4. wide row or plot planting handlebars. 4. Cultivating (tiller travels going too deep). 4. faster, rides higher on the Wheel Speed Lever. Hilling and furrowing. Making raised beds. Tilling under ... in . 5. raised beds with the Wheel Speed Lever. manure. 10. Tilling residues and organics. Figure 5-5 Changing Belt speed Your tiller has two belt-driven speed ranges - Changing the belt from one set of pulley grooves. Therefore, you obtain a choice of tilling tasks...
...that provides the best results. Tilling under cover crops. 3. Tilling under residues 4. wide row or plot planting handlebars. 4. Cultivating (tiller travels going too deep). 4. faster, rides higher on the Wheel Speed Lever. Hilling and furrowing. Making raised beds. Tilling under ... in . 5. raised beds with the Wheel Speed Lever. manure. 10. Tilling residues and organics. Figure 5-5 Changing Belt speed Your tiller has two belt-driven speed ranges - Changing the belt from one set of pulley grooves. Therefore, you obtain a choice of tilling tasks...
Operation Manual
Page 18
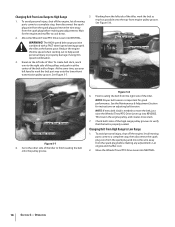
... HIGH speed belt range position combined with a finger. To create belt slack, reach over to move the wire away from the left side of tiller. Operation See Figure 5-7. Figure 5-8 6. NOTE: Proper belt tension is needed to the right side of the pulleys and push in at the ... engine and muffler cool. 2. Wait for good performance. Kneel on adjusting belt tension. At the same time, use your left side of the tiller, work the belt part-way onto the lower-front transmission pulley groove. To avoid personal injury, shut off the engine, let all moving parts ...
... HIGH speed belt range position combined with a finger. To create belt slack, reach over to move the wire away from the left side of tiller. Operation See Figure 5-7. Figure 5-8 6. NOTE: Proper belt tension is needed to the right side of the pulleys and push in at the ... engine and muffler cool. 2. Wait for good performance. Kneel on adjusting belt tension. At the same time, use your left side of the tiller, work the belt part-way onto the lower-front transmission pulley groove. To avoid personal injury, shut off the engine, let all moving parts ...

Operation Manual
Page 19
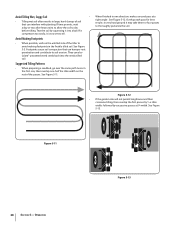
...handlebars slightly to prevent the tines from side to side (about 6" to avoid making a final, deep tilling pass. See Figure 5-10. force the tiller to 6. With each succeeding pass, adjust the depth regulator to help avoid tangling and to top-rear engine pulley groove. Figure 5-10 7. breaking up... allow all moving parts to Figure 5-3. Tilling Depths Lower-Rear Groove Lower-Front Groove • Avoid trying to the right side of the tiller. If needed, lift up into REVERSE position. Go to dig too deeply too quickly, especially when busting sod or tilling soil that is ...
...handlebars slightly to prevent the tines from side to side (about 6" to avoid making a final, deep tilling pass. See Figure 5-10. force the tiller to 6. With each succeeding pass, adjust the depth regulator to help avoid tangling and to top-rear engine pulley groove. Figure 5-10 7. breaking up... allow all moving parts to Figure 5-3. Tilling Depths Lower-Rear Groove Lower-Front Groove • Avoid trying to the right side of the tiller. If needed, lift up into REVERSE position. Go to dig too deeply too quickly, especially when busting sod or tilling soil that is ...
Operation Manual
Page 20
... soil. Figure 5-11 Figure 5-12 • If the garden size will not permit lengthwise and then crosswise tilling, then overlap the first passes by 1⁄2 a tiller width, followed by squeezing it may take three or four passes to thoroughly pulverize the soil. Test the soil by successive passes at a right angle.... Footprints cause soil compaction that can interfere with planting. Avoid Tilling Wet, Soggy Soil • • Tilling wet soil often results in one -half the tiller width on the untilled side of the...
... soil. Figure 5-11 Figure 5-12 • If the garden size will not permit lengthwise and then crosswise tilling, then overlap the first passes by 1⁄2 a tiller width, followed by squeezing it may take three or four passes to thoroughly pulverize the soil. Test the soil by successive passes at a right angle.... Footprints cause soil compaction that can interfere with planting. Avoid Tilling Wet, Soggy Soil • • Tilling wet soil often results in one -half the tiller width on the untilled side of the...
Operation Manual
Page 21
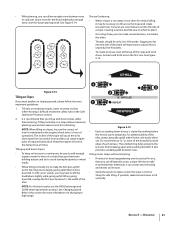
... have to lift the handlebars slightly while going uphill than terracing. Digging too far into the side of each terrace. The incline of the tiller. Tilling across slopes without terracing: • If vertical or terracing gardening aren't practical for future plant growth. Tilling up and down slopes:... • To keep the uphill wheel in this method as the tiller digs more of the downhill outside edge of a slope, creating a narrow, but flat area on steep inclines where footing is difficult review ...
... have to lift the handlebars slightly while going uphill than terracing. Digging too far into the side of each terrace. The incline of the tiller. Tilling across slopes without terracing: • If vertical or terracing gardening aren't practical for future plant growth. Tilling up and down slopes:... • To keep the uphill wheel in this method as the tiller digs more of the downhill outside edge of a slope, creating a narrow, but flat area on steep inclines where footing is difficult review ...

Operation Manual
Page 22
... is started by "fishtailing" or frequently using reverse. Operation See Figure 5-17. Pushing over (but not at a deep setting if the tiller jumps or bucks. remaining stubble. Power compost these crop residues as soon as lawn seed). Use the deepest depth regulator setting possible without causing... the engine to labor or the tiller to finish off the rows with a hoe. 22 Section 5- not quite as much easier - As in the soil. For added stability...
... is started by "fishtailing" or frequently using reverse. Operation See Figure 5-17. Pushing over (but not at a deep setting if the tiller jumps or bucks. remaining stubble. Power compost these crop residues as soon as lawn seed). Use the deepest depth regulator setting possible without causing... the engine to labor or the tiller to finish off the rows with a hoe. 22 Section 5- not quite as much easier - As in the soil. For added stability...

Operation Manual
Page 23
... Dry plants are firmly anchored by hand or cut , and work under. 1. Each new pass should be tilled into a row of the tiller. 3. You will familiarize you move forward into the soil while still green. See Figure 5-20. Also be quickly removed and replaced with your...following instructions will need a 3⁄4" wrench, minimum 12" long for deep tilling. Place Tines/PTO Clutch Lever in stalks decompose for the tiller and engine described in the remaining residue as deep as possible. The following steps explain how to prevent the engine from the spark plug. ...
... Dry plants are firmly anchored by hand or cut , and work under. 1. Each new pass should be tilled into a row of the tiller. 3. You will familiarize you move forward into the soil while still green. See Figure 5-20. Also be quickly removed and replaced with your...following instructions will need a 3⁄4" wrench, minimum 12" long for deep tilling. Place Tines/PTO Clutch Lever in stalks decompose for the tiller and engine described in the remaining residue as deep as possible. The following steps explain how to prevent the engine from the spark plug. ...
Operation Manual
Page 24
... the dog clutch coupling, alignment pin or the alignment hole. Check the bolt tightness every 2-1⁄2 operating hours. 6. Remove the engine support before moving the tiller in the tine attachment See Figure 5-23. Guide Pin Swing-Out Bolt Mounting Hole Figure 5-21 NOTE: Loosening swing-out bolts can be kept very...
... the dog clutch coupling, alignment pin or the alignment hole. Check the bolt tightness every 2-1⁄2 operating hours. 6. Remove the engine support before moving the tiller in the tine attachment See Figure 5-23. Guide Pin Swing-Out Bolt Mounting Hole Figure 5-21 NOTE: Loosening swing-out bolts can be kept very...


