
User Guide
Page 5
...telephone number of the sending machine or such business, other electronic device, including Fax machines, to party line service is not practical, the telephone company will give you to make any changes necessary to state tariffs. or an authorized representative of Toshiba, or the Toshiba Support ...these changes might affect your service or the operation of each transmitted page or on the label. If the equipment is causing harm to the telephone network, the telephone company may request that temporary discontinuance of 1991 makes it can. Connection to send any person to use a...
...telephone number of the sending machine or such business, other electronic device, including Fax machines, to party line service is not practical, the telephone company will give you to make any changes necessary to state tariffs. or an authorized representative of Toshiba, or the Toshiba Support ...these changes might affect your service or the operation of each transmitted page or on the label. If the equipment is causing harm to the telephone network, the telephone company may request that temporary discontinuance of 1991 makes it can. Connection to send any person to use a...
User Guide
Page 22
... on the power 47 Adding memory 48 Installing a memory module 49 Removing a memory module 52 Hard Drive Recovery Utilities (for the U100 model only 54 Creating Recovery CDs/DVDs 55 Hard Disk Drive Recovery using the recovery partition 56 Hard Disk Drive Recovery using the Recovery media 59 Deleting the Hard Disk Recovery Utility 62 Installing drivers and applications 63 Using the Accupoint II pointing device 64 Turning off the computer 65 Closing the display panel 65 Devices for office computing 66 libretto® DVD Dock 67 Connecting the libretto® DVD Dock 67 Removing the...
... on the power 47 Adding memory 48 Installing a memory module 49 Removing a memory module 52 Hard Drive Recovery Utilities (for the U100 model only 54 Creating Recovery CDs/DVDs 55 Hard Disk Drive Recovery using the recovery partition 56 Hard Disk Drive Recovery using the Recovery media 59 Deleting the Hard Disk Recovery Utility 62 Installing drivers and applications 63 Using the Accupoint II pointing device 64 Turning off the computer 65 Closing the display panel 65 Devices for office computing 66 libretto® DVD Dock 67 Connecting the libretto® DVD Dock 67 Removing the...

User Guide
Page 41
... memory (see "Adding memory" on page 48). ❖ Connect a mouse (see "Using a mouse" on page 72). ❖ Connect a full-size keyboard (see "Using an external keyboard" on page 71). ❖ Connect an external monitor (see "Using external display devices" on page 69). ❖ Connect a local printer (see "Connecting a local printer" on page 72). ❖ Connect an external CD/DVD drive (see "Using the libretto® DVD Dock" on page 91). ❖ Install PC Cards (see "Inserting and removing PC Cards...
... memory (see "Adding memory" on page 48). ❖ Connect a mouse (see "Using a mouse" on page 72). ❖ Connect a full-size keyboard (see "Using an external keyboard" on page 71). ❖ Connect an external monitor (see "Using external display devices" on page 69). ❖ Connect a local printer (see "Connecting a local printer" on page 72). ❖ Connect an external CD/DVD drive (see "Using the libretto® DVD Dock" on page 91). ❖ Install PC Cards (see "Inserting and removing PC Cards...

User Guide
Page 49
... this procedure. Installing a memory module An additional memory module can install one memory module slot. The computer has one memory module. The operating system turns off computer window appears. 2 Click Turn Off. Getting Started Adding memory 49 may damage the computer, the module, or both. To avoid damaging the computer's screws, use complex software or process large amounts of the computer. The Turn off the computer. 3 Unplug and remove any cables connected to step...
... this procedure. Installing a memory module An additional memory module can install one memory module slot. The computer has one memory module. The operating system turns off computer window appears. 2 Click Turn Off. Getting Started Adding memory 49 may damage the computer, the module, or both. To avoid damaging the computer's screws, use complex software or process large amounts of the computer. The Turn off the computer. 3 Unplug and remove any cables connected to step...

User Guide
Page 51
.... 9 Remove the new memory module from its antistatic packaging. 10 Holding the memory module by its edges so that you may have built up. Do not force the memory module into place. Getting Started Adding memory 51 7 Remove the memory slot cover. The memory module should be careful not to discharge any static electricity you can damage the memory module. Static electricity can retrieve them later. Sample removing the memory module slot cover...
.... 9 Remove the new memory module from its antistatic packaging. 10 Holding the memory module by its edges so that you may have built up. Do not force the memory module into place. Getting Started Adding memory 51 7 Remove the memory slot cover. The memory module should be careful not to discharge any static electricity you can damage the memory module. Static electricity can retrieve them later. Sample removing the memory module slot cover...

User Guide
Page 52
... and open the memory module slot cover. You can verify that the computer has recognized it . If you need to remove a memory module: 1 Complete steps 1-6 in "Checking total memory" on page 49 to secure the memory module. Grease or dust on the connectors may cause memory access problems. 12 Replace the memory module slot cover and tighten the screw. 13 Turn the computer over and restart it correctly as described in "Installing a memory module...
... and open the memory module slot cover. You can verify that the computer has recognized it . If you need to remove a memory module: 1 Complete steps 1-6 in "Checking total memory" on page 49 to secure the memory module. Grease or dust on the connectors may cause memory access problems. 12 Replace the memory module slot cover and tighten the screw. 13 Turn the computer over and restart it correctly as described in "Installing a memory module...

User Guide
Page 53
..., the Standby configuration will be saved. In either of the slot. 3 Carefully remove the memory module from the memory module. The following : Push the power button to remove a memory module with the computer turned on again. 2 Pull the clips away from the slot. Do not remove the memory module while the computer is in memory will not be lost. Sample removing the memory module 4 Replace the memory module slot cover and screw. Getting Started Adding memory 53 Do...
..., the Standby configuration will be saved. In either of the slot. 3 Carefully remove the memory module from the memory module. The following : Push the power button to remove a memory module with the computer turned on again. 2 Pull the clips away from the slot. Do not remove the memory module while the computer is in memory will not be lost. Sample removing the memory module 4 Replace the memory module slot cover and screw. Getting Started Adding memory 53 Do...

User Guide
Page 54
... creating Recovery media see "Creating Recovery CDs/DVDs" on page 48. An optional writable external optical media drive that you create recovery CDs/ DVDs before using your hard disk drive or reinstall selected applications and software features or utilities. TECHNICAL NOTE: You must have at least one memory module installed for the U100 model only) Your computer has been configured with a hard disk partition to work. If the computer does not recognize the memory configuration, turn off the computer, remove the memory slot cover, and make...
... creating Recovery media see "Creating Recovery CDs/DVDs" on page 48. An optional writable external optical media drive that you create recovery CDs/ DVDs before using your hard disk drive or reinstall selected applications and software features or utilities. TECHNICAL NOTE: You must have at least one memory module installed for the U100 model only) Your computer has been configured with a hard disk partition to work. If the computer does not recognize the memory configuration, turn off the computer, remove the memory slot cover, and make...
User Guide
Page 57
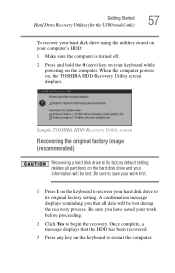
... to its original factory setting. Sample TOSHIBA HDD Recovery Utility screen Recovering the original factory image (recommended) Recovering a hard disk drive to begin the recovery. Getting Started Hard Drive Recovery Utilities (for the U100 model only) 57 To recover your hard disk drive using the utilities stored on your computer's HDD: 1 Make sure the computer is turned off. 2 Press and hold the 0 (zero) key on your hard disk drive to restart the computer. When the computer powers on the keyboard to its factory default setting deletes all data...
... to its original factory setting. Sample TOSHIBA HDD Recovery Utility screen Recovering the original factory image (recommended) Recovering a hard disk drive to begin the recovery. Getting Started Hard Drive Recovery Utilities (for the U100 model only) 57 To recover your hard disk drive using the utilities stored on your computer's HDD: 1 Make sure the computer is turned off. 2 Press and hold the 0 (zero) key on your hard disk drive to restart the computer. When the computer powers on the keyboard to its factory default setting deletes all data...

User Guide
Page 69
... connect an external display device to the Toshiba Mini RGB Adapter port on the left side of the computer. To do this : 1 Connect the monitor's video cable to the RGB (monitor) adapter, then connect the other end of the adapter to the available video port: ❖ An external monitor or projector via the RGB (monitor) port. Getting Started Using external display devices 69 3 Remove the computer from the libretto® DVD Dock Using external display devices Your computer comes with a built-in LCD display...
... connect an external display device to the Toshiba Mini RGB Adapter port on the left side of the computer. To do this : 1 Connect the monitor's video cable to the RGB (monitor) adapter, then connect the other end of the adapter to the available video port: ❖ An external monitor or projector via the RGB (monitor) port. Getting Started Using external display devices 69 3 Remove the computer from the libretto® DVD Dock Using external display devices Your computer comes with a built-in LCD display...

User Guide
Page 73
... Start, Control Panel, Printers and Other Hardware, and then Printers and Faxes. The Printers and Faxes window appears. Setting up your printer If you started your computer. You install the printer driver either by following the instructions indicated in your computer. 2 Plug the printer's power cable into one of printer that is connected to set up a printer with a printer connected and turned on your printer manual or by using...
... Start, Control Panel, Printers and Other Hardware, and then Printers and Faxes. The Printers and Faxes window appears. Setting up your printer If you started your computer. You install the printer driver either by following the instructions indicated in your computer. 2 Plug the printer's power cable into one of printer that is connected to set up a printer with a printer connected and turned on your printer manual or by using...

User Guide
Page 188
... battery power, it and press any key does not work routine, you change the system in the Startup menu to start. ❖ The operating system responds differently from the normal routine. ❖ The screen does not look right. The computer displays the Non-System disk or disk error message. For more information see "The computer is not accessing the hard disk or the optional external diskette drive." Unless a hardware device has failed, problems...
... battery power, it and press any key does not work routine, you change the system in the Startup menu to start. ❖ The operating system responds differently from the normal routine. ❖ The screen does not look right. The computer displays the Non-System disk or disk error message. For more information see "The computer is not accessing the hard disk or the optional external diskette drive." Unless a hardware device has failed, problems...

User Guide
Page 199
... key, type the password and press Enter. If you are using the built-in screen, make sure the display priority is not set for the built-in screen. 199 If Something Goes Wrong Resolving a hardware conflict Display problems Here are using an external monitor: ❖ Check that the monitor is turned on. ❖ Check that the cable connecting the external monitor to the computer is firmly attached. ❖ Try adjusting the contrast and brightness controls...
... key, type the password and press Enter. If you are using the built-in screen, make sure the display priority is not set for the built-in screen. 199 If Something Goes Wrong Resolving a hardware conflict Display problems Here are using an external monitor: ❖ Check that the monitor is turned on. ❖ Check that the cable connecting the external monitor to the computer is firmly attached. ❖ Try adjusting the contrast and brightness controls...

User Guide
Page 214
... use the adapter's management utility. A dirty drive can also cause audio problems. If you have tried several discs and all fail, consider sending your display settings: ❖ Click Start, Control Panel, Appearance and Themes, and double-click Display. ❖ Click on the Settings tab and check the Color Palette. For general problems playing a DVD title, try to establish a wireless connection. 214 If Something Goes Wrong DVD operating problems ❖ Windows XP will be set...
... use the adapter's management utility. A dirty drive can also cause audio problems. If you have tried several discs and all fail, consider sending your display settings: ❖ Click Start, Control Panel, Appearance and Themes, and double-click Display. ❖ Click on the Settings tab and check the Color Palette. For general problems playing a DVD title, try to establish a wireless connection. 214 If Something Goes Wrong DVD operating problems ❖ Windows XP will be set...

User Guide
Page 232
Fn + This hot key turns the Zooming utility to zoom-out. 232 Hot Keys Display brightness Display brightness Fn + This hot key decreases the screen brightness. Fn + This hot key turns the scroll lock feature on and off. For more information, see "TOSHIBA Zooming Utility" on and off . Fn + This hot key increases the screen brightness. Keyboard hot keys Fn + This hot key turns the cursor control overlay on and off . Fn + This hot key turns the numeric overlay on page 160. Fn + This hot key turns the Zooming...
Fn + This hot key turns the Zooming utility to zoom-out. 232 Hot Keys Display brightness Display brightness Fn + This hot key decreases the screen brightness. Fn + This hot key turns the scroll lock feature on and off. For more information, see "TOSHIBA Zooming Utility" on and off . Fn + This hot key increases the screen brightness. Keyboard hot keys Fn + This hot key turns the cursor control overlay on and off . Fn + This hot key turns the numeric overlay on page 160. Fn + This hot key turns the Zooming...

User Guide
Page 267
... battery save mode. (2) A key or combination of computers or other on the network. I icon - internal device - See also cache, CPU cache, L2 cache. hot swapping - A small image displayed on the motherboard to interact with the Fn key can set system options or control system parameters, such as the Accupoint II pointing device. interlaced - A key or combination of keys that activates a memory resident program. Memory cache installed on the screen that enables any other devices...
... battery save mode. (2) A key or combination of computers or other on the network. I icon - internal device - See also cache, CPU cache, L2 cache. hot swapping - A small image displayed on the motherboard to interact with the Fn key can set system options or control system parameters, such as the Accupoint II pointing device. interlaced - A key or combination of keys that activates a memory resident program. Memory cache installed on the screen that enables any other devices...
User Guide
Page 275
... Memory Access) 192 drivers installing 63 DVD player general problems 214 DVD-ROM drive opening 93 problems 204 troubleshooting 204 DVD-ROM/multi-function drive problems 204 E energy saving features 104 error messages device driver conflict 191 general hardware problem 191 non-system disk or disk error 188, 203 problem with display settings/ current settings not working with hardware 200 program has performed an illegal operation 185 warning resume failure 187 error-checking 202 Ethernet LAN port 127 expansion memory slot 51 exploring the desktop 120 external monitor not working...
... Memory Access) 192 drivers installing 63 DVD player general problems 214 DVD-ROM drive opening 93 problems 204 troubleshooting 204 DVD-ROM/multi-function drive problems 204 E energy saving features 104 error messages device driver conflict 191 general hardware problem 191 non-system disk or disk error 188, 203 problem with display settings/ current settings not working with hardware 200 program has performed an illegal operation 185 warning resume failure 187 error-checking 202 Ethernet LAN port 127 expansion memory slot 51 exploring the desktop 120 external monitor not working...

User Guide
Page 276
... configuring 99 starting again from 100 Hibernation mode hot key 230 hot key Display brightness 232 display modes 231 Hibernation mode 230 Instant password security 229 instant password security 229 keyboard overlays 232 power usage mode 118, 229 Power usage profile 229 Standby mode 230 utility 152 volume mute 228 hot key utility 152 hot keys 228 I icon 121 desktop 121 Internet Explorer 122 moving to desktop 121 recycle bin 122 safety 31 Industry Canada requirement 4 installation memory module 49 installing...
... configuring 99 starting again from 100 Hibernation mode hot key 230 hot key Display brightness 232 display modes 231 Hibernation mode 230 Instant password security 229 instant password security 229 keyboard overlays 232 power usage mode 118, 229 Power usage profile 229 Standby mode 230 utility 152 volume mute 228 hot key utility 152 hot keys 228 I icon 121 desktop 121 Internet Explorer 122 moving to desktop 121 recycle bin 122 safety 31 Industry Canada requirement 4 installation memory module 49 installing...

User Guide
Page 277
... troubleshooting 198 using 80 Windows special keys 82 L LCD power-saver 66 libretto DVD Dock 67 M memory adding 48, 49 expansion slots 49 problem solving 195 removing expansion slot cover 51 memory cards Secure Digital 138 memory module inserting 51 installation 49 removing 53 microphone 133 modem determining COM port 124 problem solving 210 resetting port to default settings 124 upgrading 124 monitor 69 connecting 69 not working 199 mouse installing 72 serial 72 N network accessing 126 Dial-Up Networking Wizard 126 networking wireless 126 O OmniPass 165 opening the display panel...
... troubleshooting 198 using 80 Windows special keys 82 L LCD power-saver 66 libretto DVD Dock 67 M memory adding 48, 49 expansion slots 49 problem solving 195 removing expansion slot cover 51 memory cards Secure Digital 138 memory module inserting 51 installation 49 removing 53 microphone 133 modem determining COM port 124 problem solving 210 resetting port to default settings 124 upgrading 124 monitor 69 connecting 69 not working 199 mouse installing 72 serial 72 N network accessing 126 Dial-Up Networking Wizard 126 networking wireless 126 O OmniPass 165 opening the display panel...
User Guide
Page 280
... Memory Boot Utility 163 Toshiba utilities 140 TOSHIBA Zooming Utility 160 troubleshooting DVD player general problems 214 DVD-ROM drive 204 external keyboard 198 keyboard 198 keypad overlay 198 turning off the computer 65 turning on the computer 48 turning on the power 47 U U100 deleting Hard Disk Recovery Utility 62 Hard Disk Drive Recovery media 59 hard disk drive recovery partition 56 Hard Drive Recovery partition 56 Hard Drive Recovery Utilities 54 user password, disabling 156 user passwords setting 155 using a file extension 89 using the Toshiba Dual Pointing Device 64 utilities Toshiba...
... Memory Boot Utility 163 Toshiba utilities 140 TOSHIBA Zooming Utility 160 troubleshooting DVD player general problems 214 DVD-ROM drive 204 external keyboard 198 keyboard 198 keypad overlay 198 turning off the computer 65 turning on the computer 48 turning on the power 47 U U100 deleting Hard Disk Recovery Utility 62 Hard Disk Drive Recovery media 59 hard disk drive recovery partition 56 Hard Drive Recovery partition 56 Hard Drive Recovery Utilities 54 user password, disabling 156 user passwords setting 155 using a file extension 89 using the Toshiba Dual Pointing Device 64 utilities Toshiba...


