User Guide 1
Page 14
... time 33 Turning on the power 33 Setting up your device 34 Setting up your Wi-Fi® connection 34 Setting location preferences 35 Setting the date and time 36 Sign in to your Google™ Account 36 Setting up Wi-Fi® and Bluetooth® connections 38 Registering your Toshiba device 39 Backing up your data 39 Backing up data using TOSHIBA File Manager 39 Backing up data using your Google™ Account 39 Restoring your data using your Google™ Account...
... time 33 Turning on the power 33 Setting up your device 34 Setting up your Wi-Fi® connection 34 Setting location preferences 35 Setting the date and time 36 Sign in to your Google™ Account 36 Setting up Wi-Fi® and Bluetooth® connections 38 Registering your Toshiba device 39 Backing up your data 39 Backing up data using TOSHIBA File Manager 39 Backing up data using your Google™ Account 39 Restoring your data using your Google™ Account...

User Guide 1
Page 16
... Removing memory media 85 Adding optional external devices 86 Using an external keyboard 86 Using an external mouse 86 Using external devices 87 Connecting an HDMI®-compatible television or display device 87 Using a docking station 88 Connecting your tablet to a docking station 88 Chapter 5: Utilities 90 TOSHIBA Service Station 91 Check for application updates 92 Downloading updates 92 Installing updates 93 Downloading and installing System updates 93 TOSHIBA File Manager Utility 93 File browsing screen 95 Operation of files/folders 95 TOSHIBA Adaptive display 97 TOSHIBA...
... Removing memory media 85 Adding optional external devices 86 Using an external keyboard 86 Using an external mouse 86 Using external devices 87 Connecting an HDMI®-compatible television or display device 87 Using a docking station 88 Connecting your tablet to a docking station 88 Chapter 5: Utilities 90 TOSHIBA Service Station 91 Check for application updates 92 Downloading updates 92 Installing updates 93 Downloading and installing System updates 93 TOSHIBA File Manager Utility 93 File browsing screen 95 Operation of files/folders 95 TOSHIBA Adaptive display 97 TOSHIBA...

User Guide 1
Page 22
... you last backed it up your device, you will lose all new files for files you back it up your battery runs out of online sites to date with future upgrades. Label the backup copies clearly and store them in the device's temporary memory until you receive via external media, email, or download from the Internet. ❖ Do not turn off the device if a drive indicator light indicates a drive is active.
... you last backed it up your device, you will lose all new files for files you back it up your battery runs out of online sites to date with future upgrades. Label the backup copies clearly and store them in the device's temporary memory until you receive via external media, email, or download from the Internet. ❖ Do not turn off the device if a drive indicator light indicates a drive is active.

User Guide 1
Page 37
.... The lock screen appears, unless you can sign in to a Google Account later in with your Google Account screen ❖ Enter your screen times-out and goes blank/dark, press the Power button to skip the account setup for the first time The "Sign in with your Google Account" screen appears. (Sample Image) Sign in Settings, under Accounts & sync. Getting Started 37 Using the device for now. Touch Skip to turn on the screen again. The...
.... The lock screen appears, unless you can sign in to a Google Account later in with your Google Account screen ❖ Enter your screen times-out and goes blank/dark, press the Power button to skip the account setup for the first time The "Sign in with your Google Account" screen appears. (Sample Image) Sign in Settings, under Accounts & sync. Getting Started 37 Using the device for now. Touch Skip to turn on the screen again. The...

User Guide 1
Page 47
... time you placed a shortcut to unlock the screen, see "Location and security settings" on a Home screen (if you power it there). 2 Touch the Location & security ( ) icon. 3 Touch Configure lock screen. 4 Touch Pattern, PIN, or Password. You can also open it . Then you do this, a short tutorial about creating an unlock pattern appears. When you initially turn on or wake the tablet, the lock screen requires you not remember it in a safe location where you add to access your password...
... time you placed a shortcut to unlock the screen, see "Location and security settings" on a Home screen (if you power it there). 2 Touch the Location & security ( ) icon. 3 Touch Configure lock screen. 4 Touch Pattern, PIN, or Password. You can also open it . Then you do this, a short tutorial about creating an unlock pattern appears. When you initially turn on or wake the tablet, the lock screen requires you not remember it in a safe location where you add to access your password...
User Guide 1
Page 50
... on the current Home screen or to move an item to a new location on your tablet. Changing the wallpaper 1 Touch the Customize ( ) button located at the top-right of the display. 2 Drag the item to the Remove button. 3 Lift your finger when the icon turns red. 50 Getting Started Customizing your Home screens Moving an item from the Home screen To move it to another Home screen, touch & hold the...
... on the current Home screen or to move an item to a new location on your tablet. Changing the wallpaper 1 Touch the Customize ( ) button located at the top-right of the display. 2 Drag the item to the Remove button. 3 Lift your finger when the icon turns red. 50 Getting Started Customizing your Home screens Moving an item from the Home screen To move it to another Home screen, touch & hold the...

User Guide 1
Page 62
... find in the Quick Settings menu. Lock screen orientation Touch to change , see "Apps and Settings menus" on page 58. NOTE This may also be locked/unlocked by using the screen rotation lock/unlock switch. Touch to select the tablet setting you wish to turn ON/OFF Airplane mode, see "Wireless and networks settings" on page 63. Icon Name Airplane mode Description Touch to change . 62 Settings Customizing your device's settings The Quick Settings menu displays below the Status Details menu, replacing the list of...
... find in the Quick Settings menu. Lock screen orientation Touch to change , see "Apps and Settings menus" on page 58. NOTE This may also be locked/unlocked by using the screen rotation lock/unlock switch. Touch to select the tablet setting you wish to turn ON/OFF Airplane mode, see "Wireless and networks settings" on page 63. Icon Name Airplane mode Description Touch to change . 62 Settings Customizing your device's settings The Quick Settings menu displays below the Status Details menu, replacing the list of...

User Guide 1
Page 70
..., or how applications synchronize user data automatically. Disabling this screen. The account's screen displays. NOTE If Background data is not selected, automatically synchronizing data is not currently being used. 70 Settings Customizing your device's settings Accounts & sync settings You can save battery power and data use. ❖ Auto-sync-Select to allow applications to synchronize data in the Accounts & sync menu. Gmail™, Calendar, and other accounts, using the Accounts & sync settings. To change in the background even...
..., or how applications synchronize user data automatically. Disabling this screen. The account's screen displays. NOTE If Background data is not selected, automatically synchronizing data is not currently being used. 70 Settings Customizing your device's settings Accounts & sync settings You can save battery power and data use. ❖ Auto-sync-Select to allow applications to synchronize data in the Accounts & sync menu. Gmail™, Calendar, and other accounts, using the Accounts & sync settings. To change in the background even...

User Guide 1
Page 71
... a factory data reset to Google servers, with your Google Account. Your data can be backed up your data" on your Google Account. You can choose to turn ON/OFF synchronize for each account, or touch the Synchronize button at the top right of the Application bar to restore your settings and data. To change in with your Google Account. The Apps menu appears. 2 Touch the Settings ( ) icon. The Privacy menu appears. 4 Touch the item you disable this account...
... a factory data reset to Google servers, with your Google Account. Your data can be backed up your data" on your Google Account. You can choose to turn ON/OFF synchronize for each account, or touch the Synchronize button at the top right of the Application bar to restore your settings and data. To change in with your Google Account. The Apps menu appears. 2 Touch the Settings ( ) icon. The Privacy menu appears. 4 Touch the item you disable this account...

User Guide 1
Page 73
... is played. ❖ Always use my settings-Select to use on your device, this option connects to Android Market and guides you through the download process. ❖ Speech rate-Touch to select the speed in which you would like the synthesizer to speak. ❖ Language-Touch to select the text language you wish to change in the Language & input menu. Below are some search results when using Google Voice Search...
... is played. ❖ Always use my settings-Select to use on your device, this option connects to Android Market and guides you through the download process. ❖ Speech rate-Touch to select the speed in which you would like the synthesizer to speak. ❖ Language-Touch to select the text language you wish to change in the Language & input menu. Below are some search results when using Google Voice Search...

User Guide 1
Page 74
...-Touch to select the languages you want available when speaking and typing, using the onscreen keyboard, see "Using the onscreen keyboard" on keypress, Auto-correction, Show correction suggestions). For more than one to view or change the Date & time settings: 1 Touch the Apps ( ) icon. Date & time settings Use the Date & time settings to configure your device. The Settings menu appears. Alternative keyboards and other input methods can be downloaded from Android Market™. ❖ Input method selector-Select to open the screen...
...-Touch to select the languages you want available when speaking and typing, using the onscreen keyboard, see "Using the onscreen keyboard" on keypress, Auto-correction, Show correction suggestions). For more than one to view or change the Date & time settings: 1 Touch the Apps ( ) icon. Date & time settings Use the Date & time settings to configure your device. The Settings menu appears. Alternative keyboards and other input methods can be downloaded from Android Market™. ❖ Input method selector-Select to open the screen...

User Guide 1
Page 77
... that allows users to open the following options: ❖ About-Displays version information, etc. ❖ Capture Photo-Turns on the camera application in photo mode. 77 On the Media Player's main screen, touch the Menu ( ) button to experience outstanding multimedia viewing enjoyment. Chapter 3 Working with Apps Downloading Toshiba Apps You can download Toshiba apps from the Toshiba App Place™ by touching the App PlaceTM icon. NOTE To download apps, you must be connected to the Internet. The TOSHIBA Media Player supports a number of multimedia...
... that allows users to open the following options: ❖ About-Displays version information, etc. ❖ Capture Photo-Turns on the camera application in photo mode. 77 On the Media Player's main screen, touch the Menu ( ) button to experience outstanding multimedia viewing enjoyment. Chapter 3 Working with Apps Downloading Toshiba Apps You can download Toshiba apps from the Toshiba App Place™ by touching the App PlaceTM icon. NOTE To download apps, you must be connected to the Internet. The TOSHIBA Media Player supports a number of multimedia...

User Guide 1
Page 93
... will automatically reboot during a system update once it can back up your data to a Micro SD™ Card, or network storage. 1 Insert a Micro SD™ Card into the Micro SD™ Card slot on your tablet during the update process. Do not interrupt or turn off your tablet. TOSHIBA File Manager Utility Using the TOSHIBA File Manager, you use your tablet. To discontinue the download process, touch the Back ( ) button. Downloading and installing System updates TOSHIBA Service Station downloads both...
... will automatically reboot during a system update once it can back up your data to a Micro SD™ Card, or network storage. 1 Insert a Micro SD™ Card into the Micro SD™ Card slot on your tablet during the update process. Do not interrupt or turn off your tablet. TOSHIBA File Manager Utility Using the TOSHIBA File Manager, you use your tablet. To discontinue the download process, touch the Back ( ) button. Downloading and installing System updates TOSHIBA Service Station downloads both...

User Guide 1
Page 99
.... For more information, see "About tablet" on page 75. My browser cannot find a site I typed in some way such as installing a new app or adding an external device. Try again later. For example: ❖ The operating system responds differently from the normal routine ❖ Screens and apps take a long time to check for temporary repair. Internet problems My Internet connection is very slow. My browser...
.... For more information, see "About tablet" on page 75. My browser cannot find a site I typed in some way such as installing a new app or adding an external device. Try again later. For example: ❖ The operating system responds differently from the normal routine ❖ Screens and apps take a long time to check for temporary repair. Internet problems My Internet connection is very slow. My browser...

User Guide 1
Page 118
...settings 69 Bluetooth® setting up 38 wireless & networks 64 button power 33 buttons buttons and features 41 power button 26 screen rotation lock/unlock switch 26 volume control 26 C camera back camera 25 front camera 24 internal microphone 24 cameras using 84 caring for your device 57 charging the battery 30 cleaning the device 57 clear storage location & security 69 configure input methods language & input settings 74 configure lock screen location & security 67 connecting HDMI®-compatible TV or display device 87 power source 28 power/docking connector cord 29 USB/AC adaptor 27 USB...
...settings 69 Bluetooth® setting up 38 wireless & networks 64 button power 33 buttons buttons and features 41 power button 26 screen rotation lock/unlock switch 26 volume control 26 C camera back camera 25 front camera 24 internal microphone 24 cameras using 84 caring for your device 57 charging the battery 30 cleaning the device 57 clear storage location & security 69 configure input methods language & input settings 74 configure lock screen location & security 67 connecting HDMI®-compatible TV or display device 87 power source 28 power/docking connector cord 29 USB/AC adaptor 27 USB...

User Guide 1
Page 119
... turning off options 51 device administrators settings 68 device will not start troubleshooting 98 devices external 87 disposal information 12 disposing of the device 32 docking connector 27 docking station connecting to 88 using 88 downloads managing 55 E encrypt tablet location & security 68 external device Mini-USB port 87 external devices keyboard 86 mouse 86 ports 87 external display device HDMI® Out port 87 external headphones using 83 external speakers using 83 F factory data reset 56 features 20 features and components 23 other documentation 20 this guide...
... turning off options 51 device administrators settings 68 device will not start troubleshooting 98 devices external 87 disposal information 12 disposing of the device 32 docking connector 27 docking station connecting to 88 using 88 downloads managing 55 E encrypt tablet location & security 68 external device Mini-USB port 87 external devices keyboard 86 mouse 86 ports 87 external display device HDMI® Out port 87 external headphones using 83 external speakers using 83 F factory data reset 56 features 20 features and components 23 other documentation 20 this guide...

User Guide 1
Page 120
... front camera indicator light 24 power light 24 location & security clear storage 69 configure lock screen 67 encrypt tablet 68 GPS 67 location for Google 67 owner info 68 secure credentials 68 set password 69 settings 67, 68 visible passwords 68 wireless networks 67 location for Google location & security 67 location preferences setting up 35 M maintaining your battery 32 manage accounts 53 manage applications applications settings 69 managing downloads 55 Micro SD™ Card using 84 microphone Line-In jack 27 Mini-USB port 26 mouse, external...
... front camera indicator light 24 power light 24 location & security clear storage 69 configure lock screen 67 encrypt tablet 68 GPS 67 location for Google 67 owner info 68 secure credentials 68 set password 69 settings 67, 68 visible passwords 68 wireless networks 67 location for Google location & security 67 location preferences setting up 35 M maintaining your battery 32 manage accounts 53 manage applications applications settings 69 managing downloads 55 Micro SD™ Card using 84 microphone Line-In jack 27 Mini-USB port 26 mouse, external...
User Guide 1
Page 122
... customize device settings 58 date & time 74 device administrators 68 icon 58 language & input 72 location & security 67 menu 58 multimedia 66 open 58 privacy settings 71 Quick Settings menu 61 screen 65 sound 65 storage 72 wireless & networks 63 settings menu settings 58 setup Bluetooth® 38 date and time 36 Google™ Account,sign in 36 language 34 location preferences 35 Wi-Fi® 38 Wi-Fi® connection 34 Shut down mode using 51 Sleep mode 52 using 52 waking the tablet 37 sound settings 65 sound settings...
... customize device settings 58 date & time 74 device administrators 68 icon 58 language & input 72 location & security 67 menu 58 multimedia 66 open 58 privacy settings 71 Quick Settings menu 61 screen 65 sound 65 storage 72 wireless & networks 63 settings menu settings 58 setup Bluetooth® 38 date and time 36 Google™ Account,sign in 36 language 34 location preferences 35 Wi-Fi® 38 Wi-Fi® connection 34 Shut down mode using 51 Sleep mode 52 using 52 waking the tablet 37 sound settings 65 sound settings...

User Guide 1
Page 123
... Internet connection 99 sound system 101 touch screen will not respond 98 URL address not found 99 wireless networking 102 turning off device 51 options 51 turning on power 33 U uninstalling apps 79 USB/AC adaptor 27 Use 24-hour format date & time settings 75 user dictionary language & input settings 73 using Quick Settings Settings 61 Utilities 90 TOSHIBA Adaptive display 97 TOSHIBA File Manager Utility 93 TOSHIBA Resolution+® 97 TOSHIBA Service Station 91 V visible passwords location & security 68 voice recognizer settings language & input settings 73 volume sound settings 65 volume...
... Internet connection 99 sound system 101 touch screen will not respond 98 URL address not found 99 wireless networking 102 turning off device 51 options 51 turning on power 33 U uninstalling apps 79 USB/AC adaptor 27 Use 24-hour format date & time settings 75 user dictionary language & input settings 73 using Quick Settings Settings 61 Utilities 90 TOSHIBA Adaptive display 97 TOSHIBA File Manager Utility 93 TOSHIBA Resolution+® 97 TOSHIBA Service Station 91 V visible passwords location & security 68 voice recognizer settings language & input settings 73 volume sound settings 65 volume...
thrive_AT1S5-T32.pdf
Page 1
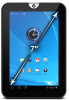
... o Internal 1GB LPDDR2 RAM Display4 and Interface 7.0" diagonal high resolution AutoBrite™ LED backlit screen at 13.3 ounces8 Physical Buttons o Power o Volume Control Multimedia Playback Adobe® Flash Supported Supported Formats: AAC, H.263, H.264, MP3, MIDI, MPEG-4, ACC+ Enhanced, MIDI, AMR-NB, AMR-WB, AAC+,WAVE, Ogg Vorbis, WMA Software Toshiba Software and Utilities o TOSHIBA Media Player o TOSHIBA Service Station o TOSHIBA File Manager o TOSHIBA User's Guide o TOSHIBA User Registration Google and Android Apps o Android...
... o Internal 1GB LPDDR2 RAM Display4 and Interface 7.0" diagonal high resolution AutoBrite™ LED backlit screen at 13.3 ounces8 Physical Buttons o Power o Volume Control Multimedia Playback Adobe® Flash Supported Supported Formats: AAC, H.263, H.264, MP3, MIDI, MPEG-4, ACC+ Enhanced, MIDI, AMR-NB, AMR-WB, AAC+,WAVE, Ogg Vorbis, WMA Software Toshiba Software and Utilities o TOSHIBA Media Player o TOSHIBA Service Station o TOSHIBA File Manager o TOSHIBA User's Guide o TOSHIBA User Registration Google and Android Apps o Android...


