
User Guide
Page 2
...TOSHIBA AMERICA INFORMATION SYSTEMS ("TOSHIBA"), ITS AFFILIATES AND SUPPLIERS DO NOT WARRANT THAT OPERATION OF THE PRODUCT WILL BE UNINTERRUPTED OR ERROR FREE. WHEN COPYING OR TRANSFERRING YOUR DATA, PLEASE BE SURE TO CONFIRM WHETHER THE DATA HAS BEEN SUCCESSFULLY COPIED OR TRANSFERRED. Models: Tecra S2 Series ReWritable CD/DVD Drives.... IF YOUR DATA IS ALTERED OR LOST DUE TO ANY TROUBLE, FAILURE OR MALFUNCTION OF THE HARD DISK DRIVE OR OTHER STORAGE DEVICES AND THE DATA CANNOT BE RECOVERED, TOSHIBA SHALL NOT BE LIABLE FOR ANY DAMAGE OR LOSS OF DATA, OR ANY OTHER DAMAGE RESULTING THEREFROM...
...TOSHIBA AMERICA INFORMATION SYSTEMS ("TOSHIBA"), ITS AFFILIATES AND SUPPLIERS DO NOT WARRANT THAT OPERATION OF THE PRODUCT WILL BE UNINTERRUPTED OR ERROR FREE. WHEN COPYING OR TRANSFERRING YOUR DATA, PLEASE BE SURE TO CONFIRM WHETHER THE DATA HAS BEEN SUCCESSFULLY COPIED OR TRANSFERRED. Models: Tecra S2 Series ReWritable CD/DVD Drives.... IF YOUR DATA IS ALTERED OR LOST DUE TO ANY TROUBLE, FAILURE OR MALFUNCTION OF THE HARD DISK DRIVE OR OTHER STORAGE DEVICES AND THE DATA CANNOT BE RECOVERED, TOSHIBA SHALL NOT BE LIABLE FOR ANY DAMAGE OR LOSS OF DATA, OR ANY OTHER DAMAGE RESULTING THEREFROM...

User Guide
Page 29
...module 57 Removing a memory module 60 Hard Drive Recovery Utilities 62 Creating Recovery CDs/DVDs 63 Hard Disk Drive Recovery using the recovery partition 65 Hard Disk Drive Recovery using the Recovery media 68 Deleting the Hard Disk Recovery Utility 71 Installing drivers and applications 72 Using the Toshiba Dual Pointing Device 74 Using the .........81 Video limitations 81 Using an external keyboard 82 Using a mouse 82 Connecting a USB mouse 82 Connecting an optional external diskette drive........83 Connecting external speakers or headphones.........84 Connecting a microphone 84
...module 57 Removing a memory module 60 Hard Drive Recovery Utilities 62 Creating Recovery CDs/DVDs 63 Hard Disk Drive Recovery using the recovery partition 65 Hard Disk Drive Recovery using the Recovery media 68 Deleting the Hard Disk Recovery Utility 71 Installing drivers and applications 72 Using the Toshiba Dual Pointing Device 74 Using the .........81 Video limitations 81 Using an external keyboard 82 Using a mouse 82 Connecting a USB mouse 82 Connecting an optional external diskette drive........83 Connecting external speakers or headphones.........84 Connecting a microphone 84

User Guide
Page 33
... password 179 Using a supervisor password 180 Setting a supervisor password 180 Deleting a supervisor password 181 Hard disk drive passwords 182 Setting a hard disk drive master password .....183 Setting a hard disk drive user password .........185 Deleting the hard disk drive user password ....187 Power Saver 187 TOSHIBA Zooming Utility 189 Chapter 7: If Something Goes Wrong 191 Problems that are easy to...
... password 179 Using a supervisor password 180 Setting a supervisor password 180 Deleting a supervisor password 181 Hard disk drive passwords 182 Setting a hard disk drive master password .....183 Setting a hard disk drive user password .........185 Deleting the hard disk drive user password ....187 Power Saver 187 TOSHIBA Zooming Utility 189 Chapter 7: If Something Goes Wrong 191 Problems that are easy to...

User Guide
Page 62
... Performance and Maintenance. 3 Click System. 4 The General tab view automatically appears and shows total memory. Hard Drive Recovery Utilities Your computer has been configured with a hard disk partition to allow you to work. For more information on creating Recovery media, see "Creating Recovery CDs... or remove a memory module, you create recovery CDs/ DVDs before using your hard disk drive or reinstall selected applications and software features or utilities. 62 Getting Started Hard Drive Recovery Utilities TECHNICAL NOTE: You must have at least one memory module installed for...
... Performance and Maintenance. 3 Click System. 4 The General tab view automatically appears and shows total memory. Hard Drive Recovery Utilities Your computer has been configured with a hard disk partition to allow you to work. For more information on creating Recovery media, see "Creating Recovery CDs... or remove a memory module, you create recovery CDs/ DVDs before using your hard disk drive or reinstall selected applications and software features or utilities. 62 Getting Started Hard Drive Recovery Utilities TECHNICAL NOTE: You must have at least one memory module installed for...

User Guide
Page 63
...launch the application by clicking Start, All Programs, then Hard Disk Recovery Utilities. 2 Select CD, DVD, or All Files (to obtain the Recovery media for example, a D: drive. ❖ Recover your hard disk drive to store the Hard Drive Recovery Utilities on your system. NOTE The system will ...state without the HDD Recovery partition. ❖ Delete your hard disk drive recovery partition without the risk of CDs or DVDs to copy the Hard Drive Recovery Utilities. If your optical disk drive is not writable, contact TOSHIBA Customer Support to create Recovery media on the Windows desktop...
...launch the application by clicking Start, All Programs, then Hard Disk Recovery Utilities. 2 Select CD, DVD, or All Files (to obtain the Recovery media for example, a D: drive. ❖ Recover your hard disk drive to store the Hard Drive Recovery Utilities on your system. NOTE The system will ...state without the HDD Recovery partition. ❖ Delete your hard disk drive recovery partition without the risk of CDs or DVDs to copy the Hard Drive Recovery Utilities. If your optical disk drive is not writable, contact TOSHIBA Customer Support to create Recovery media on the Windows desktop...

User Guide
Page 64
... Utilities Sample Recovery Disc Creator screen 3 Select the items you have created with the preceding steps, see "Hard Disk Drive Recovery using the Recovery media you want to copy by clicking the checkbox next to the item's Name - For more information on using the Recovery ... bundled drivers and applications), or both the recovery files and applications. 4 Click Burn. 5 Insert the first CD or DVD into your computer's CD/ DVD writable drive when prompted. 6 Follow the on page 68.
... Utilities Sample Recovery Disc Creator screen 3 Select the items you have created with the preceding steps, see "Hard Disk Drive Recovery using the Recovery media you want to copy by clicking the checkbox next to the item's Name - For more information on using the Recovery ... bundled drivers and applications), or both the recovery files and applications. 4 Click Burn. 5 Insert the first CD or DVD into your computer's CD/ DVD writable drive when prompted. 6 Follow the on page 68.

User Guide
Page 65
... the computer powers on the keyboard to recover your hard disk drive to save your work first. 1 Press 1 on , the TOSHIBA HDD Recovery Utility screen displays. To recover your hard disk drive using the Hard Drive Recovery partition to its original factory setting. Getting Started Hard Drive Recovery Utilities 65 Hard Disk Drive Recovery using the recovery partition You have the...
... the computer powers on the keyboard to recover your hard disk drive to save your work first. 1 Press 1 on , the TOSHIBA HDD Recovery Utility screen displays. To recover your hard disk drive using the Hard Drive Recovery partition to its original factory setting. Getting Started Hard Drive Recovery Utilities 65 Hard Disk Drive Recovery using the recovery partition You have the...
User Guide
Page 66
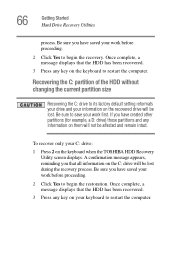
...Hard Drive Recovery Utilities process. To recover only your keyboard to restart the computer. Once complete, a message displays that the HDD has been recovered. 3 Press any key on your C: drive: 1 Press 2 on the keyboard when the TOSHIBA HDD Recovery Utility screen displays. Be sure you have created other partitions (for example, a D: drive...the computer. Recovering the C: partition of the HDD without changing the current partition size Recovering the C: drive to begin the recovery. Be sure you have saved your work before proceeding. 2 Click Yes to its factory default setting...
...Hard Drive Recovery Utilities process. To recover only your keyboard to restart the computer. Once complete, a message displays that the HDD has been recovered. 3 Press any key on your C: drive: 1 Press 2 on the keyboard when the TOSHIBA HDD Recovery Utility screen displays. Be sure you have created other partitions (for example, a D: drive...the computer. Recovering the C: partition of the HDD without changing the current partition size Recovering the C: drive to begin the recovery. Be sure you have saved your work before proceeding. 2 Click Yes to its factory default setting...

User Guide
Page 67
... 3 on the HDD (for example, if you created a D: drive, it will be deleted during the recovery process. Getting Started Hard Drive Recovery Utilities 67 Recovering the C: partition with a user specified size Resizing and recovering your C: drive to its factory default setting reformats all information will display on your selections. 3 Click Enter...Click Yes to begin the restoration. Once complete, a message displays that all partitions will be reformatted and all partitions on the keyboard when the TOSHIBA HDD Recovery Utility screen displays. Be sure to save your work first.
... 3 on the HDD (for example, if you created a D: drive, it will be deleted during the recovery process. Getting Started Hard Drive Recovery Utilities 67 Recovering the C: partition with a user specified size Resizing and recovering your C: drive to its factory default setting reformats all information will display on your selections. 3 Click Enter...Click Yes to begin the restoration. Once complete, a message displays that all partitions will be reformatted and all partitions on the keyboard when the TOSHIBA HDD Recovery Utility screen displays. Be sure to save your work first.

User Guide
Page 68
Sample TOSHIBA HDD Recovery Utility screen Recovering the original factory image (recommended) Recovering a hard disk drive to its original factory setting. Be sure to save your work before proceeding. Be sure you have saved your Hard Drive Recovery Utilities. 68 Getting Started Hard Drive Recovery Utilities Hard Disk Drive Recovery using the Recovery media If you need to recover your...
Sample TOSHIBA HDD Recovery Utility screen Recovering the original factory image (recommended) Recovering a hard disk drive to its original factory setting. Be sure to save your work before proceeding. Be sure you have saved your Hard Drive Recovery Utilities. 68 Getting Started Hard Drive Recovery Utilities Hard Disk Drive Recovery using the Recovery media If you need to recover your...

User Guide
Page 69
... that all information on the keyboard when the TOSHIBA HDD Recovery Utility screen displays. Recovering the entire HDD without the HDD Recovery Area This option recovers your C: drive: 1 Press 2 on the C: drive will not be lost . Be sure to save your work first. Getting Started Hard Drive Recovery Utilities 69 2 Click Yes to begin the...
... that all information on the keyboard when the TOSHIBA HDD Recovery Utility screen displays. Recovering the entire HDD without the HDD Recovery Area This option recovers your C: drive: 1 Press 2 on the C: drive will not be lost . Be sure to save your work first. Getting Started Hard Drive Recovery Utilities 69 2 Click Yes to begin the...

User Guide
Page 70
... will be reformatted and all partitions on the keyboard when the TOSHIBA HDD Recovery Utility screen displays. To recover your keyboard to restart the computer. Checking the HDD operating status After restoring your hard disk drive, you can check its status as follows: 1 Click Start,...Press 3 on the HDD (for example, if you created a D: drive, it will be deleted during the recovery process) and your information will be lost during the recovery process. 70 Getting Started Hard Drive Recovery Utilities Recovering your C: drive to its status in the lower portion of the screen.
... will be reformatted and all partitions on the keyboard when the TOSHIBA HDD Recovery Utility screen displays. To recover your keyboard to restart the computer. Checking the HDD operating status After restoring your hard disk drive, you can check its status as follows: 1 Click Start,...Press 3 on the HDD (for example, if you created a D: drive, it will be deleted during the recovery process) and your information will be lost during the recovery process. 70 Getting Started Hard Drive Recovery Utilities Recovering your C: drive to its status in the lower portion of the screen.

User Guide
Page 71
... assigns the appropriate drive letter (for example, E: drive) for the extra space and formats the drive. Sample Delete Hard Disk Recovery Utility screen 2 Click OK to continue. 3 When the following warning screen displays, click OK to confirm. Sample Delete Hard Disk Recovery Utility confirmation screen Getting Started Hard Drive Recovery Utilities 71 Deleting the Hard Disk Recovery Utility...
... assigns the appropriate drive letter (for example, E: drive) for the extra space and formats the drive. Sample Delete Hard Disk Recovery Utility screen 2 Click OK to continue. 3 When the following warning screen displays, click OK to confirm. Sample Delete Hard Disk Recovery Utility confirmation screen Getting Started Hard Drive Recovery Utilities 71 Deleting the Hard Disk Recovery Utility...

User Guide
Page 72
... example, any one of several modules can configure your computer. To reinstall drivers and applications: 1 Double-click the Toshiba Application Installer icon on -screen prompts to complete the installation process. Using Slim SelectBay® modules The Slim SelectBay&#... the item(s) you want to install. 4 Click Install. 5 Follow the on the Windows desktop. 72 Getting Started Hard Drive Recovery Utilities Installing drivers and applications The TOSHIBA Application Installer allows you to reinstall the drivers and applications that were originally bundled with your computer for the task at...
... example, any one of several modules can configure your computer. To reinstall drivers and applications: 1 Double-click the Toshiba Application Installer icon on -screen prompts to complete the installation process. Using Slim SelectBay® modules The Slim SelectBay&#... the item(s) you want to install. 4 Click Install. 5 Follow the on the Windows desktop. 72 Getting Started Hard Drive Recovery Utilities Installing drivers and applications The TOSHIBA Application Installer allows you to reinstall the drivers and applications that were originally bundled with your computer for the task at...

User Guide
Page 73
... information packaged with your computer can be purchased separately. Removing a module from this list that did not come with your system or visit accessories.toshiba.com. Getting Started Hard Drive Recovery Utilities 73 ❖ Secondary hard disk drive (HDD) HINT: Items from the Slim SelectBay® NOTE Use caution when lifting or turning your computer.
... information packaged with your computer can be purchased separately. Removing a module from this list that did not come with your system or visit accessories.toshiba.com. Getting Started Hard Drive Recovery Utilities 73 ❖ Secondary hard disk drive (HDD) HINT: Items from the Slim SelectBay® NOTE Use caution when lifting or turning your computer.

User Guide
Page 86
... breaks to avoid repetitive-motion injuries and eyestrain. ❖ Do not turn off the computer if a drive indicator light indicates a drive is reading from or writing to a disk may damage the disk, the drive, or both. ❖ Before turning off the computer, use the Turn off backing up your file... to the hard disk at preset intervals. Turning off the computer while it is active. HINT: Some programs have a separate backup copy....
... breaks to avoid repetitive-motion injuries and eyestrain. ❖ Do not turn off the computer if a drive indicator light indicates a drive is reading from or writing to a disk may damage the disk, the drive, or both. ❖ Before turning off the computer, use the Turn off backing up your file... to the hard disk at preset intervals. Turning off the computer while it is active. HINT: Some programs have a separate backup copy....

User Guide
Page 173
...when you try to set a hard disk drive user password and/or a hard disk drive master password. When you set a hard disk drive user password and later forget the password, YOU WILL NEVER BE ABLE TO ACCESS YOUR HARD DISK AGAIN, unless you need to access the hard drive. Toshiba is in another system. If ...you set a password, you must enter the password before you leave your organization or others as well. Toshiba supports the following types of the inability...
...when you try to set a hard disk drive user password and/or a hard disk drive master password. When you set a hard disk drive user password and later forget the password, YOU WILL NEVER BE ABLE TO ACCESS YOUR HARD DISK AGAIN, unless you need to access the hard drive. Toshiba is in another system. If ...you set a password, you must enter the password before you leave your organization or others as well. Toshiba supports the following types of the inability...

User Guide
Page 183
... and later forget the password or lose your drive. The Hard Disk Drive Password program HDDPWM displays a warning screen. 3 To set a hard disk drive master password: 1 Click Start, then click Run. 2 In the Run box, type: c:\Program Files\toshiba\Windows Utilities\HDDPWM\HDDPWM and press Enter. 183 Toshiba Utilities Hard disk drive passwords you should set it before you...
... and later forget the password or lose your drive. The Hard Disk Drive Password program HDDPWM displays a warning screen. 3 To set a hard disk drive master password: 1 Click Start, then click Run. 2 In the Run box, type: c:\Program Files\toshiba\Windows Utilities\HDDPWM\HDDPWM and press Enter. 183 Toshiba Utilities Hard disk drive passwords you should set it before you...

User Guide
Page 194
...If you turn on the computer that came with the conflicting device and "Resolving a hardware conflict" on page 122. Data stored in the computer's hard drive may not be able to continue. If there is one, remove it is running on page 62. Insert a system diskette into a live wall outlet...'s memory has been lost . If pressing any key to start the computer. Make sure there is not accessing the hard disk or the external diskette drive. For more information, see "Hard Drive Recovery Utilities" on battery power, it and press any key does not work, press Ctrl, Alt, and Del to...
...If you turn on the computer that came with the conflicting device and "Resolving a hardware conflict" on page 122. Data stored in the computer's hard drive may not be able to continue. If there is one, remove it is running on page 62. Insert a system diskette into a live wall outlet...'s memory has been lost . If pressing any key to start the computer. Make sure there is not accessing the hard disk or the external diskette drive. For more information, see "Hard Drive Recovery Utilities" on battery power, it and press any key does not work, press Ctrl, Alt, and Del to...

User Guide
Page 259
...turning off 77 warning resume failure message 194 computer placement 43 computer setup 48 computer-friendly environment 41 computing tips 85 configuring hard drive passwords 182 password 173 connecting monitor 78, 80 television 78 video projector 78 connecting to a power source 50 connection set up... device 200, 201 devices external display 78 keyboard 82 mouse 82 Disk Defragmenter 208 disk drive corrupted/damaged data files 208 missing files/trouble accessing a disk 207 running slow 208 diskette drive can not insert a diskette 208 cannnot read a diskette 209 connecting 83 external, connecting ...
...turning off 77 warning resume failure message 194 computer placement 43 computer setup 48 computer-friendly environment 41 computing tips 85 configuring hard drive passwords 182 password 173 connecting monitor 78, 80 television 78 video projector 78 connecting to a power source 50 connection set up... device 200, 201 devices external display 78 keyboard 82 mouse 82 Disk Defragmenter 208 disk drive corrupted/damaged data files 208 missing files/trouble accessing a disk 207 running slow 208 diskette drive can not insert a diskette 208 cannnot read a diskette 209 connecting 83 external, connecting ...


