User Manual
Page 133
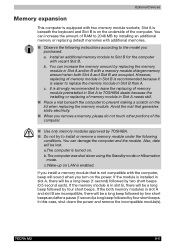
...memory module sockets; a.The computer is turned on the underside of memory module in Slot B is recommended because it is easier to TOSHIBA dealer because the installing or replacing of larger memory amount when both memory modules in slot B, there will sound when you purchased. c. You can increase the memory ...beeps. You can damage the computer and the module. Optional Devices Memory expansion This computer is equipped with vacant Slot B. b. Slot A is beneath the keyboard and Slot B is in slot A and slot B are occupied. If the memory module is on . TECRA M2 8-6
...memory module sockets; a.The computer is turned on the underside of memory module in Slot B is recommended because it is easier to TOSHIBA dealer because the installing or replacing of larger memory amount when both memory modules in slot B, there will sound when you purchased. c. You can increase the memory ...beeps. You can damage the computer and the module. Optional Devices Memory expansion This computer is equipped with vacant Slot B. b. Slot A is beneath the keyboard and Slot B is in slot A and slot B are occupied. If the memory module is on . TECRA M2 8-6

User Manual
Page 136
... in step 10 is recognized. Two screws secure the keyboard. Refer to secure latches. 15. TECRA M2 8-9 Optional Devices Do not touch the connectors on the memory module or on the computer and seat the keyboard. Insert tabs on the front of the keyboard into the computer. Insert a new module in Chapter ...the palm rest if the flat cable was dropped into corresponding notches on the computer. Install the battery pack. Seat the keyboard brace and press to Replacing the battery pack section in the socket and push it lies flat and is secured by two latches on either side. ...
... in step 10 is recognized. Two screws secure the keyboard. Refer to secure latches. 15. TECRA M2 8-9 Optional Devices Do not touch the connectors on the memory module or on the computer and seat the keyboard. Insert tabs on the front of the keyboard into the computer. Insert a new module in Chapter ...the palm rest if the flat cable was dropped into corresponding notches on the computer. Install the battery pack. Seat the keyboard brace and press to Replacing the battery pack section in the socket and push it lies flat and is secured by two latches on either side. ...
User Manual
Page 137
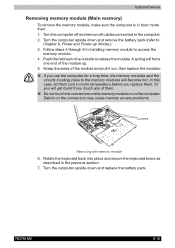
.... Grasp the sides of the module up Modes.) 3. Turn the computer off and remove all cables connected to release the module. TECRA M2 8-10 Or you replace them . ■ Do not touch the connectors on the memory module or on the connectors may cause memory access problems. LATCHES ...Removing the memory module 6. Turn the computer upside down and replace the battery pack. Follow steps 4 through 9 in Installing memory module to Chapter 6, Power and Power-up . 5. Rotate the keyboard back into place and secure the keyboard brace as described in boot mode then: 1. In this case, ...
.... Grasp the sides of the module up Modes.) 3. Turn the computer off and remove all cables connected to release the module. TECRA M2 8-10 Or you replace them . ■ Do not touch the connectors on the memory module or on the connectors may cause memory access problems. LATCHES ...Removing the memory module 6. Turn the computer upside down and replace the battery pack. Follow steps 4 through 9 in Installing memory module to Chapter 6, Power and Power-up . 5. Rotate the keyboard back into place and secure the keyboard brace as described in boot mode then: 1. In this case, ...

User Manual
Page 213
...LINK 9-18 Infrared port 9-14 Keyboard 9-7 LAN 9-19 LCD panel 9-7 Memory expansion 9-17 Modem 9-18 Monitor 9-18 Password 9-6 PC card 9-14 Power 9-4 SD card 9-14 Sound system 9-17 TOSHIBA Dual Pointing Device 9-15 USB 9-...16 Wireless LAN 9-20 Processor 1-3 Product Recovery DVD-ROM 3-11 R Region codes DVD drives 2-14 Region selection 4-21 Removing a PC card 8-3 Removing an SD card 8-4 Removing discs 4-9 Removing memory module 8-12 Removing the battery pack 6-13 Removing the HDD pack 8-13 Replacing...6-17 System Auto Off 6-18 System indicators 2-11 TECRA M2 3
...LINK 9-18 Infrared port 9-14 Keyboard 9-7 LAN 9-19 LCD panel 9-7 Memory expansion 9-17 Modem 9-18 Monitor 9-18 Password 9-6 PC card 9-14 Power 9-4 SD card 9-14 Sound system 9-17 TOSHIBA Dual Pointing Device 9-15 USB 9-...16 Wireless LAN 9-20 Processor 1-3 Product Recovery DVD-ROM 3-11 R Region codes DVD drives 2-14 Region selection 4-21 Removing a PC card 8-3 Removing an SD card 8-4 Removing discs 4-9 Removing memory module 8-12 Removing the battery pack 6-13 Removing the HDD pack 8-13 Replacing...6-17 System Auto Off 6-18 System indicators 2-11 TECRA M2 3


