
Users Manual Canada; English
Page 3
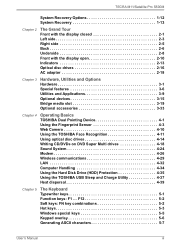
...Manual iii TECRA M11/Satellite Pro S500M System Recovery Options 1-12 System Recovery 1-13 Chapter 2 The Grand Tour Front with the display closed 2-1 Left side 2-3 Right side 2-5 Back 2-6 Underside 2-8 Front with the display open 2-10 Indicators 2-13 Optical disc drives 2-16 AC adaptor 2-18 Chapter 3 Hardware, Utilities and Options Hardware 3-1 Special features 3-6 Utilities and Applications 3-9 Optional devices 3-15 Bridge media slot 3-19 Optional accessories 3-33 Chapter 4 Operating Basics TOSHIBA Dual Pointing Device 4-1 Using the Fingerprint Sensor 4-3 Web Camera...
...Manual iii TECRA M11/Satellite Pro S500M System Recovery Options 1-12 System Recovery 1-13 Chapter 2 The Grand Tour Front with the display closed 2-1 Left side 2-3 Right side 2-5 Back 2-6 Underside 2-8 Front with the display open 2-10 Indicators 2-13 Optical disc drives 2-16 AC adaptor 2-18 Chapter 3 Hardware, Utilities and Options Hardware 3-1 Special features 3-6 Utilities and Applications 3-9 Optional devices 3-15 Bridge media slot 3-19 Optional accessories 3-33 Chapter 4 Operating Basics TOSHIBA Dual Pointing Device 4-1 Using the Fingerprint Sensor 4-3 Web Camera...

Users Manual Canada; English
Page 4
... D Bluetooth wireless technology Interoperability Bluetooth wireless technology and your Health D-2 Regulatory statements D-2 Using Bluetooth Adaptor from TOSHIBA equipment in Japan . . . . D-4 Appendix E AC Power Cord and Connectors Certification agencies E-1 Appendix F TOSHIBA PC Health Monitor Starting the TOSHIBA PC Health Monitor F-2 If a TOSHIBA PC Health Monitor message is displayed F-2 Cleaning the cooling module F-3 Appendix G Legal Footnotes Non-applicable Icons G-1 CPU G-1 Memory (Main System G-2 Battery Life G-3 Hard Disk Drive (HDD) Capacity G-3 User's Manual iv...
... D Bluetooth wireless technology Interoperability Bluetooth wireless technology and your Health D-2 Regulatory statements D-2 Using Bluetooth Adaptor from TOSHIBA equipment in Japan . . . . D-4 Appendix E AC Power Cord and Connectors Certification agencies E-1 Appendix F TOSHIBA PC Health Monitor Starting the TOSHIBA PC Health Monitor F-2 If a TOSHIBA PC Health Monitor message is displayed F-2 Cleaning the cooling module F-3 Appendix G Legal Footnotes Non-applicable Icons G-1 CPU G-1 Memory (Main System G-2 Battery Life G-3 Hard Disk Drive (HDD) Capacity G-3 User's Manual iv...
Users Manual Canada; English
Page 6
..., databases and other use of TOSHIBA. Windows, Microsoft and Windows logo are subject to change without notice. Please comply with respect to the use beyond that stipulated above (including conversion to digital format, alteration, transfer of copied material and distribution on a network) without the prior written permission of the information contained herein. All rights reserved. TECRA M11/Satellite Pro S500M Copyright ©...
..., databases and other use of TOSHIBA. Windows, Microsoft and Windows logo are subject to change without notice. Please comply with respect to the use beyond that stipulated above (including conversion to digital format, alteration, transfer of copied material and distribution on a network) without the prior written permission of the information contained herein. All rights reserved. TECRA M11/Satellite Pro S500M Copyright ©...
Users Manual Canada; English
Page 12
... 1991 makes it , the telephone company will notify you with the FCC. In order to program this change. If the telephone company notes a problem, they may cause harm to the telephone network. When you are ever needed on standard-device telephone...Use only No. 26AWG or larger modular cable. TECRA M11/Satellite Pro S500M The modem connects to the telephone line by TOSHIBA Corporation or an authorized representative of TOSHIBA Corporation. Telephone company procedures The goal of the telephone company is designed to maintain uninterrupted service. If problems arise If any changes...
... 1991 makes it , the telephone company will notify you with the FCC. In order to program this change. If the telephone company notes a problem, they may cause harm to the telephone network. When you are ever needed on standard-device telephone...Use only No. 26AWG or larger modular cable. TECRA M11/Satellite Pro S500M The modem connects to the telephone line by TOSHIBA Corporation or an authorized representative of TOSHIBA Corporation. Telephone company procedures The goal of the telephone company is designed to maintain uninterrupted service. If problems arise If any changes...
Users Manual Canada; English
Page 14
... customers. TECRA M11/Satellite Pro S500M Notes for Users in Australia and New Zealand Modem warning notice for the correct operation of that the country/region is attached to the Australian PSTN would be used in force for this modem is capable of a Telepermit for a device in no permit in any manner which displays the currently active setting. b/ the application using the modem...
... customers. TECRA M11/Satellite Pro S500M Notes for Users in Australia and New Zealand Modem warning notice for the correct operation of that the country/region is attached to the Australian PSTN would be used in force for this modem is capable of a Telepermit for a device in no permit in any manner which displays the currently active setting. b/ the application using the modem...

Users Manual Canada; English
Page 22
This manual tells how to set up your purchase of the TECRA M11/Satellite Pro S500M Series computer. Read Chapter 3, Hardware, Utilities and Options if connecting optional products or external devices. Acronyms are enclosed in parentheses following formats to describe, identify, and highlight terms and operating procedures. User's Manual xxii Preface Congratulations on Chapter 7, HW Setup, to understand how to setup and configure these features. If you are a new user of reliable, high-performance...
This manual tells how to set up your purchase of the TECRA M11/Satellite Pro S500M Series computer. Read Chapter 3, Hardware, Utilities and Options if connecting optional products or external devices. Acronyms are enclosed in parentheses following formats to describe, identify, and highlight terms and operating procedures. User's Manual xxii Preface Congratulations on Chapter 7, HW Setup, to understand how to setup and configure these features. If you are a new user of reliable, high-performance...
Users Manual Canada; English
Page 36
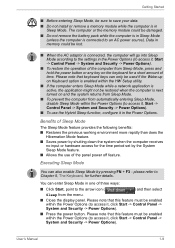
... use of three ways: ■ Click Start, point to access it, Start -> Control Panel -> System and Security -> Power Options). ■ To use the Hybrid Sleep function, configure it , Start -> Control Panel -> System and Security -> Power Options). ■ To restore the operation of the computer from the menu. ■ Close the display panel. You can only be used if the Wake-up on Keyboard option is enabled within the HW Setup utility. ■ If the computer enters Sleep Mode while a network application is active...
... use of three ways: ■ Click Start, point to access it, Start -> Control Panel -> System and Security -> Power Options). ■ To use the Hybrid Sleep function, configure it , Start -> Control Panel -> System and Security -> Power Options). ■ To restore the operation of the computer from the menu. ■ Close the display panel. You can only be used if the Wake-up on Keyboard option is enabled within the HW Setup utility. ■ If the computer enters Sleep Mode while a network application is active...
Users Manual Canada; English
Page 44
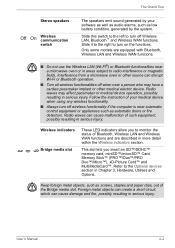
... using any wireless functionality. ■ Always turn off when near a microwave oven or in more detail within the Wireless indicators section. Keep foreign metal objects, such as automatic doors or fire detectors. Interference from a microwave oven or other medical electric device. Wireless indicators Bridge media slot These LED indicators allow you insert an SD™/SDHC™ memory card, miniSD™/microSD™ Card, Memory Stick™ (PRO...
... using any wireless functionality. ■ Always turn off when near a microwave oven or in more detail within the Wireless indicators section. Keep foreign metal objects, such as automatic doors or fire detectors. Interference from a microwave oven or other medical electric device. Wireless indicators Bridge media slot These LED indicators allow you insert an SD™/SDHC™ memory card, miniSD™/microSD™ Card, Memory Stick™ (PRO...
Users Manual Canada; English
Page 63
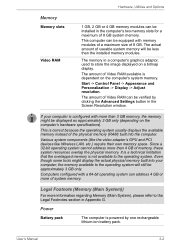
... rechargeable lithium-ion battery pack. User's Manual 3-2 The memory in the computer's two memory slots for a maximum of Video RAM available is not available to the operating system. This is powered by clicking the Advanced Settings button in Appendix G. Hardware, Utilities and Options Memory Memory slots Video RAM 1 GB, 2 GB or 4 GB memory modules can be installed in a computer's graphics adaptor, used to store the image displayed on a bitmap display. Start -> Control Panel -> Appearance and Personalization -> Display -> Adjust resolution. Even though...
... rechargeable lithium-ion battery pack. User's Manual 3-2 The memory in the computer's two memory slots for a maximum of Video RAM available is not available to the operating system. This is powered by clicking the Advanced Settings button in Appendix G. Hardware, Utilities and Options Memory Memory slots Video RAM 1 GB, 2 GB or 4 GB memory modules can be installed in a computer's graphics adaptor, used to store the image displayed on a bitmap display. Start -> Control Panel -> Appearance and Personalization -> Display -> Adjust resolution. Even though...
Users Manual Canada; English
Page 84
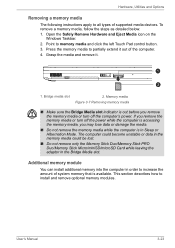
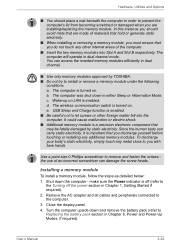
... in order to memory media and click the left Touch Pad control button. 3. Press the memory media to all types of supported media devices. If you may lose data or damage the media. ■ Do not remove the memory media while the computer is in Sleep or Hibernation Mode. User's Manual 3-23 To remove a memory media, follow the steps as detailed below: 1. Open the Safely Remove Hardware and Eject Media icon on the Windows Taskbar. 2. Memory media Figure 3-7 Removing memory media ■ Make sure the Bridge Media slot indicator...
... in order to memory media and click the left Touch Pad control button. 3. Press the memory media to all types of supported media devices. If you may lose data or damage the media. ■ Do not remove the memory media while the computer is in Sleep or Hibernation Mode. User's Manual 3-23 To remove a memory media, follow the steps as detailed below: 1. Open the Safely Remove Hardware and Eject Media icon on the Windows Taskbar. 2. Memory media Figure 3-7 Removing memory media ■ Make sure the Bridge Media slot indicator...
Users Manual Canada; English
Page 85
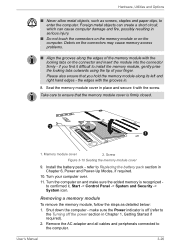
... foreign matter fall into Slot A and Slot B respectively. Use a point size 0 Phillips screwdriver to remove and fasten the screws the use of the computer. ■ Insert the two memory modules into the computer. User's Manual 3-24 Hardware, Utilities and Options ■ You should avoid mats that are installing/replacing the memory module. c. Installing a memory module To install a memory module, follow the steps as detailed below: 1. make sure the Power indicator is turned on . d. e. To discharge your...
... foreign matter fall into Slot A and Slot B respectively. Use a point size 0 Phillips screwdriver to remove and fasten the screws the use of the computer. ■ Insert the two memory modules into the computer. User's Manual 3-24 Hardware, Utilities and Options ■ You should avoid mats that are installing/replacing the memory module. c. Installing a memory module To install a memory module, follow the steps as detailed below: 1. make sure the Power indicator is turned on . d. e. To discharge your...
Users Manual Canada; English
Page 87
... - make sure the added memory is firmly closed. 2 1 1. Memory module cover 2. Hardware, Utilities and Options ■ Never allow metal objects, such as detailed below: 1. Please also ensure that the memory module cover is recognized to ensure that you find it difficult to Replacing the battery pack section in place and secure it , Start -> Control Panel -> System and Security -> System icon. User's Manual 3-26 if you hold the memory module along...
... - make sure the added memory is firmly closed. 2 1 1. Memory module cover 2. Hardware, Utilities and Options ■ Never allow metal objects, such as detailed below: 1. Please also ensure that the memory module cover is recognized to ensure that you find it difficult to Replacing the battery pack section in place and secure it , Start -> Control Panel -> System and Security -> System icon. User's Manual 3-26 if you hold the memory module along...
Users Manual Canada; English
Page 92
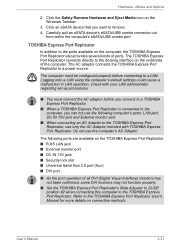
... LAN jack ■ External monitor port ■ DC IN 15V jack ■ Security lock slot ■ Universal Serial Bus 2.0 port (four) ■ DVI port ■ As the port operation of all DVI (Digital Visual Interface) monitors has not been confirmed, some DVI monitors may not function properly. ■ Set the TOSHIBA Express Port Replicator's Slide Adjuster to SLIDE position #2 when connecting this computer to a LAN. Click the Safely Remove Hardware and Eject Media icon on connection methods. User's Manual...
... LAN jack ■ External monitor port ■ DC IN 15V jack ■ Security lock slot ■ Universal Serial Bus 2.0 port (four) ■ DVI port ■ As the port operation of all DVI (Digital Visual Interface) monitors has not been confirmed, some DVI monitors may not function properly. ■ Set the TOSHIBA Express Port Replicator's Slide Adjuster to SLIDE position #2 when connecting this computer to a LAN. Click the Safely Remove Hardware and Eject Media icon on connection methods. User's Manual...

Users Manual Canada; English
Page 144
... turn on the computer and then pressing the F2 key when the TOSHIBA Leading Innovation >>> screen appears. Refer to the enclosed Instruction Manual for Safety and Comfort for detailed precautions and handling instructions. ■ Make sure the battery is securely installed in order to rupture. ■ Keep the battery pack out of reach of the battery as required by turnin on the power: S **** RTC Power...
... turn on the computer and then pressing the F2 key when the TOSHIBA Leading Innovation >>> screen appears. Refer to the enclosed Instruction Manual for Safety and Comfort for detailed precautions and handling instructions. ■ Make sure the battery is securely installed in order to rupture. ■ Keep the battery pack out of reach of the battery as required by turnin on the power: S **** RTC Power...
Users Manual Canada; English
Page 161
... loose cables can describe them in a permanent error log - User's Manual 8-2 Troubleshooting ■ Before you attach an external device you should keep the following questions in mind: ■ Which part of your observations and keep them in detail to make detailed notes of the computer is not operating properly - keyboard, hard disk drive, display panel, touch pad, touch pad control buttons - Write down what you see. ■ Do you hear any indicators light, if...
... loose cables can describe them in a permanent error log - User's Manual 8-2 Troubleshooting ■ Before you attach an external device you should keep the following questions in mind: ■ Which part of your observations and keep them in detail to make detailed notes of the computer is not operating properly - keyboard, hard disk drive, display panel, touch pad, touch pad control buttons - Write down what you see. ■ Do you hear any indicators light, if...

Users Manual Canada; English
Page 166
... BIOS setup application by the setup and configuration of each key). Keyboard Keyboard problems can be displayed. 6. the BIOS setup application will be caused by using the RTC Power following message The charge in any way (remapping involves changing or reassigning the function of the computer - Set the date in the System Time field. 5. the BIOS setup application will end and the computer will need to the TOSHIBA Password Utility section in Chapter 6, Power...
... BIOS setup application by the setup and configuration of each key). Keyboard Keyboard problems can be displayed. 6. the BIOS setup application will be caused by using the RTC Power following message The charge in any way (remapping involves changing or reassigning the function of the computer - Set the date in the System Time field. 5. the BIOS setup application will end and the computer will need to the TOSHIBA Password Utility section in Chapter 6, Power...
Users Manual Canada; English
Page 176
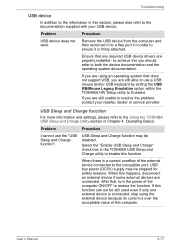
... USB keyboard by setting the USB KB/Mouse Legacy Emulation option within the TOSHIBA HW Setup utility to Enabled. User's Manual 8-17 If you are properly installed - Select the "Enable USB Sleep and Charge" check box in order to ensure it is firmly attached. After that any required USB device drivers are still unable to resolve the problem, contact your USB device. Problem Procedure USB device does not work Remove the USB device from the computer and then reconnect it to a free port...
... USB keyboard by setting the USB KB/Mouse Legacy Emulation option within the TOSHIBA HW Setup utility to Enabled. User's Manual 8-17 If you are properly installed - Select the "Enable USB Sleep and Charge" check box in order to ensure it is firmly attached. After that any required USB device drivers are still unable to resolve the problem, contact your USB device. Problem Procedure USB device does not work Remove the USB device from the computer and then reconnect it to a free port...

Users Manual Canada; English
Page 206
... the specific computer model please refer to 86°F) or >25°C (77°F) at high altitude (all temperature references are met: ■ 64-bit Operating System ■ 64-bit CPU, Chipset and BIOS (Basic Input/Output System) ■ 64-bit Device drivers ■ 64-bit applications Certain device drivers and/or applications may not function properly. Memory (Main System) Part of...
... the specific computer model please refer to 86°F) or >25°C (77°F) at high altitude (all temperature references are met: ■ 64-bit Operating System ■ 64-bit CPU, Chipset and BIOS (Basic Input/Output System) ■ 64-bit Device drivers ■ 64-bit applications Certain device drivers and/or applications may not function properly. Memory (Main System) Part of...
Users Manual Canada; English
Page 213
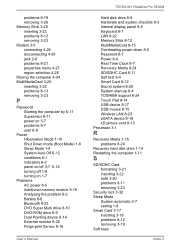
... problem 8-2 Battery 8-6 Bluetooth 8-23 DVD Super Multi drive 8-10 DVD-ROM drive 8-9 Dual Pointing device 8-14 External monitor 8-20 Fingerprint Sensor 8-16 User's Manual TECRA M11/Satellite Pro S500M Hard disk drive 8-8 Hardware and system checklist 8-3 Internal display panel 8-8 Keyboard 8-7 LAN 8-22 Memory Stick 8-12 MultiMediaCard 8-13 Overheating power down 8-5 Password 8-7 Power 8-4 Real Time Clock 8-7 Recovery Media 8-24 SD/SDHC Card 8-11 Self test 8-4 Smart Card 8-12 Sound system 8-20 System start-up 8-4 TOSHIBA support 8-24 Touch Pad 8-14 USB device 8-17 USB mouse 8-15 Wireless LAN...
... problem 8-2 Battery 8-6 Bluetooth 8-23 DVD Super Multi drive 8-10 DVD-ROM drive 8-9 Dual Pointing device 8-14 External monitor 8-20 Fingerprint Sensor 8-16 User's Manual TECRA M11/Satellite Pro S500M Hard disk drive 8-8 Hardware and system checklist 8-3 Internal display panel 8-8 Keyboard 8-7 LAN 8-22 Memory Stick 8-12 MultiMediaCard 8-13 Overheating power down 8-5 Password 8-7 Power 8-4 Real Time Clock 8-7 Recovery Media 8-24 SD/SDHC Card 8-11 Self test 8-4 Smart Card 8-12 Sound system 8-20 System start-up 8-4 TOSHIBA support 8-24 Touch Pad 8-14 USB device 8-17 USB mouse 8-15 Wireless LAN...

Detailed Specs for Tecra M11 PTME0C-04K02U English
Page 1
...13 function keys Spill Resistant keyboard Color: (Black) Pointing Device Dual Accupoint and Touchpad with BIOS Support Toshiba Spill-resistant Keyboard Toshiba Shock Absorbing Design HALT Tested Design LCD Cover pressure Resistant Design Toshiba Hard Disk Drive Protection HDD Shock Absorber HDD Impact Sensor Hinge Design Enhancement Polyurethane (PU) Coated Palm Rest Toshiba PC Diagnostic Tool Toshiba PC Health Monitor Toshiba ConfigFree™ Toshiba Diversity Antenna Toshiba Bluetooth® Stack Wireless Communication On/Off Switch Toshiba Device Access Control Toshiba Presentation Button...
...13 function keys Spill Resistant keyboard Color: (Black) Pointing Device Dual Accupoint and Touchpad with BIOS Support Toshiba Spill-resistant Keyboard Toshiba Shock Absorbing Design HALT Tested Design LCD Cover pressure Resistant Design Toshiba Hard Disk Drive Protection HDD Shock Absorber HDD Impact Sensor Hinge Design Enhancement Polyurethane (PU) Coated Palm Rest Toshiba PC Diagnostic Tool Toshiba PC Health Monitor Toshiba ConfigFree™ Toshiba Diversity Antenna Toshiba Bluetooth® Stack Wireless Communication On/Off Switch Toshiba Device Access Control Toshiba Presentation Button...


