
Users Manual Canada; English
Page 3
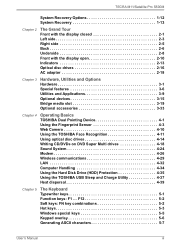
...Manual iii TECRA M11/Satellite Pro S500M System Recovery Options 1-12 System Recovery 1-13 Chapter 2 The Grand Tour Front with the display closed 2-1 Left side 2-3 Right side 2-5 Back 2-6 Underside 2-8 Front with the display open 2-10 Indicators 2-13 Optical disc drives 2-16 AC adaptor 2-18 Chapter 3 Hardware, Utilities and Options Hardware 3-1 Special features 3-6 Utilities and Applications 3-9 Optional devices 3-15 Bridge media slot 3-19 Optional accessories 3-33 Chapter 4 Operating Basics TOSHIBA Dual Pointing Device 4-1 Using the Fingerprint Sensor 4-3 Web Camera...
...Manual iii TECRA M11/Satellite Pro S500M System Recovery Options 1-12 System Recovery 1-13 Chapter 2 The Grand Tour Front with the display closed 2-1 Left side 2-3 Right side 2-5 Back 2-6 Underside 2-8 Front with the display open 2-10 Indicators 2-13 Optical disc drives 2-16 AC adaptor 2-18 Chapter 3 Hardware, Utilities and Options Hardware 3-1 Special features 3-6 Utilities and Applications 3-9 Optional devices 3-15 Bridge media slot 3-19 Optional accessories 3-33 Chapter 4 Operating Basics TOSHIBA Dual Pointing Device 4-1 Using the Fingerprint Sensor 4-3 Web Camera...

Users Manual Canada; English
Page 4
TECRA M11/Satellite Pro S500M Chapter 6 Power and Power-Up Modes Power conditions 6-1 Monitoring of power condition 6-2 Battery 6-3 TOSHIBA Password Utility 6-9 Power-up modes 6-11 Panel power on/off 6-12 System automatic Sleep/Hibernation 6-12 Chapter 7 HW Setup Accessing HW Setup 7-1 HW Setup window 7-1 Chapter 8 Troubleshooting Problem solving process 8-1 Hardware and system checklist 8-3 TOSHIBA support 8-24 Appendix A Specifications Physical Dimensions A-1 Environmental Requirements A-1 Appendix B Display Controller and Video mode Display controller B-1 Video mode...
TECRA M11/Satellite Pro S500M Chapter 6 Power and Power-Up Modes Power conditions 6-1 Monitoring of power condition 6-2 Battery 6-3 TOSHIBA Password Utility 6-9 Power-up modes 6-11 Panel power on/off 6-12 System automatic Sleep/Hibernation 6-12 Chapter 7 HW Setup Accessing HW Setup 7-1 HW Setup window 7-1 Chapter 8 Troubleshooting Problem solving process 8-1 Hardware and system checklist 8-3 TOSHIBA support 8-24 Appendix A Specifications Physical Dimensions A-1 Environmental Requirements A-1 Appendix B Display Controller and Video mode Display controller B-1 Video mode...
Users Manual Canada; English
Page 6
... of SD Card Association. TOSHIBA TECRA M11/Satellite Pro S500M Series User's Manual First edition April 2010 Copyright authority for accuracy. ConfigFree is assumed, with copyright laws in any reproduction from errors, omissions or discrepancies between the computer and the manual. Disclaimer This manual has been validated and reviewed for music, movies, computer programs, databases and other use within the home. Windows, Microsoft and Windows logo...
... of SD Card Association. TOSHIBA TECRA M11/Satellite Pro S500M Series User's Manual First edition April 2010 Copyright authority for accuracy. ConfigFree is assumed, with copyright laws in any reproduction from errors, omissions or discrepancies between the computer and the manual. Disclaimer This manual has been validated and reviewed for music, movies, computer programs, databases and other use within the home. Windows, Microsoft and Windows logo...
Users Manual Canada; English
Page 12
... individual. When you to make changes in advance of this , it may occasionally be notified as soon as it from its present line, please call the telephone company and let them to make any of your fax software before sending messages. User's Manual xii TECRA M11/Satellite Pro S500M The modem connects to the telephone line by TOSHIBA Corporation or an authorized...
... individual. When you to make changes in advance of this , it may occasionally be notified as soon as it from its present line, please call the telephone company and let them to make any of your fax software before sending messages. User's Manual xii TECRA M11/Satellite Pro S500M The modem connects to the telephone line by TOSHIBA Corporation or an authorized...
Users Manual Canada; English
Page 14
... voice telephony to the Australian telecoms network must have a valid Austel permit. TECRA M11/Satellite Pro S500M Notes for Users in Australia and New Zealand Modem warning notice for the correct operation of that the country/region is set , enter the command ATI which could constitute a nuisance to Australia. This modem has been designed to specifically configure to ensure compliance with the...
... voice telephony to the Australian telecoms network must have a valid Austel permit. TECRA M11/Satellite Pro S500M Notes for Users in Australia and New Zealand Modem warning notice for the correct operation of that the country/region is set , enter the command ATI which could constitute a nuisance to Australia. This modem has been designed to specifically configure to ensure compliance with the...

Users Manual Canada; English
Page 22
... configuring your computer, basic operations and care, using your TECRA M11/Satellite Pro S500M computer. Be sure to read Chapter 1, Getting Started for clarity, abbreviations are also defined in Chapter 3, Hardware, Utilities and Options to learn how this computer, as well as the section on Chapter 7, HW Setup, to understand how to provide years of the TECRA M11/Satellite Pro S500M Series computer. For example: Read Only Memory (ROM...
... configuring your computer, basic operations and care, using your TECRA M11/Satellite Pro S500M computer. Be sure to read Chapter 1, Getting Started for clarity, abbreviations are also defined in Chapter 3, Hardware, Utilities and Options to learn how this computer, as well as the section on Chapter 7, HW Setup, to understand how to provide years of the TECRA M11/Satellite Pro S500M Series computer. For example: Read Only Memory (ROM...
Users Manual Canada; English
Page 36
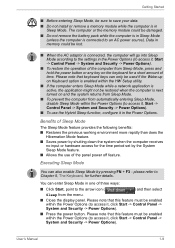
... hardware access for further details. User's Manual 1-9 Getting Started ■ Before entering Sleep Mode, be sure to save your data. ■ Do not install or remove a memory module while the computer is connected, the computer will go into Sleep Mode according to the settings in the Power Options (to access it, Start -> Control Panel -> System and Security -> Power Options). ■ To restore the operation of the computer from Sleep Mode, press and hold the power button or any key on the keyboard...
... hardware access for further details. User's Manual 1-9 Getting Started ■ Before entering Sleep Mode, be sure to save your data. ■ Do not install or remove a memory module while the computer is connected, the computer will go into Sleep Mode according to the settings in the Power Options (to access it, Start -> Control Panel -> System and Security -> Power Options). ■ To restore the operation of the computer from Sleep Mode, press and hold the power button or any key on the keyboard...
Users Manual Canada; English
Page 44
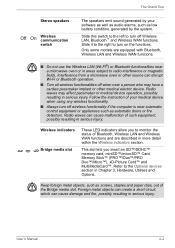
... Wireless communication switch The speakers emit sound generated by the system. Follow the instruction of Bluetooth, Wireless LAN and Wireless WAN functions and are equipped with Bluetooth, Wireless LAN and Wireless WAN functions. ■ Do not use the Wireless LAN (Wi-Fi®) or Bluetooth functionalities near a microwave oven or in serious injury. Wireless indicators Bridge media slot These LED indicators allow you insert an SD™/SDHC™ memory card, miniSD™/microSD™ Card, Memory Stick™ (PRO...
... Wireless communication switch The speakers emit sound generated by the system. Follow the instruction of Bluetooth, Wireless LAN and Wireless WAN functions and are equipped with Bluetooth, Wireless LAN and Wireless WAN functions. ■ Do not use the Wireless LAN (Wi-Fi®) or Bluetooth functionalities near a microwave oven or in serious injury. Wireless indicators Bridge media slot These LED indicators allow you insert an SD™/SDHC™ memory card, miniSD™/microSD™ Card, Memory Stick™ (PRO...
Users Manual Canada; English
Page 63
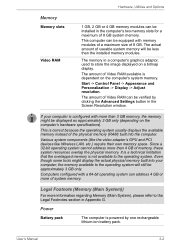
...'s graphics adaptor, used to the operating system. It is a technical limitation that the overlapped memory is dependent on the computer's hardware specifications). Legal Footnote (Memory (Main System)) For more than 3 GB memory, the memory might display the actual physical memory built into the computer. Hardware, Utilities and Options Memory Memory slots Video RAM 1 GB, 2 GB or 4 GB memory modules can be installed in the Screen Resolution window. Computers configured with more of Video RAM available is...
...'s graphics adaptor, used to the operating system. It is a technical limitation that the overlapped memory is dependent on the computer's hardware specifications). Legal Footnote (Memory (Main System)) For more than 3 GB memory, the memory might display the actual physical memory built into the computer. Hardware, Utilities and Options Memory Memory slots Video RAM 1 GB, 2 GB or 4 GB memory modules can be installed in the Screen Resolution window. Computers configured with more of Video RAM available is...
Users Manual Canada; English
Page 84
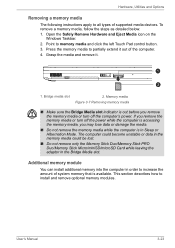
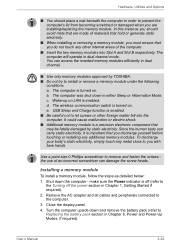
... or damage the media. ■ Do not remove the memory media while the computer is accessing the memory media, you remove the memory media or turn off the computer's power. Hardware, Utilities and Options Removing a memory media The following instructions apply to all types of the computer. 4. Additional memory module You can install additional memory into the computer in the Bridge Media slot. Open the Safely Remove Hardware and Eject Media icon on the Windows Taskbar. 2. Grasp the media and remove it out of supported media devices.
... or damage the media. ■ Do not remove the memory media while the computer is accessing the memory media, you remove the memory media or turn off the computer's power. Hardware, Utilities and Options Removing a memory media The following instructions apply to all types of the computer. 4. Additional memory module You can install additional memory into the computer in the Bridge Media slot. Open the Safely Remove Hardware and Eject Media icon on the Windows Taskbar. 2. Grasp the media and remove it out of supported media devices.
Users Manual Canada; English
Page 85
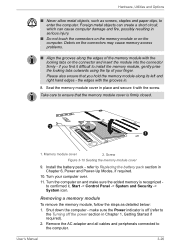
Hardware, Utilities and Options ■ You should avoid mats that are installing/replacing the memory module. The computer is enabled. Shut down in either Sleep or Hibernation Mode. Remove the AC adaptor and all cables and peripherals connected to prevent the computer's lid from becoming scratched or damaged when you are made of materials that hold or generate static electricity. ■ When installing or removing a memory module, you...
Hardware, Utilities and Options ■ You should avoid mats that are installing/replacing the memory module. The computer is enabled. Shut down in either Sleep or Hibernation Mode. Remove the AC adaptor and all cables and peripherals connected to prevent the computer's lid from becoming scratched or damaged when you are made of materials that hold or generate static electricity. ■ When installing or removing a memory module, you...
Users Manual Canada; English
Page 87
... the memory module cover 9. Turn your finger. make sure the added memory is off the power section in Chapter 6, Power and Power-Up Modes, if required. 10. Install the battery pack - if you hold the memory module along the edges of your computer over. 11. Removing a memory module To remove the memory module, follow the steps as screws, staples and paper clips, to install the memory module, gently prise the locking tabs outwards using the...
... the memory module cover 9. Turn your finger. make sure the added memory is off the power section in Chapter 6, Power and Power-Up Modes, if required. 10. Install the battery pack - if you hold the memory module along the edges of your computer over. 11. Removing a memory module To remove the memory module, follow the steps as screws, staples and paper clips, to install the memory module, gently prise the locking tabs outwards using the...
Users Manual Canada; English
Page 92
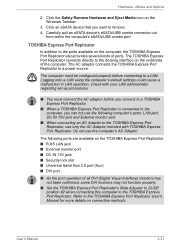
... connection methods. Check with TOSHIBA Express Port Replicator. Click the Safely Remove Hardware and Eject Media icon on the computer, the TOSHIBA Express Port Replicator also provides several kinds of ports. Logging onto a LAN using the computer's default settings could cause a malfunction in LAN operation. The TOSHIBA Express Port Replicator connects directly to the TOSHIBA Express Port Replicator, use the computer's AC Adaptor. The following computer's ports: LAN jack, DC IN 15V jack and External monitor port. ■ When connecting...
... connection methods. Check with TOSHIBA Express Port Replicator. Click the Safely Remove Hardware and Eject Media icon on the computer, the TOSHIBA Express Port Replicator also provides several kinds of ports. Logging onto a LAN using the computer's default settings could cause a malfunction in LAN operation. The TOSHIBA Express Port Replicator connects directly to the TOSHIBA Express Port Replicator, use the computer's AC Adaptor. The following computer's ports: LAN jack, DC IN 15V jack and External monitor port. ■ When connecting...

Users Manual Canada; English
Page 144
... Chapter 8 Troubleshooting for further information. You can change the Real Time Clock settings by a TOSHIBA service representative. Improper installation could be shortened. ■ Never install or remove the battery pack without first turning off the power and disconnecting the AC adaptor. Power and Power-Up Modes Real Time Clock (RTC) battery The Real Time Clock (RTC) battery provides power for the internal real time clock and calendar function and...
... Chapter 8 Troubleshooting for further information. You can change the Real Time Clock settings by a TOSHIBA service representative. Improper installation could be shortened. ■ Never install or remove the battery pack without first turning off the power and disconnecting the AC adaptor. Power and Power-Up Modes Real Time Clock (RTC) battery The Real Time Clock (RTC) battery provides power for the internal real time clock and calendar function and...
Users Manual Canada; English
Page 161
... in mind: ■ Which part of the computer is set . User's Manual 8-2 keyboard, hard disk drive, display panel, touch pad, touch pad control buttons - Write down what you hear. Troubleshooting ■ Before you attach an external device you should keep them in a permanent error log - In addition, if a problem recurs, the log you turn the computer back on again it is correctly set properly. ■ What appears on or blink? this you should first...
... in mind: ■ Which part of the computer is set . User's Manual 8-2 keyboard, hard disk drive, display panel, touch pad, touch pad control buttons - Write down what you hear. Troubleshooting ■ Before you attach an external device you should keep them in a permanent error log - In addition, if a problem recurs, the log you turn the computer back on again it is correctly set properly. ■ What appears on or blink? this you should first...

Users Manual Canada; English
Page 166
... - the BIOS setup application will end and the computer will load. 3. press the FN + F11 hot key and try typing again. User's Manual 8-7 please refer to the TOSHIBA Password Utility section in the Real Time Clock (RTC) battery is not activated - Troubleshooting Real Time Clock Problem Procedure The following steps: Failure. 1. Turn on the has run out - Problem Some letter keys produce numbers Output to use the keyboard, you will...
... - the BIOS setup application will end and the computer will load. 3. press the FN + F11 hot key and try typing again. User's Manual 8-7 please refer to the TOSHIBA Password Utility section in the Real Time Clock (RTC) battery is not activated - Troubleshooting Real Time Clock Problem Procedure The following steps: Failure. 1. Turn on the has run out - Problem Some letter keys produce numbers Output to use the keyboard, you will...
Users Manual Canada; English
Page 176
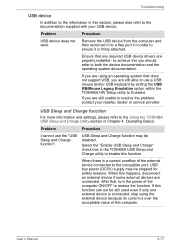
... or service provider. Problem Procedure I cannot use a USB mouse and/or USB keyboard by setting the USB KB/Mouse Legacy Emulation option within the TOSHIBA HW Setup utility to restore the function. When there is a current overflow of the computer ON/OFF to Enabled. After that, turn the power of the external device connected to use the "USB Sleep and Charge function". If you are properly installed - If this function can not be stopped for safety reasons. USB Sleep and Charge function may...
... or service provider. Problem Procedure I cannot use a USB mouse and/or USB keyboard by setting the USB KB/Mouse Legacy Emulation option within the TOSHIBA HW Setup utility to restore the function. When there is a current overflow of the computer ON/OFF to Enabled. After that, turn the power of the external device connected to use the "USB Sleep and Charge function". If you are properly installed - If this function can not be stopped for safety reasons. USB Sleep and Charge function may...

Users Manual Canada; English
Page 206
... graphics system, applications utilized, system memory size and other computing activities. Memory (Main System) Part of main system memory available for graphics performance and therefore reduce the amount of the main system memory may be compatible with a 64bit CPU and therefore may not function properly. User's Manual G-2 CPU performance may vary depending on an external storage medium. Contact Toshiba technical service and support, refer to your...
... graphics system, applications utilized, system memory size and other computing activities. Memory (Main System) Part of main system memory available for graphics performance and therefore reduce the amount of the main system memory may be compatible with a 64bit CPU and therefore may not function properly. User's Manual G-2 CPU performance may vary depending on an external storage medium. Contact Toshiba technical service and support, refer to your...
Users Manual Canada; English
Page 213
... problem 8-2 Battery 8-6 Bluetooth 8-23 DVD Super Multi drive 8-10 DVD-ROM drive 8-9 Dual Pointing device 8-14 External monitor 8-20 Fingerprint Sensor 8-16 User's Manual TECRA M11/Satellite Pro S500M Hard disk drive 8-8 Hardware and system checklist 8-3 Internal display panel 8-8 Keyboard 8-7 LAN 8-22 Memory Stick 8-12 MultiMediaCard 8-13 Overheating power down 8-5 Password 8-7 Power 8-4 Real Time Clock 8-7 Recovery Media 8-24 SD/SDHC Card 8-11 Self test 8-4 Smart Card 8-12 Sound system 8-20 System start-up 8-4 TOSHIBA support 8-24 Touch Pad 8-14 USB device 8-17 USB mouse 8-15 Wireless LAN...
... problem 8-2 Battery 8-6 Bluetooth 8-23 DVD Super Multi drive 8-10 DVD-ROM drive 8-9 Dual Pointing device 8-14 External monitor 8-20 Fingerprint Sensor 8-16 User's Manual TECRA M11/Satellite Pro S500M Hard disk drive 8-8 Hardware and system checklist 8-3 Internal display panel 8-8 Keyboard 8-7 LAN 8-22 Memory Stick 8-12 MultiMediaCard 8-13 Overheating power down 8-5 Password 8-7 Power 8-4 Real Time Clock 8-7 Recovery Media 8-24 SD/SDHC Card 8-11 Self test 8-4 Smart Card 8-12 Sound system 8-20 System start-up 8-4 TOSHIBA support 8-24 Touch Pad 8-14 USB device 8-17 USB mouse 8-15 Wireless LAN...

Detailed Specs for Tecra M11 PTME0C-04702U English
Page 1
...Tecra notebook comes with BIOS Support Toshiba Spill-resistant Keyboard Toshiba Shock Absorbing Design HALT Tested Design LCD Cover pressure Resistant Design Toshiba Hard Disk Drive Protection HDD Shock Absorber HDD Impact Sensor Hinge Design Enhancement Polyurethane (PU) Coated Palm Rest Toshiba PC Diagnostic Tool Toshiba PC Health Monitor Toshiba ConfigFree™ Toshiba Diversity Antenna Toshiba Bluetooth® Stack Wireless Communication On/Off Switch Toshiba Device Access Control Toshiba Presentation Button Toshiba Zooming Utility Toshiba Power Saver Utility Toshiba Eco Utility Toshiba...
...Tecra notebook comes with BIOS Support Toshiba Spill-resistant Keyboard Toshiba Shock Absorbing Design HALT Tested Design LCD Cover pressure Resistant Design Toshiba Hard Disk Drive Protection HDD Shock Absorber HDD Impact Sensor Hinge Design Enhancement Polyurethane (PU) Coated Palm Rest Toshiba PC Diagnostic Tool Toshiba PC Health Monitor Toshiba ConfigFree™ Toshiba Diversity Antenna Toshiba Bluetooth® Stack Wireless Communication On/Off Switch Toshiba Device Access Control Toshiba Presentation Button Toshiba Zooming Utility Toshiba Power Saver Utility Toshiba Eco Utility Toshiba...


