
Users Manual Canada; English
Page 3
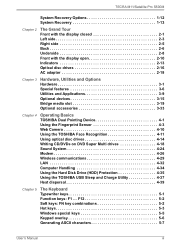
... Sensor 4-3 Web Camera 4-10 Using the TOSHIBA Face Recognition 4-11 Using optical disc drives 4-14 Writing CD/DVDs on DVD Super Multi drives 4-18 Sound System 4-24 Modem 4-26 Wireless communications 4-29 LAN 4-32 Computer Handling 4-34 Using the Hard Disk Drive (HDD) Protection 4-35 Using the TOSHIBA USB Sleep and Charge Utility 4-37 Heat dispersal 4-39 Chapter 5 The Keyboard Typewriter keys 5-1 Function keys: F1 ... F12 5-2 Soft keys: FN key combinations 5-2 Hot keys 5-3 Windows special keys 5-5 Keypad overlay 5-6 Generating ASCII characters 5-7 User's Manual iii
... Sensor 4-3 Web Camera 4-10 Using the TOSHIBA Face Recognition 4-11 Using optical disc drives 4-14 Writing CD/DVDs on DVD Super Multi drives 4-18 Sound System 4-24 Modem 4-26 Wireless communications 4-29 LAN 4-32 Computer Handling 4-34 Using the Hard Disk Drive (HDD) Protection 4-35 Using the TOSHIBA USB Sleep and Charge Utility 4-37 Heat dispersal 4-39 Chapter 5 The Keyboard Typewriter keys 5-1 Function keys: F1 ... F12 5-2 Soft keys: FN key combinations 5-2 Hot keys 5-3 Windows special keys 5-5 Keypad overlay 5-6 Generating ASCII characters 5-7 User's Manual iii

Users Manual Canada; English
Page 4
...module F-3 Appendix G Legal Footnotes Non-applicable Icons G-1 CPU G-1 Memory (Main System G-2 Battery Life G-3 Hard Disk Drive (HDD) Capacity G-3 User's Manual iv TECRA M11/Satellite Pro S500M Chapter 6 Power and Power-Up Modes Power conditions 6-1 Monitoring of power condition 6-2 Battery 6-3 TOSHIBA Password Utility 6-9 Power-up modes 6-11 Panel power on/off 6-12 System automatic Sleep/Hibernation 6-12 Chapter 7 HW Setup Accessing HW Setup 7-1 HW Setup window 7-1 Chapter 8 Troubleshooting Problem solving process 8-1 Hardware and system checklist 8-3 TOSHIBA support...
...module F-3 Appendix G Legal Footnotes Non-applicable Icons G-1 CPU G-1 Memory (Main System G-2 Battery Life G-3 Hard Disk Drive (HDD) Capacity G-3 User's Manual iv TECRA M11/Satellite Pro S500M Chapter 6 Power and Power-Up Modes Power conditions 6-1 Monitoring of power condition 6-2 Battery 6-3 TOSHIBA Password Utility 6-9 Power-up modes 6-11 Panel power on/off 6-12 System automatic Sleep/Hibernation 6-12 Chapter 7 HW Setup Accessing HW Setup 7-1 HW Setup window 7-1 Chapter 8 Troubleshooting Problem solving process 8-1 Hardware and system checklist 8-3 TOSHIBA support...
Users Manual Canada; English
Page 6
... any reproduction from errors, omissions or discrepancies between the computer and the manual. TECRA M11/Satellite Pro S500M Copyright © 2010 by TOSHIBA under license. TOSHIBA TECRA M11/Satellite Pro S500M Series User's Manual First edition April 2010 Copyright authority for personal use or use of International Business Machines Corporation. Secure Digital and SD are trademarks or registered trademarks of TOSHIBA. Bluetooth is a registered trademark of SD Card Association. Intel, Intel...
... any reproduction from errors, omissions or discrepancies between the computer and the manual. TECRA M11/Satellite Pro S500M Copyright © 2010 by TOSHIBA under license. TOSHIBA TECRA M11/Satellite Pro S500M Series User's Manual First edition April 2010 Copyright authority for personal use or use of International Business Machines Corporation. Secure Digital and SD are trademarks or registered trademarks of TOSHIBA. Bluetooth is a registered trademark of SD Card Association. Intel, Intel...
Users Manual Canada; English
Page 12
... first page of your right to the telephone network. In order to maintain uninterrupted service. Use only No. 26AWG or larger modular cable. TECRA M11/Satellite Pro S500M The modem connects to telephone company-provided coin service (central office implemented systems) is prohibited. In the event repairs are notified, you to make changes in advance of 1991 makes it may cause harm to file a complaint...
... first page of your right to the telephone network. In order to maintain uninterrupted service. Use only No. 26AWG or larger modular cable. TECRA M11/Satellite Pro S500M The modem connects to telephone company-provided coin service (central office implemented systems) is prohibited. In the event repairs are notified, you to make changes in advance of 1991 makes it may cause harm to file a complaint...
Users Manual Canada; English
Page 14
... being operated in a non-compliant manner. The use of this device in New Zealand ■ The grant of the call and. TECRA M11/Satellite Pro S500M Notes for Users in Australia and New Zealand Modem warning notice for Australia Modems connected to Australia. This modem has been designed to specifically configure to ensure compliance with Austel standards when the country/region selection is set...
... being operated in a non-compliant manner. The use of this device in New Zealand ■ The grant of the call and. TECRA M11/Satellite Pro S500M Notes for Users in Australia and New Zealand Modem warning notice for Australia Modems connected to Australia. This modem has been designed to specifically configure to ensure compliance with Austel standards when the country/region selection is set...

Users Manual Canada; English
Page 22
... Started and Chapter 3, Hardware, Utilities and Options chapters to provide years of the TECRA M11/Satellite Pro S500M Series computer. If you 're new to portable computing, first read Chapter 1, Getting Started for clarity, abbreviations are uncommon or unique to this manual by -step instructions on setting up and begin using your computer, basic operations and care, using optional devices and troubleshooting. This powerful notebook computer provides excellent expansion capability, includes multimedia functionality...
... Started and Chapter 3, Hardware, Utilities and Options chapters to provide years of the TECRA M11/Satellite Pro S500M Series computer. If you 're new to portable computing, first read Chapter 1, Getting Started for clarity, abbreviations are uncommon or unique to this manual by -step instructions on setting up and begin using your computer, basic operations and care, using optional devices and troubleshooting. This powerful notebook computer provides excellent expansion capability, includes multimedia functionality...
Users Manual Canada; English
Page 36
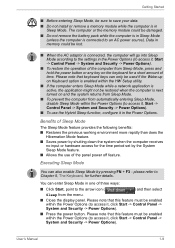
... not remove the battery pack while the computer is in one of the panel power off feature. Executing Sleep Mode You can also enable Sleep Mode by the System Sleep Mode feature. ■ Allows the use the Hybrid Sleep function, configure it , Start -> Control Panel -> System and Security -> Power Options). ■ To restore the operation of time. User's Manual 1-9 Please note that this feature must be enabled within the HW Setup utility. ■ If the computer enters Sleep Mode while a network...
... not remove the battery pack while the computer is in one of the panel power off feature. Executing Sleep Mode You can also enable Sleep Mode by the System Sleep Mode feature. ■ Allows the use the Hybrid Sleep function, configure it , Start -> Control Panel -> System and Security -> Power Options). ■ To restore the operation of time. User's Manual 1-9 Please note that this feature must be enabled within the HW Setup utility. ■ If the computer enters Sleep Mode while a network...
Users Manual Canada; English
Page 44
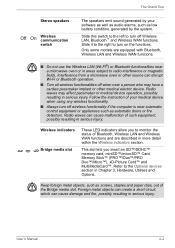
... disrupt Wi-Fi or Bluetooth operation. ■ Turn all wireless functionalities off Wireless LAN, Bluetooth™ and Wireless WAN functions. Radio waves may have a cardiac pacemaker implant or other medical electric device. User's Manual 2-2 Wireless indicators Bridge media slot These LED indicators allow you insert an SD™/SDHC™ memory card, miniSD™/microSD™ Card, Memory Stick™ (PRO™/Duo™/PRO Duo™/Micro™), xD-Picture Card™ and MultiMediaCard™...
... disrupt Wi-Fi or Bluetooth operation. ■ Turn all wireless functionalities off Wireless LAN, Bluetooth™ and Wireless WAN functions. Radio waves may have a cardiac pacemaker implant or other medical electric device. User's Manual 2-2 Wireless indicators Bridge media slot These LED indicators allow you insert an SD™/SDHC™ memory card, miniSD™/microSD™ Card, Memory Stick™ (PRO™/Duo™/PRO Duo™/Micro™), xD-Picture Card™ and MultiMediaCard™...
Users Manual Canada; English
Page 63
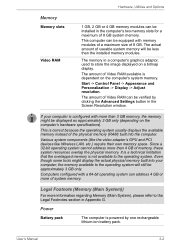
... the computer's hardware specifications). Power Battery pack The computer is configured with more of system memory. It is a technical limitation that the overlapped memory is dependent on a bitmap display. Start -> Control Panel -> Appearance and Personalization -> Display -> Adjust resolution. Computers configured with a 64-bit operating system can be verified by one rechargeable lithium-ion battery pack. Hardware, Utilities and Options Memory Memory slots Video RAM 1 GB, 2 GB or 4 GB memory modules can be equipped with memory modules of a maximum...
... the computer's hardware specifications). Power Battery pack The computer is configured with more of system memory. It is a technical limitation that the overlapped memory is dependent on a bitmap display. Start -> Control Panel -> Appearance and Personalization -> Display -> Adjust resolution. Computers configured with a 64-bit operating system can be verified by one rechargeable lithium-ion battery pack. Hardware, Utilities and Options Memory Memory slots Video RAM 1 GB, 2 GB or 4 GB memory modules can be equipped with memory modules of a maximum...
Users Manual Canada; English
Page 84
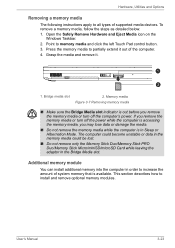
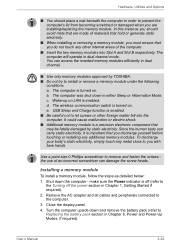
... to memory media and click the left Touch Pad control button. 3. Additional memory module You can install additional memory into the computer in the Bridge Media slot. To remove a memory media, follow the steps as detailed below: 1. Bridge media slot 2. Hardware, Utilities and Options Removing a memory media The following instructions apply to increase the amount of system memory that is available. Open the Safely Remove Hardware and Eject Media icon on the Windows Taskbar. 2. Press the memory media to partially extend it . 1 2 1. User's Manual 3-23...
... to memory media and click the left Touch Pad control button. 3. Additional memory module You can install additional memory into the computer in the Bridge Media slot. To remove a memory media, follow the steps as detailed below: 1. Bridge media slot 2. Hardware, Utilities and Options Removing a memory media The following instructions apply to increase the amount of system memory that is available. Open the Safely Remove Hardware and Eject Media icon on the Windows Taskbar. 2. Press the memory media to partially extend it . 1 2 1. User's Manual 3-23...
Users Manual Canada; English
Page 85
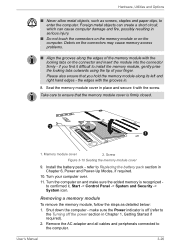
... Replacing the battery pack section in Chapter 1, Getting Started if required). 2. make sure the Power indicator is turned on. Turn the computer upside down the computer - d. Installing a memory module To install a memory module, follow the steps as detailed below: 1. Hardware, Utilities and Options ■ You should avoid mats that are installing/replacing the memory module. b. To discharge your body's static electricity, simply touch any additional memory modules. Remove the AC adaptor and all cables and peripherals connected...
... Replacing the battery pack section in Chapter 1, Getting Started if required). 2. make sure the Power indicator is turned on. Turn the computer upside down the computer - d. Installing a memory module To install a memory module, follow the steps as detailed below: 1. Hardware, Utilities and Options ■ You should avoid mats that are installing/replacing the memory module. b. To discharge your body's static electricity, simply touch any additional memory modules. Remove the AC adaptor and all cables and peripherals connected...
Users Manual Canada; English
Page 87
... memory module or on the connectors may cause memory access problems. ■ Align the grooves along its left and right hand edges - Install the battery pack - Turn the computer on the connector and insert the module into the connector firmly - Shut down the computer - make sure the added memory is off (refer to confirmed it, Start -> Control Panel -> System and Security -> System icon. Hardware, Utilities and Options...
... memory module or on the connectors may cause memory access problems. ■ Align the grooves along its left and right hand edges - Install the battery pack - Turn the computer on the connector and insert the module into the connector firmly - Shut down the computer - make sure the added memory is off (refer to confirmed it, Start -> Control Panel -> System and Security -> System icon. Hardware, Utilities and Options...
Users Manual Canada; English
Page 92
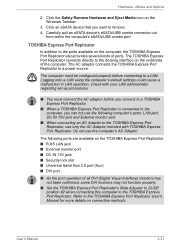
... Windows Taskbar. 3. User's Manual 3-31 The AC adaptor connects the TOSHIBA Express Port Replicator to a LAN. Logging onto a LAN using the computer's default settings could cause a malfunction in LAN operation. Hardware, Utilities and Options 2. Carefully pull an eSATA device's eSATA/USB combo connector out from within the computer's eSATA/USB combo port. The computer must connect the AC adaptor before connecting to a power source. The following computer's ports: LAN jack, DC IN 15V jack and External monitor port. ■ When connecting...
... Windows Taskbar. 3. User's Manual 3-31 The AC adaptor connects the TOSHIBA Express Port Replicator to a LAN. Logging onto a LAN using the computer's default settings could cause a malfunction in LAN operation. Hardware, Utilities and Options 2. Carefully pull an eSATA device's eSATA/USB combo connector out from within the computer's eSATA/USB combo port. The computer must connect the AC adaptor before connecting to a power source. The following computer's ports: LAN jack, DC IN 15V jack and External monitor port. ■ When connecting...

Users Manual Canada; English
Page 144
.... Never remove the battery pack while the computer is attached. Care and use of infants and children. If the RTC battery becomes completely discharged, the system will lose this instance the following message will stop working - Improper installation could be displayed when you turn on the computer and then pressing the F2 key when the TOSHIBA Leading Innovation >>> screen appears. User's Manual 6-4 It...
.... Never remove the battery pack while the computer is attached. Care and use of infants and children. If the RTC battery becomes completely discharged, the system will lose this instance the following message will stop working - Improper installation could be displayed when you turn on the computer and then pressing the F2 key when the TOSHIBA Leading Innovation >>> screen appears. User's Manual 6-4 It...
Users Manual Canada; English
Page 161
... cause signal errors. ■ Inspect all connecting cables for loose pins. ■ Check that your floppy diskette, CD or DVD media is correctly loaded and, in the case of the computer is the computer making any messages or random characters? Write down what you see. ■ Do you to describe your observations so you hear. keyboard, hard disk drive, display panel, touch pad, touch pad control buttons - If...
... cause signal errors. ■ Inspect all connecting cables for loose pins. ■ Check that your floppy diskette, CD or DVD media is correctly loaded and, in the case of the computer is the computer making any messages or random characters? Write down what you see. ■ Do you to describe your observations so you hear. keyboard, hard disk drive, display panel, touch pad, touch pad control buttons - If...

Users Manual Canada; English
Page 166
... the function of the computer - Press the F2 key when the TOSHIBA Leading Innovation >>> screen appears - Set the date in the System Time field. 5. Password Problem Procedure Cannot enter password Please refer to set the date and screen: time in the BIOS setup application by the setup and configuration of each key). Keyboard Keyboard problems can be displayed. 6. Check system. Then press [F2] key. 2. press the FN + F11 hot key and try typing again. User's Manual...
... the function of the computer - Press the F2 key when the TOSHIBA Leading Innovation >>> screen appears - Set the date in the System Time field. 5. Password Problem Procedure Cannot enter password Please refer to set the date and screen: time in the BIOS setup application by the setup and configuration of each key). Keyboard Keyboard problems can be displayed. 6. Check system. Then press [F2] key. 2. press the FN + F11 hot key and try typing again. User's Manual...
Users Manual Canada; English
Page 176
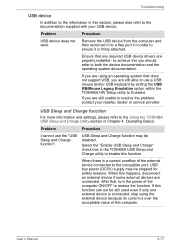
to achieve this section, please also refer to the documentation supplied with your reseller, dealer or service provider. Problem Procedure I cannot use a USB mouse and/or USB keyboard by setting the USB KB/Mouse Legacy Emulation option within the TOSHIBA HW Setup utility to the compatible port, USB bus power (DC5V) supply may be disabled. User's Manual 8-17 Troubleshooting USB device In addition to the information in this you should refer to both the...
to achieve this section, please also refer to the documentation supplied with your reseller, dealer or service provider. Problem Procedure I cannot use a USB mouse and/or USB keyboard by setting the USB KB/Mouse Legacy Emulation option within the TOSHIBA HW Setup utility to the compatible port, USB bus power (DC5V) supply may be disabled. User's Manual 8-17 Troubleshooting USB device In addition to the information in this you should refer to both the...

Users Manual Canada; English
Page 206
... depending on the specific computer model please refer to support graphics may vary depending on an external storage medium. This is a normal protective feature designed to reduce the risk of main system memory allocated to your computer product only under recommended conditions. Read additional restrictions in Chapter 8 Troubleshooting for details). User's Manual G-2 For optimum performance, use of computer at...
... depending on the specific computer model please refer to support graphics may vary depending on an external storage medium. This is a normal protective feature designed to reduce the risk of main system memory allocated to your computer product only under recommended conditions. Read additional restrictions in Chapter 8 Troubleshooting for details). User's Manual G-2 For optimum performance, use of computer at...
Users Manual Canada; English
Page 213
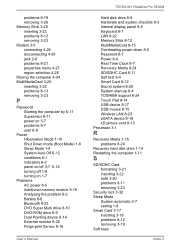
... problem 8-2 Battery 8-6 Bluetooth 8-23 DVD Super Multi drive 8-10 DVD-ROM drive 8-9 Dual Pointing device 8-14 External monitor 8-20 Fingerprint Sensor 8-16 User's Manual TECRA M11/Satellite Pro S500M Hard disk drive 8-8 Hardware and system checklist 8-3 Internal display panel 8-8 Keyboard 8-7 LAN 8-22 Memory Stick 8-12 MultiMediaCard 8-13 Overheating power down 8-5 Password 8-7 Power 8-4 Real Time Clock 8-7 Recovery Media 8-24 SD/SDHC Card 8-11 Self test 8-4 Smart Card 8-12 Sound system 8-20 System start-up 8-4 TOSHIBA support 8-24 Touch Pad 8-14 USB device 8-17 USB mouse 8-15 Wireless LAN...
... problem 8-2 Battery 8-6 Bluetooth 8-23 DVD Super Multi drive 8-10 DVD-ROM drive 8-9 Dual Pointing device 8-14 External monitor 8-20 Fingerprint Sensor 8-16 User's Manual TECRA M11/Satellite Pro S500M Hard disk drive 8-8 Hardware and system checklist 8-3 Internal display panel 8-8 Keyboard 8-7 LAN 8-22 Memory Stick 8-12 MultiMediaCard 8-13 Overheating power down 8-5 Password 8-7 Power 8-4 Real Time Clock 8-7 Recovery Media 8-24 SD/SDHC Card 8-11 Self test 8-4 Smart Card 8-12 Sound system 8-20 System start-up 8-4 TOSHIBA support 8-24 Touch Pad 8-14 USB device 8-17 USB mouse 8-15 Wireless LAN...

Detailed Specs for Tecra M11 PTME0C-01K002 English
Page 1
... _____ Model: i Tecra M11 PTME0C-01K002 Intel® Core™ i5-520M processor - 2.40GHz/2.93GHz, 14" HD LED, 4GB DDR3, 250GB 5400RPM HDD SATA, Intel HD Graphics, DVD Super-Multi Double Layer, Modem, LAN, 802.11bgn Wireless, Bluetooth, Webcam, Genuine Windows® 7 Professional Expansion 2 memory slots (first slot filled with 2GB, second slot filled with BIOS Support Toshiba Spill-resistant Keyboard Toshiba Shock Absorbing Design HALT Tested Design LCD Cover pressure Resistant Design Toshiba Hard Disk Drive Protection HDD...
... _____ Model: i Tecra M11 PTME0C-01K002 Intel® Core™ i5-520M processor - 2.40GHz/2.93GHz, 14" HD LED, 4GB DDR3, 250GB 5400RPM HDD SATA, Intel HD Graphics, DVD Super-Multi Double Layer, Modem, LAN, 802.11bgn Wireless, Bluetooth, Webcam, Genuine Windows® 7 Professional Expansion 2 memory slots (first slot filled with 2GB, second slot filled with BIOS Support Toshiba Spill-resistant Keyboard Toshiba Shock Absorbing Design HALT Tested Design LCD Cover pressure Resistant Design Toshiba Hard Disk Drive Protection HDD...


