
User Guide
Page 46
.... The computer will pause for a moment while checking for an Internet account, you through steps to set up your software. 1 From the welcome screen click Next to enter the Setup Wizard. 2 Confirm acceptance of windows displayed, and the order in modem to a telephone line or establish a Local... your software NOTE The names of Microsoft's End User License Agreement and click Next. 3 Select the appropriate option from the Help protect your computer screen and click Next. 4 Enter the computer name and description and click Next or Skip. 5 Select how your computer will display the message: "...
.... The computer will pause for a moment while checking for an Internet account, you through steps to set up your software. 1 From the welcome screen click Next to enter the Setup Wizard. 2 Confirm acceptance of windows displayed, and the order in modem to a telephone line or establish a Local... your software NOTE The names of Microsoft's End User License Agreement and click Next. 3 Select the appropriate option from the Help protect your computer screen and click Next. 4 Enter the computer name and description and click Next or Skip. 5 Select how your computer will display the message: "...
User Guide
Page 47
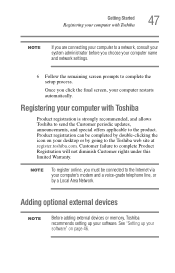
... your system administrator before you choose your computer name and network settings. 6 Follow the remaining screen prompts to complete the setup process. Getting Started Registering your computer with Toshiba Product registration is strongly recommended, and allows Toshiba to send the Customer periodic updates, announcements, and special offers applicable to the product. NOTE To...
... your system administrator before you choose your computer name and network settings. 6 Follow the remaining screen prompts to complete the setup process. Getting Started Registering your computer with Toshiba Product registration is strongly recommended, and allows Toshiba to send the Customer periodic updates, announcements, and special offers applicable to the product. NOTE To...

User Guide
Page 53
... panel. Display release latch Sample opening the display panel 3 Adjust the display to turn on the center of the computer, locate the latch on your screen display when you to a comfortable viewing angle. Using the computer for the first time The computer is now ready for the first time 53 NOTE...
... panel. Display release latch Sample opening the display panel 3 Adjust the display to turn on the center of the computer, locate the latch on your screen display when you to a comfortable viewing angle. Using the computer for the first time The computer is now ready for the first time 53 NOTE...

User Guide
Page 54
...devices (such as the AC adapter, if you plan to use AC power rather than battery power) are an intrinsic characteristic of the screen will dim and you have all the features and specifications corresponding to accommodate all the features and icons described in this guide. When ...the computer is operated on your display are properly connected and ready. 2 Check to increase the brightness of the screen technology. This information applies to all possible configurations for the first time large number of thin-film transistors (TFT) and is also an ...
...devices (such as the AC adapter, if you plan to use AC power rather than battery power) are an intrinsic characteristic of the screen will dim and you have all the features and specifications corresponding to accommodate all the features and icons described in this guide. When ...the computer is operated on your display are properly connected and ready. 2 Check to increase the brightness of the screen technology. This information applies to all possible configurations for the first time large number of thin-film transistors (TFT) and is also an ...

User Guide
Page 64
...2 Select CD, DVD, or All Files (to obtain the Recovery media for your computer. If your optical disk drive is not writable, contact TOSHIBA Customer Support to create Recovery media on both the recovery files and applications. 4 Click Burn. You can also launch the application by clicking the check... box next to the item's Name - Sample Recovery Disc Creator screen 3 Select the items you to insert the appropriate amount of CDs or DVDs to store the Hard Drive Recovery Utilities on the Windows desktop. ...
...2 Select CD, DVD, or All Files (to obtain the Recovery media for your computer. If your optical disk drive is not writable, contact TOSHIBA Customer Support to create Recovery media on both the recovery files and applications. 4 Click Burn. You can also launch the application by clicking the check... box next to the item's Name - Sample Recovery Disc Creator screen 3 Select the items you to insert the appropriate amount of CDs or DVDs to store the Hard Drive Recovery Utilities on the Windows desktop. ...

User Guide
Page 65
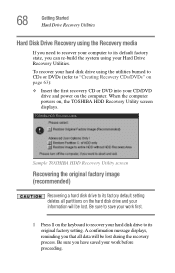
... on the computer. To recover your hard disk drive using the Recovery media" on your C: drive and then recovering it. Sample TOSHIBA HDD Recovery Utility screen Getting Started Hard Drive Recovery Utilities 65 5 Insert the first blank CD or DVD into your computer's CD/DVD writable drive when ...prompted. 6 Follow the on , the TOSHIBA HDD Recovery Utility screen displays. For more information on using the Recovery media you have the options of recovering your system using the Hard Drive Recovery partition...
... on the computer. To recover your hard disk drive using the Recovery media" on your C: drive and then recovering it. Sample TOSHIBA HDD Recovery Utility screen Getting Started Hard Drive Recovery Utilities 65 5 Insert the first blank CD or DVD into your computer's CD/DVD writable drive when ...prompted. 6 Follow the on , the TOSHIBA HDD Recovery Utility screen displays. For more information on using the Recovery media you have the options of recovering your system using the Hard Drive Recovery partition...

User Guide
Page 66
... your information will be lost . If you have created other partitions (for example, a D: drive) those partitions and any key on the keyboard when the TOSHIBA HDD Recovery Utility screen displays. A confirmation message appears, reminding you have saved your C: drive: 1 Press 2 on the keyboard to save your work before proceeding. Be sure you...
... your information will be lost . If you have created other partitions (for example, a D: drive) those partitions and any key on the keyboard when the TOSHIBA HDD Recovery Utility screen displays. A confirmation message appears, reminding you have saved your C: drive: 1 Press 2 on the keyboard to save your work before proceeding. Be sure you...

User Guide
Page 67
... C: drive to begin the restoration. Recovering the C: partition with a user specified size Resizing and recovering your information will display on the keyboard when the TOSHIBA HDD Recovery Utility screen displays. NOTE The size of the C: drive. ❖ Press the Left/Right Arrow keys to increase/decrease the C: drive size by 5 GB. Once...
... C: drive to begin the restoration. Recovering the C: partition with a user specified size Resizing and recovering your information will display on the keyboard when the TOSHIBA HDD Recovery Utility screen displays. NOTE The size of the C: drive. ❖ Press the Left/Right Arrow keys to increase/decrease the C: drive size by 5 GB. Once...
User Guide
Page 68
... sure you that all partitions on the computer. To recover your hard disk drive using your work first. 1 Press 1 on , the TOSHIBA HDD Recovery Utility screen displays. Sample TOSHIBA HDD Recovery Utility screen Recovering the original factory image (recommended) Recovering a hard disk drive to its factory default setting deletes all data will be lost .
... sure you that all partitions on the computer. To recover your hard disk drive using your work first. 1 Press 1 on , the TOSHIBA HDD Recovery Utility screen displays. Sample TOSHIBA HDD Recovery Utility screen Recovering the original factory image (recommended) Recovering a hard disk drive to its factory default setting deletes all data will be lost .

User Guide
Page 69
... computer. Once complete, a message displays that the HDD has been recovered. 3 Press any key on your C: drive: 1 Press 2 on the keyboard when the TOSHIBA HDD Recovery Utility screen displays. A confirmation message appears, reminding you that the HDD has been recovered. 3 Press any information on the recovered drive will be lost . Recovering the...
... computer. Once complete, a message displays that the HDD has been recovered. 3 Press any key on your C: drive: 1 Press 2 on the keyboard when the TOSHIBA HDD Recovery Utility screen displays. A confirmation message appears, reminding you that the HDD has been recovered. 3 Press any information on the recovered drive will be lost . Recovering the...

User Guide
Page 70
...4 Click Disk Management. 5 Highlight the hard disk drive in the lower portion of your C: drive. This will increase the size of the screen. A confirmation message appears, reminding you have saved your work first. Be sure to save your work before proceeding. 2 Click Yes to display ... without the HDD Recovery Area This option recovers your C: drive without the recovery partition: 1 Press 3 on the keyboard when the TOSHIBA HDD Recovery Utility screen displays. Recovering your C: drive to its status in the Volume list to begin the restoration. Once complete, a message displays that ...
...4 Click Disk Management. 5 Highlight the hard disk drive in the lower portion of your C: drive. This will increase the size of the screen. A confirmation message appears, reminding you have saved your work first. Be sure to save your work before proceeding. 2 Click Yes to display ... without the HDD Recovery Area This option recovers your C: drive without the recovery partition: 1 Press 3 on the keyboard when the TOSHIBA HDD Recovery Utility screen displays. Recovering your C: drive to its status in the Volume list to begin the restoration. Once complete, a message displays that ...

User Guide
Page 71
... the appropriate drive letter (for example, E: drive) for the extra space and formats the drive. Sample Delete Hard Disk Recovery Utility screen 2 Click OK to continue. 3 When the following warning screen displays, click Yes to confirm. Getting Started Hard Drive Recovery Utilities 71 Deleting the Hard Disk Recovery Utility You can delete...
... the appropriate drive letter (for example, E: drive) for the extra space and formats the drive. Sample Delete Hard Disk Recovery Utility screen 2 Click OK to continue. 3 When the following warning screen displays, click Yes to confirm. Getting Started Hard Drive Recovery Utilities 71 Deleting the Hard Disk Recovery Utility You can delete...
User Guide
Page 72
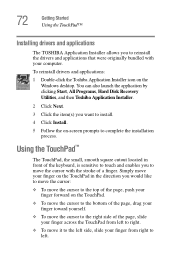
...the right side of a finger. You can also launch the application by clicking Start, All Programs, Hard Disk Recovery Utilities, and then Toshiba Application Installer. 2 Click Next. 3 Click the item(s) you want to install. 4 Click Install. 5 Follow the on the Windows ... Using the TouchPad™ Installing drivers and applications The TOSHIBA Application Installer allows you to complete the installation process. To reinstall drivers and applications: 1 Double-click the Toshiba Application Installer icon on -screen prompts to reinstall the drivers and applications that were originally...
...the right side of a finger. You can also launch the application by clicking Start, All Programs, Hard Disk Recovery Utilities, and then Toshiba Application Installer. 2 Click Next. 3 Click the item(s) you want to install. 4 Click Install. 5 Follow the on the Windows ... Using the TouchPad™ Installing drivers and applications The TOSHIBA Application Installer allows you to complete the installation process. To reinstall drivers and applications: 1 Double-click the Toshiba Application Installer icon on -screen prompts to reinstall the drivers and applications that were originally...

User Guide
Page 73
... button. The function of the TouchPad. Getting Started Using the TouchPad™ 73 NOTE Because the TouchPad is much smaller than the display screen, moving your cursor across the TouchPad in the preferred direction. To scroll vertically, run your cursor, you to click or choose an item..., move your finger several times across the screen often means having to the right mouse button. Control buttons When a step instructs you can be disabled or changed in rapid succession. Scrolling...
... button. The function of the TouchPad. Getting Started Using the TouchPad™ 73 NOTE Because the TouchPad is much smaller than the display screen, moving your cursor across the TouchPad in the preferred direction. To scroll vertically, run your cursor, you to click or choose an item..., move your finger several times across the screen often means having to the right mouse button. Control buttons When a step instructs you can be disabled or changed in rapid succession. Scrolling...

User Guide
Page 74
Sample TouchPad ON/OFF screen 5 Select Disable or Enable, whichever is enabled by default. The Control Panel window appears. 2 Click Printers and Other Hardware. 3 Click the Mouse icon. 4 Click the TouchPad ON/OFF tab. The Mouse Properties window closes. 8 Close the Printers and Other Hardware window. 74 Getting Started Using the TouchPad™ Disabling or enabling the TouchPad The TouchPad is appropriate. 6 Click Apply. 7 Click OK. The TouchPad ON/OFF tab view window appears. To change the enable/ disable TouchPad setting: 1 Click Start, and then Control Panel.
Sample TouchPad ON/OFF screen 5 Select Disable or Enable, whichever is enabled by default. The Control Panel window appears. 2 Click Printers and Other Hardware. 3 Click the Mouse icon. 4 Click the TouchPad ON/OFF tab. The Mouse Properties window closes. 8 Close the Printers and Other Hardware window. 74 Getting Started Using the TouchPad™ Disabling or enabling the TouchPad The TouchPad is appropriate. 6 Click Apply. 7 Click OK. The TouchPad ON/OFF tab view window appears. To change the enable/ disable TouchPad setting: 1 Click Start, and then Control Panel.

User Guide
Page 77
... the S-video Out port Before connecting a television, video projector, monitor or other external display device, configure your computer for your computer if you need a larger screen. If you close the display panel to notify you that it again. ❖ If you have an action feature set, the computer will perform either...
... the S-video Out port Before connecting a television, video projector, monitor or other external display device, configure your computer for your computer if you need a larger screen. If you close the display panel to notify you that it again. ❖ If you have an action feature set, the computer will perform either...

User Guide
Page 80
...printer. the printer is USBcompatible, check its original position. You can connect a USB-compatible printer to the upper-right side of the screen. 80 Getting Started Using a mouse Using a mouse If you prefer to use a standard mouse, you can attach a USB mouse ...Advanced Port Replicator III. Follow the manufacturer's instructions when connecting a local printer. If your printer supports Plug and Play, your Toshiba sales representative for more information. Connecting a printer NOTE Your printer documentation may not function correctly. Read the documentation that came with ...
...printer. the printer is USBcompatible, check its original position. You can connect a USB-compatible printer to the upper-right side of the screen. 80 Getting Started Using a mouse Using a mouse If you prefer to use a standard mouse, you can attach a USB mouse ...Advanced Port Replicator III. Follow the manufacturer's instructions when connecting a local printer. If your printer supports Plug and Play, your Toshiba sales representative for more information. Connecting a printer NOTE Your printer documentation may not function correctly. Read the documentation that came with ...

User Guide
Page 82
Sample optional external USB diskette drive To connect an optional external USB diskette drive, connect the cable to set up your printer. 82 Getting Started Connecting an optional external diskette drive Sample Add Printer Wizard 3 Follow the on-screen instructions to one of the computer's USB ports. Connecting an optional external diskette drive Some operations, such as creating a password service diskette, require a diskette drive designed for use with 3.5inch diskettes.
Sample optional external USB diskette drive To connect an optional external USB diskette drive, connect the cable to set up your printer. 82 Getting Started Connecting an optional external diskette drive Sample Add Printer Wizard 3 Follow the on-screen instructions to one of the computer's USB ports. Connecting an optional external diskette drive Some operations, such as creating a password service diskette, require a diskette drive designed for use with 3.5inch diskettes.

User Guide
Page 95
... Run dialog box 2 In the Run dialog box: ❖ If you can search for it by clicking Start, then Search, and then following the on-screen instructions. The Run dialog box appears.
... Run dialog box 2 In the Run dialog box: ❖ If you can search for it by clicking Start, then Search, and then following the on-screen instructions. The Run dialog box appears.

User Guide
Page 99
... parameters. Using the DVD-ROM or multi-function drive Optical storage has become the preferred medium for software, music, and video. These features include wide-screen movies, multiple language tracks, digital surround sound, multiple camera angles, and interactive menus.
... parameters. Using the DVD-ROM or multi-function drive Optical storage has become the preferred medium for software, music, and video. These features include wide-screen movies, multiple language tracks, digital surround sound, multiple camera angles, and interactive menus.


