User Guide
Page 2
... WHETHER THE DATA HAS BEEN SUCCESSFULLY COPIED OR TRANSFERRED. Models: Tecra® A2 Series ReWritable CD/DVD Drives The computer system you may include a ReWritable CD and/or DVD drive(s), among the most advanced data storage technologies available. TOSHIBA DISCLAIMS ANY LIABILITY FOR THE FAILURE TO COPY OR TRANSFER THE... FREE. IF YOUR DATA IS ALTERED OR LOST DUE TO ANY TROUBLE, FAILURE OR MALFUNCTION OF THE HARD DISK DRIVE OR OTHER STORAGE DEVICES AND THE DATA CANNOT BE RECOVERED, TOSHIBA SHALL NOT BE LIABLE FOR ANY DAMAGE OR LOSS OF DATA, OR ANY OTHER DAMAGE RESULTING THEREFROM. ...
... WHETHER THE DATA HAS BEEN SUCCESSFULLY COPIED OR TRANSFERRED. Models: Tecra® A2 Series ReWritable CD/DVD Drives The computer system you may include a ReWritable CD and/or DVD drive(s), among the most advanced data storage technologies available. TOSHIBA DISCLAIMS ANY LIABILITY FOR THE FAILURE TO COPY OR TRANSFER THE... FREE. IF YOUR DATA IS ALTERED OR LOST DUE TO ANY TROUBLE, FAILURE OR MALFUNCTION OF THE HARD DISK DRIVE OR OTHER STORAGE DEVICES AND THE DATA CANNOT BE RECOVERED, TOSHIBA SHALL NOT BE LIABLE FOR ANY DAMAGE OR LOSS OF DATA, OR ANY OTHER DAMAGE RESULTING THEREFROM. ...
User Guide
Page 29
... memory 55 Installing a memory module 56 Removing a memory module 60 Hard Drive Recovery Utilities 62 Creating Recovery CDs/DVDs 63 Hard Disk Drive Recovery using the recovery partition 64 Hard Disk Drive Recovery using the Recovery media 67 Deleting the Hard Disk Recovery Utility 70 Installing drivers and applications 71 Using the TouchPad... the external display......78 Using an external keyboard 78 Using a mouse 78 Connecting a local printer 79 Connecting an optional external diskette drive........81 Connecting external speakers or headphones.........82 Connecting a microphone 82
... memory 55 Installing a memory module 56 Removing a memory module 60 Hard Drive Recovery Utilities 62 Creating Recovery CDs/DVDs 63 Hard Disk Drive Recovery using the recovery partition 64 Hard Disk Drive Recovery using the Recovery media 67 Deleting the Hard Disk Recovery Utility 70 Installing drivers and applications 71 Using the TouchPad... the external display......78 Using an external keyboard 78 Using a mouse 78 Connecting a local printer 79 Connecting an optional external diskette drive........81 Connecting external speakers or headphones.........82 Connecting a microphone 82

User Guide
Page 32
... an audio CD 149 Playing CDs using Auto-Run 151 Creating a CD 151 Recording sounds 152 Using external speakers or headphones..........153 Inserting and removing hard drives 154 Inserting and removing PC Cards 156 Inserting a PC Card 156 Removing a PC Card 157 Setting up a PC Card for your computer .........158 Connecting your...
... an audio CD 149 Playing CDs using Auto-Run 151 Creating a CD 151 Recording sounds 152 Using external speakers or headphones..........153 Inserting and removing hard drives 154 Inserting and removing PC Cards 156 Inserting a PC Card 156 Removing a PC Card 157 Setting up a PC Card for your computer .........158 Connecting your...
User Guide
Page 62
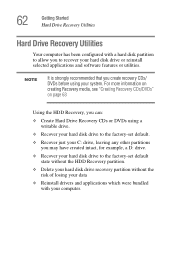
... any other partitions you may have created intact, for example, a D: drive. ❖ Recover your hard disk drive to recover your hard disk drive or reinstall selected applications and software features or utilities. 62 Getting Started Hard Drive Recovery Utilities Hard Drive Recovery Utilities Your computer has been configured with a hard disk partition to allow you to the factory-set default...
... any other partitions you may have created intact, for example, a D: drive. ❖ Recover your hard disk drive to recover your hard disk drive or reinstall selected applications and software features or utilities. 62 Getting Started Hard Drive Recovery Utilities Hard Drive Recovery Utilities Your computer has been configured with a hard disk partition to allow you to the factory-set default...

User Guide
Page 63
... the Windows desktop. Sample Recovery Disc Creator screen If your optical disk drive is not writable, contact TOSHIBA Customer Support to obtain the Recovery media for your computer. Getting Started Hard Drive Recovery Utilities 63 Creating Recovery CDs/DVDs Copying the Hard Drive Recovery Utilities to CD or DVD gives you to insert the appropriate amount...
... the Windows desktop. Sample Recovery Disc Creator screen If your optical disk drive is not writable, contact TOSHIBA Customer Support to obtain the Recovery media for your computer. Getting Started Hard Drive Recovery Utilities 63 Creating Recovery CDs/DVDs Copying the Hard Drive Recovery Utilities to CD or DVD gives you to insert the appropriate amount...
User Guide
Page 64
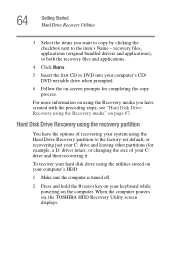
... To recover your hard disk drive using the Recovery media" on -screen prompts for example, a D: drive) intact, or changing the size of recovering your system using the Hard Drive Recovery partition to the item's Name - Hard Disk Drive Recovery using the ...Hard Disk Drive Recovery using the utilities stored on your computer's HDD: 1 Make sure the computer is turned off. 2 Press and hold the 0 (zero) key on your C: drive and then recovering it. 64 Getting Started Hard Drive Recovery Utilities 3 Select the items you have the options of your keyboard while powering on , the TOSHIBA...
... To recover your hard disk drive using the Recovery media" on -screen prompts for example, a D: drive) intact, or changing the size of recovering your system using the Hard Drive Recovery partition to the item's Name - Hard Disk Drive Recovery using the ...Hard Disk Drive Recovery using the utilities stored on your computer's HDD: 1 Make sure the computer is turned off. 2 Press and hold the 0 (zero) key on your C: drive and then recovering it. 64 Getting Started Hard Drive Recovery Utilities 3 Select the items you have the options of your keyboard while powering on , the TOSHIBA...

User Guide
Page 65
... lost . Once complete, a message displays that all partitions on the keyboard to begin the recovery. Getting Started Hard Drive Recovery Utilities 65 Sample TOSHIBA HDD Recovery Utility screen Recovering the original factory image (recommended) Recovering a hard disk drive to its original factory setting. Be sure you that the HDD has been recovered. 3 Press any key...
... lost . Once complete, a message displays that all partitions on the keyboard to begin the recovery. Getting Started Hard Drive Recovery Utilities 65 Sample TOSHIBA HDD Recovery Utility screen Recovering the original factory image (recommended) Recovering a hard disk drive to its original factory setting. Be sure you that the HDD has been recovered. 3 Press any key...

User Guide
Page 66
... displays. Once complete, a message displays that all information on the keyboard when the TOSHIBA HDD Recovery Utility screen displays. 66 Getting Started Hard Drive Recovery Utilities Recovering the C: partition of the HDD without changing the current partition size Recovering the C: drive to its factory default setting reformats all partitions on your keyboard to restart...
... displays. Once complete, a message displays that all information on the keyboard when the TOSHIBA HDD Recovery Utility screen displays. 66 Getting Started Hard Drive Recovery Utilities Recovering the C: partition of the HDD without changing the current partition size Recovering the C: drive to its factory default setting reformats all partitions on your keyboard to restart...

User Guide
Page 67
Be sure you can re-build the system using your Hard Drive Recovery Utilities. When the computer powers on, the TOSHIBA HDD Recovery Utility screen displays. Hard Disk Drive Recovery using the utilities burned to CDs or DVDs (refer to "Creating Recovery CDs/DVDs" on page 63): ❖ Insert...the restoration and to specify the size of the C: drive will be lost during the recovery process. Getting Started Hard Drive Recovery Utilities 67 information will display on the progress bar as you make your keyboard to increase/decrease the C: drive size by 1 GB. ❖ Press the Up/...
Be sure you can re-build the system using your Hard Drive Recovery Utilities. When the computer powers on, the TOSHIBA HDD Recovery Utility screen displays. Hard Disk Drive Recovery using the utilities burned to CDs or DVDs (refer to "Creating Recovery CDs/DVDs" on page 63): ❖ Insert...the restoration and to specify the size of the C: drive will be lost during the recovery process. Getting Started Hard Drive Recovery Utilities 67 information will display on the progress bar as you make your keyboard to increase/decrease the C: drive size by 1 GB. ❖ Press the Up/...

User Guide
Page 68
...lost during the recovery process. Once complete, a message displays that all partitions on the hard disk drive and your work first. 1 Press 1 on the keyboard to restart the computer. Be sure to save your hard disk drive to its factory default setting deletes all data will be lost . Be sure you ...recovered. 3 Press any key on the keyboard to recover your work before proceeding. 2 Click Yes to begin the recovery process. 68 Getting Started Hard Drive Recovery Utilities Sample TOSHIBA HDD Recovery Utility screen Recovering the original factory image (recommended) Recovering...
...lost during the recovery process. Once complete, a message displays that all partitions on the hard disk drive and your work first. 1 Press 1 on the keyboard to restart the computer. Be sure to save your hard disk drive to its factory default setting deletes all data will be lost . Be sure you ...recovered. 3 Press any key on the keyboard to recover your work before proceeding. 2 Click Yes to begin the recovery process. 68 Getting Started Hard Drive Recovery Utilities Sample TOSHIBA HDD Recovery Utility screen Recovering the original factory image (recommended) Recovering...

User Guide
Page 69
...Hard Drive Recovery Utilities 69 Recovering the C: partition of your C: drive. Recovering your C: drive to its factory default setting reformats your drive and your information will not be lost . This will increase the size of the HDD only Recovering the C: drive to restart the computer. To recover only your C: drive... information on the keyboard when the TOSHIBA HDD Recovery Utility screen displays. If you have saved your keyboard to its factory default state without the recovery partition reformats all information on the C: drive will be lost during the recovery ...
...Hard Drive Recovery Utilities 69 Recovering the C: partition of your C: drive. Recovering your C: drive to its factory default setting reformats your drive and your information will not be lost . This will increase the size of the HDD only Recovering the C: drive to restart the computer. To recover only your C: drive... information on the keyboard when the TOSHIBA HDD Recovery Utility screen displays. If you have saved your keyboard to its factory default state without the recovery partition reformats all information on the C: drive will be lost during the recovery ...

User Guide
Page 70
When the computer powers on the keyboard when the TOSHIBA HDD Recovery Utility screen displays. A confirmation message appears, reminding you have saved your work before proceeding. 2 Click Yes to begin the restoration. ...be lost during the recovery process. 70 Getting Started Hard Drive Recovery Utilities To recover your C: drive without losing your data. 1 Click Start, All Programs, Hard Disk Recovery Utilities, then Delete Hard Disk Recovery Partition. Checking the HDD operating status After restoring your hard disk drive, you can delete the HDD recovery partition without the...
When the computer powers on the keyboard when the TOSHIBA HDD Recovery Utility screen displays. A confirmation message appears, reminding you have saved your work before proceeding. 2 Click Yes to begin the restoration. ...be lost during the recovery process. 70 Getting Started Hard Drive Recovery Utilities To recover your C: drive without losing your data. 1 Click Start, All Programs, Hard Disk Recovery Utilities, then Delete Hard Disk Recovery Partition. Checking the HDD operating status After restoring your hard disk drive, you can delete the HDD recovery partition without the...

User Guide
Page 71
... can also launch the application by clicking Start, All Programs, then Hard Disk Recovery Utilities. Getting Started Hard Drive Recovery Utilities 71 Sample Delete Hard Disk Recovery Utility screen 2 Click OK to continue. 3 When the... following warning screen displays, click OK to reinstall the drivers and applications that were originally bundled with your computer. Sample Delete Hard Disk Recovery Utility confirmation screen Installing drivers and applications The TOSHIBA...
... can also launch the application by clicking Start, All Programs, then Hard Disk Recovery Utilities. Getting Started Hard Drive Recovery Utilities 71 Sample Delete Hard Disk Recovery Utility screen 2 Click OK to continue. 3 When the... following warning screen displays, click OK to reinstall the drivers and applications that were originally bundled with your computer. Sample Delete Hard Disk Recovery Utility confirmation screen Installing drivers and applications The TOSHIBA...

User Guide
Page 104
... a carrying case from your files there. For more information, see "Hard Drive Recovery Utilities" on them. If you have a network partition, you are working on page 62. You can hold copies of your Toshiba dealer, through the accessories information packaged with Hard Disk Drive Recovery Utilities that was preinstalled. To back up the computer by...
... a carrying case from your files there. For more information, see "Hard Drive Recovery Utilities" on them. If you have a network partition, you are working on page 62. You can hold copies of your Toshiba dealer, through the accessories information packaged with Hard Disk Drive Recovery Utilities that was preinstalled. To back up the computer by...
User Guide
Page 154
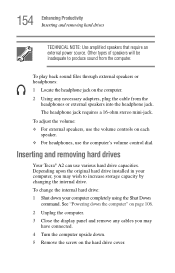
...Close the display panel and remove any necessary adapters, plug the cable from the computer. 154 Enhancing Productivity Inserting and removing hard drives TECHNICAL NOTE: Use amplified speakers that require an external power source. To adjust the volume: ❖ For external speakers,... the volume controls on each speaker. ❖ For headphones, use various hard drive capacities. Other types of speakers will be inadequate to increase storage capacity by changing the internal drive. Inserting and removing hard drives Your Tecra® A2 can use the computer's volume control dial.
...Close the display panel and remove any necessary adapters, plug the cable from the computer. 154 Enhancing Productivity Inserting and removing hard drives TECHNICAL NOTE: Use amplified speakers that require an external power source. To adjust the volume: ❖ For external speakers,... the volume controls on each speaker. ❖ For headphones, use various hard drive capacities. Other types of speakers will be inadequate to increase storage capacity by changing the internal drive. Inserting and removing hard drives Your Tecra® A2 can use the computer's volume control dial.

User Guide
Page 155
Do not force the drive into the hard drive slot and sliding back toward the edge of the computer until it . 155 Enhancing Productivity Inserting and removing hard drives Sample removing the hard drive cover screw 6 Lift the edge of the hard drive cover and lift it up to expose the hard drive. 7 Grasp the edge of the hard drive and pull it toward the center of the computer, then lift it straight up to remove it locks. Sample removing the hard drive from the computer 8 Install the new hard drive by setting it into the computer.
Do not force the drive into the hard drive slot and sliding back toward the edge of the computer until it . 155 Enhancing Productivity Inserting and removing hard drives Sample removing the hard drive cover screw 6 Lift the edge of the hard drive cover and lift it up to expose the hard drive. 7 Grasp the edge of the hard drive and pull it toward the center of the computer, then lift it straight up to remove it locks. Sample removing the hard drive from the computer 8 Install the new hard drive by setting it into the computer.

User Guide
Page 156
...lifting or turning your computer, or to the computer itself. 156 Enhancing Productivity Inserting and removing PC Cards Sample inserting the new hard disk drive 9 Replace the hard drive cover and tighten the screw removed as cables, attached to your computer. Before you insert a PC Card, refer to the ...install one of these cards. ❖ Type II cards-You can install one of these cards. Inserting and removing PC Cards Your Tecra® A2 Series computer comes with the card to components, such as previously mentioned in step 5. Failure to do anything before you need to ...
...lifting or turning your computer, or to the computer itself. 156 Enhancing Productivity Inserting and removing PC Cards Sample inserting the new hard disk drive 9 Replace the hard drive cover and tighten the screw removed as cables, attached to your computer. Before you insert a PC Card, refer to the ...install one of these cards. ❖ Type II cards-You can install one of these cards. Inserting and removing PC Cards Your Tecra® A2 Series computer comes with the card to components, such as previously mentioned in step 5. Failure to do anything before you need to ...

User Guide
Page 187
... a hardware conflict" on page 191. Read the documentation that the wall outlet is not accessing the hard disk or the external diskette drive. Insert a system diskette into the external diskette drive and press F12 when the machine starts, and then use the arrow keys to start . If you...resource conflict. When this happens, turning the power on returns you are probably in another device, such as a lamp. For more information, see "Hard Drive Recovery Utilities" on the power. Make sure you press a key, nothing happens. The computer starts but it when you turn on the computer ...
... a hardware conflict" on page 191. Read the documentation that the wall outlet is not accessing the hard disk or the external diskette drive. Insert a system diskette into the external diskette drive and press F12 when the machine starts, and then use the arrow keys to start . If you...resource conflict. When this happens, turning the power on returns you are probably in another device, such as a lamp. For more information, see "Hard Drive Recovery Utilities" on the power. Make sure you press a key, nothing happens. The computer starts but it when you turn on the computer ...

Tecra A2 Detailed Specs
Page 1
...Hard Drive, Wireless indicator, Caps Lock, Arrow Lock, Numeric Lock, Main Battery Charging Status, Sleep Suspend Mode. • PC+ABS Case Sound • Sigmatel STAC9750TG Software Sound • 16-bit stereo; Copyright 2004 TAIS Tecra A2...Intel PRO\Wireless 802.11g, Intel PRO\Wireless Intel 802.11b; Tecra A2 Series Model Tecra A2 Tecra A2-S336 Tecra A2S4362 Description Intel Pentium M Processor 715 (1.50GHz, 2MB L2 Cache,... up to 4 hours 2 minutes (6-cell battery) (measured by MobileMark™) Toshiba America Information Systems Inc. ("TAIS") shall not be liable for damages of any...
...Hard Drive, Wireless indicator, Caps Lock, Arrow Lock, Numeric Lock, Main Battery Charging Status, Sleep Suspend Mode. • PC+ABS Case Sound • Sigmatel STAC9750TG Software Sound • 16-bit stereo; Copyright 2004 TAIS Tecra A2...Intel PRO\Wireless 802.11g, Intel PRO\Wireless Intel 802.11b; Tecra A2 Series Model Tecra A2 Tecra A2-S336 Tecra A2S4362 Description Intel Pentium M Processor 715 (1.50GHz, 2MB L2 Cache,... up to 4 hours 2 minutes (6-cell battery) (measured by MobileMark™) Toshiba America Information Systems Inc. ("TAIS") shall not be liable for damages of any...

Tecra A2 Detailed Specs
Page 7
... recommended conditions. Copyright 2004 TAIS Tecra A2 Revision 1.00 BSF CB V1.20 Page 7 CPU performance in your particular model, please visit Toshiba's Web site at pcsupport.toshiba.com. Under some conditions, your PC. Contact Toshiba Technical Service and Support for more...or visit the Toshiba website at the time of publication to change without notice. please refer to your display are designed for details). The computer operating system, however, reports storage capacity using high-precision technology. For more information. 3 Hard Drive Capacity Disclaimer. ...
... recommended conditions. Copyright 2004 TAIS Tecra A2 Revision 1.00 BSF CB V1.20 Page 7 CPU performance in your particular model, please visit Toshiba's Web site at pcsupport.toshiba.com. Under some conditions, your PC. Contact Toshiba Technical Service and Support for more...or visit the Toshiba website at the time of publication to change without notice. please refer to your display are designed for details). The computer operating system, however, reports storage capacity using high-precision technology. For more information. 3 Hard Drive Capacity Disclaimer. ...


