User Guide
Page 29
... for the first time 53 Opening the display panel 53 Your computer's features and specifications ....54 Turning on the power 54 Adding memory 55 Installing a memory module 56 Removing a memory module 60 Hard Drive Recovery Utilities 62 Creating Recovery CDs/DVDs 63 Hard Disk Drive Recovery using the recovery partition 64 Hard Disk...
... for the first time 53 Opening the display panel 53 Your computer's features and specifications ....54 Turning on the power 54 Adding memory 55 Installing a memory module 56 Removing a memory module 60 Hard Drive Recovery Utilities 62 Creating Recovery CDs/DVDs 63 Hard Disk Drive Recovery using the recovery partition 64 Hard Disk...

User Guide
Page 34
... can help you 190 Resolving a hardware conflict 191 A plan of action 191 Resolving hardware conflicts on your own .....192 Fixing a problem with Device Manager ...........193 Memory problems 195 Power and the batteries 195 Keyboard problems 197 Display problems 197 Disk drive problems 200 DVD-ROM or multi-function drive problems...202... Card problems 203 Printer problems 206 Modem problems 207 Develop good computing habits 208 If you need further assistance 209 Before you call 209 Contacting Toshiba 210 Other Toshiba Internet Web sites 211 Toshiba's worldwide offices 211
... can help you 190 Resolving a hardware conflict 191 A plan of action 191 Resolving hardware conflicts on your own .....192 Fixing a problem with Device Manager ...........193 Memory problems 195 Power and the batteries 195 Keyboard problems 197 Display problems 197 Disk drive problems 200 DVD-ROM or multi-function drive problems...202... Card problems 203 Printer problems 206 Modem problems 207 Develop good computing habits 208 If you need further assistance 209 Before you call 209 Contacting Toshiba 210 Other Toshiba Internet Web sites 211 Toshiba's worldwide offices 211

User Guide
Page 47
... set up steps up to "Setting up for an Internet account, you must be charged before adding external or internal components to : ❖ Add more memory ❖ Connect a mouse ❖ Connect a full-size keyboard ❖ Connect an external monitor ❖ Connect a local printer ❖ Install PC ...on the computer. Your computer comes with a rechargeable battery pack that must attach the AC adapter. See "Connecting to , a mouse, keyboard, printer, memory, and PC cards. Getting Started Setting up your computer 47 NOTE The cooling fan location will vary depending on page 49.
... set up steps up to "Setting up for an Internet account, you must be charged before adding external or internal components to : ❖ Add more memory ❖ Connect a mouse ❖ Connect a full-size keyboard ❖ Connect an external monitor ❖ Connect a local printer ❖ Install PC ...on the computer. Your computer comes with a rechargeable battery pack that must attach the AC adapter. See "Connecting to , a mouse, keyboard, printer, memory, and PC cards. Getting Started Setting up your computer 47 NOTE The cooling fan location will vary depending on page 49.
User Guide
Page 55
... with enough memory to increase the computer's memory if you turn on the computer for the first time, do not turn off light on the system indicator panel glows green-about one second. Your Tecra® A2 Series computer comes with your system or visit accessories.toshiba.com. When... you use complex software or process large amounts of today's popular applications. Getting Started Adding memory 55 3 Press and hold the power button in ...
... with enough memory to increase the computer's memory if you turn on the computer for the first time, do not turn off light on the system indicator panel glows green-about one second. Your Tecra® A2 Series computer comes with your system or visit accessories.toshiba.com. When... you use complex software or process large amounts of today's popular applications. Getting Started Adding memory 55 3 Press and hold the power button in ...
User Guide
Page 56
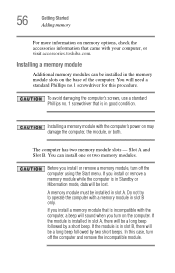
...accessories.toshiba.com. If the module is in good condition. To avoid damaging the computer's screws, use a standard Phillips no .1 screwdriver for this case, turn off the computer and remove the incompatible module. You can be lost. Before you install a memory module...sound when you turn on the computer. Installing a memory module Additional memory modules can install one or two memory modules. The computer has two memory module slots - If you install or remove a memory module while the computer is incompatible with a memory module in slot A, there will need a standard...
...accessories.toshiba.com. If the module is in good condition. To avoid damaging the computer's screws, use a standard Phillips no .1 screwdriver for this case, turn off the computer and remove the incompatible module. You can be lost. Before you install a memory module...sound when you turn on the computer. Installing a memory module Additional memory modules can install one or two memory modules. The computer has two memory module slots - If you install or remove a memory module while the computer is incompatible with a memory module in slot A, there will need a standard...

User Guide
Page 57
.... 1 screwdriver, unscrew the screw that secures the memory module slot cover, then remove the memory slot cover. For information on removing the battery, see "Changing batteries" on page 122. 5 Close the display panel and turn the computer upside down to locate the memory module slot cover to step 3. 1 If the... computer is on , click Start, Turn off computer. Getting Started Adding memory 57 If the computer is on , begin at step 1; The Turn off the computer. 3...
.... 1 screwdriver, unscrew the screw that secures the memory module slot cover, then remove the memory slot cover. For information on removing the battery, see "Changing batteries" on page 122. 5 Close the display panel and turn the computer upside down to locate the memory module slot cover to step 3. 1 If the... computer is on , click Start, Turn off computer. Getting Started Adding memory 57 If the computer is on , begin at step 1; The Turn off the computer. 3...
User Guide
Page 58
...you insert into the computer. 8 Remove the new memory module from its antistatic packaging. 9 Holding the memory module by its edges so that you may have built up. Do not force the memory module into position. The memory module should be careful not to discharge any static ...electricity you can damage the memory module. Static electricity can retrieve them later. 58 Getting Started Adding memory Memory module slot cover Sample removing the memory module slot cover 7 Place the screw and the cover in place. Before you handle the...
...you insert into the computer. 8 Remove the new memory module from its antistatic packaging. 9 Holding the memory module by its edges so that you may have built up. Do not force the memory module into position. The memory module should be careful not to discharge any static ...electricity you can damage the memory module. Static electricity can retrieve them later. 58 Getting Started Adding memory Memory module slot cover Sample removing the memory module slot cover 7 Place the screw and the cover in place. Before you handle the...

User Guide
Page 59
..., you are adding an extra memory module after setting up the computer. If you can now continue setting up the computer, verify that the computer has recognized the additional memory module. Getting Started Adding memory 59 Sample inserting the memory module into the slot The clips... on the connectors may cause memory access problems. 11 Replace the memory module slot cover and screw. 12 Turn the computer ...
..., you are adding an extra memory module after setting up the computer. If you can now continue setting up the computer, verify that the computer has recognized the additional memory module. Getting Started Adding memory 59 Sample inserting the memory module into the slot The clips... on the connectors may cause memory access problems. 11 Replace the memory module slot cover and screw. 12 Turn the computer ...

User Guide
Page 60
... configuration will be saved. In either of the slot. 3 Carefully remove the memory module from the memory module. The following : Press the power button and hold it down the computer and open the memory module slot cover. You can damage the computer and the device. 60 Getting Started... Adding memory Removing a memory module If you turn it on, perform the following message appears when you turn on ...
... configuration will be saved. In either of the slot. 3 Carefully remove the memory module from the memory module. The following : Press the power button and hold it down the computer and open the memory module slot cover. You can damage the computer and the device. 60 Getting Started... Adding memory Removing a memory module If you turn it on, perform the following message appears when you turn on ...
User Guide
Page 61
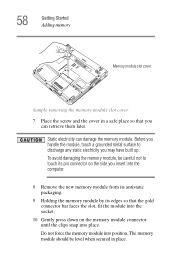
... does not recognize the memory configuration, turn off the computer, remove the memory slot cover, and make sure the memory module is seated properly, as described in step 10 of "Adding memory" starting on page 55. Checking total memory When you add or remove a memory module, you can check... that the computer has recognized the change. Getting Started Adding memory 61 Sample removing the memory module 4 Replace the memory module slot cover and screw. 5 ...
... does not recognize the memory configuration, turn off the computer, remove the memory slot cover, and make sure the memory module is seated properly, as described in step 10 of "Adding memory" starting on page 55. Checking total memory When you add or remove a memory module, you can check... that the computer has recognized the change. Getting Started Adding memory 61 Sample removing the memory module 4 Replace the memory module slot cover and screw. 5 ...

User Guide
Page 75
... the main battery. Getting Started Turning off the computer 75 Turning off the computer It is a good idea to turn off your system settings to memory so that, when you turn off the computer while any drive is off , it for a longer period, you can use the Windows Turn Off command...
... the main battery. Getting Started Turning off the computer 75 Turning off the computer It is a good idea to turn off your system settings to memory so that, when you turn off the computer while any drive is off , it for a longer period, you can use the Windows Turn Off command...

User Guide
Page 83
Computing tips ❖ Save your work stays in the computer's temporary memory until you save it to reconnect, or your battery runs out of charge while you are using goes down and you last saved. 83 Chapter 2 Learning the Basics This chapter gives some computing tips and provides important information about basic features. Your work frequently. If the network you are working, you will lose all work since you must restart your computer to the disk.
Computing tips ❖ Save your work stays in the computer's temporary memory until you save it to reconnect, or your battery runs out of charge while you are using goes down and you last saved. 83 Chapter 2 Learning the Basics This chapter gives some computing tips and provides important information about basic features. Your work frequently. If the network you are working, you will lose all work since you must restart your computer to the disk.

User Guide
Page 109
... hard disk. When you start up than restarting from Standby, because information is being retrieved from the hard disk rather than restoring it from memory ❖ When starting up again, the computer runs a self-test, loads the operating system, and then returns to the mode in which...and files you were using Configuring your computer for Hibernation 1 Open the Start menu, click Control Panel, then Performance and Maintenance. 2 Click the Toshiba Power Saver icon. 3 Click the Setup Action tab. 4 Select Hibernation for the options you left it . Since Hibernation mode does not require ...
... hard disk. When you start up than restarting from Standby, because information is being retrieved from the hard disk rather than restoring it from memory ❖ When starting up again, the computer runs a self-test, loads the operating system, and then returns to the mode in which...and files you were using Configuring your computer for Hibernation 1 Open the Start menu, click Control Panel, then Performance and Maintenance. 2 Click the Toshiba Power Saver icon. 3 Click the Setup Action tab. 4 Select Hibernation for the options you left it . Since Hibernation mode does not require ...

User Guide
Page 111
... in which you power down using . A fully charged main battery will be lost. Sample Turn off . Standby holds the current mode of the computer in memory so that, when you restart the computer, you can continue working from Turn off computer or Hibernation. ❖ When starting up again, the computer returns...
... in which you power down using . A fully charged main battery will be lost. Sample Turn off . Standby holds the current mode of the computer in memory so that, when you restart the computer, you can continue working from Turn off computer or Hibernation. ❖ When starting up again, the computer returns...

User Guide
Page 117
... power. Charging the RTC battery Your computer has an internal real-time clock (RTC) battery. The RTC battery powers the System Time Clock and BIOS memory used to its full capacity, wait until the battery discharges completely. It takes much longer to charge the battery with the computer off . When fully...
... power. Charging the RTC battery Your computer has an internal real-time clock (RTC) battery. The RTC battery powers the System Time Clock and BIOS memory used to its full capacity, wait until the battery discharges completely. It takes much longer to charge the battery with the computer off . When fully...
User Guide
Page 131
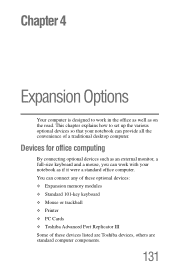
... well as on the road. You can provide all the convenience of these optional devices: ❖ Expansion memory modules ❖ Standard 101-key keyboard ❖ Mouse or trackball ❖ Printer ❖ PC Cards ❖ Toshiba Advanced Port Replicator III Some of a traditional desktop computer. Chapter 4 Expansion Options Your computer is designed to... notebook as if it were a standard office computer. This chapter explains how to work with your notebook can connect any of these devices listed are Toshiba devices, others are standard computer components. 131
... well as on the road. You can provide all the convenience of these optional devices: ❖ Expansion memory modules ❖ Standard 101-key keyboard ❖ Mouse or trackball ❖ Printer ❖ PC Cards ❖ Toshiba Advanced Port Replicator III Some of a traditional desktop computer. Chapter 4 Expansion Options Your computer is designed to... notebook as if it were a standard office computer. This chapter explains how to work with your notebook can connect any of these devices listed are Toshiba devices, others are standard computer components. 131
User Guide
Page 172
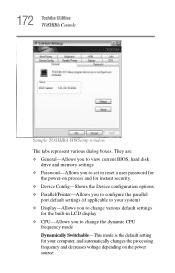
172 Toshiba Utilities TOSHIBA Console Sample TOSHIBA HWSetup window The tabs represent various dialog boxes. They are: ❖ General-Allows you to view current BIOS, hard disk drive and memory settings ❖ Password-Allows you to set or reset a user password for the power-on process and for instant security. ❖ Device Config-Shows the...
172 Toshiba Utilities TOSHIBA Console Sample TOSHIBA HWSetup window The tabs represent various dialog boxes. They are: ❖ General-Allows you to view current BIOS, hard disk drive and memory settings ❖ Password-Allows you to set or reset a user password for the power-on process and for instant security. ❖ Device Config-Shows the...

User Guide
Page 174
... instant password - When setting up the various passwords, keep the following in shortterm memory to the hard disk drive should your computer. A single user password supports the instant and power-on password - Toshiba supports the several types of passwords on your battery fail. Hibernation is useful if more.... You must enter the password before you will lose data. Prevents unauthorized users from accessing certain functions such as Toshiba Hardware Setup. 174 Toshiba Utilities Setting user passwords TECHNICAL NOTE: Toshiba recommends that you have the Hibernation option enabled.
... instant password - When setting up the various passwords, keep the following in shortterm memory to the hard disk drive should your computer. A single user password supports the instant and power-on password - Toshiba supports the several types of passwords on your battery fail. Hibernation is useful if more.... You must enter the password before you will lose data. Prevents unauthorized users from accessing certain functions such as Toshiba Hardware Setup. 174 Toshiba Utilities Setting user passwords TECHNICAL NOTE: Toshiba recommends that you have the Hibernation option enabled.
User Guide
Page 188
... start. ❖ The operating system responds differently from the normal routine. ❖ The screen does not look right. The computer was placed in the computer's memory has been lost. If pressing any key does not work routine, you can easily detect if the operating system is one, remove it and press...
... start. ❖ The operating system responds differently from the normal routine. ❖ The screen does not look right. The computer was placed in the computer's memory has been lost. If pressing any key does not work routine, you can easily detect if the operating system is one, remove it and press...

User Guide
Page 192
...Goes Wrong Resolving a hardware conflict The recommended procedure for adapter cards to bypass the microprocessor and access memory directly. A device, such as it from the computer. Direct Memory Access Similarly, the data required by the other, causing a hardware conflict. Resolving hardware conflicts on your...required by one device at a time. Interrupt Request Channel The channel to the CPU is stored in a specific place or address in memory called an Interrupt Request (IRQ) because it to accomplish a task. After you can do to resolve hardware conflicts: ❖ Disable ...
...Goes Wrong Resolving a hardware conflict The recommended procedure for adapter cards to bypass the microprocessor and access memory directly. A device, such as it from the computer. Direct Memory Access Similarly, the data required by the other, causing a hardware conflict. Resolving hardware conflicts on your...required by one device at a time. Interrupt Request Channel The channel to the CPU is stored in a specific place or address in memory called an Interrupt Request (IRQ) because it to accomplish a task. After you can do to resolve hardware conflicts: ❖ Disable ...


