
User Guide
Page 3
... medical devices, commercial transportation, nuclear facilities or systems or any "critical applications." This equipment generates, uses and can be determined by turning the equipment off and on, the user is encouraged to try to Part 15 of life or catastrophic property damage. FCC Notice "... and used in a residential installation. IF YOU USE THE COMPUTER PRODUCTS IN A CRITICAL APPLICATION, YOU, AND NOT TOSHIBA, ASSUME FULL RESPONSIBILITY FOR SUCH USE. ACCORDINGLY, TOSHIBA, ITS AFFILIATES AND SUPPLIERS DISCLAIM ANY AND ALL LIABILITY ARISING OUT OF THE USE OF THE COMPUTER PRODUCTS IN ANY ...
... medical devices, commercial transportation, nuclear facilities or systems or any "critical applications." This equipment generates, uses and can be determined by turning the equipment off and on, the user is encouraged to try to Part 15 of life or catastrophic property damage. FCC Notice "... and used in a residential installation. IF YOU USE THE COMPUTER PRODUCTS IN A CRITICAL APPLICATION, YOU, AND NOT TOSHIBA, ASSUME FULL RESPONSIBILITY FOR SUCH USE. ACCORDINGLY, TOSHIBA, ITS AFFILIATES AND SUPPLIERS DISCLAIM ANY AND ALL LIABILITY ARISING OUT OF THE USE OF THE COMPUTER PRODUCTS IN ANY ...

User Guide
Page 8
...you are encouraged to ask for authorization to use the Wireless LAN device prior to turning on the use of wireless devices in radio frequency safety standards and recommendations, Toshiba believes Wireless LAN is safe for use by the proprietor of the building or responsible... mobile phones. These situations may be interoperable with any other radio devices, emit radio frequency electromagnetic energy. 8 Wireless Interoperability The Toshiba Wireless LAN Mini PCI Card products are designed to be restricted by consumers. These standards and recommendations reflect the consensus of the ...
...you are encouraged to ask for authorization to use the Wireless LAN device prior to turning on the use of wireless devices in radio frequency safety standards and recommendations, Toshiba believes Wireless LAN is safe for use by the proprietor of the building or responsible... mobile phones. These situations may be interoperable with any other radio devices, emit radio frequency electromagnetic energy. 8 Wireless Interoperability The Toshiba Wireless LAN Mini PCI Card products are designed to be restricted by consumers. These standards and recommendations reflect the consensus of the ...
User Guide
Page 10
...to radio communications. This equipment generates, uses, and can be the responsibility of interference caused by Toshiba. Toshiba is not responsible for any radio or television interference caused by turning the equipment off and on, the user is connected. ❖ Consult the dealer or an ...the user. 10 Interference Statement This equipment has been tested and found to comply with the limits for help. If this Toshiba Wireless LAN Mini PCI Card, or the substitution or attachment of connecting cables and equipment other than specified by such unauthorized modification...
...to radio communications. This equipment generates, uses, and can be the responsibility of interference caused by Toshiba. Toshiba is not responsible for any radio or television interference caused by turning the equipment off and on, the user is connected. ❖ Consult the dealer or an ...the user. 10 Interference Statement This equipment has been tested and found to comply with the limits for help. If this Toshiba Wireless LAN Mini PCI Card, or the substitution or attachment of connecting cables and equipment other than specified by such unauthorized modification...
User Guide
Page 16
16 Connecting the AC adapter 48 Charging the battery 50 Connecting other external devices 50 Turning on the computer 51 Opening the display panel 51 Turning on the power 51 Using the computer for the first time 53 Registering your computer 53 Shutting down the computer 54 ...56 Chapter 3: Connecting Other External Devices 57 Using external display devices 57 Connecting the display device 58 Directing the display output when you turn on the computer 59 Adjusting the quality of the external display 60 Video limitations 61 Using an external keyboard 61 Making your external keyboard...
16 Connecting the AC adapter 48 Charging the battery 50 Connecting other external devices 50 Turning on the computer 51 Opening the display panel 51 Turning on the power 51 Using the computer for the first time 53 Registering your computer 53 Shutting down the computer 54 ...56 Chapter 3: Connecting Other External Devices 57 Using external display devices 57 Connecting the display device 58 Directing the display output when you turn on the computer 59 Adjusting the quality of the external display 60 Video limitations 61 Using an external keyboard 61 Making your external keyboard...
User Guide
Page 21
... backup diskette 224 Deleting the hard disk drive password 225 Chapter 10: Troubleshooting Guide 229 Problems that are easy to fix 229 Problems when you turn on the computer 230 Resolving a hardware conflict 234 Using the Windows 98 Second Edition troubleshooting feature 234 A plan of action 234 Resolving hardware conflicts on...
... backup diskette 224 Deleting the hard disk drive password 225 Chapter 10: Troubleshooting Guide 229 Problems that are easy to fix 229 Problems when you turn on the computer 230 Resolving a hardware conflict 234 Using the Windows 98 Second Edition troubleshooting feature 234 A plan of action 234 Resolving hardware conflicts on...
User Guide
Page 30
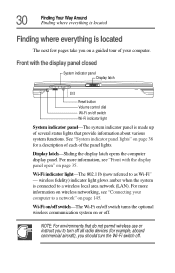
...instruct you to a wireless local area network (LAN). See "System indicator panel lights" on page 38 for example, aboard commercial aircraft), you should turn the Wi-Fi switch off . For more information, see "Connecting your computer. Front with the display panel open" on page 35. Wi-Fi ...indicator light-The 802.11b (now referred to a network" on page 145. Wi-Fi on/off switch-The Wi-Fi on/off switch turns the optional wireless communication system on or off . NOTE: For environments that provide information about various system functions. 30 Finding Your Way Around Finding...
...instruct you to a wireless local area network (LAN). See "System indicator panel lights" on page 38 for example, aboard commercial aircraft), you should turn the Wi-Fi switch off . For more information, see "Connecting your computer. Front with the display panel open" on page 35. Wi-Fi ...indicator light-The 802.11b (now referred to a network" on page 145. Wi-Fi on/off switch-The Wi-Fi on/off switch turns the optional wireless communication system on or off . NOTE: For environments that provide information about various system functions. 30 Finding Your Way Around Finding...
User Guide
Page 35
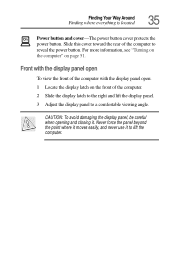
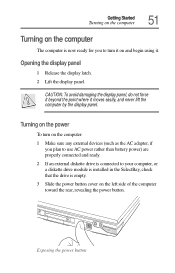
For more information, see "Turning on the computer" on the front of the computer. 2 Slide the display latch to the right and lift the display panel. 3 Adjust the display panel ...
For more information, see "Turning on the computer" on the front of the computer. 2 Slide the display latch to the right and lift the display panel. 3 Adjust the display panel ...
User Guide
Page 42
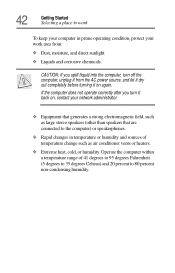
...vents or heaters. ❖ Extreme heat, cold, or humidity. If the computer does not operate correctly after you spill liquid into the computer, turn it on , contact your network administrator. ❖ Equipment that generates a strong electromagnetic field, such as large stereo speakers (other than speakers ... in prime operating condition, protect your work area from the AC power source, and let it dry out completely before turning it back on again. CAUTION: If you turn off the computer, unplug it from : ❖ Dust, moisture, and direct sunlight. ❖ Liquids and corrosive chemicals...
...vents or heaters. ❖ Extreme heat, cold, or humidity. If the computer does not operate correctly after you spill liquid into the computer, turn it on , contact your network administrator. ❖ Equipment that generates a strong electromagnetic field, such as large stereo speakers (other than speakers ... in prime operating condition, protect your work area from the AC power source, and let it dry out completely before turning it back on again. CAUTION: If you turn off the computer, unplug it from : ❖ Dust, moisture, and direct sunlight. ❖ Liquids and corrosive chemicals...

User Guide
Page 47
To use external power or to charge the battery, you turn on the computer. See "Inserting and removing PC Cards" on page 78 If you want to: ❖ Add more information, see "Connecting Other External Devices" ...
To use external power or to charge the battery, you turn on the computer. See "Inserting and removing PC Cards" on page 78 If you want to: ❖ Add more information, see "Connecting Other External Devices" ...
User Guide
Page 50
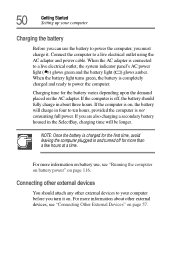
...battery use the battery to power the computer, you must charge it on. Connect the computer to power the computer. When the battery light turns green, the battery is on, the battery will charge in the SelectBay, charging time will be longer. If the computer is completely charged and... glows amber. For more information about three hours. If the computer is not consuming full power. 50 Getting Started Setting up your computer before you turn it . When the AC adapter is connected to ten hours, provided the computer is off for the battery varies depending upon the demand placed on...
...battery use the battery to power the computer, you must charge it on. Connect the computer to power the computer. When the battery light turns green, the battery is on, the battery will charge in the SelectBay, charging time will be longer. If the computer is completely charged and... glows amber. For more information about three hours. If the computer is not consuming full power. 50 Getting Started Setting up your computer before you turn it . When the AC adapter is connected to ten hours, provided the computer is off for the battery varies depending upon the demand placed on...
User Guide
Page 51
... the display panel, do not force it beyond the point where it moves easily, and never lift the computer by the display panel. Turning on the power To turn on the computer: 1 Make sure any external devices (such as the AC adapter, if you plan to use AC power rather than battery... drive is connected to your computer, or a diskette drive module is installed in the SelectBay, check that the drive is now ready for you to turn it on the left side of the computer toward the rear, revealing the power button. Opening the display panel 1 Release the display latch. 2 Lift the...
... the display panel, do not force it beyond the point where it moves easily, and never lift the computer by the display panel. Turning on the power To turn on the computer: 1 Make sure any external devices (such as the AC adapter, if you plan to use AC power rather than battery... drive is connected to your computer, or a diskette drive module is installed in the SelectBay, check that the drive is now ready for you to turn it on the left side of the computer toward the rear, revealing the power button. Opening the display panel 1 Release the display latch. 2 Lift the...
User Guide
Page 52
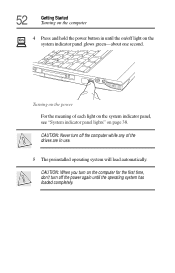
52 Getting Started Turning on the computer On 4 Press and hold the power button in use. 5 The preinstalled operating system will load automatically. CAUTION: When you turn on the computer for the first time, don't turn off the computer while any of each light on the system indicator panel, see "System indicator panel lights" on page 38. Turning on the power For the meaning of the drives are in until the on the system indicator panel glows green-about one second. CAUTION: Never turn off light on /off the power again until the operating system has loaded completely.
52 Getting Started Turning on the computer On 4 Press and hold the power button in use. 5 The preinstalled operating system will load automatically. CAUTION: When you turn on the computer for the first time, don't turn off the computer while any of each light on the system indicator panel, see "System indicator panel lights" on page 38. Turning on the power For the meaning of the drives are in until the on the system indicator panel glows green-about one second. CAUTION: Never turn off light on /off the power again until the operating system has loaded completely.
User Guide
Page 54
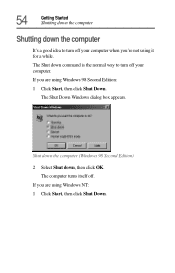
The Shut Down Windows dialog box appears. The computer turns itself off your computer. The Shut down , then click OK. If you are using Windows 98 Second Edition: 1 Click Start, then click Shut Down. 54 Getting Started Shutting down the computer Shutting down the computer It's a good idea to turn off . If you are using it for a while. Shut down the computer (Windows 98 Second Edition) 2 Select Shut down command is the normal way to turn off your computer when you're not using Windows NT: 1 Click Start, then click Shut Down.
The Shut Down Windows dialog box appears. The computer turns itself off your computer. The Shut down , then click OK. If you are using Windows 98 Second Edition: 1 Click Start, then click Shut Down. 54 Getting Started Shutting down the computer Shutting down the computer It's a good idea to turn off . If you are using it for a while. Shut down the computer (Windows 98 Second Edition) 2 Select Shut down command is the normal way to turn off your computer when you're not using Windows NT: 1 Click Start, then click Shut Down.
User Guide
Page 55
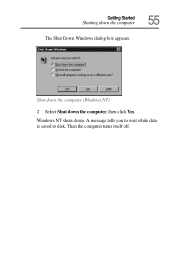
Then the computer turns itself off. A message tells you to wait while data is saved to disk. Windows NT shuts down the computer, then click Yes. Getting Started Shutting down the computer The Shut Down Windows dialog box appears. 55 Shut down the computer (Windows NT) 2 Select Shut down .
Then the computer turns itself off. A message tells you to wait while data is saved to disk. Windows NT shuts down the computer, then click Yes. Getting Started Shutting down the computer The Shut Down Windows dialog box appears. 55 Shut down the computer (Windows NT) 2 Select Shut down .
User Guide
Page 56
...; If you close the display panel while the computer is on, the Panel Close Alarm beeps loudly. ❖ You can turn off the Panel Close Alarm by using Toshiba Hardware Setup's Hardware Alarm tab. ❖ For additional information about powering down your computer so that you can start up again... where you turn off the power. ❖ Never turn off , see "Power down tips There are a few additional things to keep in...
...; If you close the display panel while the computer is on, the Panel Close Alarm beeps loudly. ❖ You can turn off the Panel Close Alarm by using Toshiba Hardware Setup's Hardware Alarm tab. ❖ For additional information about powering down your computer so that you can start up again... where you turn off the power. ❖ Never turn off , see "Power down tips There are a few additional things to keep in...
User Guide
Page 59
...computer. 2 Connect the monitor's power cable to the composite video port on the right side of the video port adapter cable to a live electrical outlet. 3 Turn on the external monitor. 4 Set the display mode by pressing Fn + F5, or by setting the Display Properties settings. Connecting an external monitor You can... to use the display hot key (Fn + F5): 1 Press Fn and F5 simultaneously. 2 While holding down Fn, press F5 repeatedly until the setting you turn on page 59. The quickest way to change the display output settings is to your computer). 3 Connect the other end of the computer...
...computer. 2 Connect the monitor's power cable to the composite video port on the right side of the video port adapter cable to a live electrical outlet. 3 Turn on the external monitor. 4 Set the display mode by pressing Fn + F5, or by setting the Display Properties settings. Connecting an external monitor You can... to use the display hot key (Fn + F5): 1 Press Fn and F5 simultaneously. 2 While holding down Fn, press F5 repeatedly until the setting you turn on page 59. The quickest way to change the display output settings is to your computer). 3 Connect the other end of the computer...
User Guide
Page 62
...mouse. A serial mouse disables the AccuPoint II. Setting up this key combination through the Windows Control Panel Toshiba Hardware Setup option icon. CAUTION: When connecting any PS/2 device, Toshiba recommends turning off your computer to have the AccuPoint II active at the same time. Using a mouse You may ... up a PS/2 mouse with the AccuPoint II: 1 Click Start, Settings, then point to Control Panel. 2 Double-click the Toshiba Hardware Setup icon. 3 Select the Pointing Devices tab, then click Simultaneous. 62 Connecting Other External Devices Using a mouse keyboard.
...mouse. A serial mouse disables the AccuPoint II. Setting up this key combination through the Windows Control Panel Toshiba Hardware Setup option icon. CAUTION: When connecting any PS/2 device, Toshiba recommends turning off your computer to have the AccuPoint II active at the same time. Using a mouse You may ... up a PS/2 mouse with the AccuPoint II: 1 Click Start, Settings, then point to Control Panel. 2 Double-click the Toshiba Hardware Setup icon. 3 Select the Pointing Devices tab, then click Simultaneous. 62 Connecting Other External Devices Using a mouse keyboard.
User Guide
Page 64
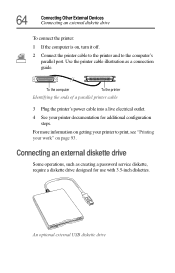
... the computer To the printer Identifying the ends of a parallel printer cable 3 Plug the printer's power cable into a live electrical outlet. 4 See your work" on , turn it off. 2 Connect the printer cable to the printer and to print, see "Printing your printer documentation for use with 3.5-inch diskettes.
... the computer To the printer Identifying the ends of a parallel printer cable 3 Plug the printer's power cable into a live electrical outlet. 4 See your work" on , turn it off. 2 Connect the printer cable to the printer and to print, see "Printing your printer documentation for use with 3.5-inch diskettes.
User Guide
Page 66
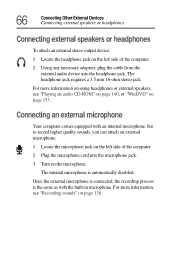
... "Recording sounds" on the left side of the computer. 2 Using any necessary adapters, plug the cable from the external audio device into the microphone jack. 3 Turn on page 153. Connecting an external microphone Your computer comes equipped with the built-in microphone. For more information, see "Playing an audio CD-ROM...
... "Recording sounds" on the left side of the computer. 2 Using any necessary adapters, plug the cable from the external audio device into the microphone jack. 3 Turn on page 153. Connecting an external microphone Your computer comes equipped with the built-in microphone. For more information, see "Playing an audio CD-ROM...
User Guide
Page 70
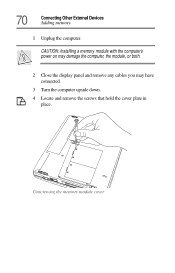
70 Connecting Other External Devices Adding memory 1 Unplug the computer. CAUTION: Installing a memory module with the computer's power on may damage the computer, the module, or both. 2 Close the display panel and remove any cables you may have connected. 3 Turn the computer upside down. 4 Locate and remove the screws that hold the cover plate in place. Unscrewing the memory module cover
70 Connecting Other External Devices Adding memory 1 Unplug the computer. CAUTION: Installing a memory module with the computer's power on may damage the computer, the module, or both. 2 Close the display panel and remove any cables you may have connected. 3 Turn the computer upside down. 4 Locate and remove the screws that hold the cover plate in place. Unscrewing the memory module cover


