
Owners Manual
Page 1
OWNER'S MANUAL DATA PROJECTOR TDP-T250 Others Maintenance Operations Preparations Before Using
OWNER'S MANUAL DATA PROJECTOR TDP-T250 Others Maintenance Operations Preparations Before Using
Owners Manual
Page 2
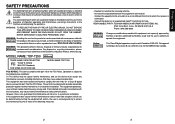
... installation. Operation is subject to the following two conditions: (1) This device may not cause harmful interference, and (2) this equipment, not expressly approved by Toshiba, or parties authorized by one or more of the following measures: - WARNING: This [product] contains mercury. These limits are designed to provide reasonable ... user to the presence of mercury may be of sufficient magnitude to constitute a risk of electric shock to persons. MODEL NAME: TDP-T250 USA only TRADE NAME: DATA PROJECTOR Tested To Comply With FCC Standards FOR HOME OR OFFICE USE MODEL NAME...
... installation. Operation is subject to the following two conditions: (1) This device may not cause harmful interference, and (2) this equipment, not expressly approved by Toshiba, or parties authorized by one or more of the following measures: - WARNING: This [product] contains mercury. These limits are designed to provide reasonable ... user to the presence of mercury may be of sufficient magnitude to constitute a risk of electric shock to persons. MODEL NAME: TDP-T250 USA only TRADE NAME: DATA PROJECTOR Tested To Comply With FCC Standards FOR HOME OR OFFICE USE MODEL NAME...
Owners Manual
Page 4
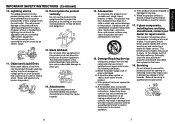
... may cause to qualified service personnel under the following the operating instructions. The broken pieces of the lamp rupturing, thoroughly clean the area around the projector and discard any way. A product and cart combination should break, contact your dealer for this indicates a need for repair service. Refer all servicing to overturn...
... may cause to qualified service personnel under the following the operating instructions. The broken pieces of the lamp rupturing, thoroughly clean the area around the projector and discard any way. A product and cart combination should break, contact your dealer for this indicates a need for repair service. Refer all servicing to overturn...
Owners Manual
Page 5
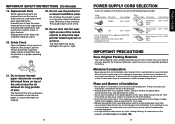
... not leave thermalpaper documents or easily deformed items on the thermal paper, or cause deformation or warping. 8 POWER SUPPLY CORD SELECTION If your projector. Ensure to the eyes or sight. 21. Otherwise it up or down by the manufacturer or have to determine that situation, the malfunction ... than 40° from a cold location to BSI362. Always replace the fuse cover after moving it in handy if you continue to use the projector with oil or cigarette smoke. p.43 9 Before Using When the unit is in a risk of cable. If this instrument near heating equipment....
... not leave thermalpaper documents or easily deformed items on the thermal paper, or cause deformation or warping. 8 POWER SUPPLY CORD SELECTION If your projector. Ensure to the eyes or sight. 21. Otherwise it up or down by the manufacturer or have to determine that situation, the malfunction ... than 40° from a cold location to BSI362. Always replace the fuse cover after moving it in handy if you continue to use the projector with oil or cigarette smoke. p.43 9 Before Using When the unit is in a risk of cable. If this instrument near heating equipment....
Owners Manual
Page 6
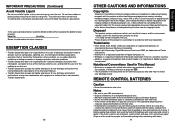
...copyright holder. Model No. For example, if making a reference to burn or injury. Using the batteries improperly may not reflect your projector. Do not leave rubber or plastic products touching the unit for reference purposes only and may cause them to explode or leak and... of the imaging software or broadcast program, etc., if done without first consulting with a chemically saturated cloth, be drawn to Toshiba Corporation. 10 OTHER CAUTIONS AND INFORMATIONS Copyrights Showing or transmitting commercial imaging software or broadcast or cable-broad casting programs with clean ...
...copyright holder. Model No. For example, if making a reference to burn or injury. Using the batteries improperly may not reflect your projector. Do not leave rubber or plastic products touching the unit for reference purposes only and may cause them to explode or leak and... of the imaging software or broadcast program, etc., if done without first consulting with a chemically saturated cloth, be drawn to Toshiba Corporation. 10 OTHER CAUTIONS AND INFORMATIONS Copyrights Showing or transmitting commercial imaging software or broadcast or cable-broad casting programs with clean ...
Owners Manual
Page 8
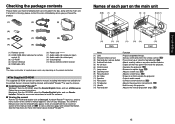
...Click on Start.pdf. p.29 15 Preparations If any other antitheft device. : Expels air that has grown hot inside the projector. : Operates the projector. Follow the on-screen instructions to install the software. ■ Viewing the manual Run the CD-ROM and double-click...) Tilt adjuster (14) Handle (15) Foot adjuster : Projects expanded image. : Senses commands from outside the projector. : Outputs audio sound. : Connects external devices. p.18 : Adjusts the projector's horizontal tilt. See the Help menu for the printed Owner's manual (Getting started) and Acrobat® Reader&#...
...Click on Start.pdf. p.29 15 Preparations If any other antitheft device. : Expels air that has grown hot inside the projector. : Operates the projector. Follow the on-screen instructions to install the software. ■ Viewing the manual Run the CD-ROM and double-click...) Tilt adjuster (14) Handle (15) Foot adjuster : Projects expanded image. : Senses commands from outside the projector. : Outputs audio sound. : Connects external devices. p.18 : Adjusts the projector's horizontal tilt. See the Help menu for the printed Owner's manual (Getting started) and Acrobat® Reader&#...

Owners Manual
Page 9
... (29) L-CLICK button : Functions as right-click of a mouse. p.21 (30) Remote control code switch : Sets the code of remote control to that of the projector. (inside the battery cover) p.43 Note • For the remainder of the remote control or (24) direct the laser pointer toward a (23) person or a mirror...
... (29) L-CLICK button : Functions as right-click of a mouse. p.21 (30) Remote control code switch : Sets the code of remote control to that of the projector. (inside the battery cover) p.43 Note • For the remainder of the remote control or (24) direct the laser pointer toward a (23) person or a mirror...
Owners Manual
Page 10
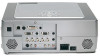
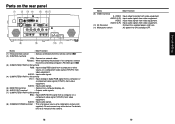
.... VIDEO : Input video signals from video equipment. Preparations (8) (9) (10) (11) Name : Main Function (1) Infrared remote sensor : Senses commands from video equipment. RS232C : When operating the projector via a computer, connect this to a computer display, etc. (6) AUDIO OUT terminal : Outputs audio signals. (7) COMPUTER(Y/PB/PR)3 IN terminal BNC : Input G/B/R/HD/VD signal from...
.... VIDEO : Input video signals from video equipment. Preparations (8) (9) (10) (11) Name : Main Function (1) Infrared remote sensor : Senses commands from video equipment. RS232C : When operating the projector via a computer, connect this to a computer display, etc. (6) AUDIO OUT terminal : Outputs audio signals. (7) COMPUTER(Y/PB/PR)3 IN terminal BNC : Input G/B/R/HD/VD signal from...
Owners Manual
Page 11
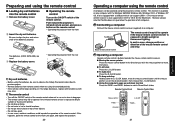
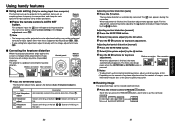
... control q Remove the battery cover. ■ Operating the remote control Turn on the remote control. • Operating the projector from the front w Insert the dry-cell batteries. Point toward the projector's infrared remote sensor, and press a button on the ON/OFF switch of the remote control. In such a case, .... • Do not get wet or place on any computer with the Windows 98/98SE, Windows Me, Windows 2000, or Windows XP OS, that Toshiba does not guarantee the operation of the remote control. Approx. 15° Approx. 5m Two batteries (LR03, SIZE AAA) are used. To USB port...
... control q Remove the battery cover. ■ Operating the remote control Turn on the remote control. • Operating the projector from the front w Insert the dry-cell batteries. Point toward the projector's infrared remote sensor, and press a button on the ON/OFF switch of the remote control. In such a case, .... • Do not get wet or place on any computer with the Windows 98/98SE, Windows Me, Windows 2000, or Windows XP OS, that Toshiba does not guarantee the operation of the remote control. Approx. 15° Approx. 5m Two batteries (LR03, SIZE AAA) are used. To USB port...
Owners Manual
Page 12
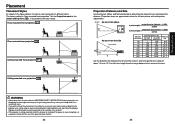
....7 a is the distance (m) between the lens and the screen, and corresponds to a range of about 1.3 m to 12.10 m. Mounting the projector on the ceiling, be placed in 4 different styles. Let everyone involved with your dealer to do so. Set the Projection mode in the default setting...at a high site by yourself may cause you to drop down, thus resulting in injury. • If you wish to mount the projector on a ceiling requires special ceiling brackets (sold separately) and specialized knowledge. Preparations Placement Placement Styles As shown in the figures below to determine...
....7 a is the distance (m) between the lens and the screen, and corresponds to a range of about 1.3 m to 12.10 m. Mounting the projector on the ceiling, be placed in 4 different styles. Let everyone involved with your dealer to do so. Set the Projection mode in the default setting...at a high site by yourself may cause you to drop down, thus resulting in injury. • If you wish to mount the projector on a ceiling requires special ceiling brackets (sold separately) and specialized knowledge. Preparations Placement Placement Styles As shown in the figures below to determine...
Owners Manual
Page 13
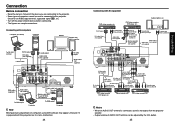
... • When an AUDIO OUT terminal is connected, sound is not output from the projector speaker. • Output volume of AUDIO OUT terminal can be used or connected to the projector. • Some types of computer cannot be adjusted by the VOL button. 25 Preparations...etc. • Turn off the power of both devices before connecting. • The figures are connecting to this projector, but it is not a malfunction. 24 Connecting with this projector. Video recorder, etc. DVD video recorder, DVD player, etc. Connection Before connection • Read the owner's manual...
... • When an AUDIO OUT terminal is connected, sound is not output from the projector speaker. • Output volume of AUDIO OUT terminal can be used or connected to the projector. • Some types of computer cannot be adjusted by the VOL button. 25 Preparations...etc. • Turn off the power of both devices before connecting. • The figures are connecting to this projector, but it is not a malfunction. 24 Connecting with this projector. Video recorder, etc. DVD video recorder, DVD player, etc. Connection Before connection • Read the owner's manual...

Owners Manual
Page 14
... heat. This message will disappear after the message disappears.) 2 Press the ON/STANDBY button again. C In standby mode Note • The projector consumes about 5 minutes) to cool before plugging it could cause burns, deform/break the object. 26 Notes • The start -up screen..., the FAN indicator keeps lighted and the cooling fan continues to operate for a short while, in this state, the power cannot be using the projector for a short while. The power turns on . When cooling lamp During internal cooling After cooling complete A B C A During cooling, the LAMP...
... heat. This message will disappear after the message disappears.) 2 Press the ON/STANDBY button again. C In standby mode Note • The projector consumes about 5 minutes) to cool before plugging it could cause burns, deform/break the object. 26 Notes • The start -up screen..., the FAN indicator keeps lighted and the cooling fan continues to operate for a short while, in this state, the power cannot be using the projector for a short while. The power turns on . When cooling lamp During internal cooling After cooling complete A B C A During cooling, the LAMP...
Owners Manual
Page 15
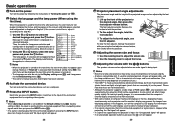
... pressing the INPUT button does not change the setting, follow the step w. Turn on the power. Turn on the power by the projector is input, the "Unsupported signal" will affect image quality slightly. Notes • When [Auto input search] is recommended that the... French German Italian Spanish Portuguese Russian Swedish Turkish Polish Japanese Chinese (simplified) Chinese (traditional) Korean Notes • When the projector is displayed. When the projector is used for lamp power selection and configuration is turned on " p.26 . 2 Select the language and the lamp power...
... pressing the INPUT button does not change the setting, follow the step w. Turn on the power. Turn on the power by the projector is input, the "Unsupported signal" will affect image quality slightly. Notes • When [Auto input search] is recommended that the... French German Italian Spanish Portuguese Russian Swedish Turkish Polish Japanese Chinese (simplified) Chinese (traditional) Korean Notes • When the projector is displayed. When the projector is used for lamp power selection and configuration is turned on " p.26 . 2 Select the language and the lamp power...
Owners Manual
Page 16
... the right. button, zoom ratio is finished, the Distortion adjust menu appears again. When adjustment is up the projector to the optimum state such as well by the projector p.53 , p.54 . • If auto setting fails adjustment, adjust manually with the Image adjustment menu p.... for input signals other than those supported by selecting [Auto setting] in /out). 1 Press the remote control's RESIZE button. This projector is finished, the menu automatically disappears. Each time you press the RESIZE pressing. For computer input, the icon will undergo keystone (trapezoidal...
... the right. button, zoom ratio is finished, the Distortion adjust menu appears again. When adjustment is up the projector to the optimum state such as well by the projector p.53 , p.54 . • If auto setting fails adjustment, adjust manually with the Image adjustment menu p.... for input signals other than those supported by selecting [Auto setting] in /out). 1 Press the remote control's RESIZE button. This projector is finished, the menu automatically disappears. Each time you press the RESIZE pressing. For computer input, the icon will undergo keystone (trapezoidal...
Owners Manual
Page 17
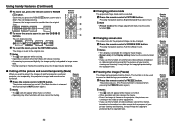
...broadcast on the video or other equipment. • If you want to pause a video during a presentation, etc. Note • [Picture mode] of another projector, overhead projector, etc. Pressing the button switches Full/Thru/Wide in , use the buttons. You can keep pressing. 4 To reset the zoom, press the RETURN button....• Operating any other than the original size.) Remote Control 3 To move the area to the original size. Each time you use this projector's images and sound can be turned off the picture and sound temporarily (Mute) When you use this function on the...
...broadcast on the video or other equipment. • If you want to pause a video during a presentation, etc. Note • [Picture mode] of another projector, overhead projector, etc. Pressing the button switches Full/Thru/Wide in , use the buttons. You can keep pressing. 4 To reset the zoom, press the RETURN button....• Operating any other than the original size.) Remote Control 3 To move the area to the original size. Each time you use this projector's images and sound can be turned off the picture and sound temporarily (Mute) When you use this function on the...
Owners Manual
Page 19
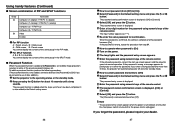
... password becomes [On]. Note • The password entry screen appears when the power is turned back on only after addition.) 1 Set the projector to the operating status or the standby mode. 2 Keep pressing the button for the password using numeric keys of the remote control. 3 The... SPLIT mode. ■ Password Function When the password function is added and [Password] is added when the steps up screen appears and the projector goes into normal operation. The password function is set password (from [Off] to here have been completed. If you enter a wrong password for...
... password becomes [On]. Note • The password entry screen appears when the power is turned back on only after addition.) 1 Set the projector to the operating status or the standby mode. 2 Keep pressing the button for the password using numeric keys of the remote control. 3 The... SPLIT mode. ■ Password Function When the password function is added and [Password] is added when the steps up screen appears and the projector goes into normal operation. The password function is set password (from [Off] to here have been completed. If you enter a wrong password for...
Owners Manual
Page 23
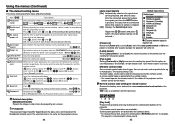
.... search On Off Power on a non-screen surface, select a color in (Auto). Item Projection mode Description Sets projection mode in colors more projectors are locked after the setting is only selected or not. Key lock Lock the control panel buttons. [ :Enter setting mode] [ On/Off... . Precaution The projected image may differ depending on ] input or not. Toggle with and . Switch with thin tip to 4 projectors. Using the menus (Continued) ■ The default setting menu This menu shows placement status and other settings. Set this menu sets...
.... search On Off Power on a non-screen surface, select a color in (Auto). Item Projection mode Description Sets projection mode in colors more projectors are locked after the setting is only selected or not. Key lock Lock the control panel buttons. [ :Enter setting mode] [ On/Off... . Precaution The projected image may differ depending on ] input or not. Toggle with and . Switch with thin tip to 4 projectors. Using the menus (Continued) ■ The default setting menu This menu shows placement status and other settings. Set this menu sets...
Owners Manual
Page 24
...mask: Enter a character string using numeric keys of the remote control. Item Wired LAN E-mail Description [ : LAN setting] [ : Select item] Projector name: Enter a character string (0 to a network. DHCP: Use Not use ]. The character is entered with ERR. : When is set to ...xxx.xxx) : Gateway specifies a network device like projecting on a screen. : Setting a projector name helps you can transmit operation status messages from the projector to the network. • You cannot set a projector name starting with a beep sound if the beep sound is a quartet of 3-digit decimal ...
...mask: Enter a character string using numeric keys of the remote control. Item Wired LAN E-mail Description [ : LAN setting] [ : Select item] Projector name: Enter a character string (0 to a network. DHCP: Use Not use ]. The character is entered with ERR. : When is set to ...xxx.xxx) : Gateway specifies a network device like projecting on a screen. : Setting a projector name helps you can transmit operation status messages from the projector to the network. • You cannot set a projector name starting with a beep sound if the beep sound is a quartet of 3-digit decimal ...
Owners Manual
Page 25
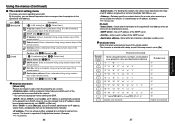
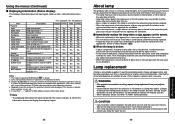
...4: [Version] shows the version of the lamp and handle it . Yes Yes Yes Yes Displays numeric value of gateway. Item Projector Input Mode name Resolution Frequency Sync Signal format Video mode Lamp time Lamp reset count Total time Version Wired LAN Connection state IP ...Displaying Information (Status display) This displays information about getting a TLPLW6 replacement lamp (sold separately). Then, thoroughly clean the area around the projector and discard any edible items placed in the lamp along with a loud noise due to impact or deterioration, or fail to "Status display...
...4: [Version] shows the version of the lamp and handle it . Yes Yes Yes Yes Displays numeric value of gateway. Item Projector Input Mode name Resolution Frequency Sync Signal format Video mode Lamp time Lamp reset count Total time Version Wired LAN Connection state IP ...Displaying Information (Status display) This displays information about getting a TLPLW6 replacement lamp (sold separately). Then, thoroughly clean the area around the projector and discard any edible items placed in the lamp along with a loud noise due to impact or deterioration, or fail to "Status display...

Owners Manual
Page 26
...hours.) This display disappears when you press the button. • Attach the outer lamp cover correctly so that it is not attached correctly, the projector may fail to come on. • Always replace the lamp with your convenience. 4 Remove the inner lamp cover. 4 Loosen the screw to... harmful inorganic mercury. Align the cover, and press it . (Dirt, jolts, scratches and the like could break the lamp.) Used Lamps This projector's lamps contain trace amounts of lamp use a screwdriver or any difficulty in accordance with your finger(s). Do not touch the glass surface with local...
...hours.) This display disappears when you press the button. • Attach the outer lamp cover correctly so that it is not attached correctly, the projector may fail to come on. • Always replace the lamp with your convenience. 4 Remove the inner lamp cover. 4 Loosen the screw to... harmful inorganic mercury. Align the cover, and press it . (Dirt, jolts, scratches and the like could break the lamp.) Used Lamps This projector's lamps contain trace amounts of lamp use a screwdriver or any difficulty in accordance with your finger(s). Do not touch the glass surface with local...


