

Brochure
Page 1
The ultimate in mobile projection with a native SVGA 800 x 600 resolution and a razor sharp contrast ratio of brightness with one -pound Toshiba TDP-FF1AU LED projector offers the ultimate in mobile projection. Designed for business or digital entertainment. Visit us online at sell.toshiba.com TDP-FF1AU The energy efficient and highly portable one of the lightest and smallest projectors on the market for mobile professionals, trainers, gamers and small-to-medium businesses, the Toshiba TDP-FF1AU delivers an incredible 400 Lux of 1500:1.
The ultimate in mobile projection with a native SVGA 800 x 600 resolution and a razor sharp contrast ratio of brightness with one -pound Toshiba TDP-FF1AU LED projector offers the ultimate in mobile projection. Designed for business or digital entertainment. Visit us online at sell.toshiba.com TDP-FF1AU The energy efficient and highly portable one of the lightest and smallest projectors on the market for mobile professionals, trainers, gamers and small-to-medium businesses, the Toshiba TDP-FF1AU delivers an incredible 400 Lux of 1500:1.

Brochure
Page 2
TDP-FF1AU Display Technology • Shape -0.55" DMD DLP® • No. DLP® and the DLP logo are registered trademarks of their respective owners. ... lock Digital Keystone Correction • Manual Vertical +/- 16° Internal Speaker • 0.5W Monaural External Dimensions • Projector Unit -5.5" (W) x 2.2" (D) x 4.0" (H) • Battery Pack -5.5" (W) x 2.2" (D) x 0.8" (H) Weight1 • 1.1 lbs. (1.7 lbs. While Toshiba has made every effort at www.info.toshiba.com. 2 Battery Life. All rights reserved. 1 Weight may vary. Ion Power Source • DC15V, AC100-240V, ...
TDP-FF1AU Display Technology • Shape -0.55" DMD DLP® • No. DLP® and the DLP logo are registered trademarks of their respective owners. ... lock Digital Keystone Correction • Manual Vertical +/- 16° Internal Speaker • 0.5W Monaural External Dimensions • Projector Unit -5.5" (W) x 2.2" (D) x 4.0" (H) • Battery Pack -5.5" (W) x 2.2" (D) x 0.8" (H) Weight1 • 1.1 lbs. (1.7 lbs. While Toshiba has made every effort at www.info.toshiba.com. 2 Battery Life. All rights reserved. 1 Weight may vary. Ion Power Source • DC15V, AC100-240V, ...
User Manual
Page 1
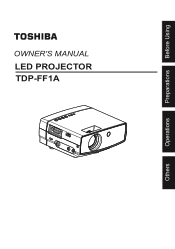
Others Operations Preparations Before Using OWNER'S MANUAL LED PROJECTOR TDP-FF1A
Others Operations Preparations Before Using OWNER'S MANUAL LED PROJECTOR TDP-FF1A

User Manual
Page 2
... will expose you to lead, a chemical known to the State of California to the presence of the FCC Rules. MODEL NAME: TDP-FF1 USA only TRADE NAME: LED PROJECTOR MODEL NAME: TDP-FF1 Tested To Comply With FCC Standards FOR HOME OR OFFICE USE FCC NOTICE: This device complies with this product, will...
... will expose you to lead, a chemical known to the State of California to the presence of the FCC Rules. MODEL NAME: TDP-FF1 USA only TRADE NAME: LED PROJECTOR MODEL NAME: TDP-FF1 Tested To Comply With FCC Standards FOR HOME OR OFFICE USE FCC NOTICE: This device complies with this product, will...

User Manual
Page 9
...immediately after moving it was originally packed at least 2 hours when there is exposed to the images or audio sound. Place and Manner of the projector. • Avoid locations with a chemically saturated cloth, be sure to a warm location. Avoid Volatile Liquid Do not use volatile liquids, such... To prevent the unit from a low-temperature room to ship your hands or lap. • Do not use it in your projector. Before Using IMPORTANT PRECAUTIONS Save Original Packing Materials The original shipping carton and packing materials will come in handy if you continue to vibration...
...immediately after moving it was originally packed at least 2 hours when there is exposed to the images or audio sound. Place and Manner of the projector. • Avoid locations with a chemically saturated cloth, be sure to a warm location. Avoid Volatile Liquid Do not use volatile liquids, such... To prevent the unit from a low-temperature room to ship your hands or lap. • Do not use it in your projector. Before Using IMPORTANT PRECAUTIONS Save Original Packing Materials The original shipping carton and packing materials will come in handy if you continue to vibration...

User Manual
Page 10
... interruption, corruption or loss of the memory contents, etc.) arising from the use of your projector. Retain this Instruction Manual. • Toshiba Corporation accepts no liability whatsoever for future reference. 10 Serial No. EXEMPTION CLAUSES • Toshiba Corporation bears no responsibility in this information for any damages arising from malfunctions arising from combination...
... interruption, corruption or loss of the memory contents, etc.) arising from the use of your projector. Retain this Instruction Manual. • Toshiba Corporation accepts no liability whatsoever for future reference. 10 Serial No. EXEMPTION CLAUSES • Toshiba Corporation bears no responsibility in this information for any damages arising from malfunctions arising from combination...

User Manual
Page 12
.... • Never step or tread on the battery pack. • Never immerse or expose the battery pack to prevent battery acid from the projector after confirming safety and discontinue use a large amount of water with another metal object. Never carry the battery pack or store it .... excessive heat, discoloration, or deformation of the battery pack, remove it . • Never throw the battery pack into the battery compartment. 12 For Projector: Be sure to explode. • Never disassemble the battery pack, as necklace or hairpin. Never store or use the battery pack in a locked ...
.... • Never step or tread on the battery pack. • Never immerse or expose the battery pack to prevent battery acid from the projector after confirming safety and discontinue use a large amount of water with another metal object. Never carry the battery pack or store it .... excessive heat, discoloration, or deformation of the battery pack, remove it . • Never throw the battery pack into the battery compartment. 12 For Projector: Be sure to explode. • Never disassemble the battery pack, as necklace or hairpin. Never store or use the battery pack in a locked ...

User Manual
Page 13
... the package contents 15 Main unit components 16 Control keypad and functions 18 Remote control keypad and functions 19 Using the battery pack with the projector 20 Using the remote control 22 Changing the new lithium battery 22 Operating the remote control 22 Placement 23 Connection 24 Turning the power on...
... the package contents 15 Main unit components 16 Control keypad and functions 18 Remote control keypad and functions 19 Using the battery pack with the projector 20 Using the remote control 22 Changing the new lithium battery 22 Operating the remote control 22 Placement 23 Connection 24 Turning the power on...
User Manual
Page 16
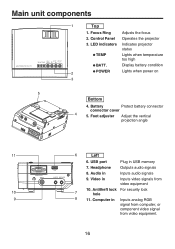
...61501;POWER Lights when power on 3 5 Bottom 4. Battery Protect battery connector connector cover 4 5. Audio in USB memory 7. Control Panel Operates the projector 3. Computer in Inputs video signals from video equipment. 16 Foot adjuster Adjust the vertical projection angle 11 6 Left 6. Headphone Outputs audio signals 8. .... USB port Plug in Inputs audio signals 9. Focus Ring Adjusts the focus 2. LED indicators Indicates projector status TEMP Lights when temperature too high BATT. Antitheft lock For security lock 7 hole 9 8 11.
...61501;POWER Lights when power on 3 5 Bottom 4. Battery Protect battery connector connector cover 4 5. Audio in USB memory 7. Control Panel Operates the projector 3. Computer in Inputs video signals from video equipment. 16 Foot adjuster Adjust the vertical projection angle 11 6 Left 6. Headphone Outputs audio signals 8. .... USB port Plug in Inputs audio signals 9. Focus Ring Adjusts the focus 2. LED indicators Indicates projector status TEMP Lights when temperature too high BATT. Antitheft lock For security lock 7 hole 9 8 11.

User Manual
Page 17
Speaker Ouputs sounds from sensor the remote control 17 Service port 18. DC input Connect the AC adaptor 13. Battery pack Li-ion battery TLPBP1 17 18 19 20 Rear 17. Infrared remote Sense commands from audio 13 12 in connector For service only For battery connection Front 19. Preparations 15 16 Right 14 12. Ventilator Air ventilator for cooling inside 15. Lens Projects expanded image 20. Power switch Turn on/off the projector 14. Battery power in terminals 16.
Speaker Ouputs sounds from sensor the remote control 17 Service port 18. DC input Connect the AC adaptor 13. Battery pack Li-ion battery TLPBP1 17 18 19 20 Rear 17. Infrared remote Sense commands from audio 13 12 in connector For service only For battery connection Front 19. Preparations 15 16 Right 14 12. Ventilator Air ventilator for cooling inside 15. Lens Projects expanded image 20. Power switch Turn on/off the projector 14. Battery power in terminals 16.

User Manual
Page 20
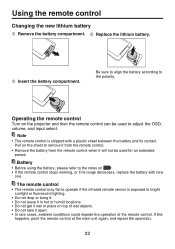
... cover. 2 1 3 Charge the battery The battery pack can be charged with the projector. Using the battery pack with the projector The following procedures are for the installation of the battery pack with the projector when the AC adaptor is turned on the projector. It takes 3 to 4 hours to turn on . Installing the battery ... "unlock" and keep it clicks into place. Switch the power button to charge the battery completely. 20 It can be also charged when the projector is connected.
... cover. 2 1 3 Charge the battery The battery pack can be charged with the projector. Using the battery pack with the projector The following procedures are for the installation of the battery pack with the projector when the AC adaptor is turned on the projector. It takes 3 to 4 hours to turn on . Installing the battery ... "unlock" and keep it clicks into place. Switch the power button to charge the battery completely. 20 It can be also charged when the projector is connected.

User Manual
Page 21
...insulating tape to a rechargeable battery recycling center. Take the battery to the terminal. Preparations Notes • Remove the battery if the projector is not in use, otherwise the battery will gradually discharge. • When the battery capacity become less then 10%, the following...capacity is recommended that you replace to a new battery when the operation time with the battery becomes significantly short. (contact reseller for TOSHIBA Li-ion battery • Model name: TLPBP1 • Output voltage: 7.4V • Capacity: 4400mAh • Operating temperature: 5°~35...
...insulating tape to a rechargeable battery recycling center. Take the battery to the terminal. Preparations Notes • Remove the battery if the projector is not in use, otherwise the battery will gradually discharge. • When the battery capacity become less then 10%, the following...capacity is recommended that you replace to a new battery when the operation time with the battery becomes significantly short. (contact reseller for TOSHIBA Li-ion battery • Model name: TLPBP1 • Output voltage: 7.4V • Capacity: 4400mAh • Operating temperature: 5°~35...
User Manual
Page 22
... the OSD, volume, and input select. Note • The remote control is exposed to the notes on top of the remote control. Pull on the projector and then the remote control can be used to remove it from the remote control. • Remove the battery from the remote control when it...
... the OSD, volume, and input select. Note • The remote control is exposed to the notes on top of the remote control. Pull on the projector and then the remote control can be used to remove it from the remote control. • Remove the battery from the remote control when it...

User Manual
Page 24
... Before connection • Read the owner's manual of computer cannot be adjusted with this projector, but it is not output from the projector speaker. • The output volume of HEADPHONE terminal can be used or connected to this projector. • Turn off the power of both devices before connecting. • The &#...64257;gures are connecting to the projector. • Some types of the device you are sample connections. Notes • Moving pictures played back on computers using DVD software may appear unnatural...
... Before connection • Read the owner's manual of computer cannot be adjusted with this projector, but it is not output from the projector speaker. • The output volume of HEADPHONE terminal can be used or connected to this projector. • Turn off the power of both devices before connecting. • The &#...64257;gures are connecting to the projector. • Some types of the device you are sample connections. Notes • Moving pictures played back on computers using DVD software may appear unnatural...

User Manual
Page 25
... power on and off Connecting the power cord 1 Plug the power cord into the adaptor. 2 Insert the power cord connector into the lens while the projector is on. Note • The start -up screen appears. 3 O POWER I Start-up screen will shut off will disappear after a moment. age to ...internal overheating. • Do not look into the DC IN socket of the projector or install the battery pack. 3 Switching the power on (I) Switch the power button to appear via the Default setting menu . 4 Switching the power off...
... power on and off Connecting the power cord 1 Plug the power cord into the adaptor. 2 Insert the power cord connector into the lens while the projector is on. Note • The start -up screen appears. 3 O POWER I Start-up screen will shut off will disappear after a moment. age to ...internal overheating. • Do not look into the DC IN socket of the projector or install the battery pack. 3 Switching the power on (I) Switch the power button to appear via the Default setting menu . 4 Switching the power off...

User Manual
Page 26
...output to turn off the LCD display, see the owner's manual of computer having LCD displays or the like, displaying images simultaneously on the projector and the monitor's display may be selected in "Turning the power on the panel. Basic operations 1 Turn on . 6 Adjust the volume... some models of your computer. • If a signal not supported by following the instructions in the Default setting menu. 26 If this projector supports a wide range of RGB signals , any signal formats not matched to native resolution of the projection image. See remote control section on...
...output to turn off the LCD display, see the owner's manual of computer having LCD displays or the like, displaying images simultaneously on the projector and the monitor's display may be selected in "Turning the power on the panel. Basic operations 1 Turn on . 6 Adjust the volume... some models of your computer. • If a signal not supported by following the instructions in the Default setting menu. 26 If this projector supports a wide range of RGB signals , any signal formats not matched to native resolution of the projection image. See remote control section on...

User Manual
Page 27
...Before correction After correction Press the remote control's KEYSTONE or button. Operations 27 This projector can also select [Keystone] in the Image adjustment menu . Correcting the keystone distortion When the projector placement angle against the screen is changed while projecting the image, the picture will ...performed correctly for input signals other than those supported by using simple operations. Press the AUTOSET button on the projector. You can correct for this keystone distortion. Using handy features Using auto setting (Only for computer input) This function sets ...
...Before correction After correction Press the remote control's KEYSTONE or button. Operations 27 This projector can also select [Keystone] in the Image adjustment menu . Correcting the keystone distortion When the projector placement angle against the screen is changed while projecting the image, the picture will ...performed correctly for input signals other than those supported by using simple operations. Press the AUTOSET button on the projector. You can correct for this keystone distortion. Using handy features Using auto setting (Only for computer input) This function sets ...

User Manual
Page 28
...; The icon will appear while freeze is in effect. • Other operation will also release the freeze. • Although an image is frozen on the projector, the pictures are running on the video or other equipment. • If you use this function on commercial video software, broadcast or cablebroadcasting except for...
...; The icon will appear while freeze is in effect. • Other operation will also release the freeze. • Although an image is frozen on the projector, the pictures are running on the video or other equipment. • If you use this function on commercial video software, broadcast or cablebroadcasting except for...

User Manual
Page 29
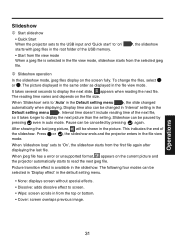
... 29 File View Mode When Quick Start sets to "On" and there is not supported. 2. Using USB Memory Connect the USB memory to the projector and select USB input Turn off the power switch. Plug the USB memory to the USB port. Turn on the... projector for detail. You can change input as below (file view mode). Notes 1. Current folder name Thumbnail display Information of the USB memory, the slideshow ...
... 29 File View Mode When Quick Start sets to "On" and there is not supported. 2. Using USB Memory Connect the USB memory to the projector and select USB input Turn off the power switch. Plug the USB memory to the USB port. Turn on the... projector for detail. You can change input as below (file view mode). Notes 1. Current folder name Thumbnail display Information of the USB memory, the slideshow ...
User Manual
Page 31
... slideshow mode, jpeg files display on the screen fully. Operations 31 The reading time varies and depends on the current picture and the projector automatically starts to read the next jpeg file. It takes several seconds to display the next picture than the setting. Press or , ...the slideshow ends and the projector enters in the file view mode. Interval time doesn't include reading time of the next file, so it takes longer to ...
... slideshow mode, jpeg files display on the screen fully. Operations 31 The reading time varies and depends on the current picture and the projector automatically starts to read the next jpeg file. It takes several seconds to display the next picture than the setting. Press or , ...the slideshow ends and the projector enters in the file view mode. Interval time doesn't include reading time of the next file, so it takes longer to ...


