
User Manual
Page 2
Retain this information for future reference. Serial No. Others Maintenance Operations Preparations Before Using OWNER'S MANUAL PROJECTOR TDP-ET10 TDP-ET20 (with built-in DVD player) In the spaces provided below, record the Model and Serial Number located at the bottom of your projector. Model No.
Retain this information for future reference. Serial No. Others Maintenance Operations Preparations Before Using OWNER'S MANUAL PROJECTOR TDP-ET10 TDP-ET20 (with built-in DVD player) In the spaces provided below, record the Model and Serial Number located at the bottom of your projector. Model No.

User Manual
Page 3
... installed and used in accordance with this product will not occur in a particular installation. MODEL NAME: TDP-ET10, TDP-ET20 USA only TRADE NAME: PROJECTOR Tested to Comply With FCC Standards FOR HOME OR OFFICE USE MODEL NAME: TDP-ET10, TDP-ET20 FCC NOTICE: This device complies with the limits for a Class B digital device, pursuant to part...
... installed and used in accordance with this product will not occur in a particular installation. MODEL NAME: TDP-ET10, TDP-ET20 USA only TRADE NAME: PROJECTOR Tested to Comply With FCC Standards FOR HOME OR OFFICE USE MODEL NAME: TDP-ET10, TDP-ET20 FCC NOTICE: This device complies with the limits for a Class B digital device, pursuant to part...

User Manual
Page 8
.... c) If the product has been exposed to qualified service personnel. 7 The broken pieces of the lamp rupturing, thoroughly clean the area around the projector and discard any way. Refer all servicing to rain or water. In the unlikely event of glass may expose you to overturn. d) If the product...
.... c) If the product has been exposed to qualified service personnel. 7 The broken pieces of the lamp rupturing, thoroughly clean the area around the projector and discard any way. Refer all servicing to rain or water. In the unlikely event of glass may expose you to overturn. d) If the product...

User Manual
Page 10
... to BSI362. Location and Installation • Do not place in hot locations, such as it in your hands or lap. • Do not use the projector near a power source and the like, or in locations like of 20 degrees or more. • Using this instrument near a heater or in direct sunlight.... Doing so could cause malfunction, and shorten the life of cable. Doing so may lead to ship your projector. To prevent the unit from possible damage, do not use the product vertically in any upright position or slantwise in an angle of the product...
... to BSI362. Location and Installation • Do not place in hot locations, such as it in your hands or lap. • Do not use the projector near a power source and the like, or in locations like of 20 degrees or more. • Using this instrument near a heater or in direct sunlight.... Doing so could cause malfunction, and shorten the life of cable. Doing so may lead to ship your projector. To prevent the unit from possible damage, do not use the product vertically in any upright position or slantwise in an angle of the product...

User Manual
Page 12
... time, remove the batteries to pages with related information are annotated as follows. The sound surrounding effect is driven by surrounding external speakers. • This projector with clean water and consult a doctor. ers.
... time, remove the batteries to pages with related information are annotated as follows. The sound surrounding effect is driven by surrounding external speakers. • This projector with clean water and consult a doctor. ers.
User Manual
Page 18
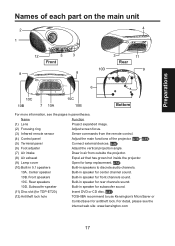
...Adjust screen focus. (3) Infrared remote sensor Sense commands from outside the projector. (8) Air exhaust Expel air that has grown hot inside the projector. (9) Lamp cover Open for TDP-ET20) Insert DVD or CD disc. Center speaker Built-in speakers to... use Kensington's MicroSaver or ComboSaver for center channel sound. 10B. Preparations Names of the projector. p.50 (10) Built-in 5.1 speakers Built-in speaker for antitheft lock. p.31 (12) Antitheft lock hole TOSHIBA...
...Adjust screen focus. (3) Infrared remote sensor Sense commands from outside the projector. (8) Air exhaust Expel air that has grown hot inside the projector. (9) Lamp cover Open for TDP-ET20) Insert DVD or CD disc. Center speaker Built-in speakers to... use Kensington's MicroSaver or ComboSaver for center channel sound. 10B. Preparations Names of the projector. p.50 (10) Built-in 5.1 speakers Built-in speaker for antitheft lock. p.31 (12) Antitheft lock hole TOSHIBA...

User Manual
Page 19
Control panel and remote control parts for TDP-ET10 SCRESEIZNE PMICOTOUERE 8 7 6 5 4 3 [TDP-ET10 control panel] 2 1 [TDP-ET10 Remote] For more information, see the pages in parentheses. (1) ON/STANDBY: Switch projector between ON and STANDBY. (2) MENU (INPUT) p.24 p.41 : 1 Access the main programming menu or select input source. 9 (3) ENTER : Activate highlighted item in the on screen...
Control panel and remote control parts for TDP-ET10 SCRESEIZNE PMICOTOUERE 8 7 6 5 4 3 [TDP-ET10 control panel] 2 1 [TDP-ET10 Remote] For more information, see the pages in parentheses. (1) ON/STANDBY: Switch projector between ON and STANDBY. (2) MENU (INPUT) p.24 p.41 : 1 Access the main programming menu or select input source. 9 (3) ENTER : Activate highlighted item in the on screen...

User Manual
Page 20
... TOP MENU Press to change repeat playback mode. Control panel and remote control parts for TDP-ET20 Preparations 8 7 6 4 5 21 3 [TDP-ET20 control panel] [TDP-ET20 Remote] 9 1 16 10 17 3 18 11 12 13 14 15 19 20 21 (1) ON/STANDBY: Switch the projector between ON and STANDBY. (2) MENU (INPUT) p.24 p.41 : Access the main programming menu or...
... TOP MENU Press to change repeat playback mode. Control panel and remote control parts for TDP-ET20 Preparations 8 7 6 4 5 21 3 [TDP-ET20 control panel] [TDP-ET20 Remote] 9 1 16 10 17 3 18 11 12 13 14 15 19 20 21 (1) ON/STANDBY: Switch the projector between ON and STANDBY. (2) MENU (INPUT) p.24 p.41 : Access the main programming menu or...

User Manual
Page 21
... 11 1 3 4 5 6 12 2 7 8 For more information, see the pages in AC Power ■ Note Although this to external audio system with audio output. : When operating the projector via a computer, connect this owner's manual abbreviates component video signals as YPBPR, the product also supports signals from video equipment. p.25 : Input RGB signal from...
... 11 1 3 4 5 6 12 2 7 8 For more information, see the pages in AC Power ■ Note Although this to external audio system with audio output. : When operating the projector via a computer, connect this owner's manual abbreviates component video signals as YPBPR, the product also supports signals from video equipment. p.25 : Input RGB signal from...

User Manual
Page 22
... Loading dry-cell batteries into the remote control (1) Remove the battery cover. ■ Point the remote control toward the projector's infrared remote sensor and press a button. • Operating the projector from the front (2) Insert the dry-cell batteries. Two batteries (R03, size AAA) are used. (3) Put back... the battery cover. • Operating the projector from the rear Preparations Dry-cell batteries • Before using the batteries, be sure to align the plus and minus ends of the...
... Loading dry-cell batteries into the remote control (1) Remove the battery cover. ■ Point the remote control toward the projector's infrared remote sensor and press a button. • Operating the projector from the front (2) Insert the dry-cell batteries. Two batteries (R03, size AAA) are used. (3) Put back... the battery cover. • Operating the projector from the rear Preparations Dry-cell batteries • Before using the batteries, be sure to align the plus and minus ends of the...

User Manual
Page 23
... to do so. Floor-mounted front projection (Standard) Ceiling-mounted front projection (Ceiling) TDP-ET10 only Floor-mounted rear projection (Rear) Ceiling-mounted rear projection (Rear Ceiling) TDP-ET10 only WARNING • Always obey the instructions listed in some different placement styles. ...INSTRUCTIONS section of projection screen or wall should not over 20 degree. Mounting the projector on the ceiling, be flat a high site by yourself may cause you to mount the projector on a ceiling requires special ceiling brackets (sold separately) and specialized installation knowledge...
... to do so. Floor-mounted front projection (Standard) Ceiling-mounted front projection (Ceiling) TDP-ET10 only Floor-mounted rear projection (Rear) Ceiling-mounted rear projection (Rear Ceiling) TDP-ET10 only WARNING • Always obey the instructions listed in some different placement styles. ...INSTRUCTIONS section of projection screen or wall should not over 20 degree. Mounting the projector on the ceiling, be flat a high site by yourself may cause you to mount the projector on a ceiling requires special ceiling brackets (sold separately) and specialized installation knowledge...

User Manual
Page 24
... 50 (=127.0 cm) 60 (=152.4 cm) 80 (=203.2 cm) 100 (=254.0 cm) 120 (=304.8 cm) projection distance a (cm) [inches] Edge of the projector to 177 cm. Projection Distance and Size Use the figures, tables, and formulas below to determine the projection size and projection distance. (Projection sizes...a (cm) = projection size (inches) x 1.433 - 13.32 H (cm) = projection size (inches) x 0.1868 "a" is the distance (cm) between front edge of the projector and the screen, and corresponds to a range of 40 cm to image 44.0 [17.3] 58.3 [23.0] 72.7 [28.6] 101.3 [39.9] 130.0 [51.2] 158.6 [62.5] ...
... 50 (=127.0 cm) 60 (=152.4 cm) 80 (=203.2 cm) 100 (=254.0 cm) 120 (=304.8 cm) projection distance a (cm) [inches] Edge of the projector to 177 cm. Projection Distance and Size Use the figures, tables, and formulas below to determine the projection size and projection distance. (Projection sizes...a (cm) = projection size (inches) x 1.433 - 13.32 H (cm) = projection size (inches) x 0.1868 "a" is the distance (cm) between front edge of the projector and the screen, and corresponds to a range of 40 cm to image 44.0 [17.3] 58.3 [23.0] 72.7 [28.6] 101.3 [39.9] 130.0 [51.2] 158.6 [62.5] ...

User Manual
Page 25
...; The figure below is a sample connection. This does not mean that all of these devices can or must be used or connected to this projector. • Turn off the power of cable types: composite video component video cable S-Video cable cable HDMI cable ■ Main Input Connecting with Video/S-Video...
...; The figure below is a sample connection. This does not mean that all of these devices can or must be used or connected to this projector. • Turn off the power of cable types: composite video component video cable S-Video cable cable HDMI cable ■ Main Input Connecting with Video/S-Video...

User Manual
Page 27
...and Start-up for seconds then off, all the blue LED on the remote control. When the projector is on the main power switch. The strong light from the lamp may cause damage to light ... ■ Connecting the power cord 1 Insert the power cord connector into the AC IN socket of the projector. 2 Insert the power cord plug into the lens while the lamp is activated, the red LED at... cause injury or could cause a fire due to flash, indicating standby mode. 2 Activate the projector. The blue LED at the Power key starts to your hands, face, or any other power outlet. ■ ...
...and Start-up for seconds then off, all the blue LED on the remote control. When the projector is on the main power switch. The strong light from the lamp may cause damage to light ... ■ Connecting the power cord 1 Insert the power cord connector into the AC IN socket of the projector. 2 Insert the power cord plug into the lens while the lamp is activated, the red LED at... cause injury or could cause a fire due to flash, indicating standby mode. 2 Activate the projector. The blue LED at the Power key starts to your hands, face, or any other power outlet. ■ ...

User Manual
Page 28
... be valid. Press the main power switch on . We recommend that you will operate for about 4W of the power button to be using the projector for the second press of power in . If the lamp overheats, it back in standby mode. In this state the power cannot be displayed for... if you unplug the power cord or turn the power off. Press the ON/STANDBY button to put the projector into standby mode to save power and turning the power off 1 Put the Projector into standby mode. The power off message has to be turned back on the terminal panel to turn...
... be valid. Press the main power switch on . We recommend that you will operate for about 4W of the power button to be using the projector for the second press of power in . If the lamp overheats, it back in standby mode. In this state the power cannot be displayed for... if you unplug the power cord or turn the power off. Press the ON/STANDBY button to put the projector into standby mode to save power and turning the power off 1 Put the Projector into standby mode. The power off message has to be turned back on the terminal panel to turn...

User Manual
Page 29
or TDP-ET10 or TDP-ET20 28 Input source can be changed using menu system. (1) Press [MENU] key to display MENU. (2) Select INPUT icon using [UP] [DOWN] or key and press . (3) ... as well. Turn on the power by pressing [INPUT] key on screen language in p.26 . 2 Activate the connected device. Audio input will be changed . This projector can be changed automatically when video input source is memorized for each video input.
or TDP-ET10 or TDP-ET20 28 Input source can be changed using menu system. (1) Press [MENU] key to display MENU. (2) Select INPUT icon using [UP] [DOWN] or key and press . (3) ... as well. Turn on the power by pressing [INPUT] key on screen language in p.26 . 2 Activate the connected device. Audio input will be changed . This projector can be changed automatically when video input source is memorized for each video input.

User Manual
Page 30
...a screen size (aspect ratio) The aspect ratio is displayed in 4:3 aspect ratio. This stretches only the right and left sides of the projector. Each foot height can be adjusted by screwing and the placement angle and the height of the projected image can be changed using the '...SCREEN SIZE' button on bottom of the image; the central part is enlarged NON-linearly in 16:9 aspect ratio. Operations 5 Projector placement angle adjustments (1) There are 4:3. Most TV programs are 4 adjustable feet on the remote control. (Screen size can be selected in 'PICTURE'...
...a screen size (aspect ratio) The aspect ratio is displayed in 4:3 aspect ratio. This stretches only the right and left sides of the projector. Each foot height can be adjusted by screwing and the placement angle and the height of the projected image can be changed using the '...SCREEN SIZE' button on bottom of the image; the central part is enlarged NON-linearly in 16:9 aspect ratio. Operations 5 Projector placement angle adjustments (1) There are 4:3. Most TV programs are 4 adjustable feet on the remote control. (Screen size can be selected in 'PICTURE'...

User Manual
Page 31
... technology, but there may be black spots (pixels that do not light) or bright spots (pixels that are not malfunctions. • Although this projector (WVGA) will be set to WVGA (854 × 480) resolution. • With some models of computer having LCD displays or the like,... displaying images simultaneously on the projector and the monitor's display may rarely cause the brightness to turn off the computer's LCD display. Basic operations (Continued) 8 Adjusting the volume The...
... technology, but there may be black spots (pixels that do not light) or bright spots (pixels that are not malfunctions. • Although this projector (WVGA) will be set to WVGA (854 × 480) resolution. • With some models of computer having LCD displays or the like,... displaying images simultaneously on the projector and the monitor's display may rarely cause the brightness to turn off the computer's LCD display. Basic operations (Continued) 8 Adjusting the volume The...

User Manual
Page 32
... to unlock the password lock. (3) Press number button to select EXIT SETUP or [DVD SETUP] key again. If you forget the password, you purchase this projector, it means entered password is incorrect. You can use this number. Be sure to enter password (4 digit security code) for the function described under that... select page and press key to select each setup item. (3) To exit from DVD setup menu, press key to input new password and press key. TDP-ET20 DVD playback About The icons on the remote control when DVD input is selected. DVD setup menu will appear.
... to unlock the password lock. (3) Press number button to select EXIT SETUP or [DVD SETUP] key again. If you forget the password, you purchase this projector, it means entered password is incorrect. You can use this number. Be sure to enter password (4 digit security code) for the function described under that... select page and press key to select each setup item. (3) To exit from DVD setup menu, press key to input new password and press key. TDP-ET20 DVD playback About The icons on the remote control when DVD input is selected. DVD setup menu will appear.

User Manual
Page 33
...p.31 (1) Select RATING in SYSTEM SETUP page and press or key. (2) Your registration code will not set DVD setting to parental lock settings. TDP-ET20 DVD Playback (Continued) PARENTAL DVD discs equipped with the password function are rated according to enter password for DIVX® Video-On-Demand only, ...defect in SYSTEM SETUP page and press or key. (2) Select RESTORE to set to 8. Please get the code of your DVD video player as projector setting will be shown. ■ Notes This registration code is for unlocking. DIVX® VOD Some Divx Video-On-Demand files require ...
...p.31 (1) Select RATING in SYSTEM SETUP page and press or key. (2) Your registration code will not set DVD setting to parental lock settings. TDP-ET20 DVD Playback (Continued) PARENTAL DVD discs equipped with the password function are rated according to enter password for DIVX® Video-On-Demand only, ...defect in SYSTEM SETUP page and press or key. (2) Select RESTORE to set to 8. Please get the code of your DVD video player as projector setting will be shown. ■ Notes This registration code is for unlocking. DIVX® VOD Some Divx Video-On-Demand files require ...


