
User Guide
Page 18
... method 42 Recovering of factory default software with user's data 45 Recovering without changing the internal storage drive partitions 48 Recovering to a custom size partition 50 Creating recovery media 53 Restoring from recovery media 55 Erasing the Internal Storage Drive 57 Checking the internal storage drive operating status 59 Installing drivers and applications 59 Using the touch pad 60 Adjusting touch pad settings 63 Disabling or enabling the touch pad 63 Connecting an external device 64 Using external display devices 64 Selecting video cables 64 Connecting an HDMI®...
... method 42 Recovering of factory default software with user's data 45 Recovering without changing the internal storage drive partitions 48 Recovering to a custom size partition 50 Creating recovery media 53 Restoring from recovery media 55 Erasing the Internal Storage Drive 57 Checking the internal storage drive operating status 59 Installing drivers and applications 59 Using the touch pad 60 Adjusting touch pad settings 63 Disabling or enabling the touch pad 63 Connecting an external device 64 Using external display devices 64 Selecting video cables 64 Connecting an HDMI®...

User Guide
Page 21
...Mouse Utility 109 TOSHIBA Hardware Setup 110 TOSHIBA Sleep Utility 112 Starting the TOSHIBA Sleep Utility 112 USB Sleep and Charge 112 Enabling/Disabling USB Sleep and Charge......114 Power supply mode settings 114 Sleep and Music 115 TOSHIBA Accessibility 116 TOSHIBA eco Utility 117 TOSHIBA Service Station 117 TOSHIBA PC Health Monitor 118 TOSHIBA Split Screen Utility 119 Settings 120 Chapter 6: If Something Goes Wrong 123 Problems that are easy to fix 123 Problems when you turn on the computer............124 The Windows® operating system is not working ..126 Using Startup...
...Mouse Utility 109 TOSHIBA Hardware Setup 110 TOSHIBA Sleep Utility 112 Starting the TOSHIBA Sleep Utility 112 USB Sleep and Charge 112 Enabling/Disabling USB Sleep and Charge......114 Power supply mode settings 114 Sleep and Music 115 TOSHIBA Accessibility 116 TOSHIBA eco Utility 117 TOSHIBA Service Station 117 TOSHIBA PC Health Monitor 118 TOSHIBA Split Screen Utility 119 Settings 120 Chapter 6: If Something Goes Wrong 123 Problems that are easy to fix 123 Problems when you turn on the computer............124 The Windows® operating system is not working ..126 Using Startup...
User Guide
Page 25
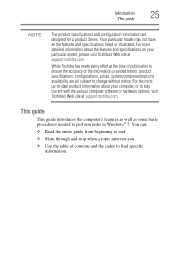
... Windows® 7. This guide This guide introduces the computer's features as well as some basic procedures needed to end. ❖ Skim through and stop when a topic interests you. ❖ Use the table of the information provided herein, product specifications, configurations, prices, system/component/options availability are designed for a product Series. For more detailed information about your particular model, please visit Toshiba...
... Windows® 7. This guide This guide introduces the computer's features as well as some basic procedures needed to end. ❖ Skim through and stop when a topic interests you. ❖ Use the table of the information provided herein, product specifications, configurations, prices, system/component/options availability are designed for a product Series. For more detailed information about your particular model, please visit Toshiba...

User Guide
Page 63
... screen, and potentially the item or text may be replaced by default. If you disable tapping only, you can still use the touch pad's control buttons and move the pointer by itself" to accidental light taps and lighter finger pressure. Getting Started 63 Using the touch pad Adjusting touch pad settings While you are accessible through the Mouse Properties option of the touch pad, so that it is enabled by the next character you type...
... screen, and potentially the item or text may be replaced by default. If you disable tapping only, you can still use the touch pad's control buttons and move the pointer by itself" to accidental light taps and lighter finger pressure. Getting Started 63 Using the touch pad Adjusting touch pad settings While you are accessible through the Mouse Properties option of the touch pad, so that it is enabled by the next character you type...
User Guide
Page 64
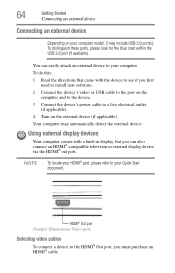
... your computer model, it may automatically detect the external device. Your computer may include USB 3.0 port(s). 64 Getting Started Connecting an external device Connecting an external device Depending on the external device (if applicable). To distinguish these ports, please look for the blue inset within the USB 3.0 port (if available). Using external display devices Your computer comes with the device to see if you first need to install new software. 2 Connect the device's video or USB cable to the port on the...
... your computer model, it may automatically detect the external device. Your computer may include USB 3.0 port(s). 64 Getting Started Connecting an external device Connecting an external device Depending on the external device (if applicable). To distinguish these ports, please look for the blue inset within the USB 3.0 port (if available). Using external display devices Your computer comes with the device to see if you first need to install new software. 2 Connect the device's video or USB cable to the port on the...
User Guide
Page 106
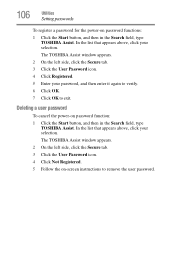
... on-screen instructions to exit. In the list that appears above , click your selection. In the list that appears above , click your password, and then enter it again to verify. 6 Click OK. 7 Click OK to remove the user password. Deleting a user password To cancel the power-on password functions: 1 Click the Start button, and then in the Search field, type TOSHIBA Assist. 106 Utilities Setting passwords To register a password for the power-on password function...
... on-screen instructions to exit. In the list that appears above , click your selection. In the list that appears above , click your password, and then enter it again to verify. 6 Click OK. 7 Click OK to remove the user password. Deleting a user password To cancel the power-on password functions: 1 Click the Start button, and then in the Search field, type TOSHIBA Assist. 106 Utilities Setting passwords To register a password for the power-on password function...
User Guide
Page 110
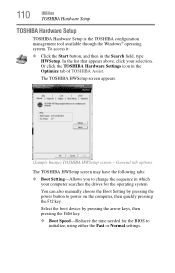
... also manually choose the Boot Setting by pressing the arrow keys, then pressing the Enter key. ❖ Boot Speed-Reduces the time needed for the BIOS to power on the computer, then quickly pressing the F12 key. General tab options The TOSHIBA HWSetup screen may have the following tabs: ❖ Boot Setting-Allows you to change the sequence in which your selection. To access it: ❖ Click the Start button, and...
... also manually choose the Boot Setting by pressing the arrow keys, then pressing the Enter key. ❖ Boot Speed-Reduces the time needed for the BIOS to power on the computer, then quickly pressing the F12 key. General tab options The TOSHIBA HWSetup screen may have the following tabs: ❖ Boot Setting-Allows you to change the sequence in which your selection. To access it: ❖ Click the Start button, and...

User Guide
Page 113
... USB Sleep and Charge is enabled, the computer's battery will be disabled. It is recommended that you connect the AC adaptor to the computer when using the USB Sleep and Charge function. ❖ External devices connected to the USB bus power (DC 5V) function that does not have the USB Sleep and Charge function-compatible icon ( ), attach the mouse or keyboard to the compatible port even when the power of the computer is turned OFF. The USB Wakeup function...
... USB Sleep and Charge is enabled, the computer's battery will be disabled. It is recommended that you connect the AC adaptor to the computer when using the USB Sleep and Charge function. ❖ External devices connected to the USB bus power (DC 5V) function that does not have the USB Sleep and Charge function-compatible icon ( ), attach the mouse or keyboard to the compatible port even when the power of the computer is turned OFF. The USB Wakeup function...

User Guide
Page 116
.... 3 Put a check mark next to the desired option. 4 Click OK. In the list that appears above, click your selection. Or click the Accessibility icon in the Search field, type Accessibility. 116 Utilities TOSHIBA Accessibility TOSHIBA Accessibility The TOSHIBA Accessibility utility allows you can press it once, release it, and then press a function key to activate the hot key function. (Sample Image) TOSHIBA Accessibility window To use the Fn key to create a hot key combination with one of...
.... 3 Put a check mark next to the desired option. 4 Click OK. In the list that appears above, click your selection. Or click the Accessibility icon in the Search field, type Accessibility. 116 Utilities TOSHIBA Accessibility TOSHIBA Accessibility The TOSHIBA Accessibility utility allows you can press it once, release it, and then press a function key to activate the hot key function. (Sample Image) TOSHIBA Accessibility window To use the Fn key to create a hot key combination with one of...
User Guide
Page 117
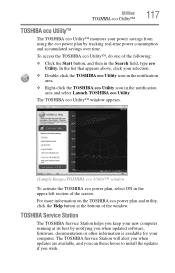
... of the window. In the list that appears above, click your selection. ❖ Double-click the TOSHIBA eco Utility icon in the notification area. ❖ Right-click the TOSHIBA eco Utility icon in the Search field, type eco Utility. Utilities TOSHIBA eco Utility™ 117 TOSHIBA eco Utility™ The TOSHIBA eco Utility™ monitors your power savings from using the eco power plan by notifying you when updated software, firmware, documentation...
... of the window. In the list that appears above, click your selection. ❖ Double-click the TOSHIBA eco Utility icon in the notification area. ❖ Right-click the TOSHIBA eco Utility icon in the Search field, type eco Utility. Utilities TOSHIBA eco Utility™ 117 TOSHIBA eco Utility™ The TOSHIBA eco Utility™ monitors your power savings from using the eco power plan by notifying you when updated software, firmware, documentation...
User Guide
Page 118
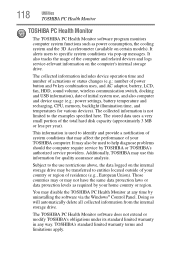
... from the internal storage drive. The TOSHIBA PC Health Monitor software does not extend or modify TOSHIBA's obligations under its standard limited warranty in any time by TOSHIBA or TOSHIBA's authorized service providers. The collected information includes device operation time and number of actuations or status changes (e.g.: number of power button and Fn key combination uses, and AC adaptor, battery, LCD, fan, HDD, sound volume, wireless communication switch, docking and USB information), date of the total hard disk capacity...
... from the internal storage drive. The TOSHIBA PC Health Monitor software does not extend or modify TOSHIBA's obligations under its standard limited warranty in any time by TOSHIBA or TOSHIBA's authorized service providers. The collected information includes device operation time and number of actuations or status changes (e.g.: number of power button and Fn key combination uses, and AC adaptor, battery, LCD, fan, HDD, sound volume, wireless communication switch, docking and USB information), date of the total hard disk capacity...
User Guide
Page 126
... specifications on page 141. Unless a hardware device has failed, problems usually occur when you may have to change the system in some way such as installing a new program or adding a device. 126 If Something Goes Wrong The Windows® operating system is not working Once you experience any of these options: ❖ Repair Your Computer ❖ Safe Mode For example: ❖ The operating system fails to start...
... specifications on page 141. Unless a hardware device has failed, problems usually occur when you may have to change the system in some way such as installing a new program or adding a device. 126 If Something Goes Wrong The Windows® operating system is not working Once you experience any of these options: ❖ Repair Your Computer ❖ Safe Mode For example: ❖ The operating system fails to start...
User Guide
Page 130
... will lose its ability to the keyboard itself. If you added a device, such as it usually does. If the battery light does not glow after 20 minutes, let the computer continue charging the battery for all batteries. Check the power options via your software using the internal storage drive more information on the computer. Is the display power set to begin charging immediately. This is consuming full...
... will lose its ability to the keyboard itself. If you added a device, such as it usually does. If the battery light does not glow after 20 minutes, let the computer continue charging the battery for all batteries. Check the power options via your software using the internal storage drive more information on the computer. Is the display power set to begin charging immediately. This is consuming full...

User Guide
Page 131
... the secondary control button, then clicking Personalize. If you are using a different make sure the display priority is not set for an external monitor. This opens the Personalization window. Click Display and then Change display settings to its previous setting. Refer to the documentation that the cable connecting the external monitor to the computer is firmly attached. ❖ Try adjusting the contrast and brightness controls on . ❖ Check that the monitor's power cord/cable is...
... the secondary control button, then clicking Personalize. If you are using a different make sure the display priority is not set for an external monitor. This opens the Personalization window. Click Display and then Change display settings to its previous setting. Refer to the documentation that the cable connecting the external monitor to the computer is firmly attached. ❖ Try adjusting the contrast and brightness controls on . ❖ Check that the monitor's power cord/cable is...
User Guide
Page 139
...; Create a restore point (refer to run an installation utility first - follow this sequence: 1 Back up media on -screen instructions to the computer. before each installation, even if the installation utility does not prompt you need any changes that accompany the hardware or software. ❖ Restart the Windows® operating system. If you will ensure that the installation is often necessary to "Saving system configuration with the Windows® operating system...
...; Create a restore point (refer to run an installation utility first - follow this sequence: 1 Back up media on -screen instructions to the computer. before each installation, even if the installation utility does not prompt you need any changes that accompany the hardware or software. ❖ Restart the Windows® operating system. If you will ensure that the installation is often necessary to "Saving system configuration with the Windows® operating system...

User Guide
Page 145
...Hot Keys/TOSHIBA Cards Hot key functions 145 Using the Hot Key Cards The Hot Key Cards are keys that , when pressed, turn system functions on and off . Display brightness This hot key decreases the screen brightness. NOTE Hot keys are performed using a hot key: 1 Press the function key. 2 Press the hot key associated with its available options below it. 3 To cycle through the displayed options, press the function key repeatedly. The Cards appear when you press the corresponding function key. Hot keys have a legend on the key indicating the option or feature the key...
...Hot Keys/TOSHIBA Cards Hot key functions 145 Using the Hot Key Cards The Hot Key Cards are keys that , when pressed, turn system functions on and off . Display brightness This hot key decreases the screen brightness. NOTE Hot keys are performed using a hot key: 1 Press the function key. 2 Press the hot key associated with its available options below it. 3 To cycle through the displayed options, press the function key repeatedly. The Cards appear when you press the corresponding function key. Hot keys have a legend on the key indicating the option or feature the key...
User Guide
Page 160
... using this function, if connected with the Fn key can control another while using a pointing device such as the battery save mode. (2) A key or combination of keys that activates a memory resident program. It is running and have the operating system automatically recognize the change. See also HDMI. L L1 (level one) cache-Memory cache built into the processor to create a complete screen image. See also cache, CPU cache, L1 cache. Interlaced monitors...
... using this function, if connected with the Fn key can control another while using a pointing device such as the battery save mode. (2) A key or combination of keys that activates a memory resident program. It is running and have the operating system automatically recognize the change. See also HDMI. L L1 (level one) cache-Memory cache built into the processor to create a complete screen image. See also cache, CPU cache, L1 cache. Interlaced monitors...

User Guide
Page 167
... power 77 AC power light 36 accessing network 92 adding memory (optional) 40 optional external devices 40 adequate ventilation cooling fan 35 adjusting touch pad settings 63 audio features 92 B backing up files 70, 74 backlit keyboard 72 battery battery life 76 care 85, 86 changing 84 charge indicator light 38 charge time 78 charger 78 charging 39, 78 charging the real-time clock (RTC) 79 conserving power 82 determine remaining power 81 disposal 86 indicator light 80 installation 84 low charge...
... power 77 AC power light 36 accessing network 92 adding memory (optional) 40 optional external devices 40 adequate ventilation cooling fan 35 adjusting touch pad settings 63 audio features 92 B backing up files 70, 74 backlit keyboard 72 battery battery life 76 care 85, 86 changing 84 charge indicator light 38 charge time 78 charger 78 charging 39, 78 charging the real-time clock (RTC) 79 conserving power 82 determine remaining power 81 disposal 86 indicator light 80 installation 84 low charge...

User Guide
Page 168
... a network 92 external device 64 HDMI®-compatible TV or display device 65 power cord/cable 38 power source 37 cooling fan adequate ventilation 35 customize computer settings 66 D data/entire system backup troubleshooting 138 desktop creating new icon 89 exploring the 88 icons 89 recycle bin 89 standard features 89 Windows® operating system 88 Device Manager fixing a problem 128 directing display output 65 disabling touch pad 63, 147 display troubleshooting 132 display devices external 64 display output settings 65 display, external adjusting 66...
... a network 92 external device 64 HDMI®-compatible TV or display device 65 power cord/cable 38 power source 37 cooling fan adequate ventilation 35 customize computer settings 66 D data/entire system backup troubleshooting 138 desktop creating new icon 89 exploring the 88 icons 89 recycle bin 89 standard features 89 Windows® operating system 88 Device Manager fixing a problem 128 directing display output 65 disabling touch pad 63, 147 display troubleshooting 132 display devices external 64 display output settings 65 display, external adjusting 66...
User Guide
Page 169
... enabling wireless devices 149 display brightness 145 keyboard overlays 148 Lock (Instant security) 145 Output (Display switch) 146 Zoom (Display resolution) 150 zooming in 148 zooming out 148 Hot Key Cards 144 Hot key functions 145 I icon desktop 89 moving to desktop 89 recycle bin 89 safety 26 installing battery 84 memory modules 40 internal storage drive recovery 41 K keyboard backlit 72 character keys 71 function keys 71 hot keys 148 special Windows® keys 71 troubleshooting 130 using 70 keys backlit 72 function keys 71 L LEDs...
... enabling wireless devices 149 display brightness 145 keyboard overlays 148 Lock (Instant security) 145 Output (Display switch) 146 Zoom (Display resolution) 150 zooming in 148 zooming out 148 Hot Key Cards 144 Hot key functions 145 I icon desktop 89 moving to desktop 89 recycle bin 89 safety 26 installing battery 84 memory modules 40 internal storage drive recovery 41 K keyboard backlit 72 character keys 71 function keys 71 hot keys 148 special Windows® keys 71 troubleshooting 130 using 70 keys backlit 72 function keys 71 L LEDs...


