

Users Manual AU/NZ
Page 2
.../T110, Satellite Pro T130/T110, PORTEGE T130/T110 Series Portable Personal Computer at coffee shops or hotels for the purposes of this manual cannot be reproduced only for damages incurred directly or indirectly from this product to display enlarged images/ video at the time of profits or providing these to the public. TOSHIBA assumes no liability for personal use or use the screen mode switching functions...
.../T110, Satellite Pro T130/T110, PORTEGE T130/T110 Series Portable Personal Computer at coffee shops or hotels for the purposes of this manual cannot be reproduced only for damages incurred directly or indirectly from this product to display enlarged images/ video at the time of profits or providing these to the public. TOSHIBA assumes no liability for personal use or use the screen mode switching functions...
Users Manual AU/NZ
Page 14
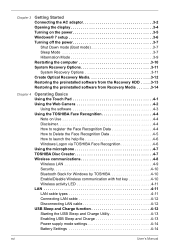
... the help file 4-6 Windows Logon via TOSHIBA Face Recognition 4-6 Using the microphone 4-7 TOSHIBA Disc Creator 4-7 Wireless communications 4-8 Wireless LAN 4-9 Security 4-10 Bluetooth Stack for Windows by TOSHIBA 4-10 Enable/Disable Wireless communication with hot key 4-10 Wireless activity LED 4-11 LAN 4-11 LAN cable types 4-11 Connecting LAN cable 4-12 Disconnecting LAN cable 4-12 USB Sleep and Charge function 4-12 Starting the USB Sleep and Charge Utility 4-13 Enabling USB Sleep and Charge 4-13 Power supply mode settings 4-14 Battery Settings 4-14 xvi User's Manual
... the help file 4-6 Windows Logon via TOSHIBA Face Recognition 4-6 Using the microphone 4-7 TOSHIBA Disc Creator 4-7 Wireless communications 4-8 Wireless LAN 4-9 Security 4-10 Bluetooth Stack for Windows by TOSHIBA 4-10 Enable/Disable Wireless communication with hot key 4-10 Wireless activity LED 4-11 LAN 4-11 LAN cable types 4-11 Connecting LAN cable 4-12 Disconnecting LAN cable 4-12 USB Sleep and Charge function 4-12 Starting the USB Sleep and Charge Utility 4-13 Enabling USB Sleep and Charge 4-13 Power supply mode settings 4-14 Battery Settings 4-14 xvi User's Manual
Users Manual AU/NZ
Page 15
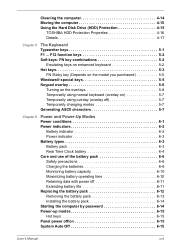
... Power indicators 6-2 Battery indicator 6-2 Power indicator 6-3 Battery types 6-3 Battery pack 6-3 Real Time Clock battery 6-4 Care and use of the battery pack 6-6 Safety precautions 6-6 Charging the batteries 6-8 Monitoring battery capacity 6-10 Maximizing battery operating time 6-10 Retaining data with power off 6-11 Extending battery life 6-11 Replacing the battery pack 6-12 Removing the battery pack 6-13 Installing the battery pack 6-14 Starting the computer by password 6-14 Power-up modes 6-15 Hot keys 6-15 Panel power off/on 6-15 System Auto Off 6-15 User's Manual...
... Power indicators 6-2 Battery indicator 6-2 Power indicator 6-3 Battery types 6-3 Battery pack 6-3 Real Time Clock battery 6-4 Care and use of the battery pack 6-6 Safety precautions 6-6 Charging the batteries 6-8 Monitoring battery capacity 6-10 Maximizing battery operating time 6-10 Retaining data with power off 6-11 Extending battery life 6-11 Replacing the battery pack 6-12 Removing the battery pack 6-13 Installing the battery pack 6-14 Starting the computer by password 6-14 Power-up modes 6-15 Hot keys 6-15 Panel power off/on 6-15 System Auto Off 6-15 User's Manual...

Users Manual AU/NZ
Page 16
... card 8-4 Memory card care 8-5 Memory expansion 8-6 Installing a memory module 8-6 Removing a memory module 8-8 Additional battery pack 8-9 Additional AC adaptor 8-9 External monitor 8-10 Security lock 8-10 Chapter 9 Troubleshooting Problem solving process 9-1 Preliminary checklist 9-2 Analyzing the problem 9-2 Hardware and system checklist 9-3 System start-up 9-3 Self test 9-4 Power 9-4 Disposing of PC and PC batteries 9-6 Real Time Clock 9-7 Keyboard 9-7 LCD panel 9-8 Hard disk drive 9-9 Recovery Media 9-9 Pointing device 9-10 USB 9-11 USB Sleep and Charge function...
... card 8-4 Memory card care 8-5 Memory expansion 8-6 Installing a memory module 8-6 Removing a memory module 8-8 Additional battery pack 8-9 Additional AC adaptor 8-9 External monitor 8-10 Security lock 8-10 Chapter 9 Troubleshooting Problem solving process 9-1 Preliminary checklist 9-2 Analyzing the problem 9-2 Hardware and system checklist 9-3 System start-up 9-3 Self test 9-4 Power 9-4 Disposing of PC and PC batteries 9-6 Real Time Clock 9-7 Keyboard 9-7 LCD panel 9-8 Hard disk drive 9-9 Recovery Media 9-9 Pointing device 9-10 USB 9-11 USB Sleep and Charge function...

Users Manual AU/NZ
Page 18
... how to read Chapter 8, Optional Devices. If you 're new to learn how this manual by -step instructions on safety and designing your work area. User's Manual xxi It also provides detailed information on your purchase of computers or if you are going to install Memory cards or connect external devices such as a monitor, be sure to set up and begin operating your computer and gives tips...
... how to read Chapter 8, Optional Devices. If you 're new to learn how this manual by -step instructions on safety and designing your work area. User's Manual xxi It also provides detailed information on your purchase of computers or if you are going to install Memory cards or connect external devices such as a monitor, be sure to set up and begin operating your computer and gives tips...

Users Manual AU/NZ
Page 36
... Lock Front of the computer with a Wireless WAN module. 2-2 User's Manual The Power LED glows green when the computer is charging and flashing Amber indicates a low battery charge. Only some models are turned on , two seconds off) while the computer enters Sleep Mode. Refer to indicate the connection status of the battery's charge: Green indicates a full charge, amber indicates that the battery is on . Disk LED 5. Wireless communication LED The Wireless communication LED glows amber when the Wireless LAN and Bluetooth functions are equipped with Wireless LAN...
... Lock Front of the computer with a Wireless WAN module. 2-2 User's Manual The Power LED glows green when the computer is charging and flashing Amber indicates a low battery charge. Only some models are turned on , two seconds off) while the computer enters Sleep Mode. Refer to indicate the connection status of the battery's charge: Green indicates a full charge, amber indicates that the battery is on . Disk LED 5. Wireless communication LED The Wireless communication LED glows amber when the Wireless LAN and Bluetooth functions are equipped with Wireless LAN...

Users Manual AU/NZ
Page 56
... Control Panel. 2. Enable the desired Hibernation settings for five seconds. Press CTRL + ALT + DEL to reset the computer system: 1. Once the computer has turned itself off the power in Hibernation Mode When you press the power button or close the lid. 5. During this time, the disk indicator will enter Hibernation mode automatically when you turn the computer or devices back on again with the power button. 3-10 User's Manual Getting Started...
... Control Panel. 2. Enable the desired Hibernation settings for five seconds. Press CTRL + ALT + DEL to reset the computer system: 1. Once the computer has turned itself off the power in Hibernation Mode When you press the power button or close the lid. 5. During this time, the disk indicator will enter Hibernation mode automatically when you turn the computer or devices back on again with the power button. 3-10 User's Manual Getting Started...
Users Manual AU/NZ
Page 60
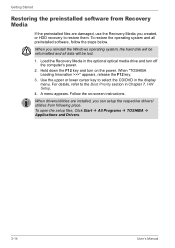
... Recovery Media in the optional optical media drive and turn on -screen instructions. For details, refer to the Boot Priority section in the display menu. To open the setup files, Click Start Æ All Programs Æ TOSHIBA Æ Applications and Drivers. 3-14 User's Manual Use the upper or lower cursor key to restore them. When drivers/utilities are installed, you can setup the respective drivers/ utilities from Recovery Media If the preinstalled files are damaged, use the Recovery Media you reinstall the Windows operating...
... Recovery Media in the optional optical media drive and turn on -screen instructions. For details, refer to the Boot Priority section in the display menu. To open the setup files, Click Start Æ All Programs Æ TOSHIBA Æ Applications and Drivers. 3-14 User's Manual Use the upper or lower cursor key to restore them. When drivers/utilities are installed, you can setup the respective drivers/ utilities from Recovery Media If the preinstalled files are damaged, use the Recovery Media you reinstall the Windows operating...
Users Manual AU/NZ
Page 99
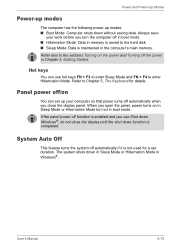
Hot keys You can set duration. If the panel power off function is enabled and you use hot keys FN + F3 to enter Sleep Mode and FN + F4 to enter Hibernation Mode. Refer to Chapter 5, The Keyboard for a set up modes: ■ Boot Mode: Computer shuts down Windows®, do not close the display panel. User's Manual 6-15 Refer also to the sections Turning on the power and Turning off the power in Windows®. The system shuts down function is completed...
Hot keys You can set duration. If the panel power off function is enabled and you use hot keys FN + F3 to enter Sleep Mode and FN + F4 to enter Hibernation Mode. Refer to Chapter 5, The Keyboard for a set up modes: ■ Boot Mode: Computer shuts down Windows®, do not close the display panel. User's Manual 6-15 Refer also to the sections Turning on the power and Turning off the power in Windows®. The system shuts down function is completed...
Users Manual AU/NZ
Page 102
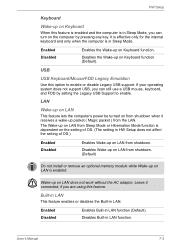
...'s power be turned on the computer by setting the Legacy USB Support to enable or disable Legacy USB support. Built-in LAN This feature enables or disables the Built-in Sleep Mode. User's Manual 7-3 Disables Wake-up on LAN from shutdown. (Default) Do not install or remove an optional memory module while Wake-up on Keyboard function. USB USB Keyboard/Mouse/FDD Legacy Emulation Use this feature. Disables the Wake-up on LAN does not work without the AC adaptor. Wake-up on Keyboard function (Default). Enabled Disabled Enables Built...
...'s power be turned on the computer by setting the Legacy USB Support to enable or disable Legacy USB support. Built-in LAN This feature enables or disables the Built-in Sleep Mode. User's Manual 7-3 Disables Wake-up on LAN from shutdown. (Default) Do not install or remove an optional memory module while Wake-up on Keyboard function. USB USB Keyboard/Mouse/FDD Legacy Emulation Use this feature. Disables the Wake-up on LAN does not work without the AC adaptor. Wake-up on Keyboard function (Default). Enabled Disabled Enables Built...

Users Manual AU/NZ
Page 109
... install or remove a memory module under the cover and lift it off the power. 2. Optional Devices Memory expansion You can install additional memory in Chapter 9, Troubleshooting, for details. ■ Expansion memory is a precision electronic component that may be fatally damaged by TOSHIBA. ■ Do not try to increase the amount of an incorrect screwdriver can damage the computer and the module. Remove all cables connected to boot mode and turn off . 8-6 User's Manual...
... install or remove a memory module under the cover and lift it off the power. 2. Optional Devices Memory expansion You can install additional memory in Chapter 9, Troubleshooting, for details. ■ Expansion memory is a precision electronic component that may be fatally damaged by TOSHIBA. ■ Do not try to increase the amount of an incorrect screwdriver can damage the computer and the module. Remove all cables connected to boot mode and turn off . 8-6 User's Manual...
Users Manual AU/NZ
Page 120
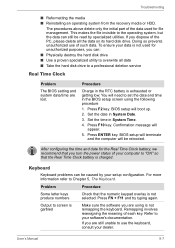
... refer to screen is garbled Make sure the software you dispose of each key. User's Manual 9-7 If you are still unable to your dealer. Set the time in the BIOS setup screen using is not selected. Keyboard Keyboard problems can still be read by your setup configuration. Troubleshooting ■ Reformatting the media ■ Reinstalling an operating system from the recovery media or HDD. You will be caused by specialized utilities. This makes the file...
... refer to screen is garbled Make sure the software you dispose of each key. User's Manual 9-7 If you are still unable to your dealer. Set the time in the BIOS setup screen using is not selected. Keyboard Keyboard problems can still be read by your setup configuration. Troubleshooting ■ Reformatting the media ■ Reinstalling an operating system from the recovery media or HDD. You will be caused by specialized utilities. This makes the file...
Users Manual AU/NZ
Page 125
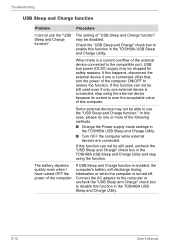
... to the compatible port, USB bus power (DC5V) supply may be still used , uncheck the "USB Sleep and Charge" check box in the TOSHIBA USB Sleep and Charge Utility and stop using the function. The setting of the external device connected to restore the function. Connect the AC adaptor to the computer or uncheck the "USB Sleep and Charge" check box to use the "USB Sleep and Charge function". Troubleshooting USB Sleep and Charge function Problem Procedure I computer's battery will discharge during have turned OFF the hibernation...
... to the compatible port, USB bus power (DC5V) supply may be still used , uncheck the "USB Sleep and Charge" check box in the TOSHIBA USB Sleep and Charge Utility and stop using the function. The setting of the external device connected to restore the function. Connect the AC adaptor to the computer or uncheck the "USB Sleep and Charge" check box to use the "USB Sleep and Charge function". Troubleshooting USB Sleep and Charge function Problem Procedure I computer's battery will discharge during have turned OFF the hibernation...
Users Manual AU/NZ
Page 138
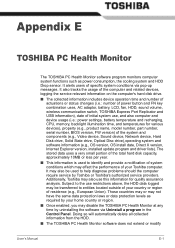
It also tracks the usage of the computer and related devices, logging the service relevant information on the computer's hard disk drive. ■ The collected information includes device operation time and number of actuations or status changes (i.e.: number of power button and FN key combination uses, AC adaptor, battery, LCD, fan, HDD, sound volume, wireless communication switch, TOSHIBA Express Port Replicator and USB information), date of residence (e.g., European Union). It may also be transferred to the...
It also tracks the usage of the computer and related devices, logging the service relevant information on the computer's hard disk drive. ■ The collected information includes device operation time and number of actuations or status changes (i.e.: number of power button and FN key combination uses, AC adaptor, battery, LCD, fan, HDD, sound volume, wireless communication switch, TOSHIBA Express Port Replicator and USB information), date of residence (e.g., European Union). It may also be transferred to the...

Users Manual AU/NZ
Page 141
... operating system is preinstalled on an external storage medium. CPU performance may also vary from specifications due to support graphics may vary depending on the graphics system, applications utilized, system memory size and other computing activities. To avoid risk of lost data or damage to 3GB of system memory. Read additional restrictions in Chapter 9 Troubleshooting for more of system memory. Appendix F-2 User's Manual Memory...
... operating system is preinstalled on an external storage medium. CPU performance may also vary from specifications due to support graphics may vary depending on the graphics system, applications utilized, system memory size and other computing activities. To avoid risk of lost data or damage to 3GB of system memory. Read additional restrictions in Chapter 9 Troubleshooting for more of system memory. Appendix F-2 User's Manual Memory...
Users Manual AU/NZ
Page 148
.... This type of power is the television set of instructions written for a computer that enable it to make up a byte. disk drive: The device that controls the functions of the computer that indicates the current position on the display screen. disk storage: Storing data on concentric tracks much like a phonograph record. User's Manual Glossary-5 configuration: The specific components in hardware and software that randomly accesses information on a fluorescent screen-producing luminous spots. controller: Built...
.... This type of power is the television set of instructions written for a computer that enable it to make up a byte. disk drive: The device that controls the functions of the computer that indicates the current position on the display screen. disk storage: Storing data on concentric tracks much like a phonograph record. User's Manual Glossary-5 configuration: The specific components in hardware and software that randomly accesses information on a fluorescent screen-producing luminous spots. controller: Built...
Users Manual AU/NZ
Page 150
... that reads and writes to floppy diskettes. See also software and firmware. HW Setup: A TOSHIBA utility that lets you set the parameters for its first use. folder: An icon in a fingerprint. format: The process of memory is referred to as drive C. See also hard disk. This type of readying a blank disk for various hardware components. Compare RAM and ROM. graphics: Drawings, pictures, or other folders. Glossary fingerprint...
... that reads and writes to floppy diskettes. See also software and firmware. HW Setup: A TOSHIBA utility that lets you set the parameters for its first use. folder: An icon in a fingerprint. format: The process of memory is referred to as drive C. See also hard disk. This type of readying a blank disk for various hardware components. Compare RAM and ROM. graphics: Drawings, pictures, or other folders. Glossary fingerprint...

Users Manual AU/NZ
Page 151
... device from the keyboard or external or internal storage devices. interface: 1) Hardware and/or software components of contact between user, the computer, and the program, for the receiving computer. I /O: Input/output. For each key, the transmitted code is input for example, the keyboard or a menu. See also cache memory, L1 cache. instruction: Statements or commands that enables any other devices dispersed over a relatively limited area and connected...
... device from the keyboard or external or internal storage devices. interface: 1) Hardware and/or software components of contact between user, the computer, and the program, for the receiving computer. I /O: Input/output. For each key, the transmitted code is input for example, the keyboard or a menu. See also cache memory, L1 cache. instruction: Statements or commands that enables any other devices dispersed over a relatively limited area and connected...
Users Manual AU/NZ
Page 155
... disk. Touch Pad: A pointing device integrated into the TOSHIBA computer palm rest. This serial interface lets you run any popular software. Wi-Fi®: A registered trademark term of the Wi-Fi Alliance that direct and control the computer system's activities. Compare parallel. Specifically refers to computer programs that stands for data input/output. W: warm start the computer. Glossary-12 User's Manual See also hardware...
... disk. Touch Pad: A pointing device integrated into the TOSHIBA computer palm rest. This serial interface lets you run any popular software. Wi-Fi®: A registered trademark term of the Wi-Fi Alliance that direct and control the computer system's activities. Compare parallel. Specifically refers to computer programs that stands for data input/output. W: warm start the computer. Glossary-12 User's Manual See also hardware...
Users Manual AU/NZ
Page 158
...LAN, 1-7, 4-11 cable types, 4-11 connecting, 4-12 disconnecting, 4-12 M Memory, 1-3 expansion, 1-14, 8-6 installing, 8-6 removing, 8-8 Monitor, external, 1-6 P Ports, 1-6 external monitor, 1-6 USB, 1-6 Power conditions, 6-1 hibernation mode, 3-9 indicator, 6-3 panel power on/off, 1-9, 6-15 shut Down mode (Boot mode), 3-7 Sleep Mode, 3-7 system Auto Off, 6-15 turning off, 3-7 Power-up modes, 6-15 Problems AC power, 9-5 analyzing, 9-2 Battery, 9-5 Hard disk drive, 9-9 Hardware and system checklist, 9-3 Keyboard, 9-7 LAN, 9-14 LCD panel, 9-8 Memory expansion, 9-13 Monitor, 9-14 overheating power...
...LAN, 1-7, 4-11 cable types, 4-11 connecting, 4-12 disconnecting, 4-12 M Memory, 1-3 expansion, 1-14, 8-6 installing, 8-6 removing, 8-8 Monitor, external, 1-6 P Ports, 1-6 external monitor, 1-6 USB, 1-6 Power conditions, 6-1 hibernation mode, 3-9 indicator, 6-3 panel power on/off, 1-9, 6-15 shut Down mode (Boot mode), 3-7 Sleep Mode, 3-7 system Auto Off, 6-15 turning off, 3-7 Power-up modes, 6-15 Problems AC power, 9-5 analyzing, 9-2 Battery, 9-5 Hard disk drive, 9-9 Hardware and system checklist, 9-3 Keyboard, 9-7 LAN, 9-14 LCD panel, 9-8 Memory expansion, 9-13 Monitor, 9-14 overheating power...


