

User Guide
Page 2
... data, please make periodic back-up and usage instructions in the applicable user guides and/or manuals enclosed or provided electronically. 2 Handling the cord on the hard disk or other storage devices as a precaution against possible failures, alteration, or loss of California to cause birth defects or other damage. Model: Satellite Pro® U500 Series Recordable and/or ReWritable Drive(s) and Associated Software Warranty The...
... data, please make periodic back-up and usage instructions in the applicable user guides and/or manuals enclosed or provided electronically. 2 Handling the cord on the hard disk or other storage devices as a precaution against possible failures, alteration, or loss of California to cause birth defects or other damage. Model: Satellite Pro® U500 Series Recordable and/or ReWritable Drive(s) and Associated Software Warranty The...

User Guide
Page 5
... 1991 makes it can. Disconnection If you with the best service it unlawful for which charges exceed local or long-distance transmission charges.) In order to program this computer. or an authorized representative of the telephone company is to provide you should ever decide to permanently disconnect your fax transmission, refer to the fax software instructions installed on...
... 1991 makes it can. Disconnection If you with the best service it unlawful for which charges exceed local or long-distance transmission charges.) In order to program this computer. or an authorized representative of the telephone company is to provide you should ever decide to permanently disconnect your fax transmission, refer to the fax software instructions installed on...
User Guide
Page 30
... without changing the internal storage drive partitions 68 Creating recovery DVDs/media 70 Restoring from recovery DVDs/media 71 Erasing the Internal Storage Drive 73 Checking the internal storage drive operating status 74 Installing drivers and applications 75 Using the TouchPad 75 Adjusting TouchPad™ settings 78 Disabling or enabling the TouchPad 79 Using external display devices 79 Connecting the display device 80 Directing the display output when you turn on the computer 81 Adjusting the quality of the external display......82 Using an external keyboard 82 Using a mouse...
... without changing the internal storage drive partitions 68 Creating recovery DVDs/media 70 Restoring from recovery DVDs/media 71 Erasing the Internal Storage Drive 73 Checking the internal storage drive operating status 74 Installing drivers and applications 75 Using the TouchPad 75 Adjusting TouchPad™ settings 78 Disabling or enabling the TouchPad 79 Using external display devices 79 Connecting the display device 80 Directing the display output when you turn on the computer 81 Adjusting the quality of the external display......82 Using an external keyboard 82 Using a mouse...
User Guide
Page 34
...162 TOSHIBA Hardware Setup 163 USB Sleep and Charge Utility 166 Starting the USB Sleep and Charge Utility.......166 USB Sleep and Charge 166 Enabling USB Sleep and Charge 168 Power supply mode settings 168 Battery settings 168 TOSHIBA Zooming Utility 169 TOSHIBA Button Support 170 TOSHIBA Accessibility 171 Fingerprint Authentication Utility 172 Fingerprint utility limitations 172 Using the Fingerprint Authentication Utility.....172 Fingerprint Logon 172 Care and maintenance of your fingerprint reader 173 Fingerprint reader limitations 174 TOSHIBA eco Utility 175 TOSHIBA Service...
...162 TOSHIBA Hardware Setup 163 USB Sleep and Charge Utility 166 Starting the USB Sleep and Charge Utility.......166 USB Sleep and Charge 166 Enabling USB Sleep and Charge 168 Power supply mode settings 168 Battery settings 168 TOSHIBA Zooming Utility 169 TOSHIBA Button Support 170 TOSHIBA Accessibility 171 Fingerprint Authentication Utility 172 Fingerprint utility limitations 172 Using the Fingerprint Authentication Utility.....172 Fingerprint Logon 172 Care and maintenance of your fingerprint reader 173 Fingerprint reader limitations 174 TOSHIBA eco Utility 175 TOSHIBA Service...
User Guide
Page 53
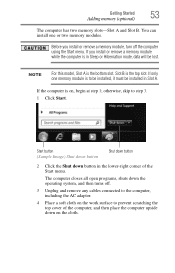
... upside down button in Slot A. If the computer is to be installed, it must be lost. The computer closes all open programs, shuts down the operating system, and then turns off the computer using the Start menu. NOTE For this model, Slot A is the top slot. Getting Started 53 Adding memory (optional) The computer has two memory slots-Slot A and Slot B. If you install or remove a memory module, turn off . 3 Unplug and remove any cables connected to...
... upside down button in Slot A. If the computer is to be installed, it must be lost. The computer closes all open programs, shuts down the operating system, and then turns off the computer using the Start menu. NOTE For this model, Slot A is the top slot. Getting Started 53 Adding memory (optional) The computer has two memory slots-Slot A and Slot B. If you install or remove a memory module, turn off . 3 Unplug and remove any cables connected to...
User Guide
Page 58
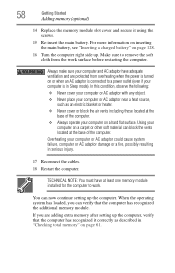
... on a hard flat surface. 58 Getting Started Adding memory (optional) 14 Replace the memory module slot cover and secure it correctly as an electric blanket or heater. ❖ Never cover or block the air vents including those located at least one memory module installed for the computer to remove the soft cloth from overheating when the power is turned on or when an AC adaptor is in Sleep mode).
... on a hard flat surface. 58 Getting Started Adding memory (optional) 14 Replace the memory module slot cover and secure it correctly as an electric blanket or heater. ❖ Never cover or block the air vents including those located at least one memory module installed for the computer to remove the soft cloth from overheating when the power is turned on or when an AC adaptor is in Sleep mode).
User Guide
Page 59
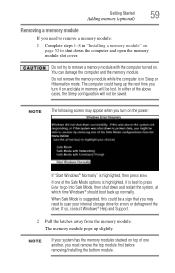
The computer could be lost. When Safe Mode is in Sleep or Hibernation mode. If one another, you must remove the top module first before removing/installing the bottom module. Getting Started 59 Adding memory (optional) Removing a memory module If you need to go into Safe Mode, then shut down the computer and open the memory module slot cover. NOTE The following screen may appear when you turn on the power: If "Start Windows® Normally" is best to...
The computer could be lost. When Safe Mode is in Sleep or Hibernation mode. If one another, you must remove the top module first before removing/installing the bottom module. Getting Started 59 Adding memory (optional) Removing a memory module If you need to go into Safe Mode, then shut down the computer and open the memory module slot cover. NOTE The following screen may appear when you turn on the power: If "Start Windows® Normally" is best to...

User Guide
Page 60
... Sleep mode). Using your computer on a carpet or other soft material can block the vents located at the base of the slot. Slot B Slot A Front of computer (Sample Illustration) Removing the memory module 4 Replace the memory module slot cover and secure it out of the computer. For more information on inserting the main battery, see "Inserting a charged battery" on or when an AC adaptor is turned on page 128. 6 Turn...
... Sleep mode). Using your computer on a carpet or other soft material can block the vents located at the base of the slot. Slot B Slot A Front of computer (Sample Illustration) Removing the memory module 4 Replace the memory module slot cover and secure it out of the computer. For more information on inserting the main battery, see "Inserting a charged battery" on or when an AC adaptor is turned on page 128. 6 Turn...
User Guide
Page 80
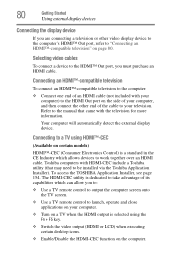
... an HDMI cable. 80 Getting Started Using external display devices Connecting the display device If you are connecting a television or other end of the cable to the manual that came with your computer) to the HDMI Out port on the computer. To access the TOSHIBA Application Installer, see page 154. Connecting to a TV using the Fn + F5 key. ❖ Switch the video output (HDMI or LCD) when executing certain desktop icons. ❖ Enable/Disable the HDMI-CEC function on...
... an HDMI cable. 80 Getting Started Using external display devices Connecting the display device If you are connecting a television or other end of the cable to the manual that came with your computer) to the HDMI Out port on the computer. To access the TOSHIBA Application Installer, see page 154. Connecting to a TV using the Fn + F5 key. ❖ Switch the video output (HDMI or LCD) when executing certain desktop icons. ❖ Enable/Disable the HDMI-CEC function on...
User Guide
Page 158
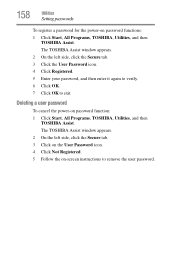
... enter it again to verify. 6 Click OK. 7 Click OK to remove the user password. The TOSHIBA Assist window appears. 2 On the left side, click the Secure tab. 3 Click on the User Password icon. 4 Click Not Registered. 5 Follow the on-screen instructions to exit. Deleting a user password To cancel the power-on password functions: 1 Click Start, All Programs, TOSHIBA, Utilities, and then TOSHIBA Assist. 158 Utilities Setting passwords To register a password for the power-on password function...
... enter it again to verify. 6 Click OK. 7 Click OK to remove the user password. The TOSHIBA Assist window appears. 2 On the left side, click the Secure tab. 3 Click on the User Password icon. 4 Click Not Registered. 5 Follow the on-screen instructions to exit. Deleting a user password To cancel the power-on password functions: 1 Click Start, All Programs, TOSHIBA, Utilities, and then TOSHIBA Assist. 158 Utilities Setting passwords To register a password for the power-on password function...
User Guide
Page 176
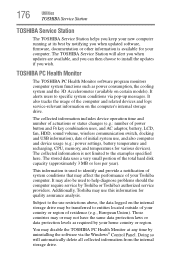
... your new computer running at any time by uninstalling the software via pop-up messages. The collected information includes device operation time and number of actuations or status changes (e.g.: number of power button and Fn key combination uses, and AC adaptor, battery, LCD, fan, HDD, sound volume, wireless communication switch, docking and USB information), date of residence (e.g., European Union). You may use , and also computer and device usage (e.g.: power settings, battery temperature and recharging, CPU, memory, and...
... your new computer running at any time by uninstalling the software via pop-up messages. The collected information includes device operation time and number of actuations or status changes (e.g.: number of power button and Fn key combination uses, and AC adaptor, battery, LCD, fan, HDD, sound volume, wireless communication switch, docking and USB information), date of residence (e.g., European Union). You may use , and also computer and device usage (e.g.: power settings, battery temperature and recharging, CPU, memory, and...
User Guide
Page 185
... INPUT specifications on , this indicates a power mismatch. If you experience any of the computer. For example: ❖ The operating system fails to start after the initial startup appears. ❖ The operating system takes a long time to or greater than that shipped with the desktop and used to the way the operating system responds to fix the problem. Unless a hardware device has failed, problems usually...
... INPUT specifications on , this indicates a power mismatch. If you experience any of the computer. For example: ❖ The operating system fails to start after the initial startup appears. ❖ The operating system takes a long time to or greater than that shipped with the desktop and used to the way the operating system responds to fix the problem. Unless a hardware device has failed, problems usually...
User Guide
Page 191
... software you are using a different make sure the display priority is registered, press any key, type the password and press Enter. Display Auto Off may have connected an external keyboard and the operating system displays one or more keyboard error messages. To do this does not correct the problem, press Fn and F5 simultaneously again to return the display priority to its previous setting. If Something Goes Wrong Keyboard problems 191 Keyboard problems...
... software you are using a different make sure the display priority is registered, press any key, type the password and press Enter. Display Auto Off may have connected an external keyboard and the operating system displays one or more keyboard error messages. To do this does not correct the problem, press Fn and F5 simultaneously again to return the display priority to its previous setting. If Something Goes Wrong Keyboard problems 191 Keyboard problems...
User Guide
Page 236
... Fn key can set system options or control system parameters, such as a mouse. L2 (level two) cache - interlaced - Internet - It is running and have the operating system automatically recognize the change. Compare non-interlaced. The decentralized, world-wide network of your work , including all open files and programs, when you turn on the motherboard to perform a task instead of many Toshiba computers that represents a function...
... Fn key can set system options or control system parameters, such as a mouse. L2 (level two) cache - interlaced - Internet - It is running and have the operating system automatically recognize the change. Compare non-interlaced. The decentralized, world-wide network of your work , including all open files and programs, when you turn on the motherboard to perform a task instead of many Toshiba computers that represents a function...

User Guide
Page 242
... changing 126 charge indicator light 48, 119 charge not lasting 190 charging 48, 117 conserving power 122 disposal 131 installing 126, 128 low charge 121 maintaining 130 monitoring power 48, 119 242 not charging 190 notifications 121 power plan 218 power plan hot key 124 real-time clock (RTC) 116, 118 remaining power 120 removing 126 safety precautions 129 BIOS Setup see TOSHIBA Hardware Setup button power 50 start 135 buttons eject, optical drive 108 Media control buttons 109 C Call2Recycle™ battery...
... changing 126 charge indicator light 48, 119 charge not lasting 190 charging 48, 117 conserving power 122 disposal 131 installing 126, 128 low charge 121 maintaining 130 monitoring power 48, 119 242 not charging 190 notifications 121 power plan 218 power plan hot key 124 real-time clock (RTC) 116, 118 remaining power 120 removing 126 safety precautions 129 BIOS Setup see TOSHIBA Hardware Setup button power 50 start 135 buttons eject, optical drive 108 Media control buttons 109 C Call2Recycle™ battery...

User Guide
Page 243
... files/trouble accessing a drive 193 running slow 194 diskette drive cannot insert a diskette 194 cannot read a diskette 194 display does not look normal/flickers 192 external monitor not working 192 display device connecting 80 external 79 display output settings 81 display panel opening 49 display problems screen is blank 191 display, external adjusting 82 disposal information 28 disposing of used batteries 131 DVD using 107 DVD player general problems 201 E EasyGuard® 115 eject button optical drive 108 eject, optical drive 108...
... files/trouble accessing a drive 193 running slow 194 diskette drive cannot insert a diskette 194 cannot read a diskette 194 display does not look normal/flickers 192 external monitor not working 192 display device connecting 80 external 79 display output settings 81 display panel opening 49 display problems screen is blank 191 display, external adjusting 82 disposal information 28 disposing of used batteries 131 DVD using 107 DVD player general problems 201 E EasyGuard® 115 eject button optical drive 108 eject, optical drive 108...
User Guide
Page 244
... keys 99 function keys 99 H HDMI™ Out Port 79 headphones using 142 Help and Support Windows® operating system 187 Hibernation mode 85 configuring 89 hot key 220 starting again from 91 hot key disabling or enabling TouchPad™ 224 disabling or enabling wireless devices 223 display brightness 222 Hibernation mode 220 keyboard overlays 226 Lock (Instant security) 217 Output (Display switch) 221 power plan 218 Sleep mode 219 volume mute 216 Zoom (Display resolution) 225 zooming in 226 zooming out 226 Hot Key Cards 211 Hot key functions 215 hot key power...
... keys 99 function keys 99 H HDMI™ Out Port 79 headphones using 142 Help and Support Windows® operating system 187 Hibernation mode 85 configuring 89 hot key 220 starting again from 91 hot key disabling or enabling TouchPad™ 224 disabling or enabling wireless devices 223 display brightness 222 Hibernation mode 220 keyboard overlays 226 Lock (Instant security) 217 Output (Display switch) 221 power plan 218 Sleep mode 219 volume mute 216 Zoom (Display resolution) 225 zooming in 226 zooming out 226 Hot Key Cards 211 Hot key functions 215 hot key power...
User Guide
Page 245
... 139 J jack RJ-11 138 K keyboard character keys 98 function keys 99 hot keys 226 not working 183 overlay keys 100 special Windows® keys 99 troubleshooting 191 unexpected characters 191 using 98 keyboard, external 82 keyboard, full-size 98 L light AC power 46 drive in-use indicator 108 lock computer, using 95 M main battery changing 126 installing 126, 128 removing 126 safety precautions 129 manual eject hole optical drive 108 memory adding 52 problem solving 189 removing memory module slot cover 54 Memory card reader inserting memory media 146 removing memory media 146 memory module...
... 139 J jack RJ-11 138 K keyboard character keys 98 function keys 99 hot keys 226 not working 183 overlay keys 100 special Windows® keys 99 troubleshooting 191 unexpected characters 191 using 98 keyboard, external 82 keyboard, full-size 98 L light AC power 46 drive in-use indicator 108 lock computer, using 95 M main battery changing 126 installing 126, 128 removing 126 safety precautions 129 manual eject hole optical drive 108 memory adding 52 problem solving 189 removing memory module slot cover 54 Memory card reader inserting memory media 146 removing memory media 146 memory module...
User Guide
Page 246
... problems 195 removing disc 112, 113 troubleshooting 195 using 107 optical media recording 112 other documentation 41 overlay keys 100 P password deleting a supervisor 157 disabling a user 158 setting a user 157 supervisor set up 156 types 155 passwords instant, using 155 setting 155 port RGB 79 power computer will not start 182 connecting cable to AC adaptor 47 cord/cable 47 cord/cable connectors 227 energy-saving features 114 problem solving 189 turning on 50 power button 50 power plan hot key...
... problems 195 removing disc 112, 113 troubleshooting 195 using 107 optical media recording 112 other documentation 41 overlay keys 100 P password deleting a supervisor 157 disabling a user 158 setting a user 157 supervisor set up 156 types 155 passwords instant, using 155 setting 155 port RGB 79 power computer will not start 182 connecting cable to AC adaptor 47 cord/cable 47 cord/cable connectors 227 energy-saving features 114 problem solving 189 turning on 50 power button 50 power plan hot key...
User Guide
Page 248
... external keyboard 191 keyboard 191 optical drive 195 turning on the computer 50 turning on the power 50 U USB Sleep and Charge cannot use 207 USB Sleep and Charge Utility 166 USB Wakeup function does not work 207 USB-compatible printer 83 user password, disabling 158 user password, setting 157 using Memory card reader 145 using a file extension 105 Utilities 148 V video cables 80 video display device connecting 80 video projector adjusting display 82 W warranty standard limited warranty 41 Web 139 Web Camera using 143 Web sites 208 Wi-Fi® wireless networking 136 Windows...
... external keyboard 191 keyboard 191 optical drive 195 turning on the computer 50 turning on the power 50 U USB Sleep and Charge cannot use 207 USB Sleep and Charge Utility 166 USB Wakeup function does not work 207 USB-compatible printer 83 user password, disabling 158 user password, setting 157 using Memory card reader 145 using a file extension 105 Utilities 148 V video cables 80 video display device connecting 80 video projector adjusting display 82 W warranty standard limited warranty 41 Web 139 Web Camera using 143 Web sites 208 Wi-Fi® wireless networking 136 Windows...


