

User Guide
Page 2
... loss of all set-up and usage instructions in the applicable user guides and/or manuals enclosed. Protection of Stored Data For your important data, please make periodic back-up copies of life or catastrophic property damage. 2 Models: Satellite Pro® M10/M15 Series ReWritable CD/DVD Drives The computer system you have purchased is not designed for any "critical applications." TOSHIBA DISCLAIMS ANY...
... loss of all set-up and usage instructions in the applicable user guides and/or manuals enclosed. Protection of Stored Data For your important data, please make periodic back-up copies of life or catastrophic property damage. 2 Models: Satellite Pro® M10/M15 Series ReWritable CD/DVD Drives The computer system you have purchased is not designed for any "critical applications." TOSHIBA DISCLAIMS ANY...
User Guide
Page 5
... If any changes necessary to State tariffs. When you are ever needed on standard-device telephone lines. In the event repairs are notified, you with the best service it can connect to it, the telephone company will be given the opportunity to correct the problem and informed of your telephone equipment is to make any of your right...
... If any changes necessary to State tariffs. When you are ever needed on standard-device telephone lines. In the event repairs are notified, you with the best service it can connect to it, the telephone company will be given the opportunity to correct the problem and informed of your telephone equipment is to make any of your right...

User Guide
Page 20
... Started 43 Selecting a place to work 43 Creating a computer-friendly environment 43 Keeping yourself comfortable 44 Other precautions 47 Setting up your computer 48 Connecting to a power source 49 Adding memory 52 Installing a memory module 52 Removing a memory module 55 Turning on the computer 57 Opening the display panel 57 Turning on the power 57 Using the AccuPoint II® pointing device 58 Using the TouchPad 59 Scrolling with the TouchPad 60 Control buttons 60 Disabling or enabling the...
... Started 43 Selecting a place to work 43 Creating a computer-friendly environment 43 Keeping yourself comfortable 44 Other precautions 47 Setting up your computer 48 Connecting to a power source 49 Adding memory 52 Installing a memory module 52 Removing a memory module 55 Turning on the computer 57 Opening the display panel 57 Turning on the power 57 Using the AccuPoint II® pointing device 58 Using the TouchPad 59 Scrolling with the TouchPad 60 Control buttons 60 Disabling or enabling the...
User Guide
Page 22
... battery power 110 Battery Notice 110 Safety Precautions 111 Maximizing battery life 112 Charging the batteries 113 Monitoring battery power 113 What to do when the battery alarm sounds 116 Changing batteries 117 Disposing of used batteries 119 Conserving power 119 Power usage modes in Windows XP 120 Using a hot key to set the power usage mode 121 Additional options for power 122 Chapter 5: Expansion Options 123 Devices for office computing 123 Connecting external (optional) devices 124 Using an external keyboard 125 Using a mouse 125 Connecting a USB mouse 125 Using...
... battery power 110 Battery Notice 110 Safety Precautions 111 Maximizing battery life 112 Charging the batteries 113 Monitoring battery power 113 What to do when the battery alarm sounds 116 Changing batteries 117 Disposing of used batteries 119 Conserving power 119 Power usage modes in Windows XP 120 Using a hot key to set the power usage mode 121 Additional options for power 122 Chapter 5: Expansion Options 123 Devices for office computing 123 Connecting external (optional) devices 124 Using an external keyboard 125 Using a mouse 125 Connecting a USB mouse 125 Using...
User Guide
Page 24
... 163 Starting Fn-esse 163 Using the keyboard or pointing device to assign keys 165 Viewing existing key assignments 166 Changing or removing existing key assignments ...... 167 Toshiba Console 167 Customizing Your Computer 168 Network 169 Security 169 Power Management 169 Mouse utility 172 Hotkey utility 172 Mobile Extension Service 173 Slim SelectBay® Service 173 Toshiba Hardware Settings 173 Mobile Extension 175 Toshiba Power Saver utility 177 Enabling Hibernation 177 Setting user passwords 178 Using an instant password 179 Setting a user password 180 Disabling a user...
... 163 Starting Fn-esse 163 Using the keyboard or pointing device to assign keys 165 Viewing existing key assignments 166 Changing or removing existing key assignments ...... 167 Toshiba Console 167 Customizing Your Computer 168 Network 169 Security 169 Power Management 169 Mouse utility 172 Hotkey utility 172 Mobile Extension Service 173 Slim SelectBay® Service 173 Toshiba Hardware Settings 173 Mobile Extension 175 Toshiba Power Saver utility 177 Enabling Hibernation 177 Setting user passwords 178 Using an instant password 179 Setting a user password 180 Disabling a user...

User Guide
Page 33
Cooling vents Network port Modem port USB 2.0 ports-The USB (Universal Serial Bus) ports provide a connection for peripherals such as a standard television set. USB 2.0 peripherals have everything 33 Video-out port DC IN USB 2.0 ports Parallel port RGB (monitor) port _ + DC IN-Lets you plug in the AC adapter. DEFINITION: USB 2.0 is a peripheral expansion standard that components may be plugged and unplugged while the computer is on. USB 2.0 allows "hot swapping" of peripherals...
Cooling vents Network port Modem port USB 2.0 ports-The USB (Universal Serial Bus) ports provide a connection for peripherals such as a standard television set. USB 2.0 peripherals have everything 33 Video-out port DC IN USB 2.0 ports Parallel port RGB (monitor) port _ + DC IN-Lets you plug in the AC adapter. DEFINITION: USB 2.0 is a peripheral expansion standard that components may be plugged and unplugged while the computer is on. USB 2.0 allows "hot swapping" of peripherals...
User Guide
Page 35
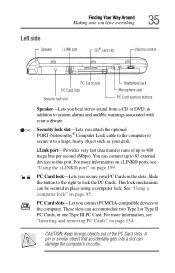
...; card slot Volume control PC Card slots PC Card lock Security lock slot Headphone jack Microphone jack PC Card ejection buttons Speaker-Lets you hear stereo sound from a CD or DVD, in addition to lock the PC Cards. Slide the button to the right to system alarms and audible warnings associated with your software. PC Card slots-Let you connect PCMCIA-compatible devices to this port. You can be secured in the slots. This lock mechanism can connect up...
...; card slot Volume control PC Card slots PC Card lock Security lock slot Headphone jack Microphone jack PC Card ejection buttons Speaker-Lets you hear stereo sound from a CD or DVD, in addition to lock the PC Cards. Slide the button to the right to system alarms and audible warnings associated with your software. PC Card slots-Let you connect PCMCIA-compatible devices to this port. You can be secured in the slots. This lock mechanism can connect up...
User Guide
Page 39
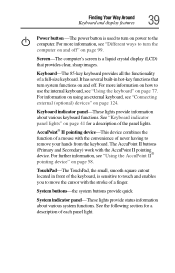
... "Connecting external (optional) devices" on page 124. For more information on how to remove your hands from the keyboard. Screen-The computer's screen is sensitive to touch and enables you to the computer. System buttons-the system buttons provide quick System indicator panel-These lights provide status information about various keyboard functions. TouchPad-The TouchPad, the small, smooth square cutout located in hot-key functions that provides clear, sharp images. For information on using an external keyboard, see "Using...
... "Connecting external (optional) devices" on page 124. For more information on how to remove your hands from the keyboard. Screen-The computer's screen is sensitive to touch and enables you to the computer. System buttons-the system buttons provide quick System indicator panel-These lights provide status information about various keyboard functions. TouchPad-The TouchPad, the small, smooth square cutout located in hot-key functions that provides clear, sharp images. For information on using an external keyboard, see "Using...
User Guide
Page 53
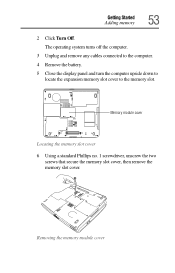
Getting Started Adding memory 53 2 Click Turn Off. The operating system turns off the computer. 3 Unplug and remove any cables connected to the computer. 4 Remove the battery. 5 Close the display panel and turn the computer upside down to locate the expansion memory slot cover to the memory slot. Memory module cover Locating the memory slot cover 6 Using a standard Phillips no. 1 screwdriver, unscrew the two screws that secure the memory slot cover, then remove the memory slot cover. Removing the memory module cover
Getting Started Adding memory 53 2 Click Turn Off. The operating system turns off the computer. 3 Unplug and remove any cables connected to the computer. 4 Remove the battery. 5 Close the display panel and turn the computer upside down to locate the expansion memory slot cover to the memory slot. Memory module cover Locating the memory slot cover 6 Using a standard Phillips no. 1 screwdriver, unscrew the two screws that secure the memory slot cover, then remove the memory slot cover. Removing the memory module cover
User Guide
Page 55
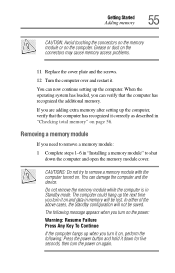
... configuration will be saved. The computer could hang up when you are adding extra memory after setting up the computer. The following message appears when you turn it down the computer and open the memory module cover. Removing a memory module If you turn on the power: Warning: Resume Failure Press Any Key To Continue If the computer hangs up the next time you need to remove a memory module...
... configuration will be saved. The computer could hang up when you are adding extra memory after setting up the computer. The following message appears when you turn it down the computer and open the memory module cover. Removing a memory module If you turn on the power: Warning: Resume Failure Press Any Key To Continue If the computer hangs up the next time you need to remove a memory module...
User Guide
Page 116
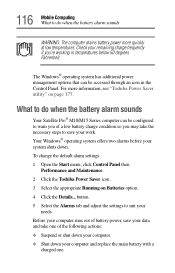
... Satellite Pro® M10/M15 Series computer can be configured to warn you of a low battery charge condition so you 're working in the Control Panel. Check your remaining charge frequently if you may take one . To change the default alarm settings: 1 Open the Start menu, click Control Panel then Performance and Maintenance. 2 Click the Toshiba Power Saver icon. 3 Select the appropriate Running on page 177. button. 5 Select the Alarms tab and adjust the settings...
... Satellite Pro® M10/M15 Series computer can be configured to warn you of a low battery charge condition so you 're working in the Control Panel. Check your remaining charge frequently if you may take one . To change the default alarm settings: 1 Open the Start menu, click Control Panel then Performance and Maintenance. 2 Click the Toshiba Power Saver icon. 3 Select the appropriate Running on page 177. button. 5 Select the Alarms tab and adjust the settings...
User Guide
Page 206
Unless a hardware device has failed, problems usually occur when you experience any of these problems, use the options in the Startup menu to continue. For more information, see "Power and the batteries" on page 213. If pressing any key to fix the problem. If there is no diskette in some way such as installing a new program or adding a device. For example: ❖ The operating system fails to start after...
Unless a hardware device has failed, problems usually occur when you experience any of these problems, use the options in the Startup menu to continue. For more information, see "Power and the batteries" on page 213. If pressing any key to fix the problem. If there is no diskette in some way such as installing a new program or adding a device. For example: ❖ The operating system fails to start after...
User Guide
Page 215
.... Display problems Here are using the Power Management utility. All these conditions affect how long the charge lasts. Refer to begin with your software using the hard disk more keyboard error messages. Is your computer. If you added a device, such as a PC Card or memory module, that the program does not assign different meanings to activate the screen. If the numeric keypad or cursor control light is on . Press any key to...
.... Display problems Here are using the Power Management utility. All these conditions affect how long the charge lasts. Refer to begin with your software using the hard disk more keyboard error messages. Is your computer. If you added a device, such as a PC Card or memory module, that the program does not assign different meanings to activate the screen. If the numeric keypad or cursor control light is on . Press any key to...
User Guide
Page 216
... pops up. If you to continue working power outlet. ❖ Check that the cable connecting the external monitor to the computer is firmly attached. ❖ Try adjusting the contrast and brightness controls on . ❖ Check that the monitor is not set for the built-in screen. The Settings tab allows you are using the built-in screen flickers. To change the display settings by clicking a blank area of...
... pops up. If you to continue working power outlet. ❖ Check that the cable connecting the external monitor to the computer is firmly attached. ❖ Try adjusting the contrast and brightness controls on . ❖ Check that the monitor is not set for the built-in screen. The Settings tab allows you are using the built-in screen flickers. To change the display settings by clicking a blank area of...
User Guide
Page 225
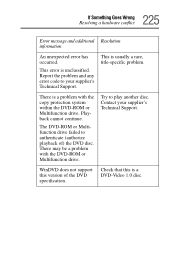
... the DVD-ROM or Multifunction drive. Check that this version of ) the DVD disc. Playback cannot continue. Contact your supplier's Technical Support. This error is usually a rare, title-specific problem. Try to your supplier's Technical Support. This is unclassified. 225 If Something Goes Wrong Resolving a hardware conflict Error message and additional Resolution information An unexpected error has occurred. Report the problem and any error code to...
... the DVD-ROM or Multifunction drive. Check that this version of ) the DVD disc. Playback cannot continue. Contact your supplier's Technical Support. This error is usually a rare, title-specific problem. Try to your supplier's Technical Support. This is unclassified. 225 If Something Goes Wrong Resolving a hardware conflict Error message and additional Resolution information An unexpected error has occurred. Report the problem and any error code to...
User Guide
Page 246
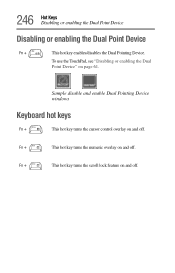
Fn + This hot key turns the numeric overlay on and off. Sample disable and enable Dual Pointing Device windows Keyboard hot keys Fn + This hot key turns the cursor control overlay on and off . Fn + This hot key turns the scroll lock feature on page 61. 246 Hot Keys Disabling or enabling the Dual Point Device Disabling or enabling the Dual Point Device Fn + This hot key enables/disables the Dual Pointing Device. To use the TouchPad, see "Disabling or enabling the Dual Point Device" on and off .
Fn + This hot key turns the numeric overlay on and off. Sample disable and enable Dual Pointing Device windows Keyboard hot keys Fn + This hot key turns the cursor control overlay on and off . Fn + This hot key turns the scroll lock feature on page 61. 246 Hot Keys Disabling or enabling the Dual Point Device Disabling or enabling the Dual Point Device Fn + This hot key enables/disables the Dual Pointing Device. To use the TouchPad, see "Disabling or enabling the Dual Point Device" on and off .

User Guide
Page 264
... unlocking 117 battery alarms 116 battery pack 37 battery power displaying remaining 114 monitoring 113 battery release 36 battery, light 40 Bluetooth modules inserting and removing 157 Bluetooth power switch 32 button power 39, 57 start 135 buttons Internet 42 one-touch TV out 42 TOSHIBA Console 42 TV out 42 C CD creating 147 playing an audio 146 playing using Auto-Run 147 CDs problem solving 220 channels DMA 210 IRQ 210 character keys 77 charging the battery 51 checking device...
... unlocking 117 battery alarms 116 battery pack 37 battery power displaying remaining 114 monitoring 113 battery release 36 battery, light 40 Bluetooth modules inserting and removing 157 Bluetooth power switch 32 button power 39, 57 start 135 buttons Internet 42 one-touch TV out 42 TOSHIBA Console 42 TV out 42 C CD creating 147 playing an audio 146 playing using Auto-Run 147 CDs problem solving 220 channels DMA 210 IRQ 210 character keys 77 charging the battery 51 checking device...

User Guide
Page 265
... 219 missing files/trouble accessing a disk 218 running slow 218 diskette drive can't insert a diskette 219 can't read a diskette 219 connecting 72 external, connecting 72 display doesn't look normal/flickers 216 external monitor not working 217 LCD 39 screen is blank 215 display device connecting 65 external 65 video 65 display features 37 display latch 32 display modes hot key 244 display output settings 67 display panel closing 64 opening 32, 37 display panel, closed, front 32 display panel, open, front 37 display, external adjusting 68 disposal...
... 219 missing files/trouble accessing a disk 218 running slow 218 diskette drive can't insert a diskette 219 can't read a diskette 219 connecting 72 external, connecting 72 display doesn't look normal/flickers 216 external monitor not working 217 LCD 39 screen is blank 215 display device connecting 65 external 65 video 65 display features 37 display latch 32 display modes hot key 244 display output settings 67 display panel closing 64 opening 32, 37 display panel, closed, front 32 display panel, open, front 37 display, external adjusting 68 disposal...
User Guide
Page 268
... problem solving 232 resetting port to default settings 137 upgrading 137 modem port 34 module battery 37 memory 37 modules Wi-Fi Mini PC 131 monitor 33, 65 connecting 65, 67 external connecting 124 not working 216 mouse installing 70 serial 70 using 125 N network 169 accessing 139 Dial-Up Networking Wizard 139 network port 34 networking wireless 139 numlock light 41 O office computing 123 on/off light 40 opening the display panel 57 optional devices 123 LapLink cable 136 other documentation 30 overlay keys 79 P panel, keyboard indicator...
... problem solving 232 resetting port to default settings 137 upgrading 137 modem port 34 module battery 37 memory 37 modules Wi-Fi Mini PC 131 monitor 33, 65 connecting 65, 67 external connecting 124 not working 216 mouse installing 70 serial 70 using 125 N network 169 accessing 139 Dial-Up Networking Wizard 139 network port 34 networking wireless 139 numlock light 41 O office computing 123 on/off light 40 opening the display panel 57 optional devices 123 LapLink cable 136 other documentation 30 overlay keys 79 P panel, keyboard indicator...
User Guide
Page 271
... setting hard disk drive passwords 184 security lock slot 35 selecting a place to work 43 SelectServ 30 service options 30 setting up adding memory 52 computer 52 setting up a connection 139 setting up your computer 48 shutting down more quickly 101 Slim SelectBay removing module 152 Slim SelectBay indicator light 41 Slim SelectBay modules 150 Slim SelectBay release 37 Slim SelectBay slot 37 slot PC Card 35 SD card 36 Slim SelectBay 37 sound problem solving 227 sound...
... setting hard disk drive passwords 184 security lock slot 35 selecting a place to work 43 SelectServ 30 service options 30 setting up adding memory 52 computer 52 setting up a connection 139 setting up your computer 48 shutting down more quickly 101 Slim SelectBay removing module 152 Slim SelectBay indicator light 41 Slim SelectBay modules 150 Slim SelectBay release 37 Slim SelectBay slot 37 slot PC Card 35 SD card 36 Slim SelectBay 37 sound problem solving 227 sound...


