User Guide
Page 5
... to the telephone network, the telephone company may request that temporary discontinuance of service may occasionally be necessary for repair or limited warranty information, please contact Toshiba Corporation, Toshiba America Information Systems, Inc. Disconnection If you disconnect the equipment until the problem is resolved. For earlier products, the REN is to provide you to make changes in writing...
... to the telephone network, the telephone company may request that temporary discontinuance of service may occasionally be necessary for repair or limited warranty information, please contact Toshiba Corporation, Toshiba America Information Systems, Inc. Disconnection If you disconnect the equipment until the problem is resolved. For earlier products, the REN is to provide you to make changes in writing...
User Guide
Page 27
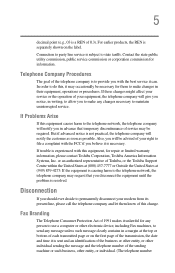
... Opening the display panel 51 Your computer's features and specifications ....52 Turning on the power 52 Adding memory (optional 53 Installing a memory module 54 Removing a memory module 59 Using the Dual Mode Pad 61 Scrolling with the Dual Mode Pad 62 Using the Control buttons 63 Using Tap Zones 63 Using the Virtual Buttons 63 Disabling or enabling the Dual Mode Pad .........65 Using external display devices 65 Directing the display output when you turn on the computer 66 Adjusting the quality of the external display......68 Using an external keyboard 68 Using a mouse...
... Opening the display panel 51 Your computer's features and specifications ....52 Turning on the power 52 Adding memory (optional 53 Installing a memory module 54 Removing a memory module 59 Using the Dual Mode Pad 61 Scrolling with the Dual Mode Pad 62 Using the Control buttons 63 Using Tap Zones 63 Using the Virtual Buttons 63 Disabling or enabling the Dual Mode Pad .........65 Using external display devices 65 Directing the display output when you turn on the computer 66 Adjusting the quality of the external display......68 Using an external keyboard 68 Using a mouse...

User Guide
Page 46
... memory (see "Adding memory (optional)" on page 53). ❖ Connect a mouse (see "Using a mouse" on page 68). ❖ Connect a full-size keyboard (see "Using an external keyboard" on page 68). ❖ Connect an external monitor (see "Using external display devices" on page 65). ❖ Connect a local printer (see "Connecting a printer" on page 69). ❖ Connect an external CD/DVD drive (see "Using the Optical Drive" on page 92). ❖ Install PC Cards (see "Using PC Cards" on page 44. After starting your software...
... memory (see "Adding memory (optional)" on page 53). ❖ Connect a mouse (see "Using a mouse" on page 68). ❖ Connect a full-size keyboard (see "Using an external keyboard" on page 68). ❖ Connect an external monitor (see "Using external display devices" on page 65). ❖ Connect a local printer (see "Connecting a printer" on page 69). ❖ Connect an external CD/DVD drive (see "Using the Optical Drive" on page 92). ❖ Install PC Cards (see "Using PC Cards" on page 44. After starting your software...
User Guide
Page 54
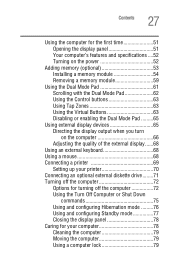
... memory module slots on the base of the computer. If this procedure. You will need a standard Phillips screwdriver for a long time, the memory module will be installed in good condition. Installing a memory module Additional memory modules can install one or two memory modules. You can be lost. Installing a memory module with the computer's power on page 44. 54 Getting Started Adding memory (optional) NOTE Before adding external devices or memory, Toshiba recommends setting up your software. Before you replace...
... memory module slots on the base of the computer. If this procedure. You will need a standard Phillips screwdriver for a long time, the memory module will be installed in good condition. Installing a memory module Additional memory modules can install one or two memory modules. You can be lost. Installing a memory module with the computer's power on page 44. 54 Getting Started Adding memory (optional) NOTE Before adding external devices or memory, Toshiba recommends setting up your software. Before you replace...
User Guide
Page 56
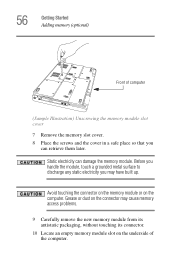
... on the underside of computer (Sample Illustration) Unscrewing the memory module slot cover 7 Remove the memory slot cover. 8 Place the screws and the cover in a safe place so that you may cause memory access problems. 9 Carefully remove the new memory module from its antistatic packaging, without touching its connector. 10 Locate an empty memory module slot on the computer. 56 Getting Started Adding memory (optional) Front of the computer. Grease or dust on the connector...
... on the underside of computer (Sample Illustration) Unscrewing the memory module slot cover 7 Remove the memory slot cover. 8 Place the screws and the cover in a safe place so that you may cause memory access problems. 9 Carefully remove the new memory module from its antistatic packaging, without touching its connector. 10 Locate an empty memory module slot on the computer. 56 Getting Started Adding memory (optional) Front of the computer. Grease or dust on the connector...
User Guide
Page 59
... has recognized it using the screws. 15 Re-insert the main battery. Removing a memory module If you are adding an extra memory module after setting up the computer. Getting Started Adding memory (optional) 59 14 Replace the memory module slot cover and secure it correctly as described in "Installing a memory module" on page 54 to work. If you need to remove a memory module: 1 Complete steps 1-8 in "Checking total memory" on page 115. 16 Turn the computer...
... has recognized it using the screws. 15 Re-insert the main battery. Removing a memory module If you are adding an extra memory module after setting up the computer. Getting Started Adding memory (optional) 59 14 Replace the memory module slot cover and secure it correctly as described in "Installing a memory module" on page 54 to work. If you need to remove a memory module: 1 Complete steps 1-8 in "Checking total memory" on page 115. 16 Turn the computer...
User Guide
Page 61
... on inserting the main battery, see "Changing the main battery" on the Dual Mode Pad in front of the keyboard, is inserted completely into the socket and lined up . 7 Reconnect the cables. 8 Restart the computer. Getting Started Using the Dual Mode Pad 61 4 Replace the memory module slot cover and tighten the screws. 5 Re-insert the main battery. To do this: 1 Click Start, Control Panel, Performance and Maintenance, and then System...
... on inserting the main battery, see "Changing the main battery" on the Dual Mode Pad in front of the keyboard, is inserted completely into the socket and lined up . 7 Reconnect the cables. 8 Restart the computer. Getting Started Using the Dual Mode Pad 61 4 Replace the memory module slot cover and tighten the screws. 5 Re-insert the main battery. To do this: 1 Click Start, Control Panel, Performance and Maintenance, and then System...
User Guide
Page 65
... be used to the available video ports: ❖ An external monitor or projector via the RGB (monitor) port. The Control Panel window appears. 2 Click Printers and Other Hardware. 3 Click Mouse Properties. NOTE The Fn + F9 shortcut can also connect an external display device to disable or enable the Dual Mode Pad (see "Disabling or enabling the Dual Mode Pad" on page 227). To change the Dual Mode Pad setting: 1 Click Start, Control Panel. The Mouse Properties window closes. 8 Close the Printers and Other Hardware window...
... be used to the available video ports: ❖ An external monitor or projector via the RGB (monitor) port. The Control Panel window appears. 2 Click Printers and Other Hardware. 3 Click Mouse Properties. NOTE The Fn + F9 shortcut can also connect an external display device to disable or enable the Dual Mode Pad (see "Disabling or enabling the Dual Mode Pad" on page 227). To change the Dual Mode Pad setting: 1 Click Start, Control Panel. The Mouse Properties window closes. 8 Close the Printers and Other Hardware window...
User Guide
Page 84
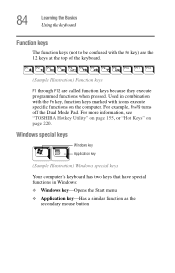
... function keys because they execute programmed functions when pressed. 84 Learning the Basics Using the keyboard Function keys The function keys (not to be confused with icons execute specific functions on page 220. Used in Windows: ❖ Windows key-Opens the Start menu ❖ Application key-Has a similar function as the secondary mouse button For more information, see "TOSHIBA Hotkey Utility" on page 155, or "Hot Keys" on the computer. For example, Fn+F9 turns off the Dual Mode Pad...
... function keys because they execute programmed functions when pressed. 84 Learning the Basics Using the keyboard Function keys The function keys (not to be confused with icons execute specific functions on page 220. Used in Windows: ❖ Windows key-Opens the Start menu ❖ Application key-Has a similar function as the secondary mouse button For more information, see "TOSHIBA Hotkey Utility" on page 155, or "Hot Keys" on the computer. For example, Fn+F9 turns off the Dual Mode Pad...
User Guide
Page 153
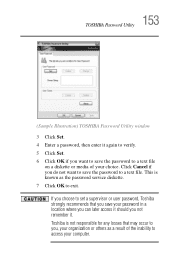
... you choose to set a supervisor or user password, Toshiba strongly recommends that may occur to you do not want to save the password to a text file on a diskette or media of the inability to access your computer. 153 TOSHIBA Password Utility (Sample Illustration) TOSHIBA Password Utility window 3 Click Set. 4 Enter a password, then enter it . Toshiba is known as a result of your password in a location where you can later access it should you...
... you choose to set a supervisor or user password, Toshiba strongly recommends that may occur to you do not want to save the password to a text file on a diskette or media of the inability to access your computer. 153 TOSHIBA Password Utility (Sample Illustration) TOSHIBA Password Utility window 3 Click Set. 4 Enter a password, then enter it . Toshiba is known as a result of your password in a location where you can later access it should you...
User Guide
Page 180
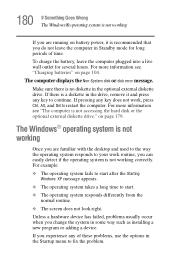
... screen does not look right. on battery power, it is recommended that you do not leave the computer in Standby mode for several hours. If you experience any key does not work routine, you change the system in the optional external diskette drive. The computer displays the Non-System disk or disk error message. If there is a diskette in the Startup menu to start after the Starting Windows XP...
... screen does not look right. on battery power, it is recommended that you do not leave the computer in Standby mode for several hours. If you experience any key does not work routine, you change the system in the optional external diskette drive. The computer displays the Non-System disk or disk error message. If there is a diskette in the Startup menu to start after the Starting Windows XP...
User Guide
Page 191
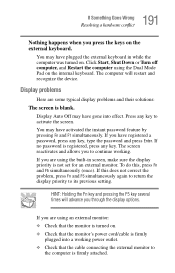
... a working . Click Start, Shut Down or Turn off computer, and Restart the computer using the Dual Mode Pad on the external keyboard. Press any key, type the password and press Enter. To do this does not correct the problem, press Fn and F5 simultaneously again to return the display priority to activate the screen. The screen reactivates and allows you to the computer is not set for an external monitor...
... a working . Click Start, Shut Down or Turn off computer, and Restart the computer using the Dual Mode Pad on the external keyboard. Press any key, type the password and press Enter. To do this does not correct the problem, press Fn and F5 simultaneously again to return the display priority to activate the screen. The screen reactivates and allows you to the computer is not set for an external monitor...
User Guide
Page 206
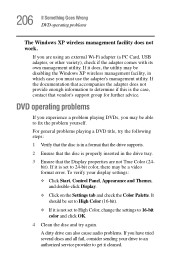
... Start, Control Panel, Appearance and Themes, and double-click Display. ❖ Click on the Settings tab and check the Color Palette. A dirty drive can also cause audio problems. If you may be able to get it is the case, contact that the Display properties are using an external Wi-Fi adapter (a PC Card, USB adapter, or other variety), check if the adapter comes with its own management utility...
... Start, Control Panel, Appearance and Themes, and double-click Display. ❖ Click on the Settings tab and check the Color Palette. A dirty drive can also cause audio problems. If you may be able to get it is the case, contact that the Display properties are using an external Wi-Fi adapter (a PC Card, USB adapter, or other variety), check if the adapter comes with its own management utility...
User Guide
Page 231
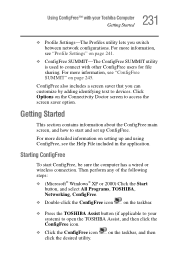
... network configurations. Click Options on the taskbar, and then Getting Started This section contains information about the ConfigFree main screen, and how to open the TOSHIBA Assist, and then click the ConfigFree icon. ❖ Click the ConfigFree icon click the desired utility. on the Connectivity Doctor screen to devices. For more information, see "Profile Settings" on the taskbar. ❖ Press the TOSHIBA Assist button...
... network configurations. Click Options on the taskbar, and then Getting Started This section contains information about the ConfigFree main screen, and how to open the TOSHIBA Assist, and then click the ConfigFree icon. ❖ Click the ConfigFree icon click the desired utility. on the Connectivity Doctor screen to devices. For more information, see "Profile Settings" on the taskbar. ❖ Press the TOSHIBA Assist button...
User Guide
Page 262
... key can set system options or control system parameters, such as drive C. A storage device composed of a rigid platter or platters that saves to which certain keys in the circuit. The physical components of reference for voltages in combination with the computer's operating system. When you turn on the keyboard. function keys - By default, the hard disk is returned to as the battery save mode. (2) A key or combination of keys...
... key can set system options or control system parameters, such as drive C. A storage device composed of a rigid platter or platters that saves to which certain keys in the circuit. The physical components of reference for voltages in combination with the computer's operating system. When you turn on the keyboard. function keys - By default, the hard disk is returned to as the battery save mode. (2) A key or combination of keys...
User Guide
Page 269
... memory 53 adding external devices 46 adding memory 53 adjusting recording quality 134 Alt keys 83 audio .wav files 133 audio features 133 Auto-Run 97 B backing up files 82 battery changing 113 charge indicator light 106 charge not lasting 189 charging 50 conserving power 111 disposal 118 low charge 109 monitoring power 106 not charging 189 power schemes hot key 113 power usage mode 223 real-time clock (RTC) 103 removing 114 BIOS Setup see TOSHIBA Hardware Setup Bridge Media slot 140 button power...
... memory 53 adding external devices 46 adding memory 53 adjusting recording quality 134 Alt keys 83 audio .wav files 133 audio features 133 Auto-Run 97 B backing up files 82 battery changing 113 charge indicator light 106 charge not lasting 189 charging 50 conserving power 111 disposal 118 low charge 109 monitoring power 106 not charging 189 power schemes hot key 113 power usage mode 223 real-time clock (RTC) 103 removing 114 BIOS Setup see TOSHIBA Hardware Setup Bridge Media slot 140 button power...
User Guide
Page 270
... drive cannot insert a diskette 195 cannot read a diskette 195 connecting 71 external, connecting 71 display does not look normal/flickers 192 external monitor not working 193 screen is blank 191 display device external 65 display output settings 66 display, external adjusting 68 disposal information 25 disposing of used batteries 118 DMA (Direct Memory Access) 184 double-click 63 drive in-use indicator light 93 Drive light 41 Drive-in-use light 72 DVD player general problems 206 DVD-ROM drive problems 196 troubleshooting 196 DVD-ROM/multi-function drive problems 196 DVI video port...
... drive cannot insert a diskette 195 cannot read a diskette 195 connecting 71 external, connecting 71 display does not look normal/flickers 192 external monitor not working 193 screen is blank 191 display device external 65 display output settings 66 display, external adjusting 68 disposal information 25 disposing of used batteries 118 DMA (Direct Memory Access) 184 double-click 63 drive in-use indicator light 93 Drive light 41 Drive-in-use light 72 DVD player general problems 206 DVD-ROM drive problems 196 troubleshooting 196 DVD-ROM/multi-function drive problems 196 DVI video port...
User Guide
Page 271
... 90 restoring 92 saving 88 fingerprint enrollment 163 Fingerprint Authentication Utility 163 Fn keys 83 function keys 84 H hard disk light 72 hardware conflicts 183 resolving 185 headphones using 135 Help and Support Windows XP 182 Hibernation mode 73 configuring 76 starting again from 77 hot key display brightness 227 display modes 226 Hibernation mode 225 instant password security 221 keyboard 227 keyboard overlays 228 password security 221 power usage 223 power usage mode 223 Standby mode 224 volume mute 220 hot key power...
... 90 restoring 92 saving 88 fingerprint enrollment 163 Fingerprint Authentication Utility 163 Fn keys 83 function keys 84 H hard disk light 72 hardware conflicts 183 resolving 185 headphones using 135 Help and Support Windows XP 182 Hibernation mode 73 configuring 76 starting again from 77 hot key display brightness 227 display modes 226 Hibernation mode 225 instant password security 221 keyboard 227 keyboard overlays 228 password security 221 power usage 223 power usage mode 223 Standby mode 224 volume mute 220 hot key power...
User Guide
Page 272
... K keyboard character keys 83 function keys 84 hot keys 228 not working 179 troubleshooting 190 keyboard, external 68 keyboard, PS/2-compatible 68 L light drive in-use indicator 93 M main battery removing 114 Main battery light 49 memory adding 53 problem solving 187 removing expansion slot cover 56 memory module installation 54 removing 60 microphone 133 modem determining COM port 125 problem solving 202 resetting port to default settings 125 upgrading 125 modem default 125 monitor 65 connecting 66 not working 191 mouse installing 68 serial 68 N network 127 accessing 127 networking wireless...
... K keyboard character keys 83 function keys 84 hot keys 228 not working 179 troubleshooting 190 keyboard, external 68 keyboard, PS/2-compatible 68 L light drive in-use indicator 93 M main battery removing 114 Main battery light 49 memory adding 53 problem solving 187 removing expansion slot cover 56 memory module installation 54 removing 60 microphone 133 modem determining COM port 125 problem solving 202 resetting port to default settings 125 upgrading 125 modem default 125 monitor 65 connecting 66 not working 191 mouse installing 68 serial 68 N network 127 accessing 127 networking wireless...
User Guide
Page 273
... O opening the display panel 51 other documentation 37 P password deleting a supervisor 150 disabling a user 152 supervisor set up 150 types 149 passwords instant, using 149 setting 149 PC Card checklist 198 CIS (Card Information Structure) 198 computer stops working 199 configuring 138 errors 200 hot swapping fails 200 inserting 137 not recognized 200 problem solving 197, 199 removing 138, 140 setting up 138 Plug and Play 184 port COM 125 Ethernet LAN...
... O opening the display panel 51 other documentation 37 P password deleting a supervisor 150 disabling a user 152 supervisor set up 150 types 149 passwords instant, using 149 setting 149 PC Card checklist 198 CIS (Card Information Structure) 198 computer stops working 199 configuring 138 errors 200 hot swapping fails 200 inserting 137 not recognized 200 problem solving 197, 199 removing 138, 140 setting up 138 Plug and Play 184 port COM 125 Ethernet LAN...


