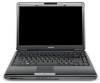

User Manual
Page 2
... THAT OPERATION OF THE PRODUCT WILL BE UNINTERRUPTED OR ERROR FREE. IF YOUR DATA IS ALTERED OR LOST DUE TO ANY TROUBLE, FAILURE OR MALFUNCTION OF THE HARD DISK DRIVE OR OTHER STORAGE DEVICES AND THE DATA CANNOT BE RECOVERED, TOSHIBA SHALL NOT BE LIABLE FOR ANY DAMAGE OR LOSS OF DATA, OR ANY OTHER DAMAGE RESULTING THEREFROM. Model: Satellite® M300 Series Recordable...
... THAT OPERATION OF THE PRODUCT WILL BE UNINTERRUPTED OR ERROR FREE. IF YOUR DATA IS ALTERED OR LOST DUE TO ANY TROUBLE, FAILURE OR MALFUNCTION OF THE HARD DISK DRIVE OR OTHER STORAGE DEVICES AND THE DATA CANNOT BE RECOVERED, TOSHIBA SHALL NOT BE LIABLE FOR ANY DAMAGE OR LOSS OF DATA, OR ANY OTHER DAMAGE RESULTING THEREFROM. Model: Satellite® M300 Series Recordable...
User Manual
Page 5
... decide to permanently disconnect your fax transmission, refer to the fax software instructions installed on this computer. 5 Connection to party line service is resolved. If these changes might affect your service or the operation of 1991 makes it unlawful for which charges exceed local or long-distance transmission charges.) In order to program this information into your modem from its present line...
... decide to permanently disconnect your fax transmission, refer to the fax software instructions installed on this computer. 5 Connection to party line service is resolved. If these changes might affect your service or the operation of 1991 makes it unlawful for which charges exceed local or long-distance transmission charges.) In order to program this information into your modem from its present line...

User Manual
Page 28
... time 48 Opening the display panel 48 Your computer's features and specifications ....49 Turning on the power 49 Adding memory (optional 50 Installing a memory module 51 Removing a memory module 56 Checking total memory 58 Using the TouchPad 59 Scrolling with the TouchPad 60 Control buttons 60 Disabling or enabling the TouchPad 60 Using external display devices 60 Directing the display output when you turn on the computer 61 Adjusting the quality of the external display......62 Using an external keyboard 62 Using a mouse 62 Connecting a printer 62 Setting up a printer...
... time 48 Opening the display panel 48 Your computer's features and specifications ....49 Turning on the power 49 Adding memory (optional 50 Installing a memory module 51 Removing a memory module 56 Checking total memory 58 Using the TouchPad 59 Scrolling with the TouchPad 60 Control buttons 60 Disabling or enabling the TouchPad 60 Using external display devices 60 Directing the display output when you turn on the computer 61 Adjusting the quality of the external display......62 Using an external keyboard 62 Using a mouse 62 Connecting a printer 62 Setting up a printer...

User Manual
Page 51
.... Avoid touching the cover, the module, and the surrounding area before replacing it must be installed, it . Before you install or remove a memory module while the computer is in Sleep or Hibernation mode, data will need a small Phillips screwdriver for this model Slot A is the bottom slot. If you install or remove a memory module, turn off the computer using the Start menu. The computer has two memory slots-Slot A and Slot B. Getting Started Adding memory (optional) 51 Installing a memory module Memory modules can install one memory module is...
.... Avoid touching the cover, the module, and the surrounding area before replacing it must be installed, it . Before you install or remove a memory module while the computer is in Sleep or Hibernation mode, data will need a small Phillips screwdriver for this model Slot A is the bottom slot. If you install or remove a memory module, turn off the computer using the Start menu. The computer has two memory slots-Slot A and Slot B. Getting Started Adding memory (optional) 51 Installing a memory module Memory modules can install one memory module is...

User Manual
Page 53
... electricity you may cause memory access problems. 9 Carefully remove the new memory module from its antistatic packaging, without touching its connector. 10 Locate an empty memory module slot on the underside of the computer. Getting Started Adding memory (optional) 53 6 Using a small Phillips screwdriver, loosen the captive screws that you must remove a module by performing steps 2-3 of "Removing a memory module" on page 56. Avoid touching the connector on the memory module or on the...
... electricity you may cause memory access problems. 9 Carefully remove the new memory module from its antistatic packaging, without touching its connector. 10 Locate an empty memory module slot on the underside of the computer. Getting Started Adding memory (optional) 53 6 Using a small Phillips screwdriver, loosen the captive screws that you must remove a module by performing steps 2-3 of "Removing a memory module" on page 56. Avoid touching the connector on the memory module or on the...

User Manual
Page 56
... operating system has loaded, you need to shut down the computer and open the memory module slot cover. If you turn it using the screws. 15 Re-insert the main battery. For more information on inserting the main battery, see "Inserting a charged battery" on and data in Sleep or Hibernation mode. You can damage the computer and the memory module. In either of the above cases, the Sleep configuration...
... operating system has loaded, you need to shut down the computer and open the memory module slot cover. If you turn it using the screws. 15 Re-insert the main battery. For more information on inserting the main battery, see "Inserting a charged battery" on and data in Sleep or Hibernation mode. You can damage the computer and the memory module. In either of the above cases, the Sleep configuration...

User Manual
Page 58
...) Removing the memory module 4 Replace the memory module slot cover and secure it using the screws. 5 Re-insert the main battery. For more information on inserting the main battery, see "Inserting a charged battery" on page 107. 6 Turn the computer right side up. 7 Reconnect the cables. 8 Restart the computer. To do this: 1 Click Start, Control Panel, and then System. 58 Getting Started Adding memory (optional) 3 Gently lift the memory module to work. Checking total memory When...
...) Removing the memory module 4 Replace the memory module slot cover and secure it using the screws. 5 Re-insert the main battery. For more information on inserting the main battery, see "Inserting a charged battery" on page 107. 6 Turn the computer right side up. 7 Reconnect the cables. 8 Restart the computer. To do this: 1 Click Start, Control Panel, and then System. 58 Getting Started Adding memory (optional) 3 Gently lift the memory module to work. Checking total memory When...

User Manual
Page 59
... and lined up that the module is sensitive to touch and enables you to continue." If unsure, cancel and try again. Getting Started Using the TouchPad™ 59 If the computer does not recognize the memory configuration, turn off the computer and remove the memory module slot cover (complete steps 1-8 in "Installing a memory module" on page 51), and then check that says, "Windows® needs your permission to move...
... and lined up that the module is sensitive to touch and enables you to continue." If unsure, cancel and try again. Getting Started Using the TouchPad™ 59 If the computer does not recognize the memory configuration, turn off the computer and remove the memory module slot cover (complete steps 1-8 in "Installing a memory module" on page 51), and then check that says, "Windows® needs your permission to move...

User Manual
Page 60
... the right mouse button ("right-clicking"). To change the enable/disable TouchPad setting, press Fn + F9. To do this: 1 Connect the monitor's video cable to your finger up or down along the bottom edge of the TouchPad. Connecting an external monitor or projector You can also connect an external monitor or projector via the RGB (monitor) port. Disabling or enabling the TouchPad™ The TouchPad™ is enabled by default. Control buttons When a step instructs you need a larger screen. To scroll vertically...
... the right mouse button ("right-clicking"). To change the enable/disable TouchPad setting, press Fn + F9. To do this: 1 Connect the monitor's video cable to your finger up or down along the bottom edge of the TouchPad. Connecting an external monitor or projector You can also connect an external monitor or projector via the RGB (monitor) port. Disabling or enabling the TouchPad™ The TouchPad™ is enabled by default. Control buttons When a step instructs you need a larger screen. To scroll vertically...

User Manual
Page 142
... using the "USB Sleep and Charge function." ❖ External devices connected to the USB bus power (DC 5V) function that interfaces with their own chargers. For normal use . ❖ Using the "USB Sleep and Charge function" to charge external devices will take longer than charging the devices with the power ON/OFF of the computer may always be in your bag. 142 Utilities TOSHIBA Hardware Setup NOTE ❖ The "USB Sleep and Charge function" only works for compatible ports. ❖ When "USB Sleep and Charge function" is Enabled, USB...
... using the "USB Sleep and Charge function." ❖ External devices connected to the USB bus power (DC 5V) function that interfaces with their own chargers. For normal use . ❖ Using the "USB Sleep and Charge function" to charge external devices will take longer than charging the devices with the power ON/OFF of the computer may always be in your bag. 142 Utilities TOSHIBA Hardware Setup NOTE ❖ The "USB Sleep and Charge function" only works for compatible ports. ❖ When "USB Sleep and Charge function" is Enabled, USB...

User Manual
Page 143
... settings the "USB Wakeup function" will become default settings when you restart your system. Enables the function Disabled (Default) -- When "USB Sleep and Charge function" is in Sleep Mode. NOTE "USB Wakeup function" will not be supplied if the computer is in the dialog boxes and clicking Apply, you want to use this happens, change it to Mode-2. Any options that function. Some external devices may not be displayed on the external devices connected to the USB ports. The Wakeup setting (function...
... settings the "USB Wakeup function" will become default settings when you restart your system. Enables the function Disabled (Default) -- When "USB Sleep and Charge function" is in Sleep Mode. NOTE "USB Wakeup function" will not be supplied if the computer is in the dialog boxes and clicking Apply, you want to use this happens, change it to Mode-2. Any options that function. Some external devices may not be displayed on the external devices connected to the USB ports. The Wakeup setting (function...

User Manual
Page 153
...; starts ❖ Devices-lets you enable or disable settings of wired and wireless network devices, infrared devices, and set up profiles to handle these networking environments. Utilities ConfigFree® 153 Profile Settings The Profile Settings utility lets you can set the power status of Bluetooth® antennas ❖ TCP/IP settings-includes DHCP, IP address, subnet mask, default gateway, DNS server, and WINS server settings ❖ Personal firewall settings for Internet connections ❖ Bluetooth®...
...; starts ❖ Devices-lets you enable or disable settings of wired and wireless network devices, infrared devices, and set up profiles to handle these networking environments. Utilities ConfigFree® 153 Profile Settings The Profile Settings utility lets you can set the power status of Bluetooth® antennas ❖ TCP/IP settings-includes DHCP, IP address, subnet mask, default gateway, DNS server, and WINS server settings ❖ Personal firewall settings for Internet connections ❖ Bluetooth®...
User Manual
Page 159
... screen does not look right. Using Startup options to fix problems If the operating system fails to start properly, you may not be equal to or greater than the computer requires, even if the rated voltage is correct, and the plug fits correctly in the Startup menu. Unless a hardware device has failed, problems usually occur when you change your computer starts and before Windows® starts loading...
... screen does not look right. Using Startup options to fix problems If the operating system fails to start properly, you may not be equal to or greater than the computer requires, even if the rated voltage is correct, and the plug fits correctly in the Startup menu. Unless a hardware device has failed, problems usually occur when you change your computer starts and before Windows® starts loading...

User Manual
Page 166
... have registered a password, press any of keyboard. The keyboard you connected may be on . Using the computer's TouchPad: 1 Click Start, and then click the arrow next to continue working. Display problems Here are using a different make sure the software you are some typical display problems and their solutions: The screen is registered, press any key to any key, type the password and press Enter. If the numlock light or cursor control mode light is not...
... have registered a password, press any of keyboard. The keyboard you connected may be on . Using the computer's TouchPad: 1 Click Start, and then click the arrow next to continue working. Display problems Here are using a different make sure the software you are some typical display problems and their solutions: The screen is registered, press any key to any key, type the password and press Enter. If the numlock light or cursor control mode light is not...
User Manual
Page 174
... information on how to change these settings. Disable Sleep mode, turn off line. Contact the software manufacturer for more information. The modem is firmly connected to the computer's modem port and the telephone line jack. Check the communications parameters (baud rate, parity, data length and stop bits) specified in the instructions that came with the printer itself. Make sure the line has...
... information on how to change these settings. Disable Sleep mode, turn off line. Contact the software manufacturer for more information. The modem is firmly connected to the computer's modem port and the telephone line jack. Check the communications parameters (baud rate, parity, data length and stop bits) specified in the instructions that came with the printer itself. Make sure the line has...

User Manual
Page 211
... the operating system automatically recognize the change. Interlaced monitors take two passes to interact with the Fn key can set system options or control system parameters, such as a mouse. Internet - The decentralized, world-wide network of computers that holds 1.44 MB of your work , including all open files and programs, when you use to perform a task instead of using a pointing device such as the battery save mode. (2) A key...
... the operating system automatically recognize the change. Interlaced monitors take two passes to interact with the Fn key can set system options or control system parameters, such as a mouse. Internet - The decentralized, world-wide network of computers that holds 1.44 MB of your work , including all open files and programs, when you use to perform a task instead of using a pointing device such as the battery save mode. (2) A key...

User Manual
Page 217
... 78 battery changing 105 charge indicator light 47, 99 charge not lasting 165 charging 45, 47 conserving power 102 disposal 110 low charge 101 monitoring power 47, 99 not charging 165 notifications 102 power plan 193 power plan hot key 104 real-time clock (RTC) 96 removing 105 BIOS Setup see TOSHIBA Hardware Setup Bridge Media Adapter inserting memory media 124 removing memory media 125 button power 50 start 114 C CD playing an audio 91 CD, using 88 character keys 79 charging the battery 47 checking device properties...
... 78 battery changing 105 charge indicator light 47, 99 charge not lasting 165 charging 45, 47 conserving power 102 disposal 110 low charge 101 monitoring power 47, 99 not charging 165 notifications 102 power plan 193 power plan hot key 104 real-time clock (RTC) 96 removing 105 BIOS Setup see TOSHIBA Hardware Setup Bridge Media Adapter inserting memory media 124 removing memory media 125 button power 50 start 114 C CD playing an audio 91 CD, using 88 character keys 79 charging the battery 47 checking device properties...

User Manual
Page 218
.../trouble accessing a disk 168 running slow 169 diskette drive cannot insert a diskette 169 cannot read a diskette 170 connecting 63 external, connecting 63 display does not look normal/flickers 167 external monitor not working 168 screen is blank 166 display device external 60 display output settings 61 display, external adjusting 62 disposal information 26 disposing of used batteries 110 double-click 60 DVD player general problems 177 DVD, using 88 E error messages device driver conflict 161 general hardware problem 161 non-system disk...
.../trouble accessing a disk 168 running slow 169 diskette drive cannot insert a diskette 169 cannot read a diskette 170 connecting 63 external, connecting 63 display does not look normal/flickers 167 external monitor not working 168 screen is blank 166 display device external 60 display output settings 61 display, external adjusting 62 disposal information 26 disposing of used batteries 110 double-click 60 DVD player general problems 177 DVD, using 88 E error messages device driver conflict 161 general hardware problem 161 non-system disk...
User Manual
Page 220
... monitor 60 connecting 60 not working 167 mouse installing 62 mouse utility 139 N network accessing 116 Connect to the Internet 116 networking wireless 115 Notification Area 114 O Opening the display panel 48 optical disc positioning 90 optical discs handling 91 inserting 90 removing 93, 94 optical drive problems 170 troubleshooting 170 using 88 optical media recording 93 other documentation 38 overlay keys 81 P password deleting a supervisor 135 disabling a user 136 setting a user 135 supervisor set up 134 types 133 passwords instant, using 133 setting 133 port...
... monitor 60 connecting 60 not working 167 mouse installing 62 mouse utility 139 N network accessing 116 Connect to the Internet 116 networking wireless 115 Notification Area 114 O Opening the display panel 48 optical disc positioning 90 optical discs handling 91 inserting 90 removing 93, 94 optical drive problems 170 troubleshooting 170 using 88 optical media recording 93 other documentation 38 overlay keys 81 P password deleting a supervisor 135 disabling a user 136 setting a user 135 supervisor set up 134 types 133 passwords instant, using 133 setting 133 port...

User Manual
Page 221
... 172 error occurs 173 hot swapping fails 173 not recognized 173 slot appears dead 172 external display not working 168 external monitor 167 faulty memory 163 hardware conflict 161 high-pitched noise 171 Internet bookmarked site not found 161 Internet connection is slow 160 keyboard not responding 157 missing files/trouble accessing a disk 168 modem not receiving or transmitting 174 no sound 171 non-system disk or disk error 158 power and batteries...
... 172 error occurs 173 hot swapping fails 173 not recognized 173 slot appears dead 172 external display not working 168 external monitor 167 faulty memory 163 hardware conflict 161 high-pitched noise 171 Internet bookmarked site not found 161 Internet connection is slow 160 keyboard not responding 157 missing files/trouble accessing a disk 168 modem not receiving or transmitting 174 no sound 171 non-system disk or disk error 158 power and batteries...


