
User Manual
Page 43
... must either establish a Local Area Network (LAN) connection, or connect the built-in which windows appear, may vary according to your software. 1 From the Welcome screen click Next to enter the Setup Wizard.
... must either establish a Local Area Network (LAN) connection, or connect the built-in which windows appear, may vary according to your software. 1 From the Welcome screen click Next to enter the Setup Wizard.

User Manual
Page 44
...Next. 3 Select the appropriate option from the Help Protect Your Computer screen and click Next. 4 Enter the computer name and description and click Next or Skip. 5 Select how your desktop or go to the Toshiba Web site at www.register.toshiba.com at a later time. The computer will connect to the ...Internet and click Next. Once you click the final screen, your computer. Product registration can either double-click the icon on your ...
...Next. 3 Select the appropriate option from the Help Protect Your Computer screen and click Next. 4 Enter the computer name and description and click Next or Skip. 5 Select how your desktop or go to the Toshiba Web site at www.register.toshiba.com at a later time. The computer will connect to the ...Internet and click Next. Once you click the final screen, your computer. Product registration can either double-click the icon on your ...
User Manual
Page 50
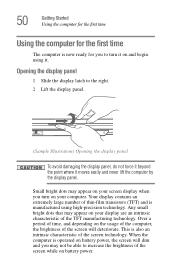
... ready for you turn it moves easily and never lift the computer by the display panel. Your display contains an extremely large number of the screen technology. This is also an intrinsic characteristic of thin-film transistors (TFT) and is operated on battery power, the... of time, and depending on the usage of the computer, the brightness of the screen will dim and you may appear on your screen display when you to turn on your display are an intrinsic characteristic of the screen while on and begin using high-precision technology. Opening the display panel 1 Slide the...
... ready for you turn it moves easily and never lift the computer by the display panel. Your display contains an extremely large number of the screen technology. This is also an intrinsic characteristic of thin-film transistors (TFT) and is operated on battery power, the... of time, and depending on the usage of the computer, the brightness of the screen will dim and you may appear on your screen display when you to turn on your display are an intrinsic characteristic of the screen while on and begin using high-precision technology. Opening the display panel 1 Slide the...

User Manual
Page 61
... inserted completely into the socket and lined up squarely with the socket latches. NOTE Because the TouchPad is much smaller than the display screen, moving your cursor across the screen often means having to move your finger several times across the TouchPad from right to left. Using the TouchPad™ The TouchPad...
... inserted completely into the socket and lined up squarely with the socket latches. NOTE Because the TouchPad is much smaller than the display screen, moving your cursor across the screen often means having to move your finger several times across the TouchPad from right to left. Using the TouchPad™ The TouchPad...
User Manual
Page 63
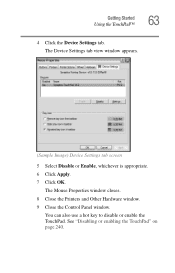
You can also use a hot key to disable or enable the TouchPad. See "Disabling or enabling the TouchPad" on page 240. Getting Started Using the TouchPad™ 63 4 Click the Device Settings tab. The Mouse Properties window closes. 8 Close the Printers and Other Hardware window. 9 Close the Control Panel window. The Device Settings tab view window appears. (Sample Image) Device Settings tab screen 5 Select Disable or Enable, whichever is appropriate. 6 Click Apply. 7 Click OK.
You can also use a hot key to disable or enable the TouchPad. See "Disabling or enabling the TouchPad" on page 240. Getting Started Using the TouchPad™ 63 4 Click the Device Settings tab. The Mouse Properties window closes. 8 Close the Printers and Other Hardware window. 9 Close the Control Panel window. The Device Settings tab view window appears. (Sample Image) Device Settings tab screen 5 Select Disable or Enable, whichever is appropriate. 6 Click Apply. 7 Click OK.
User Manual
Page 64
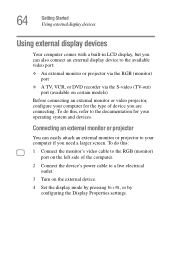
To do this : 1 Connect the monitor's video cable to the RGB (monitor) port on the left side of device you need a larger screen. To do this , refer to a live electrical outlet. 3 Turn on the external device. 4 Set the display mode by pressing Fn + F5, or by configuring the ...
To do this : 1 Connect the monitor's video cable to the RGB (monitor) port on the left side of device you need a larger screen. To do this , refer to a live electrical outlet. 3 Turn on the external device. 4 Set the display mode by pressing Fn + F5, or by configuring the ...
User Manual
Page 67
Connecting a printer NOTE Your printer documentation may want to use a mouse instead of the screen. You can use . If a USB cable was not included with your printer. If this occurs, press the Esc or Windows key to return it to ...
Connecting a printer NOTE Your printer documentation may want to use a mouse instead of the screen. You can use . If a USB cable was not included with your printer. If this occurs, press the Esc or Windows key to return it to ...
User Manual
Page 68
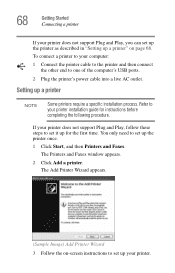
If your printer does not support Plug and Play, follow these steps to set up the printer as described in "Setting up a printer" on -screen instructions to set up your printer. 68 Getting Started Connecting a printer If your printer does not support Plug and Play, you can set it up ...
If your printer does not support Plug and Play, follow these steps to set up the printer as described in "Setting up a printer" on -screen instructions to set up your printer. 68 Getting Started Connecting a printer If your printer does not support Plug and Play, you can set it up ...

User Manual
Page 74
.... To use this method, you first need to activate it using Toshiba's Power Saver utility. 1 Click Start, Control Panel, and then Performance and Maintenance. 2 Click the TOSHIBA Power Saver icon. 3 Click on the Setup Action tab. (Sample Image) Setup action settings screen 4 Select the options you want from the drop-down lists. ❖...
.... To use this method, you first need to activate it using Toshiba's Power Saver utility. 1 Click Start, Control Panel, and then Performance and Maintenance. 2 Click the TOSHIBA Power Saver icon. 3 Click on the Setup Action tab. (Sample Image) Setup action settings screen 4 Select the options you want from the drop-down lists. ❖...
User Manual
Page 77
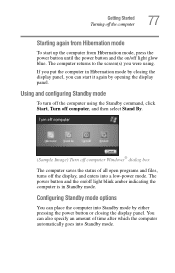
..., Turn off computer, and then select Stand By. (Sample Image) Turn off the display, and enters into a low-power mode. The computer returns to the screen(s) you can place the computer into Standby mode. Using and configuring Standby mode To turn off light glow blue. The power button and the on...
..., Turn off computer, and then select Stand By. (Sample Image) Turn off the display, and enters into a low-power mode. The computer returns to the screen(s) you can place the computer into Standby mode. Using and configuring Standby mode To turn off light glow blue. The power button and the on...

User Manual
Page 78
NOTE For more information about the Power Saver utility, see "TOSHIBA Power Saver" on the Standby options set. If you place the computer in Toshiba's Power Saver utility. 1 Click Start, Control Panel, and then Performance and Maintenance. 2 Click the TOSHIBA Power Saver icon. 3 Click the Setup Action tab. 4 Select Standby for ... the power button until the power button and the on/off the computer To use any of these methods, you first need to the screen(s) you can place it again by either pressing the power button or closing the display panel, you can start it into Standby mode when...
NOTE For more information about the Power Saver utility, see "TOSHIBA Power Saver" on the Standby options set. If you place the computer in Toshiba's Power Saver utility. 1 Click Start, Control Panel, and then Performance and Maintenance. 2 Click the TOSHIBA Power Saver icon. 3 Click the Setup Action tab. 4 Select Standby for ... the power button until the power button and the on/off the computer To use any of these methods, you first need to the screen(s) you can place it again by either pressing the power button or closing the display panel, you can start it into Standby mode when...
User Manual
Page 89
.... ❖ If you turn off the computer, save feature. This is a good idea to the right of computing. Learning the Basics Saving your work on -screen instructions. HINT: To run the same program again, click the arrow to get in the habit of saving frequently. Saving documents is quick and easy...
.... ❖ If you turn off the computer, save feature. This is a good idea to the right of computing. Learning the Basics Saving your work on -screen instructions. HINT: To run the same program again, click the arrow to get in the habit of saving frequently. Saving documents is quick and easy...
User Manual
Page 94
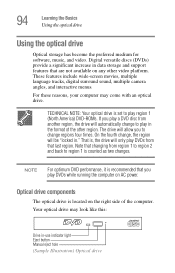
... video platform. NOTE For optimum DVD performance, it is located on AC power. Note that you to change regions four times. These features include wide-screen movies, multiple language tracks, digital surround sound, multiple camera angles, and interactive menus. Optical drive components The optical drive is recommended that changing from another...
... video platform. NOTE For optimum DVD performance, it is located on AC power. Note that you to change regions four times. These features include wide-screen movies, multiple language tracks, digital surround sound, multiple camera angles, and interactive menus. Optical drive components The optical drive is recommended that changing from another...

User Manual
Page 100
Before putting on headphones to listen to loud sound can harm your hearing. Do not set the volume too high when using headphones. Continuous exposure to an audio CD, turn the volume dial down. 100 Learning the Basics Using the optical drive Stop button Play/Pause button (Sample Image) Windows Media Player screen The Windows Media Player control panel works much like an ordinary compact disc player: ❖ To play the CD or to pause, click the Play/Pause button. ❖ To stop the CD, click the Stop button.
Before putting on headphones to listen to loud sound can harm your hearing. Do not set the volume too high when using headphones. Continuous exposure to an audio CD, turn the volume dial down. 100 Learning the Basics Using the optical drive Stop button Play/Pause button (Sample Image) Windows Media Player screen The Windows Media Player control panel works much like an ordinary compact disc player: ❖ To play the CD or to pause, click the Play/Pause button. ❖ To stop the CD, click the Stop button.

User Manual
Page 125
Chapter 4 Exploring Your Computer's Features In this guide may appear slightly different from the screens displayed by your system. HINT: The illustrated examples in this chapter, you can do not indicate any change in the Windows® operating system. You ...
Chapter 4 Exploring Your Computer's Features In this guide may appear slightly different from the screens displayed by your system. HINT: The illustrated examples in this chapter, you can do not indicate any change in the Windows® operating system. You ...
User Manual
Page 137
... have an account with similar interests and ideas communicate in real-time, one-on the Internet or your own, you need a mailbox on their computer screens. 137 Exploring Your Computer's Features An overview of using the Internet Surfing the Internet Once connected to help you perform many tasks. ❖ Internet email...
... have an account with similar interests and ideas communicate in real-time, one-on the Internet or your own, you need a mailbox on their computer screens. 137 Exploring Your Computer's Features An overview of using the Internet Surfing the Internet Once connected to help you perform many tasks. ❖ Internet email...

User Manual
Page 139
..., All Programs, Accessories, Entertainment, and then Volume Control. The Sound Recorder window displays the new sound file as a waveform. Positioning bar (Sample Image) Sound Recorder screen Record Stop Play Skip forward Skip backward 3 Click the Record button. 4 Speak normally into the microphone. 5 When you just recorded, click the Play button. 7 To...
..., All Programs, Accessories, Entertainment, and then Volume Control. The Sound Recorder window displays the new sound file as a waveform. Positioning bar (Sample Image) Sound Recorder screen Record Stop Play Skip forward Skip backward 3 Click the Record button. 4 Speak normally into the microphone. 5 When you just recorded, click the Play button. 7 To...
User Manual
Page 152
...trackball. This freezes the keyboard and TouchPad, and blanks the screen. Prohibits unauthorized users from starting or restarting the computer. ❖ A supervisor password - Prevents unauthorized users from accessing certain functions such as Toshiba Hardware Setup. Using an instant password An instant password secures ...your desk for a few minutes and do not want to turn off the computer. 152 Toshiba Utilities Setting passwords Setting passwords Setting a password lets you walk away from your computer, secure in mind: ❖ The ...
...trackball. This freezes the keyboard and TouchPad, and blanks the screen. Prohibits unauthorized users from starting or restarting the computer. ❖ A supervisor password - Prevents unauthorized users from accessing certain functions such as Toshiba Hardware Setup. Using an instant password An instant password secures ...your desk for a few minutes and do not want to turn off the computer. 152 Toshiba Utilities Setting passwords Setting passwords Setting a password lets you walk away from your computer, secure in mind: ❖ The ...
User Manual
Page 153
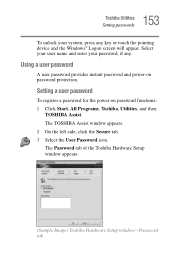
... password provides instant password and power-on password functions: 1 Click Start, All Programs, Toshiba, Utilities, and then TOSHIBA Assist. 153 Toshiba Utilities Setting passwords To unlock your password, if any key or touch the pointing device and the Windows® Logon screen will appear. Setting a user password To register a password for the power-on...
... password provides instant password and power-on password functions: 1 Click Start, All Programs, Toshiba, Utilities, and then TOSHIBA Assist. 153 Toshiba Utilities Setting passwords To unlock your password, if any key or touch the pointing device and the Windows® Logon screen will appear. Setting a user password To register a password for the power-on...
User Manual
Page 154
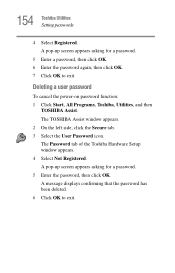
... OK to exit. The Password tab of the Toshiba Hardware Setup window appears. 4 Select Not Registered. Deleting a user password To cancel the power-on password function: 1 Click Start, All Programs, Toshiba, Utilities, and then TOSHIBA Assist. A pop-up screen appears asking for a password. 5 Enter a ...password, then click OK. 6 Enter the password again, then click OK. 7 Click OK to exit. A pop-up screen appears asking for a password. 5 Enter...
... OK to exit. The Password tab of the Toshiba Hardware Setup window appears. 4 Select Not Registered. Deleting a user password To cancel the power-on password function: 1 Click Start, All Programs, Toshiba, Utilities, and then TOSHIBA Assist. A pop-up screen appears asking for a password. 5 Enter a ...password, then click OK. 6 Enter the password again, then click OK. 7 Click OK to exit. A pop-up screen appears asking for a password. 5 Enter...


