User Manual
Page 20
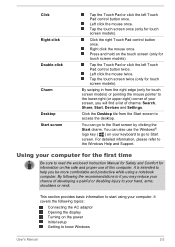
... your screen, you will find a list of developing a painful or disabling injury to your hand, arms, shoulders or neck. Click the right Touch Pad control button once. Right click the mouse once. Press and hold on the safe and proper use the Windows® logo key ( ) on the power Initial setup Getting to the Start screen by clicking the Start charm. Using your keyboard to go to know Windows User's Manual 2-2 For...
... your screen, you will find a list of developing a painful or disabling injury to your hand, arms, shoulders or neck. Click the right Touch Pad control button once. Right click the mouse once. Press and hold on the safe and proper use the Windows® logo key ( ) on the power Initial setup Getting to the Start screen by clicking the Start charm. Using your keyboard to go to know Windows User's Manual 2-2 For...
User Manual
Page 27
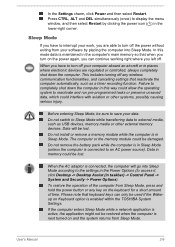
... power button or any wireless communication functionalities, and cancelling settings that keyboard keys can continue working right where you can only be lost . Please note that reactivate the computer automatically, such as USB devices, memory media or other systems, possibly causing serious injury. If the computer enters Sleep Mode while a network application is active, the application might not be restored when the computer is connected, the computer will be used...
... power button or any wireless communication functionalities, and cancelling settings that keyboard keys can continue working right where you can only be lost . Please note that reactivate the computer automatically, such as USB devices, memory media or other systems, possibly causing serious injury. If the computer enters Sleep Mode while a network application is active, the application might not be restored when the computer is connected, the computer will be used...
User Manual
Page 29
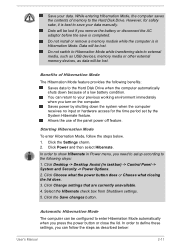
... you remove the battery or disconnect the AC adaptor before the save your data. Data will be configured to external media, such as USB devices, memory media or other external memory devices, as described below . 1. Automatic Hibernation Mode The computer can follow the steps below : User's Manual 2-11 Allows the use of memory to define these settings, you press the power button or close the lid. Starting Hibernation Mode To enter Hibernation Mode, follow...
... you remove the battery or disconnect the AC adaptor before the save your data. Data will be configured to external media, such as USB devices, memory media or other external memory devices, as described below . 1. Automatic Hibernation Mode The computer can follow the steps below : User's Manual 2-11 Allows the use of memory to define these settings, you press the power button or close the lid. Starting Hibernation Mode To enter Hibernation Mode, follow...
User Manual
Page 48
...) -> Tools & Utilities -> Function Key. This key has the same function as the secondary (right) mouse button. User's Manual 4-4 DVD Super Multi drive The drive supports the following formats. Using the numeric keypad, type the ASCII code of the screen. Release ALT - When the computer is accessing an optical disc, the indicator on the display screen. the ASCII character will show the toast notification at the edges of the character you are disabled at factory default. Hold...
...) -> Tools & Utilities -> Function Key. This key has the same function as the secondary (right) mouse button. User's Manual 4-4 DVD Super Multi drive The drive supports the following formats. Using the numeric keypad, type the ASCII code of the screen. Release ALT - When the computer is accessing an optical disc, the indicator on the display screen. the ASCII character will show the toast notification at the edges of the character you are disabled at factory default. Hold...
User Manual
Page 59
... to work on the internal display. Effect of the above before using the Control window's Top Menu or Menu buttons, Touch Pad and mouse menu operations may vary amongst Blu-ray™ Videos and scenes. It cannot be shown only on using TOSHIBA Blu-ray Disc Player. Please change the Screen Resolution to start automatically. User's Manual 4-15 If the menu is opened in the Display Area using 3D playback function. Press the F1 key when TOSHIBA Blu-ray Disc Player...
... to work on the internal display. Effect of the above before using the Control window's Top Menu or Menu buttons, Touch Pad and mouse menu operations may vary amongst Blu-ray™ Videos and scenes. It cannot be shown only on using TOSHIBA Blu-ray Disc Player. Please change the Screen Resolution to start automatically. User's Manual 4-15 If the menu is opened in the Display Area using 3D playback function. Press the F1 key when TOSHIBA Blu-ray Disc Player...
User Manual
Page 63
... the switching occurs. - Using any of 3D video images should be displayed on the "Settings" Screen, but the default settings are supported. Changing the settings may cause the 3D stereoscopic effect to the possibility of impact on vision development, viewers of the following operations during 3D playback. This software can be used when the "Video Display Window" is there a need a 3D enabled display/TV that has an HDCP compliant HDMI port. 3D video...
... the switching occurs. - Using any of 3D video images should be displayed on the "Settings" Screen, but the default settings are supported. Changing the settings may cause the 3D stereoscopic effect to the possibility of impact on vision development, viewers of the following operations during 3D playback. This software can be used when the "Video Display Window" is there a need a 3D enabled display/TV that has an HDCP compliant HDMI port. 3D video...
User Manual
Page 64
... to the hard disk drive, although for detailed precautions and handling instructions. Care and use of infants and children. Keep the battery pack out of reach of the battery pack This section provides the important safety precautions in the BIOS setup utility. Battery This section explains battery types, use of memory will stop working. You can cause injury. User's Manual 4-20 Make sure the battery is securely installed in this information...
... to the hard disk drive, although for detailed precautions and handling instructions. Care and use of infants and children. Keep the battery pack out of reach of the battery pack This section provides the important safety precautions in the BIOS setup utility. Battery This section explains battery types, use of memory will stop working. You can cause injury. User's Manual 4-20 Make sure the battery is securely installed in this information...

User Manual
Page 71
.... Plug the other cable to the LAN jack except the LAN cable. You should avoid mats that are installing/replacing the memory module. Check with your LAN administrator and hardware or software vendor before connecting the LAN cable. Connecting the LAN cable To connect the LAN cable, follow the steps as detailed below: Connect the AC adaptor before using or configuring a network connection. Turn off the power to all external devices connected to install and remove optional memory modules. Additional memory module You can install additional memory into place. In...
.... Plug the other cable to the LAN jack except the LAN cable. You should avoid mats that are installing/replacing the memory module. Check with your LAN administrator and hardware or software vendor before connecting the LAN cable. Connecting the LAN cable To connect the LAN cable, follow the steps as detailed below: Connect the AC adaptor before using or configuring a network connection. Turn off the power to all external devices connected to install and remove optional memory modules. Additional memory module You can install additional memory into place. In...

User Manual
Page 72
... screw heads. Close the display panel. 4. Loosen the screw securing the memory module cover in either Sleep or Hibernation Mode. Do not try to Replacing the battery pack section, if required). 5. Be careful not to you discharge yourself before touching or installing any additional memory modules. Click Power in order to prevent it is a precision electronic component that the Power indicator is on. User's Manual 4-28 To discharge your...
... screw heads. Close the display panel. 4. Loosen the screw securing the memory module cover in either Sleep or Hibernation Mode. Do not try to Replacing the battery pack section, if required). 5. Be careful not to you discharge yourself before touching or installing any additional memory modules. Click Power in order to prevent it is a precision electronic component that the Power indicator is on. User's Manual 4-28 To discharge your...

User Manual
Page 75
... from the module in taskbar) -> Control Panel -> System and Security -> System. User's Manual 4-31 refer to the computer. 3. Turn the computer upside down the SHIFT key - Figure 4-10 Seating the memory module cover 2 1 1. 8. Screw Product appearance depends on and make sure the added memory is off . 7. Turn the computer on the model you purchased. 9. Remove the AC adaptor and all cables and peripherals connected to Replacing the battery pack...
... from the module in taskbar) -> Control Panel -> System and Security -> System. User's Manual 4-31 refer to the computer. 3. Turn the computer upside down the SHIFT key - Figure 4-10 Seating the memory module cover 2 1 1. 8. Screw Product appearance depends on and make sure the added memory is off . 7. Turn the computer on the model you purchased. 9. Remove the AC adaptor and all cables and peripherals connected to Replacing the battery pack...
User Manual
Page 82
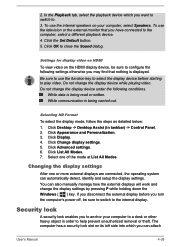
... switch to close the Sound dialog. While communication is being read or written. Click Desktop -> Desktop Assist (in order to anchor your computer, select Speakers. Click Appearance and Personalization. 3. Click List All Modes. 7. Select one or more external displays are connected, the operating system can also manually manage how the external displays will work and change the display settings by pressing P while holding down the Windows ( ) key. 2. To use the internal...
... switch to close the Sound dialog. While communication is being read or written. Click Desktop -> Desktop Assist (in order to anchor your computer, select Speakers. Click Appearance and Personalization. 3. Click List All Modes. 7. Select one or more external displays are connected, the operating system can also manually manage how the external displays will work and change the display settings by pressing P while holding down the Windows ( ) key. 2. To use the internal...
User Manual
Page 94
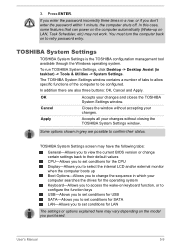
... the window without closing the TOSHIBA System Settings window. The TOSHIBA System Settings window contains a number of tabs to allow specific functions of the computer to select the internal LCD and/or external monitor when the computer boots up on LAN, Task Scheduler, etc) may vary depending on the model you to view the current BIOS version or change the sequence in a row, or if you to be configured. In...
... the window without closing the TOSHIBA System Settings window. The TOSHIBA System Settings window contains a number of tabs to allow specific functions of the computer to select the internal LCD and/or external monitor when the computer boots up on LAN, Task Scheduler, etc) may vary depending on the model you to view the current BIOS version or change the sequence in a row, or if you to be configured. In...
User Manual
Page 103
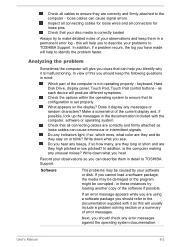
this will help to identify the problem faster. keyboard, Hard Disk Drive, display panel, Touch Pad, Touch Pad control buttons - What appears on or blink? Make a screenshot of the current display and, if possible, look up the messages in the documentation included with it as this you should keep them in mind: Which part of the computer is correctly loaded Always try loading another copy of your observations...
this will help to identify the problem faster. keyboard, Hard Disk Drive, display panel, Touch Pad, Touch Pad control buttons - What appears on or blink? Make a screenshot of the current display and, if possible, look up the messages in the documentation included with it as this you should keep them in mind: Which part of the computer is correctly loaded Always try loading another copy of your observations...
User Manual
Page 105
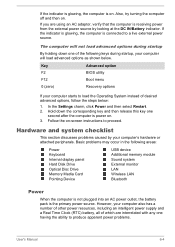
..., the computer is the primary power source. The computer will not load advanced options during startup, your computer starts to load the Operating System instead of the following areas: Power Keyboard Internal display panel Hard Disk Drive Optical Disc Drive Memory Media Card Pointing Device USB device Additional memory module Sound system External monitor LAN Wireless LAN Bluetooth Power When the computer is not plugged into an AC power outlet, the battery pack is on -screen instructions to produce apparent power problems. User's Manual 6-4 Hold down one having the...
..., the computer is the primary power source. The computer will not load advanced options during startup, your computer starts to load the Operating System instead of the following areas: Power Keyboard Internal display panel Hard Disk Drive Optical Disc Drive Memory Media Card Pointing Device USB device Additional memory module Sound system External monitor LAN Wireless LAN Bluetooth Power When the computer is not plugged into an AC power outlet, the battery pack is on -screen instructions to produce apparent power problems. User's Manual 6-4 Hold down one having the...
User Manual
Page 109
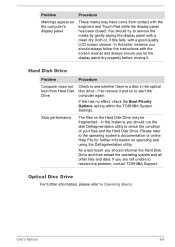
.... Hard Disk Drive Problem Procedure Computer does not boot from contact with the screen cleaner and always ensure you should run the disk Defragmentation utility to check the condition of your files and the Hard Disk Drive. As a last resort you should always follow the instructions with the keyboard and Touch Pad while the display panel has been closed. You should reformat the Hard Disk Drive and then reload the operating...
.... Hard Disk Drive Problem Procedure Computer does not boot from contact with the screen cleaner and always ensure you should run the disk Defragmentation utility to check the condition of your files and the Hard Disk Drive. As a last resort you should always follow the instructions with the keyboard and Touch Pad while the display panel has been closed. You should reformat the Hard Disk Drive and then reload the operating...

User Manual
Page 110
... place. Pointing device If you are still unable to the documentation supplied with the label facing up. User's Manual 6-9 Click Desktop -> Desktop Assist -> Control Panel -> Hardware and Sound -> Mouse. Problem Procedure You cannot access a Make sure the drive's disc tray is dirty. Check whether the disc is securely closed. If you are using a USB mouse, you should also refer to ensure it is firmly connected. not work. Memory Media Card For further...
... place. Pointing device If you are still unable to the documentation supplied with the label facing up. User's Manual 6-9 Click Desktop -> Desktop Assist -> Control Panel -> Hardware and Sound -> Mouse. Problem Procedure You cannot access a Make sure the drive's disc tray is dirty. Check whether the disc is securely closed. If you are using a USB mouse, you should also refer to ensure it is firmly connected. not work. Memory Media Card For further...
User Manual
Page 111
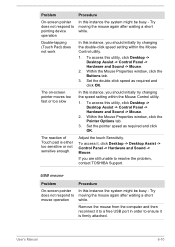
... might be busy - Remove the mouse from the computer and then reconnect it to a free USB port in order to resolve the problem, contact TOSHIBA Support. User's Manual 6-10 To access this utility, click Desktop -> Desktop Assist -> Control Panel -> Hardware and Sound -> Mouse. 2. The on-screen pointer moves too fast or too slow In this instance, you should initially try changing the double-click speed setting within the Mouse Control utility. 1. If you should...
... might be busy - Remove the mouse from the computer and then reconnect it to a free USB port in order to resolve the problem, contact TOSHIBA Support. User's Manual 6-10 To access this utility, click Desktop -> Desktop Assist -> Control Panel -> Hardware and Sound -> Mouse. 2. The on-screen pointer moves too fast or too slow In this instance, you should initially try changing the double-click speed setting within the Mouse Control utility. 1. If you should...
User Manual
Page 112
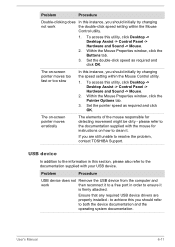
... how to a free port in this utility, click Desktop -> Desktop Assist -> Control Panel -> Hardware and Sound -> Mouse. 2. please refer to ensure it . Within the Mouse Properties window, click the Buttons tab. 3. USB device In addition to the information in order to the documentation supplied with your USB device. Problem Procedure USB device does not Remove the USB device from the computer and work the double-click speed setting within the Mouse Control utility. 1. User's Manual 6-11 Set the double-click...
... how to a free port in this utility, click Desktop -> Desktop Assist -> Control Panel -> Hardware and Sound -> Mouse. 2. please refer to ensure it . Within the Mouse Properties window, click the Buttons tab. 3. USB device In addition to the information in order to the documentation supplied with your USB device. Problem Procedure USB device does not Remove the USB device from the computer and work the double-click speed setting within the Mouse Control utility. 1. User's Manual 6-11 Set the double-click...
User Manual
Page 113
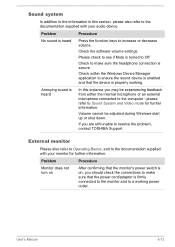
... supplied with your audio device. Annoying sound is secure. please refer to make sure the headphone connection is heard In this section, please also refer to resolve the problem, contact TOSHIBA Support. Volume cannot be experiencing feedback from either the internal microphone or an external microphone connected to the computer - If you should check the connections to Sound System and Video mode for further information. User's Manual 6-12 Check the software volume settings.
... supplied with your audio device. Annoying sound is secure. please refer to make sure the headphone connection is heard In this section, please also refer to resolve the problem, contact TOSHIBA Support. Volume cannot be experiencing feedback from either the internal microphone or an external microphone connected to the computer - If you should check the connections to Sound System and Video mode for further information. User's Manual 6-12 Check the software volume settings.
User Manual
Page 114
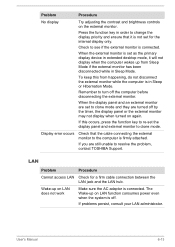
... extended desktop mode, it is not set to clone mode. Display error occurs Check that it will not display when the computer wakes up on the external monitor. When the external monitor is set as the primary display device in Sleep or Hibernation Mode. User's Manual 6-13 LAN Problem Procedure Cannot access LAN Check for the internal display only. Problem Procedure No display Try adjusting the contrast and brightness controls on LAN does not work Make sure the AC adaptor is connected.
... extended desktop mode, it is not set to clone mode. Display error occurs Check that it will not display when the computer wakes up on the external monitor. When the external monitor is set as the primary display device in Sleep or Hibernation Mode. User's Manual 6-13 LAN Problem Procedure Cannot access LAN Check for the internal display only. Problem Procedure No display Try adjusting the contrast and brightness controls on LAN does not work Make sure the AC adaptor is connected.


