
Toshiba Online Users Guide for Satellite A40/A45
Page 5
... any other number for any person to use a computer or other entity, or individual. (The telephone number provided may not be advised of your fax transmission, refer to the fax software instructions installed on the first page of the transmission, the date and time it is necessary. or an authorized representative of Toshiba, or the Toshiba Support Centre within...
... any other number for any person to use a computer or other entity, or individual. (The telephone number provided may not be advised of your fax transmission, refer to the fax software instructions installed on the first page of the transmission, the date and time it is necessary. or an authorized representative of Toshiba, or the Toshiba Support Centre within...

Toshiba Online Users Guide for Satellite A40/A45
Page 27
27 Contents Charging the main battery 51 Using the computer for the first time 52 Opening the display panel 52 Turning on the power 53 Activating the power-on password 54 Using the TouchPad 55 Using TOSHIBA Touch and Launch 58 Setting up a printer 62 Installing additional memory (optional 65 Removing a memory module 72 Connecting a mouse 75 Connecting a printer 75 Connecting a USB printer 75 Connecting a parallel printer 75 Using external display devices 76 Connecting an external monitor 76 Directing the display output when you turn on the computer 76...
27 Contents Charging the main battery 51 Using the computer for the first time 52 Opening the display panel 52 Turning on the power 53 Activating the power-on password 54 Using the TouchPad 55 Using TOSHIBA Touch and Launch 58 Setting up a printer 62 Installing additional memory (optional 65 Removing a memory module 72 Connecting a mouse 75 Connecting a printer 75 Connecting a USB printer 75 Connecting a parallel printer 75 Using external display devices 76 Connecting an external monitor 76 Directing the display output when you turn on the computer 76...
Toshiba Online Users Guide for Satellite A40/A45
Page 62
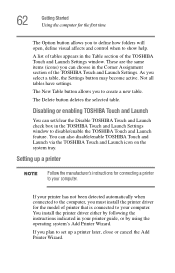
... install the printer driver either by using the operating system's Add Printer Wizard. You can set up a printer Follow the manufacturer's instructions for connecting a printer to create a new table. Setting up a printer later, close or cancel the Add Printer Wizard. If you plan to set /clear the Disable TOSHIBA Touch and Launch check box in your printer guide, or by following the instructions indicated in the TOSHIBA Touch and Launch Settings window...
... install the printer driver either by using the operating system's Add Printer Wizard. You can set up a printer Follow the manufacturer's instructions for connecting a printer to create a new table. Setting up a printer later, close or cancel the Add Printer Wizard. If you plan to set /clear the Disable TOSHIBA Touch and Launch check box in your printer guide, or by following the instructions indicated in the TOSHIBA Touch and Launch Settings window...

Toshiba Online Users Guide for Satellite A40/A45
Page 65
... beeps. There are using the Start menu. Do not try to run most of data. If you tell the difference. In this case, turn off the computer and remove the incompatible module. HINT: If you turn on -screen instructions. Your system may want to help you install a memory module that is installed in slot B, there will sound when you are two memory slots. Additional memory comes in various...
... beeps. There are using the Start menu. Do not try to run most of data. If you tell the difference. In this case, turn off the computer and remove the incompatible module. HINT: If you turn on -screen instructions. Your system may want to help you install a memory module that is installed in slot B, there will sound when you are two memory slots. Additional memory comes in various...
Toshiba Online Users Guide for Satellite A40/A45
Page 85
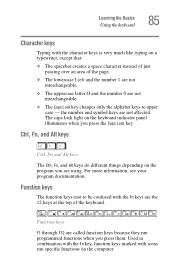
... keys Ctrl Fn Alt . Function keys The function keys (not to upper case - The caps lock light on a typewriter, except that: ❖ The spacebar creates a space character instead of just passing over an area of the keyboard. Learning the Basics Using the keyboard 85 Character keys Typing with the character keys is very much like typing on the keyboard indicator panel illuminates when you press the Caps Lock key. the number...
... keys Ctrl Fn Alt . Function keys The function keys (not to upper case - The caps lock light on a typewriter, except that: ❖ The spacebar creates a space character instead of just passing over an area of the keyboard. Learning the Basics Using the keyboard 85 Character keys Typing with the character keys is very much like typing on the keyboard indicator panel illuminates when you press the Caps Lock key. the number...
Toshiba Online Users Guide for Satellite A40/A45
Page 94
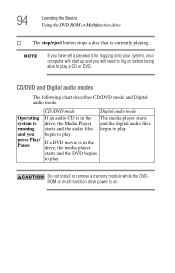
.../eject button stops a disc that is on before being able to play . CD/DVD and Digital audio modes The following chart describes CD/DVD mode and Digital audio mode. Operating system is running and you will need to log on . Do not install or remove a memory module while the DVDROM or multi-function drive power is currently playing. If a DVD movie is in the drive, the media player starts and the DVD begins...
.../eject button stops a disc that is on before being able to play . CD/DVD and Digital audio modes The following chart describes CD/DVD mode and Digital audio mode. Operating system is running and you will need to log on . Do not install or remove a memory module while the DVDROM or multi-function drive power is currently playing. If a DVD movie is in the drive, the media player starts and the DVD begins...

Toshiba Online Users Guide for Satellite A40/A45
Page 184
... Card: 1 Turn off the computer. Other cards may work with the card to see if you insert a PC Card, refer to the documentation that acts as cables, attached to your computer, or to do so may also hot swap a PC Card (see if it . Even if your computer. PC Card supporting software PC Cards require Card and Socket Services software - Inserting PC Cards Use caution when lifting or turning...
... Card: 1 Turn off the computer. Other cards may work with the card to see if you insert a PC Card, refer to the documentation that acts as cables, attached to your computer, or to do so may also hot swap a PC Card (see if it . Even if your computer. PC Card supporting software PC Cards require Card and Socket Services software - Inserting PC Cards Use caution when lifting or turning...
Toshiba Online Users Guide for Satellite A40/A45
Page 205
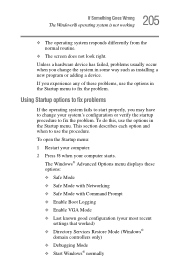
... recent settings that worked) ❖ Directory Services Restore Mode (Windows® domain controllers only) ❖ Debugging Mode ❖ Start Windows® normally If you change your system's configuration or verify the startup procedure to fix the problem. The Windows® Advanced Options menu displays these problems, use the options in some way such as installing a new program or adding a device. This section describes each option and when to fix the problem. 205 If Something Goes Wrong The Windows® operating...
... recent settings that worked) ❖ Directory Services Restore Mode (Windows® domain controllers only) ❖ Debugging Mode ❖ Start Windows® normally If you change your system's configuration or verify the startup procedure to fix the problem. The Windows® Advanced Options menu displays these problems, use the options in some way such as installing a new program or adding a device. This section describes each option and when to fix the problem. 205 If Something Goes Wrong The Windows® operating...

Toshiba Online Users Guide for Satellite A40/A45
Page 240
Sample disable and enable TouchPad windows Keyboard hot keys F10 Fn + and off . F11 Fn + off . F12 Fn + off. 240 Hot Keys Disabling or enabling the TouchPad Disabling or enabling the TouchPad Fn + This hot key enables/disables the TouchPad. To use the TouchPad, see "Overlay keys" on page 56. This hot key turns the cursor control overlay on This hot key turns the numeric overlay on and This hot key turns the scroll lock feature on and For more information, see "Disabling or enabling the TouchPad" on page 86.
Sample disable and enable TouchPad windows Keyboard hot keys F10 Fn + and off . F11 Fn + off . F12 Fn + off. 240 Hot Keys Disabling or enabling the TouchPad Disabling or enabling the TouchPad Fn + This hot key enables/disables the TouchPad. To use the TouchPad, see "Overlay keys" on page 56. This hot key turns the cursor control overlay on This hot key turns the numeric overlay on and This hot key turns the scroll lock feature on and For more information, see "Disabling or enabling the TouchPad" on page 86.

Toshiba Online Users Guide for Satellite A40/A45
Page 261
... change. hot swapping - Memory cache built into the processor to help improve processing speed. K keyboard shortcut - Memory cache installed on the network. The ability to interact with the Fn key can set system options or control system parameters, such as the TouchPad. A group of computers or other devices dispersed over a relatively limited area and connected by a communications link that enables any other line of keys that activates a memory...
... change. hot swapping - Memory cache built into the processor to help improve processing speed. K keyboard shortcut - Memory cache installed on the network. The ability to interact with the Fn key can set system options or control system parameters, such as the TouchPad. A group of computers or other devices dispersed over a relatively limited area and connected by a communications link that enables any other line of keys that activates a memory...
Toshiba Online Users Guide for Satellite A40/A45
Page 271
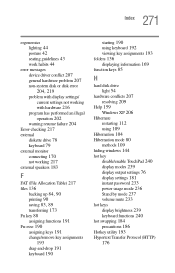
... change/remove key assignments 193 drag-and-drop 191 keyboard 190 starting 190 using keyboard 192 viewing key assignments 193 folders 136 displaying information 169 function keys 85 H hard disk drive light 54 hardware conflicts 207 resolving 209 Help 159 Windows XP 206 Hibernate restarting 112 using 109 Hibernation 104 Hibernation mode 80 methods 109 hiding windows 144 hot key disable/enable TouchPad 240 display modes 239 display output settings 76 display settings 181 instant password 233 power usage mode 236 Stand by mode 237 volume...
... change/remove key assignments 193 drag-and-drop 191 keyboard 190 starting 190 using keyboard 192 viewing key assignments 193 folders 136 displaying information 169 function keys 85 H hard disk drive light 54 hardware conflicts 207 resolving 209 Help 159 Windows XP 206 Hibernate restarting 112 using 109 Hibernation 104 Hibernation mode 80 methods 109 hiding windows 144 hot key disable/enable TouchPad 240 display modes 239 display output settings 76 display settings 181 instant password 233 power usage mode 236 Stand by mode 237 volume...

Toshiba Online Users Guide for Satellite A40/A45
Page 272
... keys 86 L lights AC power 49, 53 battery 53, 121 hard disk drive 54 M main battery changing 125 removing 125 memory accessing modules 67 accessing slots 67 checking total 74 problem solving 212 removing 72, 73 verifying 74 Microsoft Internet Explorer 101 Microsoft Support Online Web site 207 Microsoft Windows XP 132 minimizing 145 modem determining COM port 171 port 101 problem solving 226 resetting port to default settings 171 upgrading 171 modem, using 101 monitor connecting 76, 170 not working 215 mouse connecting...
... keys 86 L lights AC power 49, 53 battery 53, 121 hard disk drive 54 M main battery changing 125 removing 125 memory accessing modules 67 accessing slots 67 checking total 74 problem solving 212 removing 72, 73 verifying 74 Microsoft Internet Explorer 101 Microsoft Support Online Web site 207 Microsoft Windows XP 132 minimizing 145 modem determining COM port 171 port 101 problem solving 226 resetting port to default settings 171 upgrading 171 modem, using 101 monitor connecting 76, 170 not working 215 mouse connecting...
Maintenance Manual
Page 3
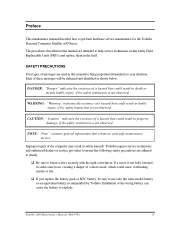
... in this manual are intended to explode. If a screw is not observed. q Be sure to use only the same model battery or an equivalent battery recommended by Toshiba. q If you replace the battery pack or RTC battery, be italicized and identified as shown below. Each of messages are adhered to perform hardware service maintenance for the Toshiba Personal Computer Satellite A40 Series. SAFETY PRECAUTIONS Four types of...
... in this manual are intended to explode. If a screw is not observed. q Be sure to use only the same model battery or an equivalent battery recommended by Toshiba. q If you replace the battery pack or RTC battery, be italicized and identified as shown below. Each of messages are adhered to perform hardware service maintenance for the Toshiba Personal Computer Satellite A40 Series. SAFETY PRECAUTIONS Four types of...
Maintenance Manual
Page 114
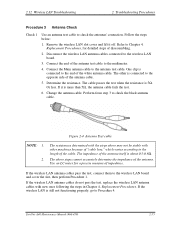
... end of disassembling. 2. Connect the Main antenna cable to check the antennas' connection. One clip is about 0.5-0.8Ω. Use an LC meter for detailed steps of the white antenna cable. 2.12 Wireless LAN Troubleshooting 2 Troubleshooting Procedures Procedure 3 Antenna Check Check 1 Use an antenna test cable to the antenna test cable. If it off. Perform from step 3 to the wireless LAN board. 3. Satellite A40 Maintenance Manual (960-458) 2-55 Remove the wireless LAN slot cover and...
... end of disassembling. 2. Connect the Main antenna cable to check the antennas' connection. One clip is about 0.5-0.8Ω. Use an LC meter for detailed steps of the white antenna cable. 2.12 Wireless LAN Troubleshooting 2 Troubleshooting Procedures Procedure 3 Antenna Check Check 1 Use an antenna test cable to the antenna test cable. If it off. Perform from step 3 to the wireless LAN board. 3. Satellite A40 Maintenance Manual (960-458) 2-55 Remove the wireless LAN slot cover and...
Maintenance Manual
Page 162
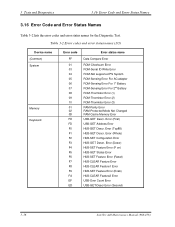
... Battery ROM-Sensing Error For 2nd Battery ROM-Thormistor Error (1) ROM-Thormistor Error (2) ROM-Thormistor Error (3) RAM-Parity Error RAM-Protected Mode Not Changed RAM-Cache Memory Error USB-GET Descr. Error (First) USB-GET Address Error HUB-GET Descr. Error (Whole) HUB-SET Configuration Error HUB-GET Descr. Error (Descr) HUB-SET Feature Error (P on) HUB-GET States Error HUB-SET Feature Error (Reset) HUB-CLEAR Feature Error HUB-CLEAR Feature1 Error HUB-SET Feature Error (Enab) HUB-CLEAR Feature2 Error USB-Over Count Error USB-GET-Descr Error (Second) 3-36 Satellite A40 Maintenance Manual...
... Battery ROM-Sensing Error For 2nd Battery ROM-Thormistor Error (1) ROM-Thormistor Error (2) ROM-Thormistor Error (3) RAM-Parity Error RAM-Protected Mode Not Changed RAM-Cache Memory Error USB-GET Descr. Error (First) USB-GET Address Error HUB-GET Descr. Error (Whole) HUB-SET Configuration Error HUB-GET Descr. Error (Descr) HUB-SET Feature Error (P on) HUB-GET States Error HUB-SET Feature Error (Reset) HUB-CLEAR Feature Error HUB-CLEAR Feature1 Error HUB-SET Feature Error (Enab) HUB-CLEAR Feature2 Error USB-Over Count Error USB-GET-Descr Error (Second) 3-36 Satellite A40 Maintenance Manual...
Maintenance Manual
Page 163
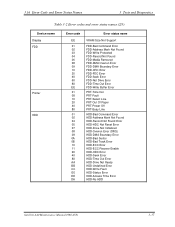
... PRT-Select Line PRT-Out Of Paper PRT-Power Off PRT-Busy Line HDD-Bad Command Error HDD-Address Mark Not Found HDD-Record Not Found Error HDD-HDC Not Reset Error HDD-Drive Not Initialized HDD-Overrun Error (DRQ) HDD-DMA Boundary Error HDD-Bad Sector HDD-Bad Track Error HDD-ECC Error HDD-ECC Recover Enable HDD-HDC Error HDD-Seek Error HDD-Time Out Error HDD-Drive Not Ready HDD-Undefined Error HDD-Write Fault HDD-Status Error HDD-Access Time Error HDD-No HDD Satellite A40 Maintenance Manual (960-458) 3-37
... PRT-Select Line PRT-Out Of Paper PRT-Power Off PRT-Busy Line HDD-Bad Command Error HDD-Address Mark Not Found HDD-Record Not Found Error HDD-HDC Not Reset Error HDD-Drive Not Initialized HDD-Overrun Error (DRQ) HDD-DMA Boundary Error HDD-Bad Sector HDD-Bad Track Error HDD-ECC Error HDD-ECC Recover Enable HDD-HDC Error HDD-Seek Error HDD-Time Out Error HDD-Drive Not Ready HDD-Undefined Error HDD-Write Fault HDD-Status Error HDD-Access Time Error HDD-No HDD Satellite A40 Maintenance Manual (960-458) 3-37
Maintenance Manual
Page 181
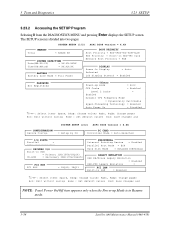
...HDD→PC Card Network Boot Protocol = PXE DISPLAY Power On Display Selected LCD Display Stretch = Auto= Enabled PASSWORD Not Registered Others Power-up mode = Boot CPU Cache = Enabled Level 2 Cache = Enabled Dynamic CPU Frequency Mode = Dynamically Switchable Hyper-Threading Technology = Enabled Auto Power On = Disabled Select items Space, BkSp: Change values PgDn, PgUp: Change pages Esc: Exit without saving Home : Set default values End: Save changes and Exit SYSTEM SETUP (2/2) ACPI BIOS version = X.XX CONFIGURATION Device Config. = Setup by OS PC CARD Controller Mode...
...HDD→PC Card Network Boot Protocol = PXE DISPLAY Power On Display Selected LCD Display Stretch = Auto= Enabled PASSWORD Not Registered Others Power-up mode = Boot CPU Cache = Enabled Level 2 Cache = Enabled Dynamic CPU Frequency Mode = Dynamically Switchable Hyper-Threading Technology = Enabled Auto Power On = Disabled Select items Space, BkSp: Change values PgDn, PgUp: Change pages Esc: Exit without saving Home : Set default values End: Save changes and Exit SYSTEM SETUP (2/2) ACPI BIOS version = X.XX CONFIGURATION Device Config. = Setup by OS PC CARD Controller Mode...
Maintenance Manual
Page 190
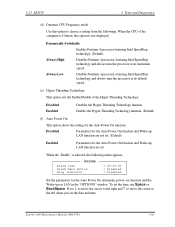
...-Threading Technology function. (Default) (f) Auto Power On This option shows the setting for the Auto Power On function and Wake-up LAN function are set . (Default) Enabled Parameters for the Auto Power On function and Wake-up on LAN in the "OPTIONS" window. When the "Enable" is not displayed. When the CPU of the Hyper-Threading Technology. Disabled Parameters for the Auto Power On function. 3.23 SETUP 3 Tests and Diagnostics (d) Dynamic CPU Frequency mode Use this option is...
...-Threading Technology function. (Default) (f) Auto Power On This option shows the setting for the Auto Power On function and Wake-up LAN function are set . (Default) Enabled Parameters for the Auto Power On function and Wake-up on LAN in the "OPTIONS" window. When the "Enable" is not displayed. When the CPU of the Hyper-Threading Technology. Disabled Parameters for the Auto Power On function. 3.23 SETUP 3 Tests and Diagnostics (d) Dynamic CPU Frequency mode Use this option is...
Maintenance Manual
Page 216
... the CPU slot cover and heat sink slot cover 4-16 Removing the CPU holder and heat sink 4-17 Installing the CPU 4-18 Applying new grease 4-19 Removing the optical drive 4-20 Disassembling the optical drivel 4-21 Removing the keyboard holder and keyboard hold plate 4-23 Removing the keyboard support plate 4-24 Removing the memory module 4-26 Removing the wireless LAN board cover 4-28 Removing the wireless LAN board 4-29 Removing the modem daughter card 4-31 Removing the CD/DVD (audio) play button 4-33 Removing the display assembly (1 4-34 4-iv Satellite A40 Maintenance Manual...
... the CPU slot cover and heat sink slot cover 4-16 Removing the CPU holder and heat sink 4-17 Installing the CPU 4-18 Applying new grease 4-19 Removing the optical drive 4-20 Disassembling the optical drivel 4-21 Removing the keyboard holder and keyboard hold plate 4-23 Removing the keyboard support plate 4-24 Removing the memory module 4-26 Removing the wireless LAN board cover 4-28 Removing the wireless LAN board 4-29 Removing the modem daughter card 4-31 Removing the CD/DVD (audio) play button 4-33 Removing the display assembly (1 4-34 4-iv Satellite A40 Maintenance Manual...

Maintenance Manual
Page 247
...1. Insulator Latch Memory slot B Memory module Memory slot A Figure 4-14 Removing the memory module Satellite A40 Maintenance Manual (960-458) 4-29 Do not touch the memory module terminals. Removing a memory module with the power on the system board. Removing the memory module To remove the memory module, confirm that the computer is in boot mode. Open the left and right latches and remove the memory module from slot A or slot B on risks damaging the module or the computer itself. 4.9 Memory module 4 Replacement Procedures 4.9 Memory module CAUTION: The power of the computer...
...1. Insulator Latch Memory slot B Memory module Memory slot A Figure 4-14 Removing the memory module Satellite A40 Maintenance Manual (960-458) 4-29 Do not touch the memory module terminals. Removing a memory module with the power on the system board. Removing the memory module To remove the memory module, confirm that the computer is in boot mode. Open the left and right latches and remove the memory module from slot A or slot B on risks damaging the module or the computer itself. 4.9 Memory module 4 Replacement Procedures 4.9 Memory module CAUTION: The power of the computer...


