

Owner's Manual - English
Page 8
Front panel 16 8 16 10 HDMI SELECT 12 16 Rear panel Power Cord HDMI OUT jack 12 HDMI indicator 12 16 16 11 11 VIDEO Y PB PR VIDEO OUT HDMI OUT AUDIO OUT R ANALOG L COAXIAL DIGITAL 11 DVD display The indicators vary depending on the kinds of Controls See the page in for details. Some...
Front panel 16 8 16 10 HDMI SELECT 12 16 Rear panel Power Cord HDMI OUT jack 12 HDMI indicator 12 16 16 11 11 VIDEO Y PB PR VIDEO OUT HDMI OUT AUDIO OUT R ANALOG L COAXIAL DIGITAL 11 DVD display The indicators vary depending on the kinds of Controls See the page in for details. Some...

Owner's Manual - English
Page 9
To operate a menu, follow the instructions in for details. 16 19 22 23 24 17 18 17 18 18 20 19 21 29 12 16 19 17 23 24 16 16 18 17 18 25 16 25 * 16 16 20 22 HDMI button 12 * RETURN button Return to menu display for VCD (2.0) discs with menu. * MENU button Use the MENU button to display the menu included on the remote control. Introduction Remote control The instructions in this manual describe the functions on many DVDs. See the page in "Locating a title using the top menu." 18 9
To operate a menu, follow the instructions in for details. 16 19 22 23 24 17 18 17 18 18 20 19 21 29 12 16 19 17 23 24 16 16 18 17 18 25 16 25 * 16 16 20 22 HDMI button 12 * RETURN button Return to menu display for VCD (2.0) discs with menu. * MENU button Use the MENU button to display the menu included on the remote control. Introduction Remote control The instructions in this manual describe the functions on many DVDs. See the page in "Locating a title using the top menu." 18 9
Owner's Manual - English
Page 11
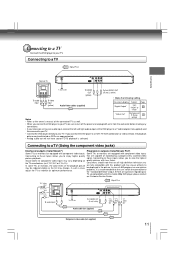
... scanned video picture playback. signal. To Y video input To PB video input To PR video input To audio input VIDEO Y PB PR VIDEO OUT HDMI OUT AUDIO OUT R ANALOG L COAXIAL DIGITAL To 2ch AUDIO OUT (R: red, L:white) Audio cable (not supplied) Component video cable (not supplied)...video inputs. On-screen display Select: Page "Digital Output" "Off", "PCM" or 32 "Raw" "Video Out" Component P-Scan 31 Notes HDMI • Refer to the owner's manual of the connected TV as DVDs are fully compatible with less flicker. Connecting to these inputs allows you connect...
... scanned video picture playback. signal. To Y video input To PB video input To PR video input To audio input VIDEO Y PB PR VIDEO OUT HDMI OUT AUDIO OUT R ANALOG L COAXIAL DIGITAL To 2ch AUDIO OUT (R: red, L:white) Audio cable (not supplied) Component video cable (not supplied)...video inputs. On-screen display Select: Page "Digital Output" "Off", "PCM" or 32 "Raw" "Video Out" Component P-Scan 31 Notes HDMI • Refer to the owner's manual of the connected TV as DVDs are fully compatible with less flicker. Connecting to these inputs allows you connect...
Owner's Manual - English
Page 12
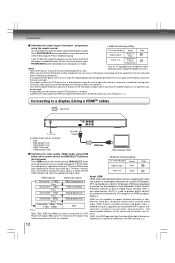
... DVD player away from original 480i signal. Connecting to a display (Using a HDMITM cable) VIDEO Y PB PR VIDEO OUT HDMI OUT AUDIO OUT R ANALOG L COAXIAL DIGITAL To HDMI Output Available output signals are registered trademarks of Toshiba America Cousumer Products L.L.C. See the HDMI indicator and select the appropriate output signal. • Make the following setting...
... DVD player away from original 480i signal. Connecting to a display (Using a HDMITM cable) VIDEO Y PB PR VIDEO OUT HDMI OUT AUDIO OUT R ANALOG L COAXIAL DIGITAL To HDMI Output Available output signals are registered trademarks of Toshiba America Cousumer Products L.L.C. See the HDMI indicator and select the appropriate output signal. • Make the following setting...
Owner's Manual - English
Page 13
... the DVD player are connected to the COAXIAL DIGITAL AUDIO OUT jack of the DVD player. Connections Content of the output for each output jack HDMI Video Component Output Output Output - Warning • When you have output when HD JPEG Mode is invalid. Otherwise, the speakers may view photos (JPEG...to be sure to turn off the power and unplug both units from the wall outlet before making any connections. • If you have a HDMI (with HDCP) equipped monitor or display, you connect the DVD player to your A/V Receiver is reserved for Laser disc use only and is incompatible...
... the DVD player are connected to the COAXIAL DIGITAL AUDIO OUT jack of the DVD player. Connections Content of the output for each output jack HDMI Video Component Output Output Output - Warning • When you have output when HD JPEG Mode is invalid. Otherwise, the speakers may view photos (JPEG...to be sure to turn off the power and unplug both units from the wall outlet before making any connections. • If you have a HDMI (with HDCP) equipped monitor or display, you connect the DVD player to your A/V Receiver is reserved for Laser disc use only and is incompatible...
Owner's Manual - English
Page 30
...your DivX® files include a subtitle file, then you may not include your TV screen. Video Aspect Ratio : 16 : 9 : Auto Fit Video Out : HDMI HDMI Resolution : Auto HD JPEG Mode : On JPEG Interval : 5 seconds Aspect Ratio DVD 1) Press SETUP button. 2) Press / button to select Video. 3) Press ...button, then use the / button to exit the menu. Spanish: To display DVD Menus in a different language than you selected. Aspect Ratio Video Out HDMI Resolution : Auto HD JPEG Mode : On JPEG Interval : 5 seconds 4:3 Select when a standard 4:3 TV is connected. A prior language may not ...
...your DivX® files include a subtitle file, then you may not include your TV screen. Video Aspect Ratio : 16 : 9 : Auto Fit Video Out : HDMI HDMI Resolution : Auto HD JPEG Mode : On JPEG Interval : 5 seconds Aspect Ratio DVD 1) Press SETUP button. 2) Press / button to select Video. 3) Press ...button, then use the / button to exit the menu. Spanish: To display DVD Menus in a different language than you selected. Aspect Ratio Video Out HDMI Resolution : Auto HD JPEG Mode : On JPEG Interval : 5 seconds 4:3 Select when a standard 4:3 TV is connected. A prior language may not ...

Owner's Manual - English
Page 31
...DVDs recorded in the 4:3 picture size only, the playback picture always appears in use the / button to select the output mode (Component, P-Scan or HDMI). 5) Press ENTER button. 6) Press SETUP button to fill your TV which has component video inputs. Therefore, the playback picture of some DVDs may ... distortion. P-Scan: Select if you own a 4:3 TV set to the performance of the picture are cut off. Aspect Ratio : 16 : 9 Video Out HDMI Resolution : Auto Fit Auto 480p 720p HD JPEG Mode 1080i JPEG Interval 1080p Notes • If the Video Out is preferred for Jpeg viewing. Auto...
...DVDs recorded in the 4:3 picture size only, the playback picture always appears in use the / button to select the output mode (Component, P-Scan or HDMI). 5) Press ENTER button. 6) Press SETUP button to fill your TV which has component video inputs. Therefore, the playback picture of some DVDs may ... distortion. P-Scan: Select if you own a 4:3 TV set to the performance of the picture are cut off. Aspect Ratio : 16 : 9 Video Out HDMI Resolution : Auto Fit Auto 480p 720p HD JPEG Mode 1080i JPEG Interval 1080p Notes • If the Video Out is preferred for Jpeg viewing. Auto...
Owner's Manual - English
Page 32
...select Video. 3) Press button, then the / button to select the JPEG Interval. 4) Press ENTER button, then the / button to exit the HDMI Resolution HD JPEG Mode Off 5 seconds menu. Off: The picture quality is Dynamic Range Control (DRC) option for analog audio output. Off: To ... interval. Audio : PCM : Off 32 Digital Output Selects the output sound format corresponding to your amplifier supports "DTS". Video Out : HDMI HDMI Resolution On HD JPEG Mode Off JPEG Interval On: JPEG image is equivalent to a Multi-channel digital stereo amplifier. Raw PCM: Select ...
...select Video. 3) Press button, then the / button to select the JPEG Interval. 4) Press ENTER button, then the / button to exit the HDMI Resolution HD JPEG Mode Off 5 seconds menu. Off: The picture quality is Dynamic Range Control (DRC) option for analog audio output. Off: To ... interval. Audio : PCM : Off 32 Digital Output Selects the output sound format corresponding to your amplifier supports "DTS". Video Out : HDMI HDMI Resolution On HD JPEG Mode Off JPEG Interval On: JPEG image is equivalent to a Multi-channel digital stereo amplifier. Raw PCM: Select ...

Owner's Manual - English
Page 33
.... If the DVD has been designed to input the new password. 7) Press ENTER button, "Confirm Password" screen will appear. PASSWORD: 8888 Misc Screen saver : On HDMI CEC : Off Use Default Settings If you can virtually playback all DVD software. 6) Press OPEN/CLOSE button to input the current password (If the password...
.... If the DVD has been designed to input the new password. 7) Press ENTER button, "Confirm Password" screen will appear. PASSWORD: 8888 Misc Screen saver : On HDMI CEC : Off Use Default Settings If you can virtually playback all DVD software. 6) Press OPEN/CLOSE button to input the current password (If the password...

Owner's Manual - English
Page 34
...Press button, then use the / button to select Screen saver. 4) Press ENTER button, then use this unit with TV's remote control. Off: To deactivate HDMI-CEC. Check your TV owner's manual for other applications or websites. Notes • This function may not work . • Other components must be shown....button. Button for one touch play When the operations with following button of this DVD unit from TV's remote which is not set to "HDMI", HDMI-CEC will automatically switch to use the / button to select the On or Off mode. 5) Press ENTER button. 6) Press SETUP button ...
...Press button, then use the / button to select Screen saver. 4) Press ENTER button, then use this unit with TV's remote control. Off: To deactivate HDMI-CEC. Check your TV owner's manual for other applications or websites. Notes • This function may not work . • Other components must be shown....button. Button for one touch play When the operations with following button of this DVD unit from TV's remote which is not set to "HDMI", HDMI-CEC will automatically switch to use the / button to select the On or Off mode. 5) Press ENTER button. 6) Press SETUP button ...
Owner's Manual - English
Page 36
.... • The automatic power off function turned the unit off. • The TV is not set to receive DVD signal output. • The video/HDMI cable is not connected securely. • Mismatch setting between TV and this unit. • Wrong connection. • PROGRESSIVE button is pressed on the front ...the audio cable. • Select the proper audio setting. • Remove the disc and clean it on the TV screen. • Connect the video/HDMI cable securely into the wall outlet again. • Point the remote control at the remote sensor of the DVD player. • The remote control is...
.... • The automatic power off function turned the unit off. • The TV is not set to receive DVD signal output. • The video/HDMI cable is not connected securely. • Mismatch setting between TV and this unit. • Wrong connection. • PROGRESSIVE button is pressed on the front ...the audio cable. • Select the proper audio setting. • Remove the disc and clean it on the TV screen. • Connect the video/HDMI cable securely into the wall outlet again. • Point the remote control at the remote sensor of the DVD player. • The remote control is...

Owner's Manual - English
Page 37
... % (W.PEAK)) Temperature: 5 °C to 35 °C, Operation status: Horizontal Outputs Video output Component video output Audio output (COAXIAL DIGITAL) Audio output (ANALOG) HDMI output 1.0 V (p-p), 75 Ω, negative sync., pin jack x 1 (Y) 1.0 V (p-p), 75 Ω, negative sync., pin jack x 1 (PB)/(PR) ...jacks (L, R) x 1 19 pin Supplied Accessories Audio/video cable 1 Remote control (SE-R0313 1 Batteries (R03/AAA 2 HDMI cable (for SDK990KU model only 1 • This model complies with the above specifications. • Designs and specifications are subject to change without notice...
... % (W.PEAK)) Temperature: 5 °C to 35 °C, Operation status: Horizontal Outputs Video output Component video output Audio output (COAXIAL DIGITAL) Audio output (ANALOG) HDMI output 1.0 V (p-p), 75 Ω, negative sync., pin jack x 1 (Y) 1.0 V (p-p), 75 Ω, negative sync., pin jack x 1 (PB)/(PR) ...jacks (L, R) x 1 19 pin Supplied Accessories Audio/video cable 1 Remote control (SE-R0313 1 Batteries (R03/AAA 2 HDMI cable (for SDK990KU model only 1 • This model complies with the above specifications. • Designs and specifications are subject to change without notice...


