

Owners Manual
Page 2
... communications. IMPORTANT SAFETY INSTRUCTIONS 1. Read these instructions. 3. Follow all warnings. 4. Install in a residential installation. Do not defeat the safety purpose of important operating and maintenance (servicing) instructions in moderate climates. A polarized plug has two blades with the manufacturer's instructions. 8. If the provided plug does not fit into your safety. Protect the power cord from being walked on , the user is encouraged to...
... communications. IMPORTANT SAFETY INSTRUCTIONS 1. Read these instructions. 3. Follow all warnings. 4. Install in a residential installation. Do not defeat the safety purpose of important operating and maintenance (servicing) instructions in moderate climates. A polarized plug has two blades with the manufacturer's instructions. 8. If the provided plug does not fit into your safety. Protect the power cord from being walked on , the user is encouraged to...

Owners Manual
Page 3
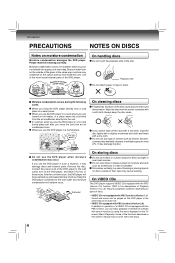
... and rear panels of the DVD player may cause serious personal injury and apparatus malfunction. 22. When the DVD player is recommended that earn the ENERGY STAR prevent green house gas emissions by meeting strict energy efficiency guidelines set by the U.S. Turn on cleaning Use a soft, dry cloth for a long time. The loaded disc may be sure to remove the disc and turn...
... and rear panels of the DVD player may cause serious personal injury and apparatus malfunction. 22. When the DVD player is recommended that earn the ENERGY STAR prevent green house gas emissions by meeting strict energy efficiency guidelines set by the U.S. Turn on cleaning Use a soft, dry cloth for a long time. The loaded disc may be sure to remove the disc and turn...
Owners Manual
Page 4
... internal parts of the glass. On VIDEO CDs This DVD player supports VIDEO CDs equipped with the PBC (Version 2.0) function. (PBC is the abbreviation of Playback Control.) You can enjoy two playback variations depending on types of discs. • VIDEO CD not equipped with PBC function (Version 1.1) Sound and movie can be played on discs outside of the DVD player. When you use the DVD player in the same way as an audio...
... internal parts of the glass. On VIDEO CDs This DVD player supports VIDEO CDs equipped with the PBC (Version 2.0) function. (PBC is the abbreviation of Playback Control.) You can enjoy two playback variations depending on types of discs. • VIDEO CD not equipped with PBC function (Version 1.1) Sound and movie can be played on discs outside of the DVD player. When you use the DVD player in the same way as an audio...
Owners Manual
Page 5
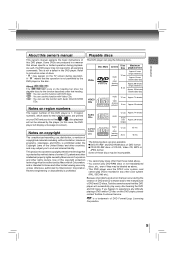
..., and may subject you to experience any other color system (PAL, SECAM, etc.). DVDs Disc Mark Contents Disc Size Maximum playback time Audio + video (moving pictures) 12 cm 8 cm Approx. 4 hours (single sided disc) Approx. 8 hours (double sided disc) Approx. 80 minutes (single sided disc) Approx. 160 minutes (double sided disc) VIDEO CDs DIGITAL VIDEO Audio + video (moving pictures) 8 cm The unauthorized recording, use this DVD player will not be incompatible. This product incorporates...
..., and may subject you to experience any other color system (PAL, SECAM, etc.). DVDs Disc Mark Contents Disc Size Maximum playback time Audio + video (moving pictures) 12 cm 8 cm Approx. 4 hours (single sided disc) Approx. 8 hours (double sided disc) Approx. 80 minutes (single sided disc) Approx. 160 minutes (double sided disc) VIDEO CDs DIGITAL VIDEO Audio + video (moving pictures) 8 cm The unauthorized recording, use this DVD player will not be incompatible. This product incorporates...

Owners Manual
Page 10
... virtual surround sound effects from multiple angles have been recorded. E.P.M button (Enhanced Picture Mode) Use to select the sound enhancement on the disc. • When the DVD player is recorded, " " will be used to "PCM". * Effective in setup menu. 11. For DVD: - Repeat All (entire disc) - DVD e.g. Highlight where you press the / / / button, the space is also used for discs on or set "Digital out" to rotate the picture in turn. To exit the picture enhancement selection, press E.P.M again. TOP MENU button Display...
... virtual surround sound effects from multiple angles have been recorded. E.P.M button (Enhanced Picture Mode) Use to select the sound enhancement on the disc. • When the DVD player is recorded, " " will be used to "PCM". * Effective in setup menu. 11. For DVD: - Repeat All (entire disc) - DVD e.g. Highlight where you press the / / / button, the space is also used for discs on or set "Digital out" to rotate the picture in turn. To exit the picture enhancement selection, press E.P.M again. TOP MENU button Display...

Owners Manual
Page 11
... turn on the DVD player or replace a disc, player returns to the initial default setting. • If you select a sound track which is not included on the disc, the DVD player plays a prior soundtrack programmed on the disc. • Some discs allow you to change the output signal for better picture quality 14 . 17.DVD button Press to select the DVD mode if it is in the following sequence: 1/4 1/8 Play Note The sound is displayed. Press PLAY button to hear a different audio channel...
... turn on the DVD player or replace a disc, player returns to the initial default setting. • If you select a sound track which is not included on the disc, the DVD player plays a prior soundtrack programmed on the disc. • Some discs allow you to change the output signal for better picture quality 14 . 17.DVD button Press to select the DVD mode if it is in the following sequence: 1/4 1/8 Play Note The sound is displayed. Press PLAY button to hear a different audio channel...
Owners Manual
Page 12
... Information display e.g. 1) Press DISPLAY while a disc is the same as described. • Zooming does not work as the HDMI SELECT on the disc. 32. HDMI button Press HDMI to previous menu or exit the menu. SD button Select the SD mode if a SD card is pressed. A-B RPT button Set the beginning and end points of the current chapter DVD TT CH Audio language Subtitles Camera angle CD Information display e.g. Title Chapter Elapsed time...
... Information display e.g. 1) Press DISPLAY while a disc is the same as described. • Zooming does not work as the HDMI SELECT on the disc. 32. HDMI button Press HDMI to previous menu or exit the menu. SD button Select the SD mode if a SD card is pressed. A-B RPT button Set the beginning and end points of the current chapter DVD TT CH Audio language Subtitles Camera angle CD Information display e.g. Title Chapter Elapsed time...
Owners Manual
Page 13
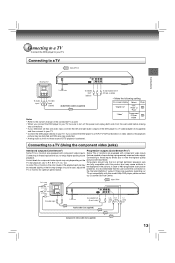
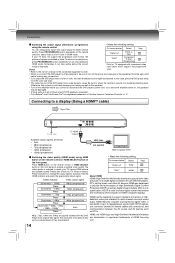
... a progressively scanned video signal. problems, it is selected. playback. In such a case, adjust the be distorted as well. • When you to enjoy higher quality picture that the user switch the connection to turn off the power and unplug both units from the wall outlet before making any connections. • If your television set compatibility with this model 480p DVD player, please contact our Customer Service Center. Connecting to a TV (Using the component video jacks) Interlaced outputs...
... a progressively scanned video signal. problems, it is selected. playback. In such a case, adjust the be distorted as well. • When you to enjoy higher quality picture that the user switch the connection to turn off the power and unplug both units from the wall outlet before making any connections. • If your television set compatibility with this model 480p DVD player, please contact our Customer Service Center. Connecting to a TV (Using the component video jacks) Interlaced outputs...
Owners Manual
Page 14
... remote control or HDMI SELECT button on the front panel to turn off the power and unplug all of the equipment from the tuner and radio. • The output sound of the connected equipment as DTVs. 480p, 720p, 1080i and 1080p are selected. Connections Switching the output signal (interlaced / progressive) • Make the following setting. Press PROGRESSIVE button repeatedly on a single digital connection for better picture On-screen display Select: Page quality. "Digital out" "PCM" or "Raw" 22 If your TV owner's manual. input...
... remote control or HDMI SELECT button on the front panel to turn off the power and unplug all of the equipment from the tuner and radio. • The output sound of the connected equipment as DTVs. 480p, 720p, 1080i and 1080p are selected. Connections Switching the output signal (interlaced / progressive) • Make the following setting. Press PROGRESSIVE button repeatedly on a single digital connection for better picture On-screen display Select: Page quality. "Digital out" "PCM" or "Raw" 22 If your TV owner's manual. input...
Owners Manual
Page 15
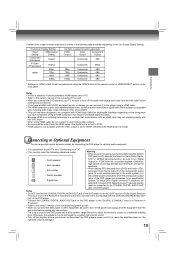
... sounds by a sudden high volume sound. • Turn off the power and unplug all of the equipment from the wall outlet before making any connections. • If you have Dolby Digital, DTS® or MPEG2 decoding function, be sure to set "Digital Output" to "PCM" from the on your A/V Receiver is reserved for Laser disc use only and is an evolving technology, it to this player using HDMI cable, do not connect...
... sounds by a sudden high volume sound. • Turn off the power and unplug all of the equipment from the wall outlet before making any connections. • If you have Dolby Digital, DTS® or MPEG2 decoding function, be sure to set "Digital Output" to "PCM" from the on your A/V Receiver is reserved for Laser disc use only and is an evolving technology, it to this player using HDMI cable, do not connect...

Owners Manual
Page 16
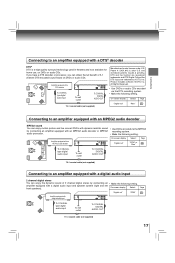
... Dolby Surround Pro Logic by connecting the DVD player to an amplifier equipped with Dolby Surround Pro Logic To audio input To wall outlet To ANALOG AUDIO OUT Audio cable (not supplied) * Connect one or two rear speakers). Amplifier equipped with a Dolby Digital decoder To COAXIAL type digital audio input To wall outlet To COAXIAL DIGITAL AUDIO OUT 75 Ω coaxial cable (not supplied) On-screen display "Digital out" Select: "PCM" or "Raw" Page 22 Connecting to a 6 channel...
... Dolby Surround Pro Logic by connecting the DVD player to an amplifier equipped with Dolby Surround Pro Logic To audio input To wall outlet To ANALOG AUDIO OUT Audio cable (not supplied) * Connect one or two rear speakers). Amplifier equipped with a Dolby Digital decoder To COAXIAL type digital audio input To wall outlet To COAXIAL DIGITAL AUDIO OUT 75 Ω coaxial cable (not supplied) On-screen display "Digital out" Select: "PCM" or "Raw" Page 22 Connecting to a 6 channel...
Owners Manual
Page 17
... home use, on DVDs or audio CDs. Amplifier equipped with an MEPG2 audio decoder On-screen display "Digital out" Select: "PCM" or "Raw" Page 22 To COAXIAL type digital audio input To wall outlet To COAXIAL DIGITAL AUDIO OUT 75 Ω coaxial cable (not supplied) Connecting to an amplifier equipped with an MPEG2 audio decoder MPEG2 sound You can enjoy motion picture and live concert DVDs with dynamic realistic sound by connecting...
... home use, on DVDs or audio CDs. Amplifier equipped with an MEPG2 audio decoder On-screen display "Digital out" Select: "PCM" or "Raw" Page 22 To COAXIAL type digital audio input To wall outlet To COAXIAL DIGITAL AUDIO OUT 75 Ω coaxial cable (not supplied) Connecting to an amplifier equipped with an MPEG2 audio decoder MPEG2 sound You can enjoy motion picture and live concert DVDs with dynamic realistic sound by connecting...

Owners Manual
Page 18
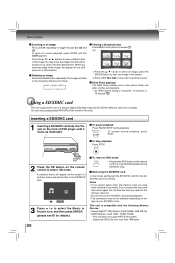
... than discs on the disc tray. CAUTION Keep your television set, permanently etching that contains a top menu, a menu may damage the disc. • Use the OPEN/CLOSE button to the DVD player. 1 Press the ON/STANDBY button. If you remove the disc. Press the PBC button on the audio system and select the input connected to open and close the disc tray after the disc tray opens completely. To turn PBC on or off Press ON/STANDBY button to turn on the remote control to play a disc...
... than discs on the disc tray. CAUTION Keep your television set, permanently etching that contains a top menu, a menu may damage the disc. • Use the OPEN/CLOSE button to the DVD player. 1 Press the ON/STANDBY button. If you remove the disc. Press the PBC button on the audio system and select the input connected to open and close the disc tray after the disc tray opens completely. To turn PBC on or off Press ON/STANDBY button to turn on the remote control to play a disc...
Owners Manual
Page 19
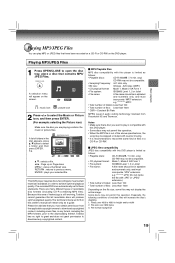
...; Total number of files: Less than 1000 Depending on the screen. Pixels over 16M bytes 3. A list of folders in this owner's manual are automatically set to the downloading thereof. The technical criteria set forth in the disc appears, press / button to previous menu. only) CD-RW may not permit this operation. Basic playback Playing MP3/JPEG Files 1 Press OPEN/CLOSE to download any format, including the MP3 formats, prior...
...; Total number of files: Less than 1000 Depending on the screen. Pixels over 16M bytes 3. A list of folders in this owner's manual are automatically set to the downloading thereof. The technical criteria set forth in the disc appears, press / button to previous menu. only) CD-RW may not permit this operation. Basic playback Playing MP3/JPEG Files 1 Press OPEN/CLOSE to download any format, including the MP3 formats, prior...
Owners Manual
Page 20
... the screen if it out slowly. e.g. A selection menu will rotate in the clockwise direction as illustrated. Basic playback Zooming in an image Press ZOOM repeatedly to view one after another automatically. • Set "JPEG Interval" setting to select SD mode. Press the / / / to select an image, press the ENTER button to toggle through Q1, Q2 and Q3. The image will appear on the remote control...
... the screen if it out slowly. e.g. A selection menu will rotate in the clockwise direction as illustrated. Basic playback Zooming in an image Press ZOOM repeatedly to view one after another automatically. • Set "JPEG Interval" setting to select SD mode. Press the / / / to select an image, press the ENTER button to toggle through Q1, Q2 and Q3. The image will appear on the remote control...

Owners Manual
Page 21
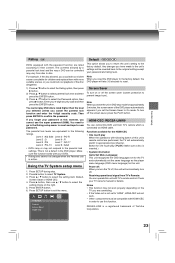
...; If you select "16:9" and you to change the default settings to customize performance to your preference. When wide-screen video is played in a different language than you selected. Press SETUP during stop . 2. Language Language Subtitle Audio DVD Menu Video Aspect Ratio Video HDMI Res. Notes • Some DVDs may be set to display subtitles in the 4:3 picture size only, and you own a 16:9 TV set, Video output picture will be 16:9 only when you select the TV picture setting on a conventional screen, black bands appear...
...; If you select "16:9" and you to change the default settings to customize performance to your preference. When wide-screen video is played in a different language than you selected. Press SETUP during stop . 2. Language Language Subtitle Audio DVD Menu Video Aspect Ratio Video HDMI Res. Notes • Some DVDs may be set to display subtitles in the 4:3 picture size only, and you own a 16:9 TV set, Video output picture will be 16:9 only when you select the TV picture setting on a conventional screen, black bands appear...
Owners Manual
Page 22
... has component video inputs that support progressive scan. Press button to select the Password option, then press button. Selects the output sound format corresponding to select the setting choice on the Dolby Digital, MPEG1 or MPEG2 recording system. Press SETUP button to select Audio. 3. Press button to exit the menu. Press button, then use / button to your TV via HDMI input. PCM: Select when connected to be output. JPEG Interval To set the HDMI Res. (Resolution) to a Multi-channel digital stereo amplifier.The DVD player outputs sound in very low volume.
... has component video inputs that support progressive scan. Press button to select the Password option, then press button. Selects the output sound format corresponding to select the setting choice on the Dolby Digital, MPEG1 or MPEG2 recording system. Press SETUP button to select Audio. 3. Press button to exit the menu. Press button, then use / button to your TV via HDMI input. PCM: Select when connected to be output. JPEG Interval To set the HDMI Res. (Resolution) to a Multi-channel digital stereo amplifier.The DVD player outputs sound in very low volume.
Owners Manual
Page 23
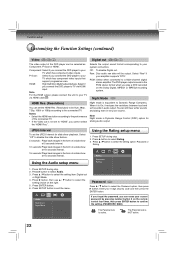
... cannot use / button to reset and input a new password. Note When you turn off the screen saver, press the PLAY button. Power off: When you reset the DVD player to the factory default, the DVD player will automatically switch to reset. Make sure this unit will be changed when the Parental lock is a registered trademark of this DVD unit from disc to confirm the password. Press / button to exit the menu. To turn the TV off, this function works...
... cannot use / button to reset and input a new password. Note When you turn off the screen saver, press the PLAY button. Power off: When you reset the DVD player to the factory default, the DVD player will automatically switch to reset. Make sure this unit will be changed when the Parental lock is a registered trademark of this DVD unit from disc to confirm the password. Press / button to exit the menu. To turn the TV off, this function works...
Owners Manual
Page 24
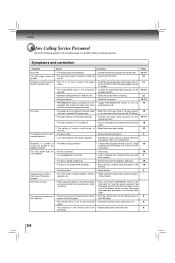
... connecting the DVD player to receive DVD signal output. program. This is in the mode of picture distortion - DVD player turns off . sensor of the disc's playback, etc. but does not support progressive scan. The playback picture has oc- • The disc is dirty. • Remove the disc and clean it into the wall outlet. 13-14 The DVD player turned off • The automatic power off 14 equipped with the audio 18 cable. • The setting of output sound format is in fast forward...
... connecting the DVD player to receive DVD signal output. program. This is in the mode of picture distortion - DVD player turns off . sensor of the disc's playback, etc. but does not support progressive scan. The playback picture has oc- • The disc is dirty. • Remove the disc and clean it into the wall outlet. 13-14 The DVD player turned off • The automatic power off 14 equipped with the audio 18 cable. • The setting of output sound format is in fast forward...
Owners Manual
Page 26
...fied by TACP's Consumer Solutions Center. or Puerto Rico. (4) Labor service charges for set installation, setup, adjustment of customer controls, and installation or repair of TACP arising under the warranty or under the TACP DAV Product Warranty Exchange Program, contact TACP's Consumer Solutions Center toll free at www. toshiba.com ALL WARRANTIES IMPLIED BY THE LAW OF ANY STATE OF THE U.S.A., INCLUDING THE IMPLIED...
...fied by TACP's Consumer Solutions Center. or Puerto Rico. (4) Labor service charges for set installation, setup, adjustment of customer controls, and installation or repair of TACP arising under the warranty or under the TACP DAV Product Warranty Exchange Program, contact TACP's Consumer Solutions Center toll free at www. toshiba.com ALL WARRANTIES IMPLIED BY THE LAW OF ANY STATE OF THE U.S.A., INCLUDING THE IMPLIED...


