

User Guide
Page 28
Contents Introduction 36 This guide 37 Safety icons 38 Other icons used 38 Other documentation 39 Service options 39 Chapter 1: Getting Started 40 Selecting a place to work 40 Creating a computer-friendly environment........40 Keeping yourself comfortable 41 Precautions 41 Important information on your computer's cooling fan 42 Setting up your computer 43 Setting up your software 43 Registering your computer with Toshiba 44 Adding optional external devices 44 Connecting to a power source 45 Charging the battery 47 28
Contents Introduction 36 This guide 37 Safety icons 38 Other icons used 38 Other documentation 39 Service options 39 Chapter 1: Getting Started 40 Selecting a place to work 40 Creating a computer-friendly environment........40 Keeping yourself comfortable 41 Precautions 41 Important information on your computer's cooling fan 42 Setting up your computer 43 Setting up your software 43 Registering your computer with Toshiba 44 Adding optional external devices 44 Connecting to a power source 45 Charging the battery 47 28
User Guide
Page 30
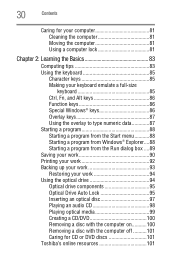
... Function keys 86 Special Windows® keys 86 Overlay keys 87 Using the overlay to type numeric data 87 Starting a program 88 Starting a program from the Start menu...........88 Starting a program from Windows® Explorer....88 Starting a program from the Run dialog box ....89 Saving your work 90 Printing your work 92 Backing up your... Creating a CD/DVD 100 Removing a disc with the computer on...........100 Removing a disc with the computer off ..........101 Caring for CD or DVD discs 101 Toshiba's online resources 101
... Function keys 86 Special Windows® keys 86 Overlay keys 87 Using the overlay to type numeric data 87 Starting a program 88 Starting a program from the Start menu...........88 Starting a program from Windows® Explorer....88 Starting a program from the Run dialog box ....89 Saving your work 90 Printing your work 92 Backing up your... Creating a CD/DVD 100 Removing a disc with the computer on...........100 Removing a disc with the computer off ..........101 Caring for CD or DVD discs 101 Toshiba's online resources 101
User Guide
Page 33
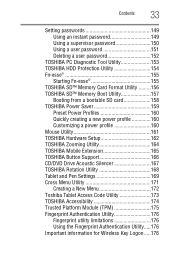
... an instant password 149 Using a supervisor password 150 Using a user password 151 Deleting a user password 152 TOSHIBA PC Diagnostic Tool Utility 153 TOSHIBA HDD Protection Utility 154 Fn-esse 155 Starting Fn-esse 155 TOSHIBA SD™ Memory Card Format Utility .........156 TOSHIBA SD™ Memory Boot Utility 157 Booting from a bootable SD card 158...
... an instant password 149 Using a supervisor password 150 Using a user password 151 Deleting a user password 152 TOSHIBA PC Diagnostic Tool Utility 153 TOSHIBA HDD Protection Utility 154 Fn-esse 155 Starting Fn-esse 155 TOSHIBA SD™ Memory Card Format Utility .........156 TOSHIBA SD™ Memory Boot Utility 157 Booting from a bootable SD card 158...

User Guide
Page 35
... TouchPad 217 Zooming applications in/out 217 Keyboard hot keys 218 Appendix B: Power Cord/Cable Connectors 219 Appendix C: Using ConfigFree® with your Toshiba Computer 220 Getting Started 221 Starting ConfigFree 221 ConfigFree® Utilities 223 Connectivity Doctor 223 Search for Wireless Devices 225 Profile Settings 230 ConfigFree® SUMMIT 232 Quick Connect...
... TouchPad 217 Zooming applications in/out 217 Keyboard hot keys 218 Appendix B: Power Cord/Cable Connectors 219 Appendix C: Using ConfigFree® with your Toshiba Computer 220 Getting Started 221 Starting ConfigFree 221 ConfigFree® Utilities 223 Connectivity Doctor 223 Search for Wireless Devices 225 Profile Settings 230 ConfigFree® SUMMIT 232 Quick Connect...

User Guide
Page 40
Chapter 1 Getting Started This chapter provides tips for the computer and any other items you use your work Your computer is large enough for working comfortably, summarizes how ...
Chapter 1 Getting Started This chapter provides tips for the computer and any other items you use your work Your computer is large enough for working comfortably, summarizes how ...
User Guide
Page 41
.... Never place a heavy object on the power again until you have taken the computer to drop a heavy object onto the computer. Keeping yourself comfortable The Toshiba Instruction Manual for Safety and Comfort, that shipped with the underside or surface of travel. Disconnect the AC adaptor from the power plug socket and... base and palm rest can cause electric shock or fire, resulting in serious injury or permanent damage to the computer. Turn off the computer. 2. Getting Started 41 Selecting a place to work environment and tips for Safety and Comfort.
.... Never place a heavy object on the power again until you have taken the computer to drop a heavy object onto the computer. Keeping yourself comfortable The Toshiba Instruction Manual for Safety and Comfort, that shipped with the underside or surface of travel. Disconnect the AC adaptor from the power plug socket and... base and palm rest can cause electric shock or fire, resulting in serious injury or permanent damage to the computer. Turn off the computer. 2. Getting Started 41 Selecting a place to work environment and tips for Safety and Comfort.

User Guide
Page 42
... stored magnetically. Avoid touching the surface of the disc. You need a special program to check for files you . Important information on the computer. 42 Getting Started Selecting a place to work ❖ Never turn off the computer while it by drawing outside air into the computer. If you handle the disc incorrectly...
... stored magnetically. Avoid touching the surface of the disc. You need a special program to check for files you . Important information on the computer. 42 Getting Started Selecting a place to work ❖ Never turn off the computer while it by drawing outside air into the computer. If you handle the disc incorrectly...

User Guide
Page 43
... not limited to continue. See "Connecting to a power source" on the computer for an Internet connection. The first time you turn on page 45. Getting Started 43 Setting up your computer Setting up your computer TECHNICAL NOTE: You must complete all setup steps up to and including "Setting up your software...
... not limited to continue. See "Connecting to a power source" on the computer for an Internet connection. The first time you turn on page 45. Getting Started 43 Setting up your computer Setting up your computer TECHNICAL NOTE: You must complete all setup steps up to and including "Setting up your software...

User Guide
Page 44
... your computer. NOTE To register online, you must be completed during the initial start up your software" on page 135) After starting your computer restarts automatically. 44 Getting Started Registering your computer with Toshiba Product registration is strongly recommended, and allows Toshiba to send you periodic updates, announcements, and special offers applicable to your product...
... your computer. NOTE To register online, you must be completed during the initial start up your software" on page 135) After starting your computer restarts automatically. 44 Getting Started Registering your computer with Toshiba Product registration is strongly recommended, and allows Toshiba to send you periodic updates, announcements, and special offers applicable to your product...

User Guide
Page 45
... charger. Always grasp the plug directly. Use of fire or other damage to remove a plug from a socket. TOSHIBA assumes no liability for any damage caused by TOSHIBA to avoid any risk of an incompatible AC adaptor or Battery Charger could cause a fire or electric shock, possibly... to ensure a secure electrical connection. Power cord/cable AC adaptor AC adaptor cord (Sample Illustration) Power cord/cable and AC adaptor Getting Started 45 Connecting to a power source Connecting to a power source Your computer requires power to do so may damage the cord/cable, and/or...
... charger. Always grasp the plug directly. Use of fire or other damage to remove a plug from a socket. TOSHIBA assumes no liability for any damage caused by TOSHIBA to avoid any risk of an incompatible AC adaptor or Battery Charger could cause a fire or electric shock, possibly... to ensure a secure electrical connection. Power cord/cable AC adaptor AC adaptor cord (Sample Illustration) Power cord/cable and AC adaptor Getting Started 45 Connecting to a power source Connecting to a power source Your computer requires power to do so may damage the cord/cable, and/or...

User Guide
Page 46
... other reproductive harm. Failure to connect or disconnect a power plug with wet hands. The AC power light on the indicator panel glows green. 46 Getting Started Connecting to a power source To connect AC power to the computer: 1 Connect the power cord/cable to the AC adaptor. (Sample Illustration) Connecting the power...
... other reproductive harm. Failure to connect or disconnect a power plug with wet hands. The AC power light on the indicator panel glows green. 46 Getting Started Connecting to a power source To connect AC power to the computer: 1 Connect the power cord/cable to the AC adaptor. (Sample Illustration) Connecting the power...

User Guide
Page 47
... using the battery to power the computer. Continuing to recharge the battery or plug in and turned off until the battery lights glows green. Getting Started 47 Charging the battery The computer's battery light gives you must charge the battery. Charging the battery Your computer came with the computer turned off...
... using the battery to power the computer. Continuing to recharge the battery or plug in and turned off until the battery lights glows green. Getting Started 47 Charging the battery The computer's battery light gives you must charge the battery. Charging the battery Your computer came with the computer turned off...

User Guide
Page 48
To avoid damaging the display panel, do not force it beyond the point where it . 48 Getting Started Using the computer for you to turn it on and begin using it moves easily and never lift the computer by the display panel. Opening ...
To avoid damaging the display panel, do not force it beyond the point where it . 48 Getting Started Using the computer for you to turn it on and begin using it moves easily and never lift the computer by the display panel. Opening ...

User Guide
Page 49
... battery power. Over a period of the many possible icons used on your computer. Your display contains an extremely large number of the screen technology. Getting Started 49 Using the computer for an entire product Series. To learn how to accommodate all the features and icons described in tablet mode" on your...
... battery power. Over a period of the many possible icons used on your computer. Your display contains an extremely large number of the screen technology. Getting Started 49 Using the computer for an entire product Series. To learn how to accommodate all the features and icons described in tablet mode" on your...

User Guide
Page 50
... the power The preinstalled operating system will load automatically. Your computer comes with your system or visit accessories.toshiba.com. NOTE Before adding external devices or memory, Toshiba recommends setting up your software. You may want to run most of data. See "Setting up your ...software" on the computer for the first time, do not turn on page 43. 50 Getting Started Adding memory (optional) 4 Press the...
... the power The preinstalled operating system will load automatically. Your computer comes with your system or visit accessories.toshiba.com. NOTE Before adding external devices or memory, Toshiba recommends setting up your software. You may want to run most of data. See "Setting up your ...software" on the computer for the first time, do not turn on page 43. 50 Getting Started Adding memory (optional) 4 Press the...
User Guide
Page 51
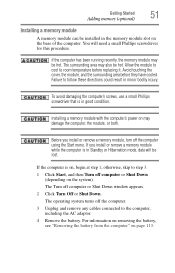
Allow the module to cool to step 3. 1 Click Start, and then Turn off the computer using the Start menu. The Turn off the computer. 3 Unplug and remove any cables connected to follow these directions could result in the memory module slot ...procedure. You will be installed in minor bodily injury. To avoid damaging the computer's screws, use a small Phillips screwdriver that is on the system). Getting Started 51 Adding memory (optional) Installing a memory module A memory module can be lost. Avoid touching the cover, the module, and the surrounding area before ...
Allow the module to cool to step 3. 1 Click Start, and then Turn off the computer using the Start menu. The Turn off the computer. 3 Unplug and remove any cables connected to follow these directions could result in the memory module slot ...procedure. You will be installed in minor bodily injury. To avoid damaging the computer's screws, use a small Phillips screwdriver that is on the system). Getting Started 51 Adding memory (optional) Installing a memory module A memory module can be lost. Avoid touching the cover, the module, and the surrounding area before ...

User Guide
Page 52
52 Getting Started Adding memory (optional) 5 Close the display panel and turn the computer over, make sure that secures the memory module slot cover. Front of computer (Sample ...
52 Getting Started Adding memory (optional) 5 Close the display panel and turn the computer over, make sure that secures the memory module slot cover. Front of computer (Sample ...

User Guide
Page 53
... performing steps 2-3 of the computer. Static electricity can retrieve them later. Position the module toward the socket, aligning the connector's notch with the socket Getting Started 53 Adding memory (optional) 8 Place the screw and the cover in the socket.
... performing steps 2-3 of the computer. Static electricity can retrieve them later. Position the module toward the socket, aligning the connector's notch with the socket Getting Started 53 Adding memory (optional) 8 Place the screw and the cover in the socket.

User Guide
Page 54
... memory module into position. These latches should be completely inserted into the socket and level when secured in the side of the module. 54 Getting Started Adding memory (optional) 12 Firmly press the memory module into the memory slot's socket at approximately a 30-degree angle (to seat the module into the...
... memory module into position. These latches should be completely inserted into the socket and level when secured in the side of the module. 54 Getting Started Adding memory (optional) 12 Firmly press the memory module into the memory slot's socket at approximately a 30-degree angle (to seat the module into the...
User Guide
Page 55
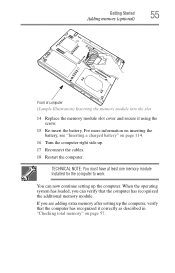
... operating system has loaded, you are adding extra memory after setting up the computer, verify that the computer has recognized the additional memory module. Getting Started 55 Adding memory (optional) Front of computer (Sample Illustration) Inserting the memory module into the slot 14 Replace the memory module slot cover and secure...
... operating system has loaded, you are adding extra memory after setting up the computer, verify that the computer has recognized the additional memory module. Getting Started 55 Adding memory (optional) Front of computer (Sample Illustration) Inserting the memory module into the slot 14 Replace the memory module slot cover and secure...


