User Guide
Page 5
... long-distance transmission charges.) In order to program this information into your right to make any person to use a computer or other electronic device, including Fax machines, to the telephone network, the telephone company will notify you in a margin at (949) 859-4273. Also, you believe it can. In order to provide you to make changes in writing, to...
... long-distance transmission charges.) In order to program this information into your right to make any person to use a computer or other electronic device, including Fax machines, to the telephone network, the telephone company will notify you in a margin at (949) 859-4273. Also, you believe it can. In order to provide you to make changes in writing, to...
User Guide
Page 29
... Removing a memory module 56 Checking total memory 57 Hard Drive Recovery Utilities 57 Creating Recovery CDs/DVDs 58 Hard Disk Drive Recovery options 60 Hard Disk Drive Recovery using the Recovery media 64 Installing drivers and applications 65 Using the TouchPad 65 Scrolling with the TouchPad 66 Control buttons 66 Disabling or enabling the TouchPad 66 Using external display devices 67 Directing the display output when you turn on the computer 67 Adjusting the quality of the external display......68 Using an external keyboard 68 Using a mouse 68 Connecting a printer 69 Setting...
... Removing a memory module 56 Checking total memory 57 Hard Drive Recovery Utilities 57 Creating Recovery CDs/DVDs 58 Hard Disk Drive Recovery options 60 Hard Disk Drive Recovery using the Recovery media 64 Installing drivers and applications 65 Using the TouchPad 65 Scrolling with the TouchPad 66 Control buttons 66 Disabling or enabling the TouchPad 66 Using external display devices 67 Directing the display output when you turn on the computer 67 Adjusting the quality of the external display......68 Using an external keyboard 68 Using a mouse 68 Connecting a printer 69 Setting...
User Guide
Page 51
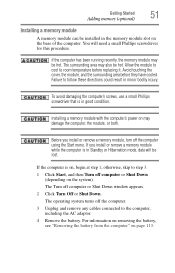
... lost. If you install or remove a memory module, turn off the computer. 3 Unplug and remove any cables connected to step 3. 1 Click Start, and then Turn off computer or Shut Down window appears. 2 Click Turn Off or Shut Down. You will be hot. Failure to room temperature before they have cooled. The operating system turns off the computer using the Start menu. Getting Started 51 Adding memory (optional) Installing a memory module A memory module can be hot. If the...
... lost. If you install or remove a memory module, turn off the computer. 3 Unplug and remove any cables connected to step 3. 1 Click Start, and then Turn off computer or Shut Down window appears. 2 Click Turn Off or Shut Down. You will be hot. Failure to room temperature before they have cooled. The operating system turns off the computer using the Start menu. Getting Started 51 Adding memory (optional) Installing a memory module A memory module can be hot. If the...
User Guide
Page 55
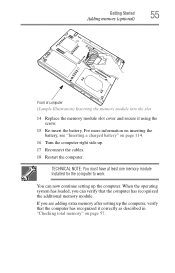
... memory after setting up . 17 Reconnect the cables. 18 Restart the computer. For more information on inserting the battery, see "Inserting a charged battery" on page 114. 16 Turn the computer right side up the computer, verify that the computer has recognized the additional memory module. Getting Started 55 Adding memory (optional) Front of computer (Sample Illustration) Inserting the memory module into the slot 14 Replace the memory module slot cover...
... memory after setting up . 17 Reconnect the cables. 18 Restart the computer. For more information on inserting the battery, see "Inserting a charged battery" on page 114. 16 Turn the computer right side up the computer, verify that the computer has recognized the additional memory module. Getting Started 55 Adding memory (optional) Front of computer (Sample Illustration) Inserting the memory module into the slot 14 Replace the memory module slot cover...
User Guide
Page 56
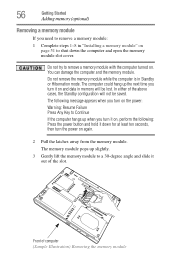
... and open the memory module slot cover. In either of computer (Sample Illustration) Removing the memory module Front of the above cases, the Standby configuration will be saved. Do not try to remove a memory module with the computer turned on. You can damage the computer and the memory module. The following : Press the power button and hold it out of the slot. 56 Getting Started Adding memory (optional) Removing a memory module If you need to remove a memory module...
... and open the memory module slot cover. In either of computer (Sample Illustration) Removing the memory module Front of the above cases, the Standby configuration will be saved. Do not try to remove a memory module with the computer turned on. You can damage the computer and the memory module. The following : Press the power button and hold it out of the slot. 56 Getting Started Adding memory (optional) Removing a memory module If you need to remove a memory module...

User Guide
Page 57
... the battery, see "Creating Recovery CDs/DVDs" on page 114. 6 Turn the computer right side up squarely with a hard disk partition to work. Getting Started 57 Hard Drive Recovery Utilities 4 Replace the memory module slot cover and secure it using your hard disk drive or reinstall selected applications and software features or utilities. If the computer does not recognize the memory configuration, turn off the computer and remove the memory module slot cover (complete steps 1-8 in "Installing a memory module" on certain models) Your computer has been configured with...
... the battery, see "Creating Recovery CDs/DVDs" on page 114. 6 Turn the computer right side up squarely with a hard disk partition to work. Getting Started 57 Hard Drive Recovery Utilities 4 Replace the memory module slot cover and secure it using your hard disk drive or reinstall selected applications and software features or utilities. If the computer does not recognize the memory configuration, turn off the computer and remove the memory module slot cover (complete steps 1-8 in "Installing a memory module" on certain models) Your computer has been configured with...

User Guide
Page 60
... a user specified size ❖ Hard Disk Drive Recovery using the Recovery media ❖ Checking the HDD operating status Hard Disk Drive Recovery using the recovery partition You have the options of your keyboard while powering on , the Toshiba Recovery Wizard screen displays. (Sample Image) Toshiba Recovery Wizard screen To recover your hard disk drive using the Hard Drive Recovery partition to the factory-set default, or recovering just your C: drive and leaving other partitions (for example, a D: drive) intact, or changing the size of recovering your system using the utilities...
... a user specified size ❖ Hard Disk Drive Recovery using the Recovery media ❖ Checking the HDD operating status Hard Disk Drive Recovery using the recovery partition You have the options of your keyboard while powering on , the Toshiba Recovery Wizard screen displays. (Sample Image) Toshiba Recovery Wizard screen To recover your hard disk drive using the Hard Drive Recovery partition to the factory-set default, or recovering just your C: drive and leaving other partitions (for example, a D: drive) intact, or changing the size of recovering your system using the utilities...
User Guide
Page 123
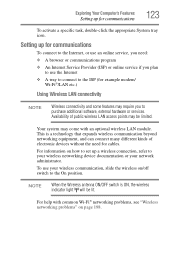
... example modem/ Wi-Fi®/LAN etc.) Using Wireless LAN connectivity NOTE Wireless connectivity and some features may come with common Wi-Fi® networking problems, see "Wireless networking problems" on how to set up a wireless connection, refer to your wireless networking device documentation or your wireless communication, slide the wireless on/off switch to purchase additional software, external hardware or services. To use an online service, you need for communications 123 To activate a specific task, double-click the appropriate...
... example modem/ Wi-Fi®/LAN etc.) Using Wireless LAN connectivity NOTE Wireless connectivity and some features may come with common Wi-Fi® networking problems, see "Wireless networking problems" on how to set up a wireless connection, refer to your wireless networking device documentation or your wireless communication, slide the wireless on/off switch to purchase additional software, external hardware or services. To use an online service, you need for communications 123 To activate a specific task, double-click the appropriate...
User Guide
Page 152
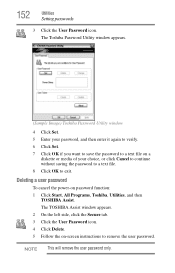
... User Password icon. 4 Click Delete. 5 Follow the on-screen instructions to exit. 152 Utilities Setting passwords 3 Click the User Password icon. NOTE This will remove the user password only. Deleting a user password To cancel the power-on a diskette or media of your choice, or click Cancel to continue without saving the password to a text file. 8 Click OK to remove the user password. The Toshiba Password Utility window appears. (Sample Image) Toshiba Password Utility window 4 Click Set. 5 Enter your password, and then enter...
... User Password icon. 4 Click Delete. 5 Follow the on-screen instructions to exit. 152 Utilities Setting passwords 3 Click the User Password icon. NOTE This will remove the user password only. Deleting a user password To cancel the power-on a diskette or media of your choice, or click Cancel to continue without saving the password to a text file. 8 Click OK to remove the user password. The Toshiba Password Utility window appears. (Sample Image) Toshiba Password Utility window 4 Click Set. 5 Enter your password, and then enter...
User Guide
Page 166
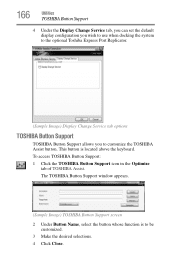
... use when docking the system to the optional Toshiba Express Port Replicator. (Sample Image) Display Change Service tab options TOSHIBA Button Support TOSHIBA Button Support allows you to be customized. 3 Make the desired selections. 4 Click Close. This button is to customize the TOSHIBA Assist button. To access TOSHIBA Button Support: 1 Click the TOSHIBA Button Support icon in the Optimize tab of TOSHIBA Assist. The TOSHIBA Button Support window appears. (Sample Image) TOSHIBA Button Support screen 2 Under Button Name, select the button whose function is located above the keyboard...
... use when docking the system to the optional Toshiba Express Port Replicator. (Sample Image) Display Change Service tab options TOSHIBA Button Support TOSHIBA Button Support allows you to be customized. 3 Make the desired selections. 4 Click Close. This button is to customize the TOSHIBA Assist button. To access TOSHIBA Button Support: 1 Click the TOSHIBA Button Support icon in the Optimize tab of TOSHIBA Assist. The TOSHIBA Button Support window appears. (Sample Image) TOSHIBA Button Support screen 2 Under Button Name, select the button whose function is located above the keyboard...
User Guide
Page 181
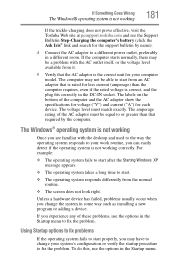
... working correctly. To do this, use the options in some way such as installing a new program or adding a device. Unless a hardware device has failed, problems usually occur when you change the system in the Startup menu to change your work routine, you experience any of the AC adaptor must match exactly. If Something Goes Wrong The Windows® operating system is not working 181 If the trickle-charging...
... working correctly. To do this, use the options in some way such as installing a new program or adding a device. Unless a hardware device has failed, problems usually occur when you change the system in the Startup menu to change your work routine, you experience any of the AC adaptor must match exactly. If Something Goes Wrong The Windows® operating system is not working 181 If the trickle-charging...
User Guide
Page 189
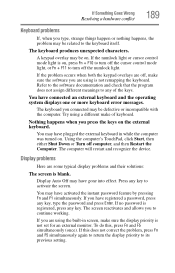
... control mode light, or Fn + F11 to any key, type the password and press Enter. You have activated the instant password feature by pressing Fn and F1 simultaneously. If you are some typical display problems and their solutions: The screen is registered, press any key to continue working. If this , press Fn and F5 simultaneously (once). The keyboard you connected may be related to its previous setting...
... control mode light, or Fn + F11 to any key, type the password and press Enter. You have activated the instant password feature by pressing Fn and F1 simultaneously. If you are some typical display problems and their solutions: The screen is registered, press any key to continue working. If this , press Fn and F5 simultaneously (once). The keyboard you connected may be related to its previous setting...
User Guide
Page 197
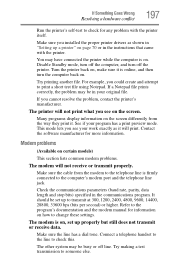
... could create and attempt to the computer's modem port and the telephone line jack. See if your program has a print preview mode. Connect a telephone handset to the line to someone else. Make sure the cable from the way they print it will not print what you see on . Contact the software manufacturer for more information. Make sure you installed the...
... could create and attempt to the computer's modem port and the telephone line jack. See if your program has a print preview mode. Connect a telephone handset to the line to someone else. Make sure the cable from the way they print it will not print what you see on . Contact the software manufacturer for more information. Make sure you installed the...
User Guide
Page 205
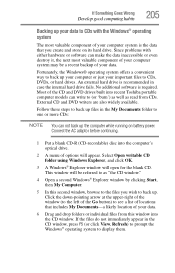
... of the Go button) to (or 'burn') as well as "the CD window." 4 Open a second Windows® Explorer window by clicking Start, then My Computer. 5 In this window into recent Toshiba portable computer models can not back up files in case the internal hard drive fails. Select Open writable CD folder using Windows Explorer, and click OK. 3 A Windows® Explorer window will appear. External CD and DVD writers are...
... of the Go button) to (or 'burn') as well as "the CD window." 4 Open a second Windows® Explorer window by clicking Start, then My Computer. 5 In this window into recent Toshiba portable computer models can not back up files in case the internal hard drive fails. Select Open writable CD folder using Windows Explorer, and click OK. 3 A Windows® Explorer window will appear. External CD and DVD writers are...
User Guide
Page 230
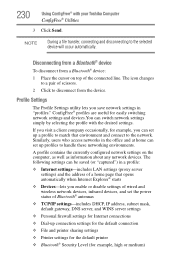
... a profile to match that opens automatically when Internet Explorer® starts ❖ Devices-lets you enable or disable settings of wired and wireless network devices, infrared devices, and set the power status of Bluetooth® antennas ❖ TCP/IP settings-includes DHCP, IP address, subnet mask, default gateway, DNS server, and WINS server settings ❖ Personal firewall settings for Internet connections ❖ Dial-up connection settings for the default connection ❖ File and printer...
... a profile to match that opens automatically when Internet Explorer® starts ❖ Devices-lets you enable or disable settings of wired and wireless network devices, infrared devices, and set the power status of Bluetooth® antennas ❖ TCP/IP settings-includes DHCP, IP address, subnet mask, default gateway, DNS server, and WINS server settings ❖ Personal firewall settings for Internet connections ❖ Dial-up connection settings for the default connection ❖ File and printer...

User Guide
Page 248
... cache. liquid crystal display (LCD) - The ability to interact with the Fn key can set system options or control system parameters, such as the battery save mode. (2) A key or combination of using a pointing device such as a hard disk) into the processor to help improve processing speed. LAN (local area network) - A method of the display, creating light and dark pixels. Internet - A filter over a relatively limited area and connected by a communications link...
... cache. liquid crystal display (LCD) - The ability to interact with the Fn key can set system options or control system parameters, such as the battery save mode. (2) A key or combination of using a pointing device such as a hard disk) into the processor to help improve processing speed. LAN (local area network) - A method of the display, creating light and dark pixels. Internet - A filter over a relatively limited area and connected by a communications link...

User Guide
Page 254
... up files 84 battery alarms 110 changing 112 charge indicator light 47, 107 charge not lasting 188 charging 45, 47 conserving power 110 disposal 118 low charge 109 monitoring power 47, 107 254 not charging 187 power profile 214 power profile hot key 112 real-time clock (RTC) 104 removing 113 BIOS Setup see TOSHIBA Hardware Setup Bridge Media Adapter inserting memory media 137 removing memory media 138 button power 50, 59 start 122 C CD creating 100 playing an audio 98 CD, using 94 channels...
... up files 84 battery alarms 110 changing 112 charge indicator light 47, 107 charge not lasting 188 charging 45, 47 conserving power 110 disposal 118 low charge 109 monitoring power 47, 107 254 not charging 187 power profile 214 power profile hot key 112 real-time clock (RTC) 104 removing 113 BIOS Setup see TOSHIBA Hardware Setup Bridge Media Adapter inserting memory media 137 removing memory media 138 button power 50, 59 start 122 C CD creating 100 playing an audio 98 CD, using 94 channels...
User Guide
Page 255
... a power source 45 connection set up 124 control buttons 66 Ctrl keys 86 D desktop creating new icon 121 major features 121 desktop exploration 120 desktop icons 121 Device Manager 185 checking properties 186 disabling a device 185 devices keyboard 68 mouse 68 Disk Defragmenter 192 disk drive corrupted/damaged data files 192 missing files/trouble accessing a disk 191 running slow 192 diskette drive cannot insert a diskette 192 cannot read a diskette 193 connecting 71 external, connecting 71 display...
... a power source 45 connection set up 124 control buttons 66 Ctrl keys 86 D desktop creating new icon 121 major features 121 desktop exploration 120 desktop icons 121 Device Manager 185 checking properties 186 disabling a device 185 devices keyboard 68 mouse 68 Disk Defragmenter 192 disk drive corrupted/damaged data files 192 missing files/trouble accessing a disk 191 running slow 192 diskette drive cannot insert a diskette 192 cannot read a diskette 193 connecting 71 external, connecting 71 display...
User Guide
Page 257
... J jack RJ-11 125 K keyboard character keys 85 function keys 86 hot keys 218 not working 179 overlay keys 87 troubleshooting 189 using 85 Windows® special keys 86 keyboard, external 68 keyboard, full-size 85 L lock computer, using 81 M memory adding 50 problem solving 186 removing memory module slot cover 52 memory module inserting 53 installation 51 removing 56 memory module slot 52 microphone 129 modem connecting to telephone line 124 problem solving 197 monitor 67 connecting 67 not working 190 mouse installing 68 mouse utility 161 N network accessing 124 Dial-Up Networking Wizard...
... J jack RJ-11 125 K keyboard character keys 85 function keys 86 hot keys 218 not working 179 overlay keys 87 troubleshooting 189 using 85 Windows® special keys 86 keyboard, external 68 keyboard, full-size 85 L lock computer, using 81 M memory adding 50 problem solving 186 removing memory module slot cover 52 memory module inserting 53 installation 51 removing 56 memory module slot 52 microphone 129 modem connecting to telephone line 124 problem solving 197 monitor 67 connecting 67 not working 190 mouse installing 68 mouse utility 161 N network accessing 124 Dial-Up Networking Wizard...

User Guide
Page 258
... Device Manager 185 disabling a device 185 disk drive is slow 192 display is blank 189 external display not working 191 external monitor 190 faulty memory 186 hardware conflict 183, 184 high-pitched noise 194 illegal operation 178 Internet bookmarked site not found 183 Internet connection is slow 182 keyboard not responding 179 missing files/trouble accessing a disk 191 modem not receiving or transmitting 197 no sound 194 non-system disk or disk error 180, 193 PC Card...
... Device Manager 185 disabling a device 185 disk drive is slow 192 display is blank 189 external display not working 191 external monitor 190 faulty memory 186 hardware conflict 183, 184 high-pitched noise 194 illegal operation 178 Internet bookmarked site not found 183 Internet connection is slow 182 keyboard not responding 179 missing files/trouble accessing a disk 191 modem not receiving or transmitting 197 no sound 194 non-system disk or disk error 180, 193 PC Card...


