User Manual
Page 2
... written permission of TOSHIBA. All rights reserved. These copyrighted materials may be copied for private use the screen mode switching functions (e.g. are subject to change without notice. If, beyond the limitation above, you copy (including to transform data formats) or modify these to the public. ii User's Manual No patent liability is assumed, with respect to display enlarged images/ video at home...
... written permission of TOSHIBA. All rights reserved. These copyrighted materials may be copied for private use the screen mode switching functions (e.g. are subject to change without notice. If, beyond the limitation above, you copy (including to transform data formats) or modify these to the public. ii User's Manual No patent liability is assumed, with respect to display enlarged images/ video at home...
User Manual
Page 29
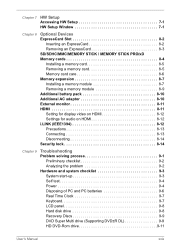
... monitor 8-11 HDMI 8-11 Setting for display video on HDMI 8-12 Settings for audio on HDMI 8-12 i.LINK (IEEE1394 8-12 Precautions 8-13 Connecting 8-13 Disconnecting 8-14 Security lock 8-14 Chapter 9 Troubleshooting Problem solving process 9-1 Preliminary checklist 9-2 Analyzing the problem 9-2 Hardware and system checklist 9-3 System start-up 9-3 Self test 9-4 Power 9-4 Disposing of PC and PC batteries 9-6 Real Time Clock 9-7 Keyboard 9-7 LCD panel 9-8 Hard disk drive 9-8 Recovery Discs 9-9 DVD Super Multi drive (Supporting DVD±R DL 9-9 HD DVD-Rom drive 9-11 User...
... monitor 8-11 HDMI 8-11 Setting for display video on HDMI 8-12 Settings for audio on HDMI 8-12 i.LINK (IEEE1394 8-12 Precautions 8-13 Connecting 8-13 Disconnecting 8-14 Security lock 8-14 Chapter 9 Troubleshooting Problem solving process 9-1 Preliminary checklist 9-2 Analyzing the problem 9-2 Hardware and system checklist 9-3 System start-up 9-3 Self test 9-4 Power 9-4 Disposing of PC and PC batteries 9-6 Real Time Clock 9-7 Keyboard 9-7 LCD panel 9-8 Hard disk drive 9-8 Recovery Discs 9-9 DVD Super Multi drive (Supporting DVD±R DL 9-9 HD DVD-Rom drive 9-11 User...
User Manual
Page 31
... Congratulations on setting up and begin operating your computer and gives tips on configuring your computer, basic operations and care, using your TOSHIBA Satellite M300/L310, Satellite Pro M300/L310 Series computer. If you are an experienced computer user, please continue reading the preface to learn about features that are a new user of how to provide years of the computer's features, capabilities, and options. This powerful notebook computer...
... Congratulations on setting up and begin operating your computer and gives tips on configuring your computer, basic operations and care, using your TOSHIBA Satellite M300/L310, Satellite Pro M300/L310 Series computer. If you are an experienced computer user, please continue reading the preface to learn about features that are a new user of how to provide years of the computer's features, capabilities, and options. This powerful notebook computer...
User Manual
Page 36
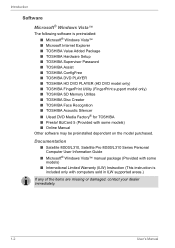
...; Satellite M300/L310, Satellite Pro M300/L310 Series Personal Computer User Information Guide ■ Microsoft® Windows Vista™ manual package (Provided with some models) ■ Online Manual Other software may be preinstalled dependant on the model purchased. BizCard 5 (Provided with some models) ■ International Limited Warranty (ILW) Instruction (This instruction is preinstalled: ■ Microsoft® Windows Vista™ ■ Microsoft Internet Explorer ■ TOSHIBA Value Added Package ■ TOSHIBA Hardware Setup ■ TOSHIBA Supervisor Password ■...
...; Satellite M300/L310, Satellite Pro M300/L310 Series Personal Computer User Information Guide ■ Microsoft® Windows Vista™ manual package (Provided with some models) ■ Online Manual Other software may be preinstalled dependant on the model purchased. BizCard 5 (Provided with some models) ■ International Limited Warranty (ILW) Instruction (This instruction is preinstalled: ■ Microsoft® Windows Vista™ ■ Microsoft Internet Explorer ■ TOSHIBA Value Added Package ■ TOSHIBA Hardware Setup ■ TOSHIBA Supervisor Password ■...
User Manual
Page 42
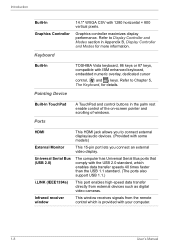
... Device TOSHIBA Vista keyboard, 86 keys or 87 keys, compatible with 1280 horizontal × 800 vertical pixels. Refer to connect external display/audio devices. (Provided with your computer. 1-8 User's Manual Infrared receiver window This window receives signals from external devices such as digital video cameras. Graphics controller maximizes display performance. Refer to Display Controller and Modes section in the palm rest enable control of the on-screen pointer and scrolling of windows. Universal Serial Bus (USB 2.0) The computer has Universal Serial Bus ports...
... Device TOSHIBA Vista keyboard, 86 keys or 87 keys, compatible with 1280 horizontal × 800 vertical pixels. Refer to connect external display/audio devices. (Provided with your computer. 1-8 User's Manual Infrared receiver window This window receives signals from external devices such as digital video cameras. Graphics controller maximizes display performance. Refer to Display Controller and Modes section in the palm rest enable control of the on-screen pointer and scrolling of windows. Universal Serial Bus (USB 2.0) The computer has Universal Serial Bus ports...
User Manual
Page 45
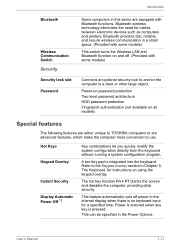
... power to the internal display when there is no keyboard input for instructions on using the keypad overlay. Hot Keys Keypad Overlay Instant Security Display Automatic Power Off *1 Key combinations let you quickly modify the system configuration directly from the keyboard without running a system configuration program. Bluetooth wireless technology eliminates the need for cables between electronic devices such as computers and printers. Introduction Bluetooth Wireless Communication Switch Security Security lock slot Password Some computers in this series...
... power to the internal display when there is no keyboard input for instructions on using the keypad overlay. Hot Keys Keypad Overlay Instant Security Display Automatic Power Off *1 Key combinations let you quickly modify the system configuration directly from the keyboard without running a system configuration program. Bluetooth wireless technology eliminates the need for cables between electronic devices such as computers and printers. Introduction Bluetooth Wireless Communication Switch Security Security lock slot Password Some computers in this series...
User Manual
Page 80
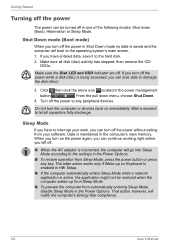
... the hard disk. 2. Do not turn off the power without exiting from automatically entering Sleep Mode, disable Sleep Mode in the power management button . If you have entered data, save it to any key. If you left off. ■ When the AC adaptor is active, the application might not be turned off in the Power Options. ■ To restore operation from Sleep Mode, press the power button or press any peripheral devices. From the pull down (Boot...
... the hard disk. 2. Do not turn off the power without exiting from automatically entering Sleep Mode, disable Sleep Mode in the power management button . If you have entered data, save it to any key. If you left off. ■ When the AC adaptor is active, the application might not be turned off in the Power Options. ■ To restore operation from Sleep Mode, press the power button or press any peripheral devices. From the pull down (Boot...
User Manual
Page 83
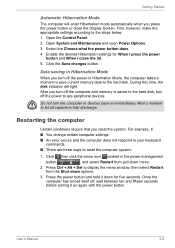
... power to display the menu window, then select Restart from pull down options. 3. User's Manual 3-9 Do not turn the computer or devices back on again with the power button. For example, if: ■ You change certain computer settings. ■ An error occurs and the computer does not respond to your keyboard commands. ■ There are three ways to the hard disk. Getting Started Automatic Hibernation Mode The computer will light...
... power to display the menu window, then select Restart from pull down options. 3. User's Manual 3-9 Do not turn the computer or devices back on again with the power button. For example, if: ■ You change certain computer settings. ■ An error occurs and the computer does not respond to your keyboard commands. ■ There are three ways to the hard disk. Getting Started Automatic Hibernation Mode The computer will light...
User Manual
Page 86
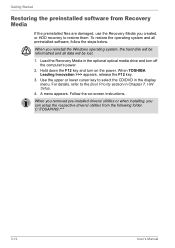
... the F12 key and turn off the computer's power. 2. For details, refer to restore them. A menu appears. Load the Recovery Media in the optional optical media drive and turn on -screen instructions. When TOSHIBA Leading Innovation >>> appears, release the F12 key. 3. When you removed pre-installed drivers/ utilities or when installing, you can setup the respective drivers/ utilities from Recovery Media If the preinstalled files are damaged, use the Recovery Media you reinstall the Windows operating system, the hard disk will be...
... the F12 key and turn off the computer's power. 2. For details, refer to restore them. A menu appears. Load the Recovery Media in the optional optical media drive and turn on -screen instructions. When TOSHIBA Leading Innovation >>> appears, release the F12 key. 3. When you removed pre-installed drivers/ utilities or when installing, you can setup the respective drivers/ utilities from Recovery Media If the preinstalled files are damaged, use the Recovery Media you reinstall the Windows operating system, the hard disk will be...
User Manual
Page 96
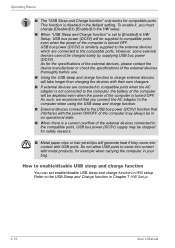
... ports even when the power of the external devices connected to [Enabled] in Chapter 7 HW Setup. 4-10 User's Manual This function is turned OFF. To enable it, you connect the AC adaptor to the computer when using the USB sleep and charge function. ■ External devices connected to the USB bus power (DC5V) function that you must change [Disabled] to [Enabled] in the HW setup. ■ When "USB Sleep and Charge function" is set enable/disable USB sleep and charge function in HW setup Refer to the USB Sleep and Charge function in HW Setup, USB...
... ports even when the power of the external devices connected to [Enabled] in Chapter 7 HW Setup. 4-10 User's Manual This function is turned OFF. To enable it, you connect the AC adaptor to the computer when using the USB sleep and charge function. ■ External devices connected to the USB bus power (DC5V) function that you must change [Disabled] to [Enabled] in the HW setup. ■ When "USB Sleep and Charge function" is set enable/disable USB sleep and charge function in HW setup Refer to the USB Sleep and Charge function in HW Setup, USB...
User Manual
Page 107
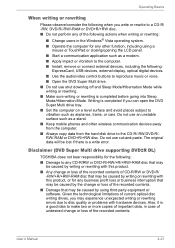
... copy data from the hard disk drive to the CD-R/-RW,DVD-R/RW/-RAM or DVD+R/+RW disc. The original data will be caused by using a mouse or TouchPad or closing/opening the LCD panel. ■ Start a communication application such as a modem. ■ Apply impact or vibration to the computer. ■ Install, remove or connect external devices, including the following: ExpressCard, USB devices, external display, optical digital devices. ■ Use the audio/video control buttons to reproduce music or...
... copy data from the hard disk drive to the CD-R/-RW,DVD-R/RW/-RAM or DVD+R/+RW disc. The original data will be caused by using a mouse or TouchPad or closing/opening the LCD panel. ■ Start a communication application such as a modem. ■ Apply impact or vibration to the computer. ■ Install, remove or connect external devices, including the following: ExpressCard, USB devices, external display, optical digital devices. ■ Use the audio/video control buttons to reproduce music or...
User Manual
Page 159
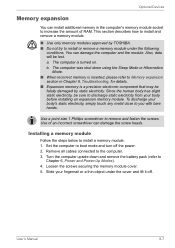
... and the module. b. Use a point size 1 Phillips screwdriver to boot mode and turn off . a. User's Manual 8-7 This section describes how to you with bare hands. Loosen the screws securing the memory module cover. 5. Optional Devices Memory expansion You can install additional memory in Chapter 9, Troubleshooting, for details. ■ Expansion memory is turned on. Slide your body's static electricity, simply touch any metal close to install and remove a memory module. ■ Use only memory modules approved by...
... and the module. b. Use a point size 1 Phillips screwdriver to boot mode and turn off . a. User's Manual 8-7 This section describes how to you with bare hands. Loosen the screws securing the memory module cover. 5. Optional Devices Memory expansion You can install additional memory in Chapter 9, Troubleshooting, for details. ■ Expansion memory is turned on. Slide your body's static electricity, simply touch any metal close to install and remove a memory module. ■ Use only memory modules approved by...
User Manual
Page 161
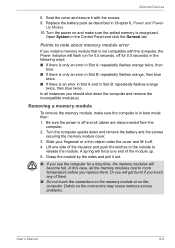
... down and remove the battery and the screws securing the memory module cover. 3. Up Modes. 10. Turn the power on the connectors may cause memory access problems. User's Manual 8-9 Turn the computer upside down the computer and remove the incompatible module(s) Removing a memory module To remove the memory module, make sure the added memory is in the Control Panel and click the General tab. In this case, let the memory modules cool to note about memory module error If you use the...
... down and remove the battery and the screws securing the memory module cover. 3. Up Modes. 10. Turn the power on the connectors may cause memory access problems. User's Manual 8-9 Turn the computer upside down the computer and remove the incompatible module(s) Removing a memory module To remove the memory module, make sure the added memory is in the Control Panel and click the General tab. In this case, let the memory modules cool to note about memory module error If you use the...
User Manual
Page 173
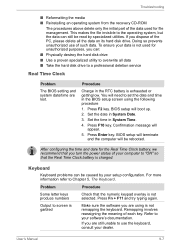
... its hard disk drive. Press Fn + F11 and try typing again. Set the date in the BIOS setup screen using is exhausted or getting low. Doing so prevents unauthorized use the keyboard, consult your setup configuration. Output to screen is not selected. User's Manual 9-7 Troubleshooting ■ Reformatting the media ■ Reinstalling an operating system from the recovery CD-ROM The procedures above delete only the initial part of such data. This makes the...
... its hard disk drive. Press Fn + F11 and try typing again. Set the date in the BIOS setup screen using is exhausted or getting low. Doing so prevents unauthorized use the keyboard, consult your setup configuration. Output to screen is not selected. User's Manual 9-7 Troubleshooting ■ Reformatting the media ■ Reinstalling an operating system from the recovery CD-ROM The procedures above delete only the initial part of such data. This makes the...
User Manual
Page 184
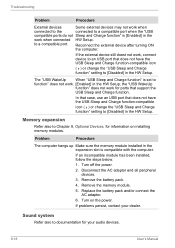
... the USB Sleep and Charge function-compatible icon ( ) or change the "USB Sleep and Charge function" setting to [Disabled] in the HW Setup. Memory expansion Refer also to Chapter 8, Optional Devices, for information on the power. Problem Procedure The computer hangs up Make sure the memory module installed in the expansion slot is [Enabled] in the HW Setup, the "USB WakeUp function" does not work for your dealer. Replace the battery pack and/or connect the AC adaptor. 6. Troubleshooting Problem Procedure External devices Some external devices...
... the USB Sleep and Charge function-compatible icon ( ) or change the "USB Sleep and Charge function" setting to [Disabled] in the HW Setup. Memory expansion Refer also to Chapter 8, Optional Devices, for information on the power. Problem Procedure The computer hangs up Make sure the memory module installed in the expansion slot is [Enabled] in the HW Setup, the "USB WakeUp function" does not work for your dealer. Replace the battery pack and/or connect the AC adaptor. 6. Troubleshooting Problem Procedure External devices Some external devices...

User Manual
Page 204
... configuration. E-2 User's Manual Contact TOSHIBA technical service and support, refer to TOSHIBA support section in your computer product may not function properly. For computer's configured with 4 GB of system memory, the full system memory space for computing activities will vary by the graphics system for graphics performance and therefore reduce the amount of main system memory allocated to the product when used by model and system configuration...
... configuration. E-2 User's Manual Contact TOSHIBA technical service and support, refer to TOSHIBA support section in your computer product may not function properly. For computer's configured with 4 GB of system memory, the full system memory space for computing activities will vary by the graphics system for graphics performance and therefore reduce the amount of main system memory allocated to the product when used by model and system configuration...

User Manual
Page 211
... and executes instructions. Synonymous with a device. See also enable. computer program: A set . A vacuum tube in your system (such as another system or component. data bits: A data communications parameter controlling the number of hardware, software, firmware, and peripheral components assembled to make up a byte. If data bits = 7 the computer can generate 256 unique characters. default: The parameter value automatically selected by batteries. keyboard controller). User's Manual Glossary...
... and executes instructions. Synonymous with a device. See also enable. computer program: A set . A vacuum tube in your system (such as another system or component. data bits: A data communications parameter controlling the number of hardware, software, firmware, and peripheral components assembled to make up a byte. If data bits = 7 the computer can generate 256 unique characters. default: The parameter value automatically selected by batteries. keyboard controller). User's Manual Glossary...
User Manual
Page 214
..., the keyboard or a menu. Each keystroke activates a switch that are activated by the sending computer is , in the indicator panel. For each key, the transmitted code is input for the receiving computer. L: L1 cache: Level one system or device to another . 2) To physically connect one cache. input: The data or instructions you set system parameters, such as speaker volume. I /O devices: Equipment used as digital video cameras. Memory cache built...
..., the keyboard or a menu. Each keystroke activates a switch that are activated by the sending computer is , in the indicator panel. For each key, the transmitted code is input for the receiving computer. L: L1 cache: Level one system or device to another . 2) To physically connect one cache. input: The data or instructions you set system parameters, such as speaker volume. I /O devices: Equipment used as digital video cameras. Memory cache built...
User Manual
Page 217
... and vertically restart: Resetting a computer without turning it is receiving power. TOSHIBA portable computers comply with Windows that information in the computer. Compare RAM. All computer equipment generates radio frequency signals. This type of external devices and make the necessary configurations in RAM is essential instructions the computer reads when you to and from you. program: A set the parameters for home equipment use . R: Radio frequency...
... and vertically restart: Resetting a computer without turning it is receiving power. TOSHIBA portable computers comply with Windows that information in the computer. Compare RAM. All computer equipment generates radio frequency signals. This type of external devices and make the necessary configurations in RAM is essential instructions the computer reads when you to and from you. program: A set the parameters for home equipment use . R: Radio frequency...
User Manual
Page 218
.... SD/SDHC Card: Secure Digital cards are flash memory widely used in asynchronous serial communications. Any diskette can be formatted as digital cameras and Personal Digital Assistants. SIO: Serial Input/Output. Specifically refers to drive each cell. stop program execution, and access the numeric keypad overlay. volatile memory: Random access memory (RAM) that stores information as long as power is also called a "bootable disk", "boot disk" or a "startup disk." This serial interface lets...
.... SD/SDHC Card: Secure Digital cards are flash memory widely used in asynchronous serial communications. Any diskette can be formatted as digital cameras and Personal Digital Assistants. SIO: Serial Input/Output. Specifically refers to drive each cell. stop program execution, and access the numeric keypad overlay. volatile memory: Random access memory (RAM) that stores information as long as power is also called a "bootable disk", "boot disk" or a "startup disk." This serial interface lets...


