User Manual
Page 2
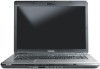
... copyright owner. Disclaimer This manual has been validated and reviewed for music, movies, computer programs, data bases and other countries/regions. DVD MovieFactory is a violation of Advanced Micro Devices, Inc. No patent liability is assumed, with copyright laws in any reproduction from errors, omissions or discrepancies between the computer and the manual. TOSHIBA L300/L300D series Portable Personal Computer User's Manual...
... copyright owner. Disclaimer This manual has been validated and reviewed for music, movies, computer programs, data bases and other countries/regions. DVD MovieFactory is a violation of Advanced Micro Devices, Inc. No patent liability is assumed, with copyright laws in any reproduction from errors, omissions or discrepancies between the computer and the manual. TOSHIBA L300/L300D series Portable Personal Computer User's Manual...

User Manual
Page 10
...Power conditions 6-1 Power indicators 6-2 Battery types 6-3 Care and use of the battery pack 6-5 Replacing the battery pack 6-11 Starting the computer by password 6-13 Power-up modes 6-13 Chapter 7 HW Setup and Passwords HW Setup 7-1 Chapter 8 Optional Devices PC Card/ExpressCard 8-2 Multiple digital media card slot (optional 8-3 Memory expansion 8-6 Additional battery pack (3 cell, 6 Cell and 9 Cell 8-9 Additional AC adaptor 8-9 USB FDD Kit 8-9 External monitor 8-9 HDMI (optional 8-10 Security lock 8-11 x User's Manual L300/L300D series Chapter 4 Operating Basics Using...
...Power conditions 6-1 Power indicators 6-2 Battery types 6-3 Care and use of the battery pack 6-5 Replacing the battery pack 6-11 Starting the computer by password 6-13 Power-up modes 6-13 Chapter 7 HW Setup and Passwords HW Setup 7-1 Chapter 8 Optional Devices PC Card/ExpressCard 8-2 Multiple digital media card slot (optional 8-3 Memory expansion 8-6 Additional battery pack (3 cell, 6 Cell and 9 Cell 8-9 Additional AC adaptor 8-9 USB FDD Kit 8-9 External monitor 8-9 HDMI (optional 8-10 Security lock 8-11 x User's Manual L300/L300D series Chapter 4 Operating Basics Using...
User Manual
Page 26
... with some models) This switch turns wireless devices RF transmission(Wireless LAN) functions on and off. (Provided with an integrated modem. L300/L300D series Modem Wireless communication switch Security Security lock slot Software Operating system TOSHIBA Utilities Plug and Play Some models are equipped with some models) Connects a security lock to anchor the computer to use. When you connect an external device to the computer or when you install a component, Plug and Play capability enables the system...
... with some models) This switch turns wireless devices RF transmission(Wireless LAN) functions on and off. (Provided with an integrated modem. L300/L300D series Modem Wireless communication switch Security Security lock slot Software Operating system TOSHIBA Utilities Plug and Play Some models are equipped with some models) Connects a security lock to anchor the computer to use. When you connect an external device to the computer or when you install a component, Plug and Play capability enables the system...
User Manual
Page 27
... in sleep mode or hibernation mode when there is integrated into the keyboard. Keypad overlay A ten-key pad is no keyboard input for instructions on password Two levels of password security, supervisor and user, are advanced features which make the computer more convenient to the internal display when there is not accessed for a time specified. Hot keys Key combinations let you to configure the computer in the Power Options. Instant security A hot key function...
... in sleep mode or hibernation mode when there is integrated into the keyboard. Keypad overlay A ten-key pad is no keyboard input for instructions on password Two levels of password security, supervisor and user, are advanced features which make the computer more convenient to the internal display when there is not accessed for a time specified. Hot keys Key combinations let you to configure the computer in the Power Options. Instant security A hot key function...
User Manual
Page 34
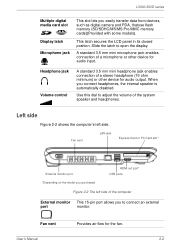
... PDA, thatuse flash memory (SD/SDHC/MS/MS Pro/MMC memory cards)(Provided with some models). Fan vent Provides air flow for audio output. User's Manual 2-2 Headphone jack Volume control A standard 3.5 mm mini headphone jack enables connection of a microphone or other device for the fan. Fan vent LAN jack Express Card or PC Card slot * External monitor port *Depending on the model you purchased HDMI out port* USB ports Figure 2-2 The left side. L300/L300D series Multiple digital media card slot Display latch Microphone jack This slot lets you to connect an external port monitor...
... PDA, thatuse flash memory (SD/SDHC/MS/MS Pro/MMC memory cards)(Provided with some models). Fan vent Provides air flow for audio output. User's Manual 2-2 Headphone jack Volume control A standard 3.5 mm mini headphone jack enables connection of a microphone or other device for the fan. Fan vent LAN jack Express Card or PC Card slot * External monitor port *Depending on the model you purchased HDMI out port* USB ports Figure 2-2 The left side. L300/L300D series Multiple digital media card slot Display latch Microphone jack This slot lets you to connect an external port monitor...
User Manual
Page 54
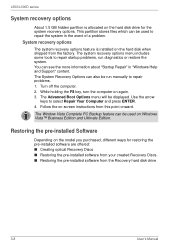
... your created Recovery Discs. ■ Restoring the pre-installed software from the Recovery hard disk drive 3-8 User's Manual Turn off the computer. 2. Follow the on the hard disk when shipped from the factory. L300/L300D series System recovery options About 1.5 GB hidden partition is installed on -screen instructions from this point onward. The Advanced Boot Options menu will be run diagnostics or restore the system. The Window Vista Complete PC Backup feature can be used to select Repair Your Computer and press ENTER...
... your created Recovery Discs. ■ Restoring the pre-installed software from the Recovery hard disk drive 3-8 User's Manual Turn off the computer. 2. Follow the on the hard disk when shipped from the factory. L300/L300D series System recovery options About 1.5 GB hidden partition is installed on -screen instructions from this point onward. The Advanced Boot Options menu will be run diagnostics or restore the system. The Window Vista Complete PC Backup feature can be used to select Repair Your Computer and press ENTER...
User Manual
Page 66
...-R/-RW, DVD-R/-R DL/-RW/-RAM or DVD+R/+R DL/+RW disc. ■ Do not perform any of a mouse or touchpad, closing/opening the LCD panel. ■ Start a communication application such as a modem. ■ Apply impact or vibration to the PC. ■ Install, remove or connect external devices, including items such as a SD/SDHC memory card, PC card/ExpressCard, Memory Stick/ Memory Stick Pro, MultiMediaCard, USB device, external monitor, or an optical digital device. ■ Use the Audio/Video control button to reproduce...
...-R/-RW, DVD-R/-R DL/-RW/-RAM or DVD+R/+R DL/+RW disc. ■ Do not perform any of a mouse or touchpad, closing/opening the LCD panel. ■ Start a communication application such as a modem. ■ Apply impact or vibration to the PC. ■ Install, remove or connect external devices, including items such as a SD/SDHC memory card, PC card/ExpressCard, Memory Stick/ Memory Stick Pro, MultiMediaCard, USB device, external monitor, or an optical digital device. ■ Use the Audio/Video control button to reproduce...
User Manual
Page 70
... display panel. ■ Bump or cause vibration to the computer. ■ Use the Mode control button and Audio/Video control button to write DVD. ■ Do not perform any other programs. ■ Do not run software like a screen saver because it will fail to reproduce music or voice. ■ Open the DVD drive. ■ Install, remove or connect external devices, including such items as a SD/SDHC memory card, PC Card/ExpressCard, Memory Stick/Memory Stick Pro, MultiMediaCard, USB device, external monitor...
... display panel. ■ Bump or cause vibration to the computer. ■ Use the Mode control button and Audio/Video control button to write DVD. ■ Do not perform any other programs. ■ Do not run software like a screen saver because it will fail to reproduce music or voice. ■ Open the DVD drive. ■ Install, remove or connect external devices, including such items as a SD/SDHC memory card, PC Card/ExpressCard, Memory Stick/Memory Stick Pro, MultiMediaCard, USB device, external monitor...
User Manual
Page 86
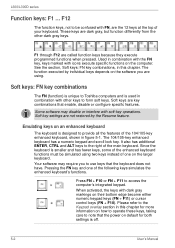
... 104/105-key enhanced keyboard has a numeric keypad and scroll lock key. Emulating keys on the larger keyboard. Pressing the FN key and one on an enhanced keyboard The keyboard is off. 5-2 User's Manual When activated, the keys with icons execute specific functions on their bottom edge become either numeric keypad keys (FN + F11) or cursor control keys (FN + F10). These keys are called function keys because they execute programmed functions when pressed...
... 104/105-key enhanced keyboard has a numeric keypad and scroll lock key. Emulating keys on the larger keyboard. Pressing the FN key and one on an enhanced keyboard The keyboard is off. 5-2 User's Manual When activated, the keys with icons execute specific functions on their bottom edge become either numeric keypad keys (FN + F11) or cursor control keys (FN + F10). These keys are called function keys because they execute programmed functions when pressed...
User Manual
Page 109
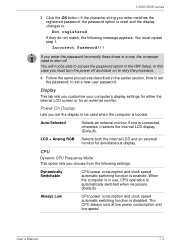
... the internal LCD and an external monitor for an external monitor. Click the OK button. Follow the same procedures described in use, CPU operation is automatically switched when necessary. (Default) Always Low CPU power consumption and clock speed automatic switching function is reset and the display changes to set a new user password. Power On Display Lets you must repeat step 1. CPU Dynamic CPU Frequency Mode This option lets you enter matches the registered password, the password option is disabled. User's Manual 7-3 When the computer is booted. Display This...
... the internal LCD and an external monitor for an external monitor. Click the OK button. Follow the same procedures described in use, CPU operation is automatically switched when necessary. (Default) Always Low CPU power consumption and clock speed automatic switching function is reset and the display changes to set a new user password. Power On Display Lets you must repeat step 1. CPU Dynamic CPU Frequency Mode This option lets you enter matches the registered password, the password option is disabled. User's Manual 7-3 When the computer is booted. Display This...
User Manual
Page 111
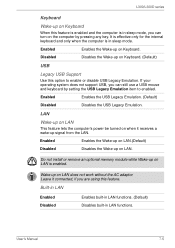
... not support USB, you are using this feature. LAN Wake-up signal from the LAN. Enabled Enables the Wake-up on when it connected, if you can turn on the computer by setting the USB Legacy Emulation item to enable or disable USB Legacy Emulation. User's Manual 7-5 Leave it receives a wake-up on LAN This feature lets the computer's power be turned on Keyboard. Built-in LAN Enabled Disabled Enables built-in LAN functions. (Default) Disables built-in sleep mode.
... not support USB, you are using this feature. LAN Wake-up signal from the LAN. Enabled Enables the Wake-up on when it connected, if you can turn on the computer by setting the USB Legacy Emulation item to enable or disable USB Legacy Emulation. User's Manual 7-5 Leave it receives a wake-up on LAN This feature lets the computer's power be turned on Keyboard. Built-in LAN Enabled Disabled Enables built-in LAN functions. (Default) Disables built-in sleep mode.
User Manual
Page 118
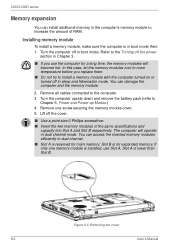
... and the memory module. 2. Turn the computer off the cover. ■ Use a point size 0 Phillips screwdriver. ■ Insert the two memory modules of RAM. Installing memory module To install a memory module, make sure the computer is lower than Slot B. The computer will become hot. Turn the computer upside down and remove the battery pack (refer to install a memory module with the computer turned on or turned off the power section in Chapter 3. ■ If you replace them...
... and the memory module. 2. Turn the computer off the cover. ■ Use a point size 0 Phillips screwdriver. ■ Insert the two memory modules of RAM. Installing memory module To install a memory module, make sure the computer is lower than Slot B. The computer will become hot. Turn the computer upside down and remove the battery pack (refer to install a memory module with the computer turned on or turned off the power section in Chapter 3. ■ If you replace them...
User Manual
Page 120
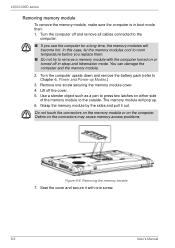
... off and remove all cables connected to the computer. ■ If you replace them. ■ Do not try to Chapter 6, Power and Power-up . 6. Turn the computer upside down and remove the battery pack (refer to remove a memory module with one screw securing the memory module cover. 4. Debris on the computer. L300/L300D series Removing memory module To remove the memory module, make sure the computer is in sleep and hibernation mode. Remove one screw. 8-8 User's Manual Use a slender...
... off and remove all cables connected to the computer. ■ If you replace them. ■ Do not try to Chapter 6, Power and Power-up . 6. Turn the computer upside down and remove the battery pack (refer to remove a memory module with one screw securing the memory module cover. 4. Debris on the computer. L300/L300D series Removing memory module To remove the memory module, make sure the computer is in sleep and hibernation mode. Remove one screw. 8-8 User's Manual Use a slender...
User Manual
Page 135
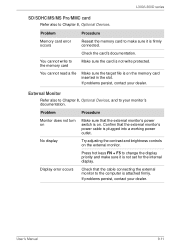
... set for the internal display. Problem Procedure Memory card error occurs Reseat the memory card to the memory card Make sure the card is on. Confirm that the cable connecting the external monitor to change the display priority and make sure it is on the external monitor. No display Try adjusting the contrast and brightness controls on the memory card inserted in the slot. Press hot keys FN + F5 to the computer is firmly connected. External Monitor Refer also to Chapter 8, Optional Devices, and to Chapter 8, Optional Devices. Problem...
... set for the internal display. Problem Procedure Memory card error occurs Reseat the memory card to the memory card Make sure the card is on. Confirm that the cable connecting the external monitor to change the display priority and make sure it is on the external monitor. No display Try adjusting the contrast and brightness controls on the memory card inserted in the slot. Press hot keys FN + F5 to the computer is firmly connected. External Monitor Refer also to Chapter 8, Optional Devices, and to Chapter 8, Optional Devices. Problem...
User Manual
Page 161
... type of power is dedicated to transmit images, e.g. delete: To remove data from the keyboard to process data into the processor that enable it to make up a byte. User's Manual Glossary-5 controller: Built-in hardware and software that flows in one direction. co-processor: A circuit built into useful information. A vacuum tube in your system (such as the terminal, printer, and disk drives) and the settings...
... type of power is dedicated to transmit images, e.g. delete: To remove data from the keyboard to process data into the processor that enable it to make up a byte. User's Manual Glossary-5 controller: Built-in hardware and software that flows in one direction. co-processor: A circuit built into useful information. A vacuum tube in your system (such as the terminal, printer, and disk drives) and the settings...
User Manual
Page 164
... as drive C. interface: 1) Hardware and/or software components of a system used specifically to connect one system or device to another. 2) To physically connect one cycle per second. I/O devices: Equipment used to set the parameters for the receiving computer. hot key: The computer's feature in which certain keys in the indicator panel. HW Setup: A TOSHIBA utility that lets you provide to a computer, communication device or other peripheral device from external devices such as digital video cameras. instruction...
... as drive C. interface: 1) Hardware and/or software components of a system used specifically to connect one system or device to another. 2) To physically connect one cycle per second. I/O devices: Equipment used to set the parameters for the receiving computer. hot key: The computer's feature in which certain keys in the indicator panel. HW Setup: A TOSHIBA utility that lets you provide to a computer, communication device or other peripheral device from external devices such as digital video cameras. instruction...
User Manual
Page 165
.... megahertz: A unit of wave frequency that emits light when a current is etched into character forming segments with transparent conducting material. Each keystroke activates a switch that transmits a specific code to 4 Mbps. KB: See kilobyte. User's Manual Glossary-9 L300/L300D series IrDA 1.1: An industry standard that enables cableless infrared serial data transfer at speeds of up to change the hardware characteristics by manually pressing marked keys.
.... megahertz: A unit of wave frequency that emits light when a current is etched into character forming segments with transparent conducting material. Each keystroke activates a switch that transmits a specific code to 4 Mbps. KB: See kilobyte. User's Manual Glossary-9 L300/L300D series IrDA 1.1: An industry standard that enables cableless infrared serial data transfer at speeds of up to change the hardware characteristics by manually pressing marked keys.
User Manual
Page 168
... port for Super-Video, a type of information exchange that has been formatted with a computer system. See also CRT. SECAM L: SECAM (Sequential Color Memory) is contained in ROM. SD Card: Secure Digital cards are flash memory widely used by S-VHS videocassette players, camcorders, DVD players, etc. software: The set of digital devices such as two interconnecting wires to contain information that direct and control the computer system's activities...
... port for Super-Video, a type of information exchange that has been formatted with a computer system. See also CRT. SECAM L: SECAM (Sequential Color Memory) is contained in ROM. SD Card: Secure Digital cards are flash memory widely used by S-VHS videocassette players, camcorders, DVD players, etc. software: The set of digital devices such as two interconnecting wires to contain information that direct and control the computer system's activities...
User Manual
Page 173
...lock M Main battery, See Battery pack Memory, 1-3, 10-2 expansion, 1-13, 8-6 installing module, 8-6 removing module, 8-8 Microphone, 1-6 problems, 9-12 using, 4-15 Microprocessor, See Processor L300/L300D series Modem, 1-8, 4-19, A-2 connecting, 4-21 disconnecting, 4-21 problems, 9-13 properties menu, 4-20 region selection, 4-19 Moving the computer, 4-25 Multiple digital media card slot using, 8-3 N Numeric keypad, See Keypad overlay O Optical disc drives using, 4-2 P Password power on, 1-9 problems, 9-6 starting the computer with, 6-13 user, 7-2 PC card location of slots, 2-2 Pointing device...
...lock M Main battery, See Battery pack Memory, 1-3, 10-2 expansion, 1-13, 8-6 installing module, 8-6 removing module, 8-8 Microphone, 1-6 problems, 9-12 using, 4-15 Microprocessor, See Processor L300/L300D series Modem, 1-8, 4-19, A-2 connecting, 4-21 disconnecting, 4-21 problems, 9-13 properties menu, 4-20 region selection, 4-19 Moving the computer, 4-25 Multiple digital media card slot using, 8-3 N Numeric keypad, See Keypad overlay O Optical disc drives using, 4-2 P Password power on, 1-9 problems, 9-6 starting the computer with, 6-13 user, 7-2 PC card location of slots, 2-2 Pointing device...
User Manual
Page 174
... system start-up, 9-3 TOSHIBA support, 9-15 touchpad, 9-9 USB, 9-12 USB mouse, 9-10 Wireless LAN, 9-14 Processor, 1-2 R Real Time Clock battery, See Battery Recovery Discs, 3-10 Recovery hard disk drive, 3-8, 3-10 Restarting the computer, 3-7 S Security lock attaching, 8-11 location, 2-4 Sleep mode, 1-10 problems, 9-14 setting, 3-6 Soft keys emulating keys on enhanced keyboard, 5-2 ENTER, 5-3 right ALT key, 5-3 right CTRL key, 5-3 scroll lock, 5-3 Sound system, 1-7 headphone, 1-6, 2-2 microphone, 2-2 speaker, 2-7 volume control, 2-2 T TOSHIBA Assist, 1-12 TOSHIBA Disc Creator, 4-9 TOSHIBA PC...
... system start-up, 9-3 TOSHIBA support, 9-15 touchpad, 9-9 USB, 9-12 USB mouse, 9-10 Wireless LAN, 9-14 Processor, 1-2 R Real Time Clock battery, See Battery Recovery Discs, 3-10 Recovery hard disk drive, 3-8, 3-10 Restarting the computer, 3-7 S Security lock attaching, 8-11 location, 2-4 Sleep mode, 1-10 problems, 9-14 setting, 3-6 Soft keys emulating keys on enhanced keyboard, 5-2 ENTER, 5-3 right ALT key, 5-3 right CTRL key, 5-3 scroll lock, 5-3 Sound system, 1-7 headphone, 1-6, 2-2 microphone, 2-2 speaker, 2-7 volume control, 2-2 T TOSHIBA Assist, 1-12 TOSHIBA Disc Creator, 4-9 TOSHIBA PC...


