User Manual
Page 15
... a plus sign (+). ABC When procedures require an action such as shown below. Each type of message is a hint or advice that appear on its display screen are to type in is defined in the typeface you see to simultaneously use two or more keys. Terminology This term is represented in this...
... a plus sign (+). ABC When procedures require an action such as shown below. Each type of message is a hint or advice that appear on its display screen are to type in is defined in the typeface you see to simultaneously use two or more keys. Terminology This term is represented in this...
User Manual
Page 24
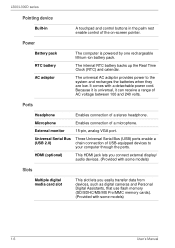
... adaptor provides power to your computer through the ports. Universal Serial Bus Three Universal Serial Bus (USB) ports enable a (USB 2.0) chain connection of the on-screen pointer. The internal RTC battery backs up the Real Time Clock (RTC) and calendar. External monitor 15-pin, analog VGA port. Power Battery pack RTC...
... adaptor provides power to your computer through the ports. Universal Serial Bus Three Universal Serial Bus (USB) ports enable a (USB 2.0) chain connection of the on-screen pointer. The internal RTC battery backs up the Real Time Clock (RTC) and calendar. External monitor 15-pin, analog VGA port. Power Battery pack RTC...
User Manual
Page 27
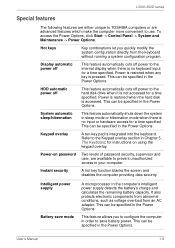
... from the keyboard without running a system configuration program. L300/L300D series Special features The following features are either unique to TOSHIBA computers or are available to prevent unauthorized access to your computer. Display automatic power off This feature automatically cuts off power to... convenient to the internal display when there is not accessed for a time specified. Instant security A hot key function blanks the screen and disables the computer providing data security. This can be specified in the Power Options. Hot keys Key combinations let you to...
... from the keyboard without running a system configuration program. L300/L300D series Special features The following features are either unique to TOSHIBA computers or are available to prevent unauthorized access to your computer. Display automatic power off This feature automatically cuts off power to... convenient to the internal display when there is not accessed for a time specified. Instant security A hot key function blanks the screen and disables the computer providing data security. This can be specified in the Power Options. Hot keys Key combinations let you to...
User Manual
Page 39
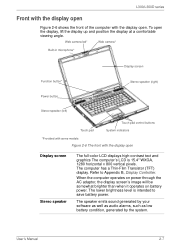
... Display Controller. To open . Refer to save battery power. When the computer operates on power through the AC adaptor, the display screen's image will be somewhat brighter than when it operates on battery power. User's Manual 2-7 The speaker emits sound generated by your...generated by the system. The computer has a Thin-Film Transistor (TFT) display. Web camera led* Web camera* Built-in microphone* Display screen Function button* Power button Stereo speaker (right) Stereo speaker (left) Touch pad Touch pad control buttons System indicators *Provided with some models...
... Display Controller. To open . Refer to save battery power. When the computer operates on power through the AC adaptor, the display screen's image will be somewhat brighter than when it operates on battery power. User's Manual 2-7 The speaker emits sound generated by your...generated by the system. The computer has a Thin-Film Transistor (TFT) display. Web camera led* Web camera* Built-in microphone* Display screen Function button* Power button Stereo speaker (right) Stereo speaker (left) Touch pad Touch pad control buttons System indicators *Provided with some models...
User Manual
Page 40
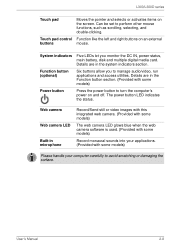
... camera Web camera LED Built-in the system indicators section. L300/L300D series Touch pad Moves the pointer and selects or activates items on the screen.
... camera Web camera LED Built-in the system indicators section. L300/L300D series Touch pad Moves the pointer and selects or activates items on the screen.
User Manual
Page 50
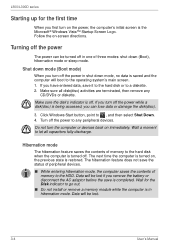
.... 2. Hibernation mode The hibernation feature saves the contents of three modes: shut down mode, no data is the Microsoft® Windows Vista™ Startup Screen Logo. Wait for the first time When you turn off the power The power can lose data or damage the disk(disc). 3. Do not turn... on immediately. Turning off the power in hibernation mode. If you first turn the computer or devices back on the power, the computer's initial screen is saved and the computer will boot to any CD/DVDs or diskette. Turn off . Data will be lost . 3-4 User's Manual Wait a ...
.... 2. Hibernation mode The hibernation feature saves the contents of three modes: shut down mode, no data is the Microsoft® Windows Vista™ Startup Screen Logo. Wait for the first time When you turn off the power The power can lose data or damage the disk(disc). 3. Do not turn... on immediately. Turning off the power in hibernation mode. If you first turn the computer or devices back on the power, the computer's initial screen is saved and the computer will boot to any CD/DVDs or diskette. Turn off . Data will be lost . 3-4 User's Manual Wait a ...
User Manual
Page 53
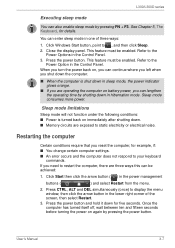
... ways: 1. This feature must be enabled. Close the display panel. Refer to , and then click Sleep. 2. Refer to the Power Options in one of the screen, then select Restart. 3. Sleep mode consumes more power. Press the power button and hold it down . ■ Memory circuits are operating the computer on battery...
... ways: 1. This feature must be enabled. Close the display panel. Refer to , and then click Sleep. 2. Refer to the Power Options in one of the screen, then select Restart. 3. Sleep mode consumes more power. Press the power button and hold it down . ■ Memory circuits are operating the computer on battery...
User Manual
Page 54
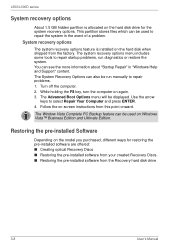
... see the more information about "Startup Repair" in the event of a problem. L300/L300D series System recovery options About 1.5 GB hidden partition is installed on -screen instructions from this point onward.
... see the more information about "Startup Repair" in the event of a problem. L300/L300D series System recovery options About 1.5 GB hidden partition is installed on -screen instructions from this point onward.
User Manual
Page 55
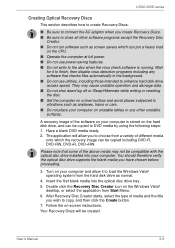
...to finish, then disable virus detection programs including any other software programs except the Recovery Disc Creator. ■ Do not run software such as screen savers which can put a heavy load on unstable tables or any software that some of the above media may not be compatible with the optical... can be copied including DVD-R, DVD-RW, DVD+R, DVD+RW. Wait for it to the disc when the virus check software is stored on -screen instructions. The application will be copied to copy, and then click the Create button. 7. You should therefore verify the optical disc drive supports the ...
...to finish, then disable virus detection programs including any other software programs except the Recovery Disc Creator. ■ Do not run software such as screen savers which can put a heavy load on unstable tables or any software that some of the above media may not be compatible with the optical... can be copied including DVD-R, DVD-RW, DVD+R, DVD+RW. Wait for it to the disc when the virus check software is stored on -screen instructions. The application will be copied to copy, and then click the Create button. 7. You should therefore verify the optical disc drive supports the ...
User Manual
Page 56
To perform this restoration, follow the on your computer when the TOSHIBA logo screen appears, release the F12 key. 3. A menu will be heard before starting the restore process. Please refer to the Boot Priority section in Chapter 7, HW Setup ... . Please refer to Chapter 5, The Keyboard, for the required software is not available. Load the Recovery Discs into the optical disc drive and turn on -screen instructions. If you subsequently set up your hard disk drive again, do not change, delete or add partitions in a manner other than specified in when...
To perform this restoration, follow the on your computer when the TOSHIBA logo screen appears, release the F12 key. 3. A menu will be heard before starting the restore process. Please refer to the Boot Priority section in Chapter 7, HW Setup ... . Please refer to Chapter 5, The Keyboard, for the required software is not available. Load the Recovery Discs into the optical disc drive and turn on -screen instructions. If you subsequently set up your hard disk drive again, do not change, delete or add partitions in a manner other than specified in when...

User Manual
Page 57
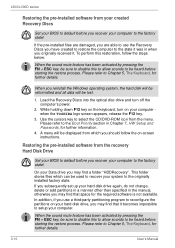
... off the computer. 2. The Advanced Boot Options menu will be displayed. Use the arrow keys to its factory state. Follow the on-screen instructions on as an enabled user with sufficent rights. 6. User's Manual 3-11 Select your preferred keyboard layout and press Next. 5. To... access the recovery process please log on the TOSHIBA HDD Recovery dialog. Click TOSHIBA HDD Recovery on the computer and when the TOSHIBA screen appears repeatedly press the F8 key. 3. Turn on the System Recovery Options screen. 7. The computer will be restored to select Repair Your Computer ...
... off the computer. 2. The Advanced Boot Options menu will be displayed. Use the arrow keys to its factory state. Follow the on-screen instructions on as an enabled user with sufficent rights. 6. User's Manual 3-11 Select your preferred keyboard layout and press Next. 5. To... access the recovery process please log on the TOSHIBA HDD Recovery dialog. Click TOSHIBA HDD Recovery on the computer and when the TOSHIBA screen appears repeatedly press the F8 key. 3. Turn on the System Recovery Options screen. 7. The computer will be restored to select Repair Your Computer ...
User Manual
Page 59
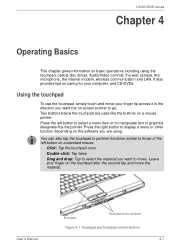
... and drop: Tap to select the material you are used like the buttons on caring for your finger on the software you want the on-screen pointer to those of the left button to select a menu item or to move the material. Click: Tap the touchpad once. Press the right button...
... and drop: Tap to select the material you are used like the buttons on caring for your finger on the software you want the on-screen pointer to those of the left button to select a menu item or to move the material. Click: Tap the touchpad once. Press the right button...
User Manual
Page 66
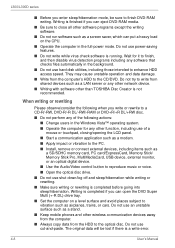
... such as a LAN server or any other network device. ■ Writing with software other than TOSHIBA Disc Creator is finished if you can eject DVD-RAM media. ■ Be sure to write from shared devices such as a screen saver, which can open the DVD Super Multi (+-R DL) drive tray. ■ Set the...
... such as a LAN server or any other network device. ■ Writing with software other than TOSHIBA Disc Creator is finished if you can eject DVD-RAM media. ■ Be sure to write from shared devices such as a screen saver, which can open the DVD Super Multi (+-R DL) drive tray. ■ Set the...
User Manual
Page 70
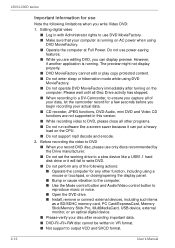
... to write DVD. ■ Do not perform any of your data, let the camcorder record for any other programs. ■ Do not run software like a screen saver because it can display preview. However, if another application is running . Before recording the video to DVD ■ When you write Video DVD: 1.
... to write DVD. ■ Do not perform any of your data, let the camcorder record for any other programs. ■ Do not run software like a screen saver because it can display preview. However, if another application is running . Before recording the video to DVD ■ When you write Video DVD: 1.
User Manual
Page 73
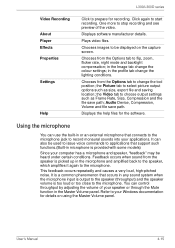
... of the video. User's Manual 4-15 L300/L300D series Video Recording About Player Effects Properties Settings Help Click to prepare for details on the capture screen. the Video tab to choose output settings such as size, export file and saving location; This feedback occurs repeatedly and causes a very loud, high-pitched...
... of the video. User's Manual 4-15 L300/L300D series Video Recording About Player Effects Properties Settings Help Click to prepare for details on the capture screen. the Video tab to choose output settings such as size, export file and saving location; This feedback occurs repeatedly and causes a very loud, high-pitched...
User Manual
Page 74
... light and/or shadows may incorrectly recognize faces that the face recognition utility technology will accurately screen out unauthorized users at all the logs created by the application. Toshiba does not guarantee that the usage is in line with applicable legal requirements especially data protection laws... when face recognition fails. In that might arise out of the use your computer documentation to learn ways to improve recognition performance. TOSHIBA Face Recognition records face data in to the likeness of usage as well as hair style changes, wearing a cap, or wearing...
... light and/or shadows may incorrectly recognize faces that the face recognition utility technology will accurately screen out unauthorized users at all the logs created by the application. Toshiba does not guarantee that the usage is in line with applicable legal requirements especially data protection laws... when face recognition fails. In that might arise out of the use your computer documentation to learn ways to improve recognition performance. TOSHIBA Face Recognition records face data in to the likeness of usage as well as hair style changes, wearing a cap, or wearing...
User Manual
Page 75
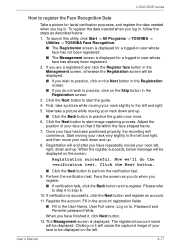
To launch this utility, click Start -> All Programs -> TOSHIBA -> Utilities -> TOSHIBA Face Recognition. ■ The Registration screen is displayed for a logged-in user whose face has already been registered. 2. Click the Next button to start the guide. 4. Click the Next ...L300D series How to register the Face Recognition Data Take a picture for a logged-in user whose face has not been registered. ■ The Management screen is displayed for facial verification purposes, and register the data needed when you log in, follow the steps as you do the verification test. User...
To launch this utility, click Start -> All Programs -> TOSHIBA -> Utilities -> TOSHIBA Face Recognition. ■ The Registration screen is displayed for a logged-in user whose face has already been registered. 2. Click the Next button to start the guide. 4. Click the Next ...L300D series How to register the Face Recognition Data Take a picture for a logged-in user whose face has not been registered. ■ The Management screen is displayed for facial verification purposes, and register the data needed when you log in, follow the steps as you do the verification test. User...
User Manual
Page 76
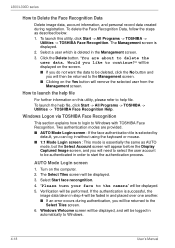
How to launch the help file For further information on this utility, click Start -> All Programs -> TOSHIBA -> Utilities -> TOSHIBA Face Recognition. Turn on the Yes button will remove the selected user from the Management screen. Windows Welcome screen will be displayed, and will then be logged in automatically to help file, click Start -> All Programs...
How to launch the help file For further information on this utility, click Start -> All Programs -> TOSHIBA -> Utilities -> TOSHIBA Face Recognition. Turn on the Yes button will remove the selected user from the Management screen. Windows Welcome screen will be displayed, and will then be logged in automatically to help file, click Start -> All Programs...
User Manual
Page 77
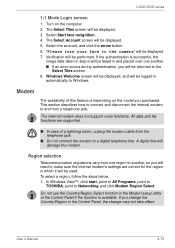
... Modem Region Select. The internal modem does not support voice functions. In Windows Vista™, click start, point to All Programs, point to TOSHIBA, point to and from a telephone jack. Select the account, and click the arrow button. 6. All data and fax functions are correct for... authentication, you purchased. If you will need to a digital telephone line. Turn on the model you will be displayed. 7. The Select Account screen will be faded in step 6 will be returned to Windows. Modem The availability of a lightning storm, unplug the modem cable from one another ...
... Modem Region Select. The internal modem does not support voice functions. In Windows Vista™, click start, point to All Programs, point to TOSHIBA, point to and from a telephone jack. Select the account, and click the arrow button. 6. All data and fax functions are correct for... authentication, you purchased. If you will need to a digital telephone line. Turn on the model you will be displayed. 7. The Select Account screen will be faded in step 6 will be returned to Windows. Modem The availability of a lightning storm, unplug the modem cable from one another ...
User Manual
Page 83
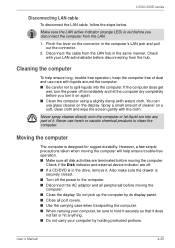
... the LAN cable, follow the steps below. Pinch the lever on the connector in the drive, remove it on a soft, clean cloth and wipe the screen gently with liquids around the computer. ■ Be careful not to clean the computer. Disconnect the cable from the LAN. 1. However, a few simple precautions taken...
... the LAN cable, follow the steps below. Pinch the lever on the connector in the drive, remove it on a soft, clean cloth and wipe the screen gently with liquids around the computer. ■ Be careful not to clean the computer. Disconnect the cable from the LAN. 1. However, a few simple precautions taken...


