
User Manual
Page 5
... problems arise If any of service Your modem is designed to be used on your modem, they should ever decide to permanently disconnect your modem from your right to file a complaint with the best service it can connect to make changes in their equipment, operations or procedures. When you are ever needed on standard-device telephone lines. In the event repairs...
... problems arise If any of service Your modem is designed to be used on your modem, they should ever decide to permanently disconnect your modem from your right to file a complaint with the best service it can connect to make changes in their equipment, operations or procedures. When you are ever needed on standard-device telephone lines. In the event repairs...
User Manual
Page 20
... Started 45 Selecting a place to work 45 Creating a computer-friendly environment 45 Keeping yourself comfortable 46 Other precautions 50 Setting up your computer 50 Connecting to a power source 51 Adding memory 54 Installing a memory module 55 Removing a memory module 58 Turning on the computer 60 Opening the display panel 60 Turning on the power 60 Using the AccuPoint II® pointing device 61 Setting up your software 62 Registering your computer with Toshiba 63 Setting...
... Started 45 Selecting a place to work 45 Creating a computer-friendly environment 45 Keeping yourself comfortable 46 Other precautions 50 Setting up your computer 50 Connecting to a power source 51 Adding memory 54 Installing a memory module 55 Removing a memory module 58 Turning on the computer 60 Opening the display panel 60 Turning on the power 60 Using the AccuPoint II® pointing device 61 Setting up your software 62 Registering your computer with Toshiba 63 Setting...
User Manual
Page 22
... battery life 110 Charging the batteries 111 Monitoring battery power 111 What to do when the battery alarm sounds 114 Changing batteries 115 Disposing of used batteries 117 Conserving power 117 Power usage modes in Windows XP Professional..... 118 Using a hot key to set the power usage mode 119 Additional options for power 120 Chapter 5: Expansion Options 121 Devices for office computing 121 Connecting external (optional) devices 122 Using an external keyboard 122 Using a mouse 123 Connecting a serial mouse 123 Connecting a USB mouse 123 Connecting a PS/2 mouse 124 Using...
... battery life 110 Charging the batteries 111 Monitoring battery power 111 What to do when the battery alarm sounds 114 Changing batteries 115 Disposing of used batteries 117 Conserving power 117 Power usage modes in Windows XP Professional..... 118 Using a hot key to set the power usage mode 119 Additional options for power 120 Chapter 5: Expansion Options 121 Devices for office computing 121 Connecting external (optional) devices 122 Using an external keyboard 122 Using a mouse 123 Connecting a serial mouse 123 Connecting a USB mouse 123 Connecting a PS/2 mouse 124 Using...

User Manual
Page 36
... port-Lets you connect the computer's internal modem directly to a conventional telephone line. Ether The Network port (RJ45 jack) provides access to the port. You can use an optional Y-cable to connect both a mouse and a keyboard to a LAN via standard Ethernet® network cable. Serial port-Lets you connect an external monitor or projector. Back with rear panel open Serial port RGB (monitor) port Parallel port Network port Modem port RGB (monitor) port-Lets you connect a serial mouse, serial printer, or other parallel device. 36 Finding Your Way Around Making...
... port-Lets you connect the computer's internal modem directly to a conventional telephone line. Ether The Network port (RJ45 jack) provides access to the port. You can use an optional Y-cable to connect both a mouse and a keyboard to a LAN via standard Ethernet® network cable. Serial port-Lets you connect an external monitor or projector. Back with rear panel open Serial port RGB (monitor) port Parallel port Network port Modem port RGB (monitor) port-Lets you connect a serial mouse, serial printer, or other parallel device. 36 Finding Your Way Around Making...
User Manual
Page 55
...: Installing a memory module with the computer's power on the base of the computer. The operating system turns off the computer. 3 Unplug and remove any cables connected to the computer. 4 Remove the battery. 5 Close the display panel and turn the computer upside down to locate the expansion memory slot cover to step 3. 1 If the computer is on , click Start, Turn off computer window appears. 2 Click Turn Off. The computer has two memory expansion slots-Slot A and Slot...
...: Installing a memory module with the computer's power on the base of the computer. The operating system turns off the computer. 3 Unplug and remove any cables connected to the computer. 4 Remove the battery. 5 Close the display panel and turn the computer upside down to locate the expansion memory slot cover to step 3. 1 If the computer is on , click Start, Turn off computer window appears. 2 Click Turn Off. The computer has two memory expansion slots-Slot A and Slot...
User Manual
Page 56
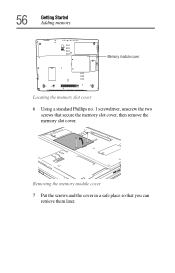
56 Getting Started Adding memory Memory module cover Locating the memory slot cover 6 Using a standard Phillips no. 1 screwdriver, unscrew the two screws that you can retrieve them later. Removing the memory module cover 7 Put the screws and the cover in a safe place so that secure the memory slot cover, then remove the memory slot cover.
56 Getting Started Adding memory Memory module cover Locating the memory slot cover 6 Using a standard Phillips no. 1 screwdriver, unscrew the two screws that you can retrieve them later. Removing the memory module cover 7 Put the screws and the cover in a safe place so that secure the memory slot cover, then remove the memory slot cover.
User Manual
Page 58
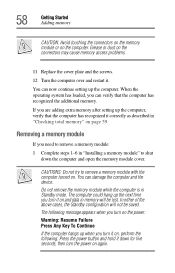
..., the Standby configuration will be saved. You can now continue setting up the computer, verify that the computer has recognized the additional memory. Grease or dust on the computer. 58 Getting Started Adding memory CAUTION: Avoid touching the connectors on the memory module or on the connectors may cause memory access problems. 11 Replace the cover plate and the screws. 12 Turn the computer...
..., the Standby configuration will be saved. You can now continue setting up the computer, verify that the computer has recognized the additional memory. Grease or dust on the computer. 58 Getting Started Adding memory CAUTION: Avoid touching the connectors on the memory module or on the connectors may cause memory access problems. 11 Replace the cover plate and the screws. 12 Turn the computer...
User Manual
Page 66
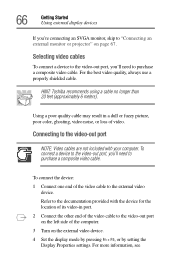
... external video device. 4 Set the display mode by pressing Fn + F5, or by setting the Display Properties settings. To connect the device: 1 Connect one end of the video cable to the documentation provided with your computer. Selecting video cables To connect a device to the video-out port, you 'll need to purchase a composite video cable. For more information, see To connect a device to the video-out port, you 'll need to purchase a composite video cable. 66 Getting Started Using external display devices If you're connecting...
... external video device. 4 Set the display mode by pressing Fn + F5, or by setting the Display Properties settings. To connect the device: 1 Connect one end of the video cable to the documentation provided with your computer. Selecting video cables To connect a device to the video-out port, you 'll need to purchase a composite video cable. For more information, see To connect a device to the video-out port, you 'll need to purchase a composite video cable. 66 Getting Started Using external display devices If you're connecting...

User Manual
Page 148
... respective Online Help menus. Creating a CD Your computer may record sounds as .wav files by connecting an external microphone or other types of media, use the software, please refer to the microphone jack. Recording sounds You may come with the media on the disk. 148 Enhancing Productivity Exploring audio features Playing CDs using this , follow these steps: 1 Open the Start menu and select My Computer. 2 Click the CD/DVD drive icon.
... respective Online Help menus. Creating a CD Your computer may record sounds as .wav files by connecting an external microphone or other types of media, use the software, please refer to the microphone jack. Recording sounds You may come with the media on the disk. 148 Enhancing Productivity Exploring audio features Playing CDs using this , follow these steps: 1 Open the Start menu and select My Computer. 2 Click the CD/DVD drive icon.
User Manual
Page 176
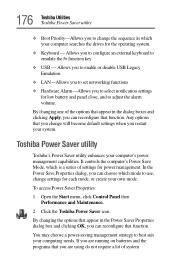
... power management. If you can reconfigure that function. Allows you change settings for each mode, or create your computer searches the drives for low battery and panel close, and to set networking functions ❖ Hardware Alarm-Allows you can reconfigure that function. Toshiba Power Saver utility Toshiba's Power Saver utility enhances your computing needs. Allows you to enable or disable USB Legacy Emulation ❖ LAN-Allows you to adjust the alarm volume. It controls the computer's Power Save Mode, which is a series...
... power management. If you can reconfigure that function. Allows you change settings for each mode, or create your computer searches the drives for low battery and panel close, and to set networking functions ❖ Hardware Alarm-Allows you can reconfigure that function. Toshiba Power Saver utility Toshiba's Power Saver utility enhances your computing needs. Allows you to enable or disable USB Legacy Emulation ❖ LAN-Allows you to adjust the alarm volume. It controls the computer's Power Save Mode, which is a series...

User Manual
Page 198
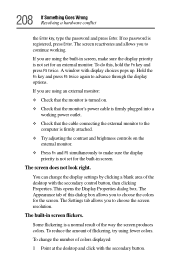
... screen does not look right. 198 If Something Goes Wrong The Windows® operating system is not working correctly. To charge the battery, leave the computer plugged into a live wall outlet for several hours. Data stored in the diskette drive. If pressing any key does not work routine, you change the system in Stand By mode and the battery has discharged. Unless a hardware device...
... screen does not look right. 198 If Something Goes Wrong The Windows® operating system is not working correctly. To charge the battery, leave the computer plugged into a live wall outlet for several hours. Data stored in the diskette drive. If pressing any key does not work routine, you change the system in Stand By mode and the battery has discharged. Unless a hardware device...

User Manual
Page 207
... display power set to turn off , make sure the software you have a second keyboard, try it works, the first keyboard may be on , press Fn and F10 simultaneously to turn off the cursor control light or press Fn and F11 simultaneously to activate the screen. Keyboard problems If, when you added a device, such as a PC Card or memory module, that the program does not assign different meanings to any key to turn...
... display power set to turn off , make sure the software you have a second keyboard, try it works, the first keyboard may be on , press Fn and F10 simultaneously to turn off the cursor control light or press Fn and F11 simultaneously to activate the screen. Keyboard problems If, when you added a device, such as a PC Card or memory module, that the program does not assign different meanings to any key to turn...
User Manual
Page 208
... control button, then clicking Properties. If you are using the built-in screen, make sure the display priority is registered, press Enter. Hold the Fn key and press F5 twice again to continue working power outlet. ❖ Check that the cable connecting the external monitor to the computer is firmly attached. ❖ Try adjusting the contrast and brightness controls on . ❖ Check that the monitor's power cable is turned on the external monitor...
... control button, then clicking Properties. If you are using the built-in screen, make sure the display priority is registered, press Enter. Hold the Fn key and press F5 twice again to continue working power outlet. ❖ Check that the cable connecting the external monitor to the computer is firmly attached. ❖ Try adjusting the contrast and brightness controls on . ❖ Check that the monitor's power cable is turned on the external monitor...
User Manual
Page 217
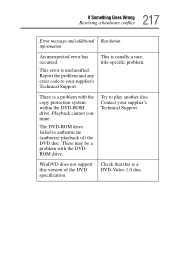
... DVD-ROM drive failed to play another disc. Contact your supplier's Technical Support. Playback cannot continue. Try to authenticate (authorize playback of the DVD specification. This is a DVD-Video 1.0 disc. Check that this version of ) the DVD disc. There may be a problem with the copy protection system within the DVD-ROM drive. Report the problem and any error code to your supplier's Technical Support. 217 If Something Goes Wrong Resolving a hardware...
... DVD-ROM drive failed to play another disc. Contact your supplier's Technical Support. Playback cannot continue. Try to authenticate (authorize playback of the DVD specification. This is a DVD-Video 1.0 disc. Check that this version of ) the DVD disc. There may be a problem with the copy protection system within the DVD-ROM drive. Report the problem and any error code to your supplier's Technical Support. 217 If Something Goes Wrong Resolving a hardware...
User Manual
Page 276
... work is usually fixed, but some computers have the operating system automatically recognize the change. A feature of many Toshiba notebook computers that holds 1.44 MB of data. A 3.5-inch diskette that saves to 1,073,741,824 bytes (1024 x 1024 x 1024 bytes). hot swapping - ground - A storage device composed of programs and data. Hard disks hold much more information than diskettes and are connected. hardware...
... work is usually fixed, but some computers have the operating system automatically recognize the change. A feature of many Toshiba notebook computers that holds 1.44 MB of data. A 3.5-inch diskette that saves to 1,073,741,824 bytes (1024 x 1024 x 1024 bytes). hot swapping - ground - A storage device composed of programs and data. Hard disks hold much more information than diskettes and are connected. hardware...
User Manual
Page 285
...flickers 208 external monitor not working 209 LCD 41 screen is blank 207 display device connecting 65 external 65 video 65 display features 40 display latch 34 display modes hot key 260 display output settings 67 display panel closing 64 opening 34, 40 display panel, closed, front 34 display panel, open, front 40 display settings 254 display, external adjusting 68 disposal information 18 DMA (Direct Memory Access) 202 DVD-ROM drive problems 212 troubleshooting 204 DVD-ROM or Multifunction drive can't access disc 212 opening 89 DVD-ROM/Multifunction drive drive tray won't open 212 problems 212...
...flickers 208 external monitor not working 209 LCD 41 screen is blank 207 display device connecting 65 external 65 video 65 display features 40 display latch 34 display modes hot key 260 display output settings 67 display panel closing 64 opening 34, 40 display panel, closed, front 34 display panel, open, front 40 display settings 254 display, external adjusting 68 disposal information 18 DMA (Direct Memory Access) 202 DVD-ROM drive problems 212 troubleshooting 204 DVD-ROM or Multifunction drive can't access disc 212 opening 89 DVD-ROM/Multifunction drive drive tray won't open 212 problems 212...

User Manual
Page 286
... function keys 78 H hard disk drive light 43 hardware alarm settings 254 hardware conflicts 201 resolving 202 Hardware Setup 252 headphone jack 34 headphones connecting 73 using 150 Help 236 Windows XP 200 Hibernation activate 248 enabling 177 Hibernation command 242 enabling 246 Hibernation mode 64, 98, 101, 242, 246 configuring 102 methods 247 starting again from 103 Hibernation mode hot key 259 hot key display modes 260 Hibernation mode 259 keyboard 262 keyboard overlays 262 power usage mode 257 Stand By mode 258 volume...
... function keys 78 H hard disk drive light 43 hardware alarm settings 254 hardware conflicts 201 resolving 202 Hardware Setup 252 headphone jack 34 headphones connecting 73 using 150 Help 236 Windows XP 200 Hibernation activate 248 enabling 177 Hibernation command 242 enabling 246 Hibernation mode 64, 98, 101, 242, 246 configuring 102 methods 247 starting again from 103 Hibernation mode hot key 259 hot key display modes 260 Hibernation mode 259 keyboard 262 keyboard overlays 262 power usage mode 257 Stand By mode 258 volume...

User Manual
Page 288
... keyboard, PS/2-compatible 69 L LAN 254 LCD display 41 LCD display settings 254 LCD power-saver 64 left side 37 light AC power 42 cursor control 43 hard disk drive 43 main battery 43 numlock 44 on/off 42 SelectBay indicator 43 light, wireless indicator 43 lighting 49 lights, indicator panel 42 lock battery 39 PC Card 38, 39 lock cable, PORT-Noteworthy computer 38 M main battery light 43 make sure you have everything 33 memory adding 54 expansion slots 55 problem solving 205 removing expansion slot cover 56 memory module...
... keyboard, PS/2-compatible 69 L LAN 254 LCD display 41 LCD display settings 254 LCD power-saver 64 left side 37 light AC power 42 cursor control 43 hard disk drive 43 main battery 43 numlock 44 on/off 42 SelectBay indicator 43 light, wireless indicator 43 lighting 49 lights, indicator panel 42 lock battery 39 PC Card 38, 39 lock cable, PORT-Noteworthy computer 38 M main battery light 43 make sure you have everything 33 memory adding 54 expansion slots 55 problem solving 205 removing expansion slot cover 56 memory module...

User Manual
Page 290
... printer choosing a driver 127 connecting a parallel 126 local, connecting 71 problem solving 223 set up 127 using 126 printer setup 234 printer, serial 36 printing a file 86 problem solving AC power 206 accessing disk drives 197 battery charge does not last 206 battery not charging 206 can't insert diskette in drive 211 can't read a diskette 211 cannot access DVD-ROM or Multifunction drive 212 changing display properties 209 checking device properties 204 compact discs not running...
... printer choosing a driver 127 connecting a parallel 126 local, connecting 71 problem solving 223 set up 127 using 126 printer setup 234 printer, serial 36 printing a file 86 problem solving AC power 206 accessing disk drives 197 battery charge does not last 206 battery not charging 206 can't insert diskette in drive 211 can't read a diskette 211 cannot access DVD-ROM or Multifunction drive 212 changing display properties 209 checking device properties 204 compact discs not running...

User Manual
Page 291
... RJ45 jack 36 Run dialog box 83 S safety icons 29 safety precautions battery disposal 117 saving files 84 screen 41 blank 207 doesn't look normal/flickers 208 SD 159 SD card inserting 159 removing 160 SD card slot 38 SD cards 159 seating 47 security 170 security lock slot 38 selecting a place to work 45 SelectServ 32 serial mouse connecting 122, 123 serial port 36 service options 32 setting...
... RJ45 jack 36 Run dialog box 83 S safety icons 29 safety precautions battery disposal 117 saving files 84 screen 41 blank 207 doesn't look normal/flickers 208 SD 159 SD card inserting 159 removing 160 SD card slot 38 SD cards 159 seating 47 security 170 security lock slot 38 selecting a place to work 45 SelectServ 32 serial mouse connecting 122, 123 serial port 36 service options 32 setting...


